
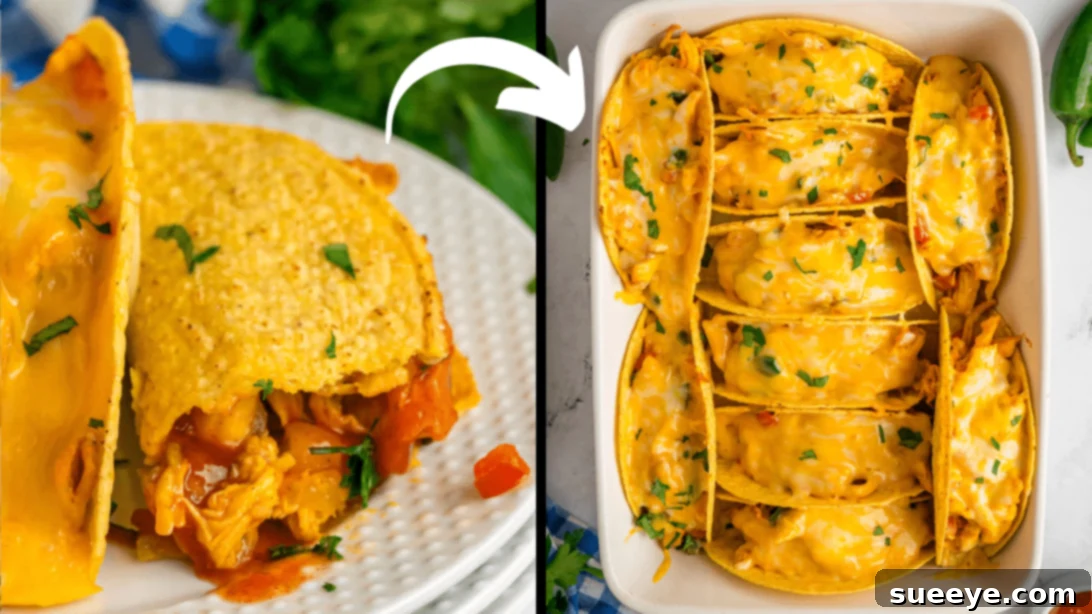
Transform your ordinary taco night into an extraordinary culinary experience with this incredibly easy and unbelievably delicious baked tacos recipe. Forget the mess and fuss of traditional frying; our baked method delivers perfectly crisp taco shells brimming with a savory, seasoned chicken filling, all baked to golden, cheesy perfection. This recipe is designed for busy families, budget-conscious cooks, and anyone craving a satisfying meal that’s both simple to prepare and universally loved.
Whether you’re looking for a clever way to use up leftover rotisserie chicken or need a go-to meal that pleases both kids and adults, these baked tacos are your answer. They’re highly customizable, allowing you to tweak ingredients and seasonings to perfectly match your family’s preferences. Get ready to discover your new favorite weeknight dinner!
RELATED: Explore Our Easy Baked Walking Taco Casserole Recipe for Another Fun Twist!
Inspired by the fantastic culinary creations from Kitchen Fun With My 3 Sons on YouTube, this recipe simplifies the taco-making process without sacrificing flavor. We guarantee these baked tacos will become a staple in your meal rotation. Dive into the detailed steps below and prepare to impress your taste buds!
Why Baked Tacos Are a Game-Changer for Busy Families
If you’ve ever hosted a taco night, you know it can get a little messy and chaotic. Baked tacos offer several distinct advantages that make them a superior choice, especially when feeding a crowd or managing a busy weeknight schedule:
- Effortless Preparation: Unlike traditional frying, baking eliminates the need for individual shell handling and constant monitoring. You fill them once, bake them, and they’re ready!
- Less Mess: No splattering oil, no shells breaking apart as you try to fill them. The baking dish keeps everything contained, making cleanup a breeze.
- Perfectly Crisp Shells: The oven’s dry heat ensures your hard taco shells emerge beautifully golden and crunchy, providing that satisfying textural contrast in every bite.
- Keeps Warm: Baked tacos stay warm longer than individually prepared ones, ideal for staggered eating schedules or if you want to enjoy a leisurely meal.
- Feeds a Crowd: Easily scale up the recipe to accommodate more people. Simply use a larger baking dish or multiple dishes.
- Highly Customizable: While our recipe features chicken, the filling possibilities are endless. Adjust proteins, vegetables, cheeses, and spices to suit any palate or dietary need.
- Kid-Friendly: The stable, upright shells make them easier for younger eaters to handle, reducing spills and increasing enjoyment.
Essential Ingredients for Irresistible Baked Tacos
Our baked taco recipe relies on a combination of fresh produce, succulent shredded chicken, and aromatic spices to create a truly unforgettable filling. Here’s what you’ll need, along with some helpful tips and potential substitutions:
- 1 tbsp Unsalted Butter: Essential for sautéing vegetables, adding a rich, foundational flavor. Olive oil or vegetable oil can be used as alternatives.
- 1 Medium Yellow Onion, Diced: Provides a sweet and pungent base for our filling. White or red onions also work well, depending on your preference.
- 1 Poblano Pepper, Diced: Offers a mild, earthy spice and depth of flavor. If you prefer more heat, a jalapeño can be substituted (remove seeds for less spice). For a milder option, use another bell pepper.
- 1 Red Bell Pepper, Diced: Adds sweetness, vibrant color, and a fresh crunch. Any color bell pepper will do, or even a mix for visual appeal.
- 2 Cups Shredded Chicken: The star protein of our tacos. This is fantastic for using up leftover roast chicken, rotisserie chicken, or chicken breasts/thighs you’ve cooked and shredded specifically for this recipe. For a quick method, boil or pressure cook chicken breasts until tender, then shred with forks or a stand mixer.
- 2 tbsp Taco Seasoning: The key to authentic taco flavor. You can use a store-bought packet or create your own blend with chili powder, cumin, paprika, garlic powder, onion powder, and a pinch of cayenne for heat. Adjust to taste!
- 1 (7 oz) Can Diced Green Chiles, Undrained: These add a subtle tang and a touch of mild spice without overwhelming the dish. Keeping them undrained helps maintain moisture in the filling.
- ¼ Cup Chicken Broth: Helps to bring the filling together, adding moisture and ensuring it doesn’t dry out during baking. Vegetable broth or even a splash of water can be used.
- 10 Hard Shell Tacos (Flat Bottom Recommended): The foundation of our baked tacos. Flat-bottomed shells are ideal as they stand upright easily in the baking dish, but regular hard shells can be propped up. You can also lightly bake them beforehand for extra crispness.
- 2 Cups Shredded Colby Jack Cheese: A fantastic blend that melts beautifully and offers a mild, creamy, and slightly sharp flavor. Cheddar, Monterey Jack, Mexican cheese blend, or even a spicier Pepper Jack would be delicious alternatives.
- Toppings of Your Choice (Optional): The fun part! Don’t skimp on fresh toppings. (More ideas below!)
Kitchen Tools You’ll Need
To whip up these amazing baked tacos, gather these basic kitchen essentials:
- 9×13-inch Baking Dish: Or a similar size that can comfortably hold 10 taco shells upright.
- Large Skillet or Frying Pan: For cooking the filling.
- Cutting Board and Sharp Knife: For dicing vegetables.
- Measuring Cups and Spoons: For accurate ingredient quantities.
- Spatula or Wooden Spoon: For sautéing and mixing.
- Nonstick Cooking Spray: To prepare your baking dish.
- Oven Mitts: For safely handling hot dishes.
Step-by-Step Guide: How to Make The Best Baked Tacos
Follow these simple instructions to create crispy, cheesy, and delicious baked tacos that your family will rave about:
Step 1: Prepare Your Oven and Sauté the Aromatics
Begin by preheating your oven to 375°F (190°C). This ensures your oven is at the correct temperature for even baking and crisp shells. Next, lightly grease a 9×13-inch baking dish with nonstick cooking spray; this will prevent the tacos from sticking and make cleanup easier. Set the prepared dish aside. Place a large skillet over medium heat, then add the tablespoon of unsalted butter. Once the butter has melted and begins to shimmer, add your diced yellow onion, poblano pepper, and red bell pepper. Sauté these vegetables for approximately 3 to 4 minutes, stirring occasionally, until they become tender and slightly softened. This step builds the foundational flavor for your taco filling.
Step 2: Combine and Simmer the Flavorful Filling
To the softened vegetables in the skillet, add the two cups of shredded chicken. Stir well to combine the chicken with the sautéed peppers and onions. Next, sprinkle in the two tablespoons of taco seasoning, ensuring it’s evenly distributed throughout the mixture. Pour in the 1 (7 oz) can of diced green chiles (undrained) and the ¼ cup of chicken broth. Mix all ingredients thoroughly until everything is well incorporated. Let the mixture simmer gently for about 5 to 7 minutes, stirring occasionally. This simmering time allows the flavors to meld together beautifully and ensures the filling is heated through and slightly reduced, creating a perfectly seasoned and moist consistency.
Step 3: Assemble and Bake Your Tacos to Perfection
Carefully arrange the 10 hard shell tacos in the prepared 9×13-inch baking dish. It’s crucial that they stand upright to make filling them easier and to ensure they bake evenly. If using flat-bottomed shells, this is straightforward. For regular shells, you may need to prop them against each other or the sides of the dish. Evenly fill each taco shell with the delicious chicken and vegetable mixture. Don’t overfill, as you’ll need space for the cheese. Once filled, generously sprinkle two cups of shredded Colby Jack cheese over the top of each taco. Transfer the baking dish to your preheated oven and bake for approximately 10 to 12 minutes, or until the cheese is completely melted, bubbly, and slightly golden, and the taco shells are delightfully crisp. Keep an eye on them to prevent over-browning.
Step 4: Cool, Top, and Serve!
Once baked to perfection, carefully remove the dish from the oven using oven mitts. Allow the baked tacos to cool slightly for a few minutes before serving. This brief cooling period helps the cheese set slightly and makes them easier to handle. Now comes the fun part: add your favorite toppings! Serve immediately and enjoy the irresistible combination of crunchy shells, savory filling, and gooey cheese!
Pro Tips for The Best Baked Tacos Every Time
Achieving taco perfection is easier than you think with these expert tips:
- Don’t Skimp on Prep: Dicing your vegetables evenly ensures they cook at the same rate and integrate smoothly into the filling.
- Flavor Boosting: Before adding the shredded chicken, you can brown a small amount of ground meat (beef, turkey, or pork) with the onions and peppers for an even richer, deeper flavor profile, then add the shredded chicken later.
- Crispier Shells: For ultimate crispness, you can briefly pre-bake the empty taco shells for 5-7 minutes before filling them. Just be careful not to burn them.
- Preventing Soggy Bottoms: Ensure your filling isn’t overly wet. If it seems too liquidy after simmering, let it reduce for a few extra minutes.
- Cheese Distribution: For maximum cheesy goodness, sprinkle some cheese inside the shells before adding the filling, then add more on top.
- Even Baking: If your oven tends to have hot spots, rotate your baking dish halfway through the baking time.
- Spice It Up: Add a pinch of red pepper flakes or a dash of hot sauce to the filling if you prefer a spicier kick.
Creative Variations and Customizations for Your Baked Tacos
One of the best things about this baked taco recipe is its incredible versatility. Feel free to experiment and make it your own!
Protein Power-Ups:
- Ground Beef or Turkey: Brown 1 lb of ground beef or turkey, drain any excess fat, and use it instead of or in addition to shredded chicken. Follow the same seasoning and simmering steps.
- Shredded Pork (Carnitas): Leftover slow-cooked pork carnitas make an incredibly flavorful filling.
- Vegetarian Delight: Swap chicken for black beans (rinsed and drained), pinto beans, or a mix of sautéed mushrooms and corn. You can also use a plant-based ground “meat” alternative.
Veggie Boosters:
- Corn: Add a can of drained corn kernels to the filling for sweetness and texture.
- Black Beans: Rinsed and drained black beans are a great addition for fiber and protein, especially if reducing meat.
- Spinach or Kale: Wilt a handful of fresh spinach or kale into the hot filling before assembling.
- Sweet Potatoes: Diced and roasted sweet potatoes can be a unique and delicious addition.
Cheese Choices:
Experiment with different shredded cheeses like Pepper Jack for a kick, sharp Cheddar, a Mexican blend, or even a smoky Gouda for a gourmet touch.
Shell Alternatives:
- Soft Flour or Corn Tortillas: For soft tacos, warm tortillas separately and fill them after the chicken mixture is cooked. You can also lightly brush them with oil and warm them in the oven for a few minutes before filling, but they won’t get crispy like hard shells.
- Lettuce Wraps: For a low-carb option, serve the filling in large lettuce cups.
The Ultimate Taco Topping Bar: Elevate Your Meal
Tacos are all about the toppings! Set up a vibrant topping bar to let everyone customize their perfect taco. Here are some popular and delicious ideas:
- Fresh Salsa: Pico de gallo, mild salsa, or a spicier salsa verde.
- Guacamole or Sliced Avocado: Creamy and rich, a must-have.
- Sour Cream or Greek Yogurt: Adds a cool, tangy contrast.
- Chopped Cilantro: Fresh herbs brighten up the flavors.
- Diced Tomatoes: For a burst of freshness.
- Shredded Lettuce: Adds crunch and coolness.
- Sliced Jalapeños: Fresh or pickled, for an extra kick.
- Pickled Red Onions: A tangy, colorful addition.
- Hot Sauce: For those who like it extra spicy.
- Black Olives: Sliced and ready to go.
- Lime Wedges: A squeeze of fresh lime juice elevates all the flavors.
Make-Ahead and Storage Tips
Planning ahead makes weeknight dinners even easier!
- Make-Ahead Filling: The chicken filling can be prepared up to 2-3 days in advance. Store it in an airtight container in the refrigerator. When ready to assemble, simply reheat the filling gently in a skillet before stuffing the shells.
- Storing Leftovers: Baked tacos are best enjoyed fresh, as the shells can soften in the refrigerator. However, if you have leftovers, store the filled tacos in an airtight container in the fridge for up to 2 days.
- Reheating Leftovers: For best results, reheat leftover baked tacos in a preheated oven or toaster oven at 300°F (150°C) for about 10-15 minutes, or until heated through and the shells crisp up again. Microwaving is possible but will result in softer shells.
*All image credit belongs to Kitchen Fun With My 3 Sons via YouTube. Follow and subscribe to her channel for more amazing recipes and creative ideas!
Easy Baked Tacos: Your New Go-To Recipe
This easy baked tacos recipe is truly a revelation for anyone seeking a hassle-free, delicious, and versatile meal. It takes the beloved flavors of traditional tacos and simplifies the preparation, making it perfect for any day of the week. From its flavorful chicken filling to its crispy, cheesy shell, every bite promises satisfaction. Don’t hesitate to customize it with your favorite proteins, vegetables, and an array of vibrant toppings. Give this recipe a try tonight, and prepare to elevate your family dinner experience!