
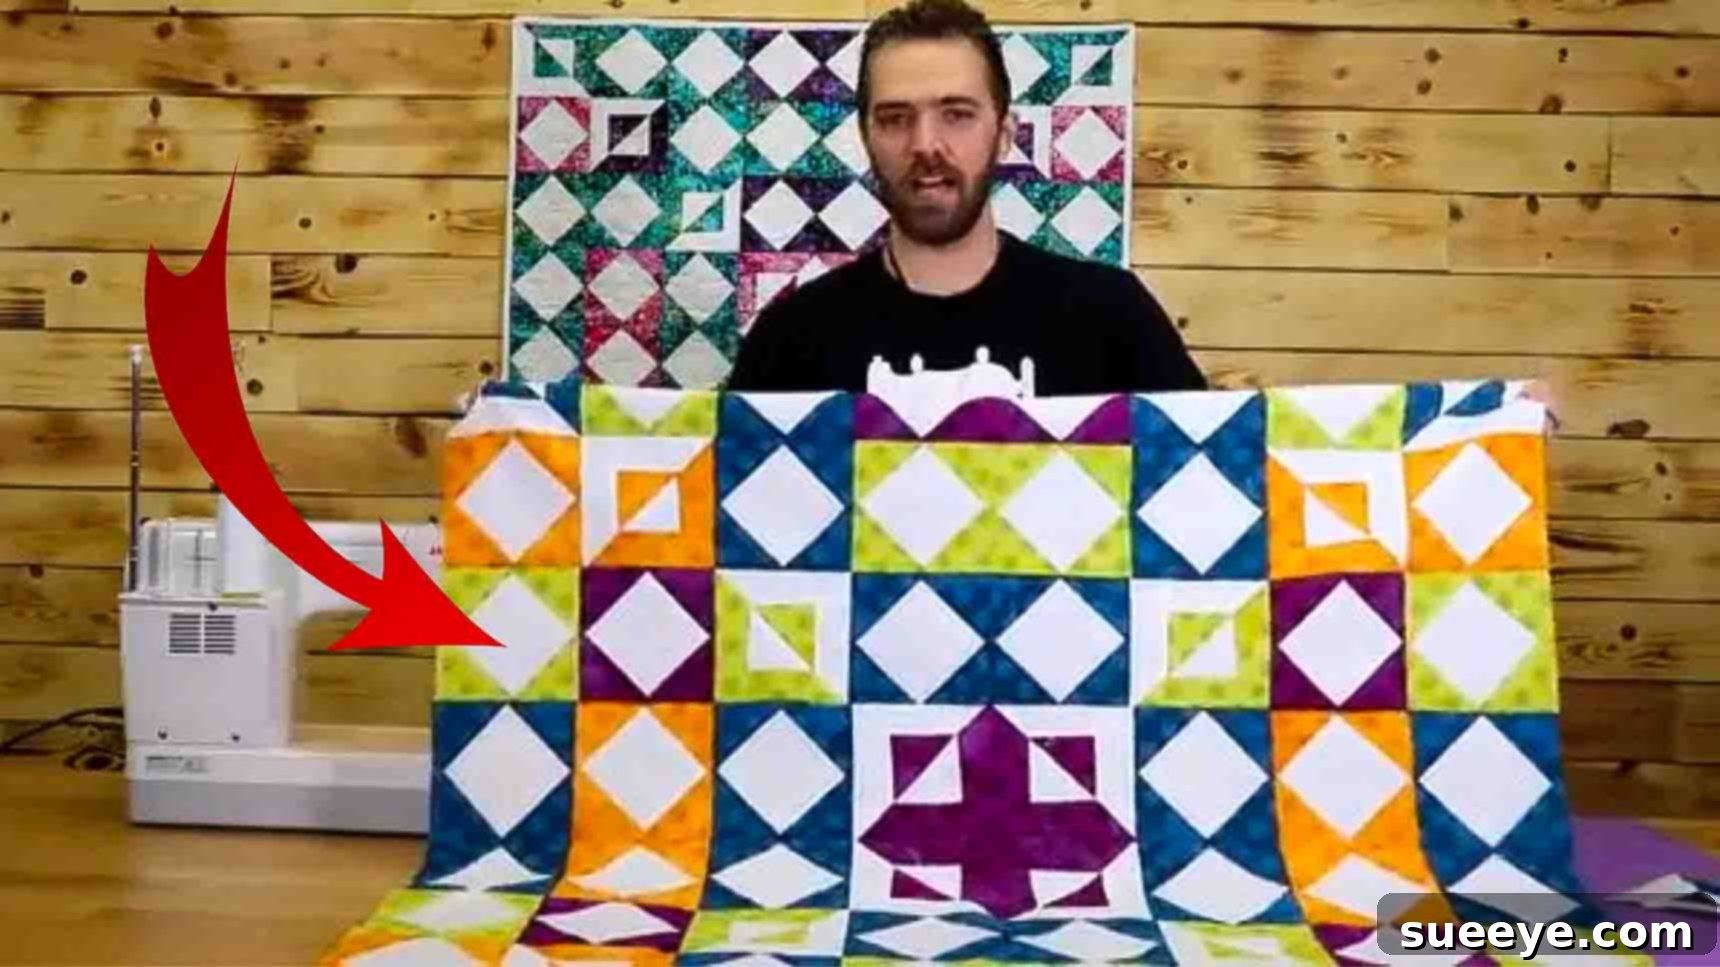
Craft Your Own Stunning Magic Square Quilt: A Beginner-Friendly Guide with Free Pattern
Are you searching for your next captivating quilting adventure? Look no further! This delightful and visually striking Magic Square Quilt, inspired by the fantastic creators at Sew Yeah on YouTube, offers an accessible yet incredibly rewarding project perfect for quilters of all skill levels, especially beginners. Its intricate appearance belies a surprisingly straightforward construction, making it an ideal choice for those eager to hone their skills while creating a truly beautiful piece of fabric art.
Quilting is more than just sewing fabric; it’s a journey of creativity, precision, and immense satisfaction. This particular Magic Square Quilt pattern is designed to guide you through fundamental quilting techniques, ensuring a successful outcome you’ll be proud to display or gift. The magic truly unfolds as simple squares and strips transform into complex-looking blocks, creating a dynamic and enchanting design. With our detailed, step-by-step instructions, combined with the helpful video tutorial, you’ll master the art of the Magic Square in no time. Get ready to dive into your fabric stash and bring this gorgeous quilt to life!
Essential Materials for Your Magic Square Quilt
Before embarking on your quilting journey, gathering all the necessary materials is crucial. High-quality fabrics and the right tools will not only make the process smoother but also contribute significantly to the final look and durability of your quilt. This project utilizes a combination of solid white fabric and four distinct colored fabrics to create a striking contrast and depth in your design. Remember, choosing your fabrics is one of the most exciting parts of quilting – let your creativity shine!
- White Fabric: 1 1/8 yards. This will serve as the background and accent in several blocks, providing a crisp contrast to your chosen colors. Consider a high-quality quilting cotton for durability and ease of sewing.
- Colored Fabrics: 3/4 yard each of four different colors. These will be the stars of your “magic squares,” so pick colors that complement each other and evoke the feeling you want for your finished quilt. Think about cool blues and greens for a serene feel, or warm reds and oranges for vibrancy.
- Binding Fabric: 3/8 yard. The binding is the finishing touch that frames your quilt and protects its edges. Choose a fabric that harmonizes with or provides a subtle pop against your quilt top.
- Backing Fabric: 2 7/8 yards. The backing provides stability and another layer of visual interest to your quilt. This can be a coordinating print, a solid that matches one of your colors, or even a whimsical print that adds a surprise element.
- Free Pattern: Make sure to click here to download your free Magic Squares Quilt pattern. This downloadable guide will be your indispensable companion throughout the project, offering visual layouts and precise measurements.
Essential Quilting Tools You’ll Need:
Beyond the fabric, a few key tools will ensure accuracy and efficiency:
- Sewing Machine: A reliable machine with a 1/4-inch presser foot is ideal for consistent seam allowances.
- Rotary Cutter, Mat, and Rulers: For precise and efficient fabric cutting. A 24-inch ruler and a smaller square ruler (e.g., 6.5-inch) are highly recommended for squaring up blocks.
- Thread: High-quality 100% cotton thread that matches or blends with your fabrics.
- Iron and Ironing Board: Crucial for pressing seams flat and accurately.
- Fabric Scissors: For trimming threads and other small cuts.
- Pins or Wonder Clips: To hold fabric pieces securely in place before sewing.
- Seam Ripper: Every quilter’s essential “undo” button.
Precise Fabric Cutting Instructions
Accuracy in cutting is paramount in quilting, as it directly impacts how well your blocks fit together. Take your time with this step, ensuring all measurements are exact. Remember, “WOF” stands for “Width of Fabric,” which is typically 42-44 inches after selvages are trimmed.
Square in Square Blocks: White Fabric
- Cut (5) 4″ x WOF strips. From these strips, subcut (48) 4″ squares. These will form the central element of your square-in-square blocks.
Colored Fabric: For Triangles and Magic Squares
Each of your four chosen colors (Color A, B, C, D) will contribute to the dynamic interplay of the Magic Square design. Pay close attention to the diagonal cuts for the square-in-square blocks.
Color A:
- Cut (4) 4″ x WOF strips. Subcut (40) 4″ squares. After cutting, these squares will be cut diagonally to create triangles for the “square in a square” blocks.
Color B:
- Cut (2) 4″ x WOF strips. Subcut (16) 4″ squares. These will also be cut diagonally to form triangles.
Color C:
- Cut (3) 4″ x WOF strips. Subcut (24) 4″ squares. These squares will similarly be cut diagonally.
Color D:
- Cut (2) 4″ x WOF strips. Subcut (16) 4″ squares. These squares will be cut diagonally as well.
Magic Square Blocks: White Fabric Components
These pieces are integral to creating the fascinating “magic” effect in your quilt. Precision here is key to achieving the desired optical illusion.
- Cut (1) 3.5″ x WOF strip. From this strip, subcut (8) 3.5″ squares.
- Cut (9) 2″ x WOF strips. From these, subcut (32) 2″ x 3.5″ strips and (32) 2″ x 6.5″ strips.
Magic Square Blocks: Each Color (A, B, C, D) Components
For each of your four colored fabrics, you will cut the following pieces. Ensure consistent measurements for a harmonious finished quilt.
- Cut (2) 3.5″ squares.
- Cut (4) 2″ x 3.5″ strips.
- Cut (4) 2″ x 6.5″ strips.
Once all your pieces are cut, organize them by block type and color. This will save you time and prevent confusion during the assembly process.
Step-by-Step Quilt Assembly Directions
Now that your fabrics are perfectly prepped, it’s time to bring your Magic Square Quilt to life! This section will guide you through constructing the two main types of blocks that form this stunning quilt: the Square-in-Square blocks and the Magic Square blocks.
Step 1: Constructing the Square-in-Square Blocks
The Square-in-Square block is a classic quilting unit that forms the foundation of many designs. Its construction involves adding triangles to the sides of a central square to create a larger square.
- Begin by selecting one 4″ white fabric square and two 4″ squares of a contrasting colored fabric.
- Carefully cut both colored fabric squares diagonally from corner to corner. This will yield four triangles from each square, for a total of eight triangles.
- Take two of these triangle pieces. Align one triangle with the raw edge of one side of your 4″ white square, right sides together. Sew it in place using a precise 1/4-inch seam allowance. Repeat this for the opposite side of the white square. When sewing, ensure your stitches are straight and consistent.
- After sewing, gently press the seams open or towards the darker fabric. Then, trim any excess fabric from the points of the triangles that extend beyond the white square. This step helps create a neat edge.
- Now, fold the unit in half, aligning the raw edges. Lightly finger press to create a crease, which will serve as a guide.
- Take two more of your remaining triangles. Align one triangle with the remaining unsewn side of the white square, matching the center of the triangle with the crease you just made. Sew this piece on, again using a 1/4-inch seam. Repeat for the fourth and final side.
- Once all four triangles are sewn, press your seams. Your block will likely have slightly uneven edges. Use a square ruler and your rotary cutter to “square up” the block to a perfect 6″ square. This precision step is crucial for ensuring all your blocks fit together seamlessly in the final quilt top.
Step 2: Creating the Magic Square Blocks and Assembling the Quilt Top
The Magic Square block is where the “magic” truly happens, transforming simple strip sets into dynamic half-square triangle units that create a captivating optical illusion.
- Gather the specific components for one Magic Square block: one 3.5″ white square, one 3.5″ colored square, two 2″ x 3.5″ white strips, two 2″ x 6.5″ white strips, two 2″ x 3.5″ colored strips, and two 2″ x 6.5″ colored strips.
- Start with your colored 3.5″ square. Take the two shorter 2″ x 3.5″ white strips and sew them to opposite sides of the colored square. Press seams open or towards the strips.
- Next, take the two longer 2″ x 6.5″ white strips and sew them to the remaining two opposite sides of the block you just created. This frames your colored square with white strips, forming a unit. Press seams.
- Now, repeat the exact same framing process, but with the opposite colors: take your white 3.5″ square and frame it with the colored 2″ x 3.5″ and 2″ x 6.5″ strips. You should now have two identical-sized framed squares, one with a colored center and white frame, and one with a white center and colored frame.
- Place these two newly created framed squares right sides together, ensuring all edges and corners are perfectly aligned. Use pins or clips along the seams to keep them from shifting.
- Using a fabric-safe marker or pencil, draw a diagonal line across the top square, from one corner to the opposite corner. This line will serve as your cutting guide later.
- Mark a second line 1/4 inch away from the first diagonal line on one side, and a third line 1/4 inch away from the first diagonal line on the other side. You will have three parallel diagonal lines: center, plus 1/4″ left, plus 1/4″ right.
- Sew down both the 1/4-inch marked lines. DO NOT sew on the center line yet. These two lines of stitching will create the seam allowances for your new blocks.
- Once sewn, take your rotary cutter and carefully cut directly along the center diagonal line. When you open up these two new units, you will find two perfectly formed half-square triangle (HST) blocks, each showcasing a portion of the “magic” effect!
- Repeat this process for all your Magic Square units. Refer back to the free pattern to see the recommended layout for combining these Magic Square blocks with your Square-in-Square blocks. This pattern will guide you in arranging your blocks into rows, then sewing those rows together to form the complete quilt top. Pay close attention to the orientation of each block to achieve the intended “magic” effect.
Finishing Your Magic Square Quilt: The Final Steps
Completing the quilt top is a huge accomplishment, but the journey isn’t over yet! The next steps involve preparing your quilt for use and adding the beautiful finishing touches that make it a true masterpiece.
Quilting the Sandwich: Batting and Backing
Once your quilt top is assembled, you’ll need to create the “quilt sandwich.” This involves layering your quilt top, batting (the cozy middle layer), and your backing fabric.
- Prepare Your Backing: If your backing fabric isn’t wide enough, you might need to seam two pieces together. Ensure your backing and batting are each about 4-6 inches larger than your quilt top on all sides.
- Layering: Lay your backing fabric right side down on a clean, flat surface. Tape it securely to prevent shifting. Next, lay your batting smoothly on top of the backing. Finally, center your quilt top (right side up) on the batting.
- Basting: Secure these three layers together. You can use safety pins (quilting pins are curved for easier piercing), basting spray, or long hand stitches (thread basting). The goal is to prevent any shifting during the quilting process.
The Quilting Process: Adding Texture and Durability
Quilting is the act of stitching through all three layers of the quilt sandwich, which holds everything together and adds texture to your finished piece. You can choose from various quilting methods:
- Machine Quilting: This can range from simple straight lines or wavy lines using your walking foot, to intricate free-motion quilting designs. For a beginner, straight lines or grid quilting are excellent starting points.
- Hand Quilting: For a traditional touch, you can hand quilt with a needle and thread, creating small, even stitches that add a beautiful, subtle texture.
- Tying: Another simple method, particularly for utility quilts, is to tie the layers together at regular intervals using yarn or embroidery floss.
Choose a quilting design that complements your Magic Square pattern. Simple lines following the seams or a gentle stipple can enhance the design without overwhelming it.
Binding Your Quilt: The Frame
The binding is the fabric strip sewn around the raw edges of your quilt to give it a clean, finished look and to protect the edges from wear.
- Prepare Binding Strips: Cut your binding fabric into 2.5-inch wide strips. You’ll need enough strips to go around the entire perimeter of your quilt, plus about 10-12 inches extra. Join these strips together using diagonal seams to create one long continuous strip.
- Attach to Quilt: Fold your long binding strip in half lengthwise and press. Align the raw edges of the binding with the raw edges of your quilt top (on the front side). Sew the binding to the quilt using a 1/4-inch seam allowance, mitering the corners as you go.
- Finish Binding: Flip the folded binding to the back of the quilt, wrapping it around the raw edge. Hand stitch the binding in place on the back for a neat, invisible finish, or machine stitch it for a quicker, more durable edge.
Why This Magic Square Quilt is Your Next Must-Make Project
The Magic Square Quilt is an excellent choice for any quilter, offering a perfect blend of learning and artistic expression. Here’s why this particular pattern stands out:
- Beginner-Friendly: While it appears complex, the techniques involved (basic square piecing, adding triangles, and simple strip sets) are fundamental and easy to grasp, making it incredibly accessible for those new to quilting.
- Visually Striking: The “magic” lies in how simple block constructions create a dazzling, dynamic pattern when arranged together. This quilt will undoubtedly capture attention and draw compliments.
- Versatile Design: The pattern is wonderfully adaptable. By simply changing your fabric colors and prints, you can achieve vastly different looks – from modern and minimalist to traditional and vibrant. Imagine it in holiday colors, pastels for a nursery, or bold primary colors for a child’s room.
- Skill-Building: You’ll gain valuable experience in precise cutting, consistent 1/4-inch seam allowances, accurate pressing, and squaring up blocks – all essential skills that will serve you well in future quilting projects.
- A Sense of Accomplishment: There’s immense joy and satisfaction in creating something beautiful and functional with your own hands. This quilt is a tangible representation of your dedication and creativity.
Whether you’re looking to create a cherished heirloom, a cozy throw for your living room, or a heartfelt gift for a loved one, the Magic Square Quilt is a project that delivers on all fronts. So, gather your materials, download your free pattern, and let the magic unfold as you stitch together your very own beautiful quilt. Happy quilting!