
Transform Ordinary Rocks into Adorable Turtle Art: An Easy DIY Guide
There’s a unique joy that comes from turning simple, natural elements into beautiful works of art. Rock painting is one of those deeply satisfying pastimes, offering a creative escape and a chance to add a personal touch to your surroundings. I absolutely adore collecting smooth, tactile rocks and transforming them with vibrant paints, bringing whimsical characters or intricate animal designs to life. These painted treasures aren’t just crafts; they serve as charming decor for both indoor spaces and outdoor gardens, and they make thoughtful, heartfelt gifts for loved ones.
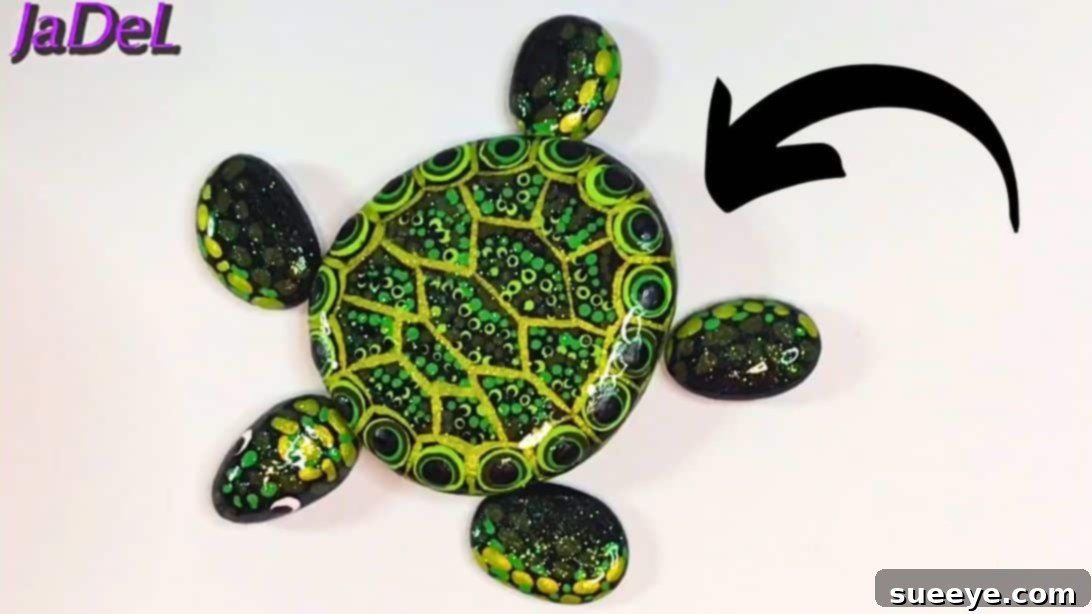
My own garden is a vibrant gallery of painted rocks, each piece adding a delightful splash of color and personality. The adorable designs nestled among the foliage always bring a smile, and I’m often inspired to experiment with larger-scale rock art. But for those new to this wonderful hobby, or simply looking for an inspiring project, this delightful turtle-painted rock tutorial by JaDeL Rocks on YouTube is the perfect starting point. It’s an accessible project that yields truly charming results, making it ideal for crafters of all skill levels.
Painting rocks is more than just a craft; it’s a mindful activity that encourages focus, patience, and creative expression. The tactile experience of working with natural stones, combined with the meditative act of painting, can be incredibly calming and rewarding. Plus, the end product is not only a personal achievement but also a durable piece of art that can withstand the elements, perfect for brightening up any space.
Why Choose Turtle Rock Painting?
Turtles are universally loved symbols of wisdom, longevity, and endurance. Their gentle nature and distinctive shells make them captivating subjects for art, especially rock painting. A painted turtle rock can bring a sense of calm and a connection to nature wherever it’s placed. The textured shell design lends itself beautifully to dot painting techniques, allowing for a creative exploration of patterns and colors. This specific project focuses on a whimsical, approachable style, ensuring that even beginners can achieve a fantastic result. It’s a great way to start building your rock art skills while creating something truly special.
Materials for Your Turtle Rock Masterpiece:
Gathering your supplies is the first exciting step in any creative project. For this charming turtle rock, you’ll need:
- 1 large smooth rock: This will form the main body and shell of your turtle. Look for one with a relatively flat surface and a pleasing, oval or round shape.
- 5 small smooth rocks: These will become the turtle’s head and four legs. Try to find pieces that are somewhat uniform in size and complement the shape of your large rock.
- Green acrylic paint, in different shades: Having a range from light to dark green will allow you to create depth and interesting visual texture for the turtle’s shell.
- White acrylic paint: Essential for highlights, dots, and adding expressiveness to the eyes.
- Black acrylic paint: Used for outlines, shadows, and defining features like the eyes, giving your turtle a finished, polished look.
- A dotting tool, large and small: These tools are perfect for creating precise, uniform dots, which are central to the turtle’s shell design. If you don’t have dedicated dotting tools, you can use the ends of paintbrushes, cotton swabs, or even toothpicks for different dot sizes.
- Thin paintbrush: Crucial for intricate detailing, drawing outlines, and adding smaller strokes.
- White pencil: Ideal for sketching initial designs on dark surfaces, as it provides a clear, erasable guide without permanently marking the rock.
Step-by-Step Directions for Your DIY Turtle Rock:
Follow these instructions carefully to bring your adorable turtle rock to life. Remember, patience and allowing paint to dry are key to a beautiful finish.
Step 1: Preparing Your Rocks and Laying the Base Coat
Begin by carefully selecting your rocks. Ensure they are clean, smooth, and free of any dirt or debris. A quick wash with soap and water, followed by thorough drying, is recommended. Once your rocks are ready, apply a complete and even coat of black acrylic paint to all six rocks (the large one for the body and the five smaller ones for the head and limbs). This black base coat serves a dual purpose: it creates a dramatic contrast that makes the subsequent green dots truly pop, and it provides a uniform surface for your artwork. Allow the paint to dry completely. This might take an hour or more, depending on the paint thickness and humidity. Patience here ensures a smooth canvas for the next steps.
Once the black paint is fully dry, take the large rock. Using your white pencil, gently sketch the outline of the turtle’s shell onto its surface. This outline will guide your dot placement, so try to make it symmetrical and proportionate to your rock. Refer to the JaDeL Rocks video for visual guidance on the shell shape. Now, grab your larger dotting tool and dip it into a light shade of green acrylic paint. Carefully dab large, uniform light green dots all around the outer edges of the pencil outline. These dots will form the first layer of the shell’s vibrant texture. Next, switch to a smaller dotting tool and begin dabbing smaller dots of the same light green paint inside the initial outline, filling the space. For the subsequent layers, repeat this dotting process, but each time, use a progressively darker shade of green. This layering of different green hues, from light to dark, will create a stunning sense of depth and dimension on the turtle’s shell, mimicking natural textures.
Step 2: Adding Details, Finishing Touches, and Assembly
With the multi-layered green dots defining the shell, it’s time to refine the design. Take your thin paintbrush and carefully trace over the white pencil outlines of the shell. This black outline will sharply define the shell’s shape, making it stand out against the dotted background. Continue by filling any remaining blank spaces within the shell outline with more dots, ensuring an even and continuous texture. Repeat this process for the five small rocks as well, adding green dots to create a consistent look for the head and limbs. These smaller rocks will likely require fewer layers of dots due to their size, but the principle of using varying shades of green still applies.
Allow all the painted rocks to dry completely once more. This is crucial before moving on to the intricate details. Once thoroughly dry, grab your black and white acrylic paints. Use the thin brush to add fine details. For example, you might add smaller black dots or lines to the green shell dots for extra texture, or white highlights to create a sense of shine and depth. Now, select one of the small rocks to be the turtle’s head. Using black paint, carefully paint two small circles for the eyes. Once the black is dry, add even smaller white dots within the black circles to create pupils, giving your turtle an expressive and lively gaze. For an extra touch of sparkle, mix a small amount of white paint with glitter paint, then lightly brush this mixture over the small rocks (the head and limbs). This will give them a subtle shimmer, enhancing their charm.
After all the paint has dried for the final time, it’s essential to protect your artwork. Apply a generous, even coat of gloss paint or a clear sealant to all the rocks. This not only gives them a beautiful, shiny finish but also protects them from wear, fading, and the elements, especially if they are destined for outdoor display. Once the gloss paint is completely dry, you can assemble your turtle. Arrange the five small rocks (one head, four limbs) around the large shell rock to form a complete turtle. You can simply place them for a temporary arrangement or use a strong adhesive, such as E6000 glue or outdoor-grade epoxy, to permanently attach the head and limbs to the main shell rock. This ensures your turtle remains intact, whether it’s adorning your garden, a shelf, or given as a cherished gift.
Pro Tips for Perfect Rock Painting:
- Cleanliness is Key: Always start with thoroughly cleaned and dried rocks. Any dust or residue can prevent paint from adhering properly.
- Thin Layers: Apply paint in thin, even layers. This prevents cracking and ensures a smoother finish. Multiple thin coats are always better than one thick coat.
- Patience with Drying: Allow each layer of paint to dry completely before applying the next. Rushing this step can lead to smudges and uneven textures.
- Test Your Tools: Before applying paint to your rock, test your dotting tools and brushes on a piece of scrap paper to get a feel for the paint consistency and dot size.
- Work in Good Lighting: Proper lighting will help you see details clearly and ensure accurate color application.
- Protect Your Workspace: Lay down newspaper or a protective mat to keep your work surface clean from paint spills.
- Sealing for Longevity: Always seal your finished rock art, especially if it will be displayed outdoors. A clear acrylic sealant (spray or brush-on) will protect it from UV rays, moisture, and general wear.
- Experiment with Colors: While this tutorial uses greens, don’t be afraid to experiment with other color palettes for your turtle shells. Blues, purples, or even rainbow colors can create unique effects.
Displaying and Sharing Your Turtle Rock Art:
Once your charming turtle rocks are complete and sealed, the possibilities for displaying them are endless. They make fantastic garden decor, adding a touch of whimsical beauty to flower beds, rockeries, or pathways. Indoors, they can brighten up a windowsill, bookshelf, or a potted plant. They’re also perfect as paperweights or unique desk accessories. Beyond personal enjoyment, these handmade turtle rocks make incredibly thoughtful gifts. Imagine the smile they’ll bring to a friend or family member who receives a handcrafted piece of art! You could even use them as unique place settings for a themed party or as little tokens of appreciation.
Rock painting can also be a wonderful community activity. Consider leaving some of your turtle rocks in public places for others to find, participating in the “kindness rocks” movement. The joy of creating is often amplified by the joy of sharing!
Conclusion: Embrace the Joy of Rock Art
This easy DIY turtle rock painting tutorial offers a delightful entry point into the world of rock art. From selecting your stones to adding the final gloss, each step is a rewarding part of the creative process. The satisfaction of transforming plain rocks into adorable, long-lasting pieces of art is truly immense. Whether you’re an experienced crafter or picking up a paintbrush for the first time, this project provides a wonderful opportunity for creative expression, relaxation, and crafting something beautiful. So, gather your materials, follow these simple steps, and embark on your own rock painting adventure. Your charming turtle creations will undoubtedly bring a touch of joy and whimsy to any space, proving that beauty can truly be found in the simplest of things.
*All image credit for this inspiring tutorial belongs to JaDeL Rocks via YouTube. We highly recommend following and subscribing to her channel for more creative and delightful rock painting ideas!