
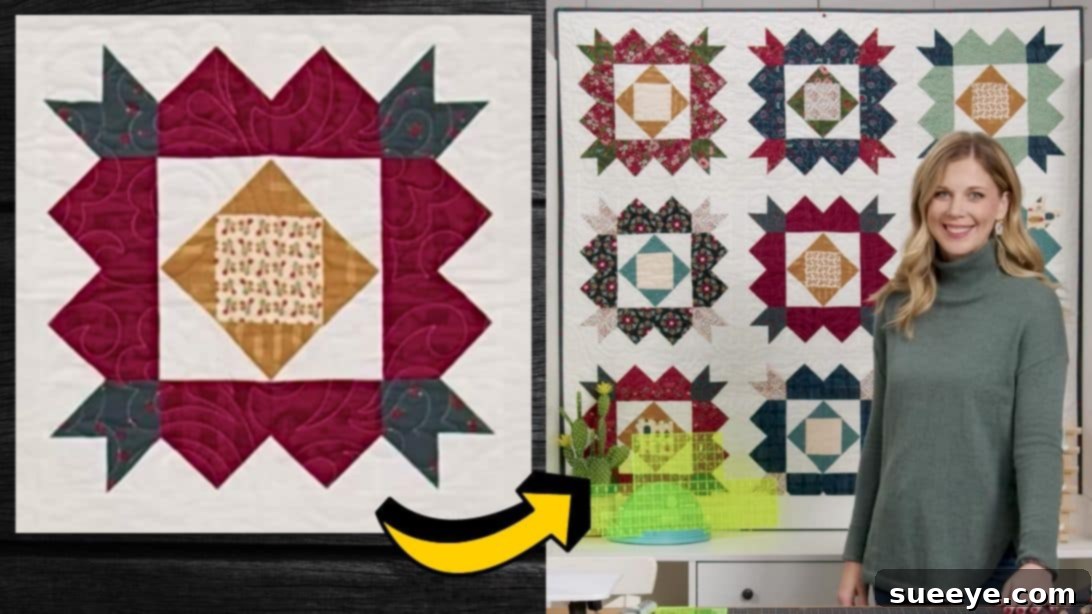
Easy Bloom Quilt Tutorial for Beginners: Craft a Stunning Floral Quilt Block
Embark on a delightful quilting journey with the mesmerizing Bloom Quilt, a project that promises both beauty and surprising simplicity. Crafted with inspiration from the renowned Missouri Star Quilt Company, this captivating design is perfect for quilters of all skill levels, especially beginners looking to create something truly special. Imagine a quilt adorned with vibrant, blooming flowers, each block a testament to your growing craftsmanship. The best part? This intricate-looking quilt block can be achieved using just a few print squares and a versatile background fabric, making it an accessible and rewarding endeavor for anyone eager to dive into the world of quilting.
The allure of the Bloom Quilt lies not only in its striking visual appeal but also in its incredible adaptability. You have the creative freedom to select any colors, patterns, and fabric prints that resonate with your personal style. Whether you prefer a cohesive palette that creates a harmonious garden or a “scrappy” look bursting with eclectic charm, this project allows your imagination to flourish. The construction process is thoughtfully designed to be straightforward and easy to follow, ensuring that even those new to quilting can achieve stunning results on their very first attempt. Gather your materials, prepare your workspace, and get ready to transform simple fabric into a breathtaking work of art. Dive into the instructions below and unlock the secrets to crafting your very own Bloom Quilt!
RELATED: Learn How To Make This Blooming Flower Quilt Block
Essential Materials for Your Beautiful Bloom Quilt
Before you begin sewing, gathering all your supplies is crucial for a smooth and enjoyable quilting experience. Having everything organized and ready will allow you to focus on the creative process. Here’s a detailed list of what you’ll need to bring this gorgeous Bloom Quilt to life:
- 1 package of 10-inch squares (Layer Cake): These pre-cut fabric bundles are a fantastic starting point for quilters. A “Layer Cake” typically contains 42 squares, each 10×10 inches, often featuring coordinated prints from a single fabric line. This saves you significant cutting time and ensures your fabrics harmonize beautifully, making your Bloom Quilt cohesive and visually appealing.
- 2½ yards of background fabric: This fabric will provide the foundation for your bloom design, allowing your print squares to pop. Choose a color that offers good contrast to your chosen prints – a solid white, cream, or light gray is a classic choice, but a subtle print or a contrasting dark color can also create a dramatic effect.
- 3¾ yards of backing fabric: The backing fabric is the “other side” of your quilt. While it’s largely unseen once the quilt is in use, it contributes to the overall feel and drape. You can opt for a soft flannel, a sturdy cotton, or even piece together leftover fabric for a unique back.
- ¾ yard of binding fabric: The binding is the finishing touch that frames your quilt, encasing the raw edges and giving it a professional appearance. Select a fabric that complements your quilt top – it can be a coordinating print, a solid that matches your background, or a bold contrast for a pop of color.
- Marking pen, pencil, or chalk: Precision is key in quilting. A good marking tool will help you draw accurate lines for sewing, ensuring your blocks come together perfectly. Choose a tool that is easily visible on your fabric and will wash out or disappear with heat.
- Ruler: A clear acrylic quilting ruler with precise measurements is indispensable. Look for one with ¼-inch and ½-inch markings, as well as diagonal lines, to aid in accurate cutting and squaring up your blocks.
- Scissors or rotary cutter and a cutting mat: While scissors work, a rotary cutter combined with a self-healing cutting mat is highly recommended for quilting. It allows for quick, accurate, and straight cuts, especially when dealing with multiple layers of fabric. Remember to always use a fresh blade for crisp cuts and exercise caution for safety.
- Needle and thread: Essential for any sewing project! Use good quality 100% cotton thread that matches or blends with your fabric colors. A strong, fine needle will help you stitch smoothly through multiple layers.
- Iron, for pressing: An iron is arguably a quilter’s best friend. Pressing your seams flat and in the correct direction is vital for creating crisp, accurate blocks that fit together beautifully. Always press, never iron (which can stretch and distort fabric).
- Sewing machine: A reliable sewing machine capable of a consistent straight stitch is a must-have. Ensure it’s in good working order and you’re comfortable with its basic functions.
Step-by-Step Guide to Crafting Your Bloom Quilt
This tutorial will guide you through the creation of a stunning Bloom Quilt block, piece by meticulous piece. Precision and careful pressing are your allies in this process, ensuring your finished quilt is a masterpiece of symmetrical beauty. Follow these detailed steps to construct your exquisite floral design.
Step 1: Mastering the Half-Square Triangle (HST) Units
The foundation of many beautiful quilt blocks, including our Bloom Quilt, lies in the humble Half-Square Triangle (HST). To begin, select one of your 10-inch print squares and one 10-inch background square. Place these two squares together, ensuring their right sides are facing each other. This means the printed or “pretty” sides of the fabric are touching. Using your marking tool, draw an “X” on the wrong side of the background fabric, connecting each corner diagonally. These lines will serve as your sewing guides. Next, using your sewing machine, stitch a seam on both sides of each drawn line, maintaining a precise ¼ inch seam allowance. This careful stitching is crucial for accurate block formation. Once all four lines are stitched, take your rotary cutter and cut directly along the two drawn “X” lines. When you separate these sections, you will magically end up with four individual fabric units, each ready to be transformed into a Half-Square Triangle. This method is incredibly efficient for producing multiple HSTs quickly and consistently.
Step 2: Precision Pressing, Squaring Up, and Corner Unit Assembly
With your four fabric units from Step 1, it’s time for the next stage of transformation. Carefully cut along the remaining unsewn lines of each piece. This action will yield a total of eight raw Half-Square Triangle blocks. The next vital step is pressing. Take each HST to your ironing board and press the seams open or to one side, whichever creates a flatter, less bulky block for your fabric type. Pressing is a non-negotiable step in quilting; it ensures your blocks lie flat and square, which is essential for accurate piecing later on. After pressing, use your quilting ruler and rotary cutter to carefully square up each HST to a precise 2.5 inches. This squaring-up process trims away any excess fabric and corrects minor inconsistencies, guaranteeing that all your HSTs are uniformly sized – a key factor for a professional-looking quilt. Now, it’s time to assemble your corner units. Referring to the Missouri Star video for visual guidance, arrange four of your freshly squared HSTs to form a distinct corner pattern. Stitch these arranged HSTs together, one seam at a time, continuously pressing your seams as you go to maintain flatness and accuracy. You should aim to create a total of four identical corner units. Once these are complete, retrieve two identical 10-inch squares from your stash. Stack them neatly, ensuring all edges are perfectly aligned. Using your rotary cutter, cut these stacked squares into 4½ inch wide strips, then subcut these strips into individual 4½ inch squares. These precisely cut squares will become central elements in your Bloom Quilt block.
Step 3: Crafting Flying Geese Units and Completing Your Bloom Block
With your HSTs and corner units ready, it’s time to introduce another classic quilting element: the Flying Geese unit, which helps give our Bloom Quilt its dynamic movement. Take your previously cut 4½ inch print squares. For each of these, you will need two smaller background squares. Place a small background square onto the top corners of a print square, ensuring their right sides are facing. Stitch diagonally from corner to corner across each small background square. This method, often called “stitch and flip,” creates precise points for your Flying Geese. After stitching, carefully trim the excess fabric from the corner, leaving a ¼ inch seam allowance. Press the newly created seam open or towards the darker fabric for a crisp finish. Repeat this process until you have a total of four of these sets, which will contribute to the “petals” or structural elements of your bloom. Once these components are prepared, you are ready for the grand assembly of your Bloom Quilt block. Refer back to the Missouri Star tutorial for the exact layout – typically, the corner units, the central 4½ inch squares, and the newly formed Flying Geese-style units will be arranged in a grid, forming a larger “flower” shape. Carefully arrange all these disparate units into their final configuration on your design wall or floor, ensuring every piece faces the correct direction to form the intended “bloom.” Once satisfied with the arrangement, stitch the units together row by row, or in sections, making sure to align all seams and points perfectly. As you stitch, continue to press your seams diligently after each section is sewn. This continuous pressing ensures the block remains flat and square, ready to be joined with other blocks to form your complete Bloom Quilt masterpiece. The meticulous attention to detail in this step will truly bring your floral design to life.
*All these images are credited to Missouri Star via YouTube. Give their channel a visit and subscribe for more amazing quilting tutorials and inspiration!
Your Beautiful Bloom Quilt: A Triumph for Every Quilter
Congratulations! You’ve successfully navigated the steps to create a stunning Bloom Quilt block, a testament to your growing quilting skills. This project, while appearing intricate, is designed to be accessible and enjoyable for even the most novice quilters, thanks to the clear guidance from Missouri Star. The true beauty of the Bloom Quilt lies in its versatility and the endless possibilities for customization. Imagine an entire quilt top composed of these vibrant blocks, each one a blooming flower, creating a garden of fabric that will brighten any room. Whether you choose to assemble several blocks for a charming baby quilt, a table runner, or go big for a full-sized bed quilt, the satisfaction of seeing your fabric pieces transform into a cohesive and beautiful design is immeasurable.
Remember, the journey of quilting is as rewarding as the destination. Don’t be afraid to experiment with different fabric combinations, playing with light and dark, warm and cool tones, or various print scales to create unique visual effects. Each stitch you make, each seam you press, contributes to the character and story of your quilt. We encourage you to visit the Missouri Star Quilt Company YouTube channel for their full video tutorial. Their expert guidance and visual demonstrations provide invaluable support, making complex steps feel simple and achievable. Subscribe to their channel to stay updated on new patterns and techniques, and let their passion for quilting inspire your next creative endeavor. Happy quilting, and may your Bloom Quilt flourish beautifully!