
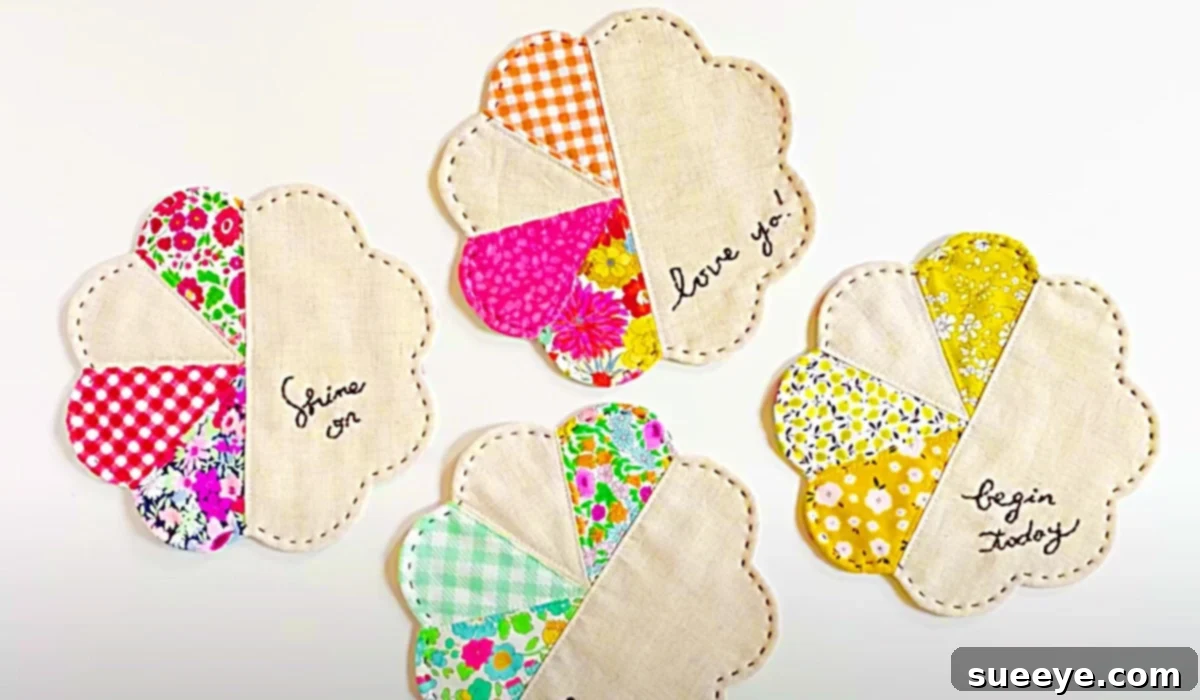
The Ultimate Guide to Crafting Beautiful Patchwork Flower Coasters
There’s a special kind of joy that comes with quilting, a timeless craft that transforms simple fabric into works of art. While quilting offers year-round delight, it truly shines during the warmer months, bringing a fresh, homey touch to any space. Imagine elevating your summer decor with charming, handmade accessories, crafted from vibrant fabric remnants and infused with seasonal flair. Nothing quite brightens a home or adds a personal touch like DIY decorative pieces, and these delightful patchwork flower coasters are no exception. They’re not just practical; they’re tiny masterpieces that infuse any gathering with warmth and creativity.
My journey to creating these beautiful coasters began with a quest for the perfect summer quilting project. I had recently stocked up on several fabric jelly rolls during a fantastic sale at JoAnn’s Fabrics, acquiring them for next to nothing. The only challenge? Deciding what wondrous creation they would become! As often happens with quilters, these rolls sat patiently, waiting for their purpose to be revealed. Turning to YouTube, a treasure trove of crafting inspiration, I stumbled upon an incredible video quilting tutorial by the talented Minki Kim. Her “Patchwork Flower Coaster” tutorial immediately captured my attention. The design was utterly charming, and the promise of transforming my jelly rolls into these gorgeous floral pieces was too exciting to resist. I couldn’t wait to dive in and bring these vibrant flowers to life for my summer table!
Essential Materials for Your Patchwork Flower Coasters
Embarking on this delightful sewing adventure requires a few fundamental tools and materials. Most are likely already in your crafting stash, making this an accessible and budget-friendly project. Gathering everything before you begin ensures a smooth and enjoyable crafting experience.
- Fabric Scraps or Jelly Rolls: This project is perfect for utilizing those smaller pieces of fabric you’ve been saving or for cutting into your beloved fabric jelly rolls. Aim for a variety of colors and patterns that complement each other, allowing your flowers to truly bloom with personality. For a single coaster, you’ll need several small pieces for the petals and a slightly larger piece for the backing.
- A Sewing Machine: Any standard home sewing machine will work perfectly for this project. Ensure it’s in good working order and has a fresh needle suitable for the type of fabric you’re using. A walking foot can be helpful, but it’s not strictly necessary.
- Thread: Choose a high-quality all-purpose polyester or cotton thread that matches or complements your fabric choices. You’ll need thread for piecing the petals and assembling the coaster. Having a few different colors on hand can be useful for blending seamlessly with various fabric prints.
- Embroidery Floss: To add those delicate, hand-stitched embellishments that truly bring the flower to life, you’ll need embroidery floss. Select colors that contrast or enhance your fabric, allowing your decorative stitches to stand out. DMC cotton floss is a popular and versatile choice.
- A Pair of Sharp Scissors or a Rotary Cutter: Precision is key in quilting. A good pair of fabric scissors will make cutting your intricate petal shapes much easier. Alternatively, a rotary cutter with a self-healing mat and a quilting ruler can offer even greater accuracy and speed, especially when cutting strips from jelly rolls or larger fabric pieces.
- Heat-Resistant Batting (Optional but Recommended): For functional coasters that protect surfaces from heat and moisture, a layer of heat-resistant batting or cotton batting is highly recommended. This adds structure, absorbency, and insulation.
- Wonder Clips or Pins: Essential for holding your fabric layers securely in place while you sew, preventing shifting and ensuring accurate seams.
- Basic Sewing Kit: A seam ripper (just in case!), an iron and ironing board for pressing seams, and a fabric marker or chalk for tracing your pattern are also invaluable.
Step-by-Step Directions: Crafting Your Floral Coasters
In this fantastic patchwork flower coaster video quilting tutorial by Minki Kim on YouTube, you’ll be guided through the process of creating these stunning coasters in just a few straightforward steps. The beauty of this project lies in its simplicity and the delightful outcome. Let’s break down the journey from fabric to a finished floral coaster.
Step 1: Fabric Selection and Preparation
The first step sets the tone for your coaster: choosing your fabrics. This is where your creativity truly shines! Whether you’re dipping into a stash of fabric scraps, pulling strips from those tempting jelly rolls, or selecting fresh fat quarters, consider a palette that brings joy. For a harmonious look, choose fabrics that share a common color thread or complementary patterns. Once selected, ensure all your fabrics are pressed smooth and flat. This is crucial for accurate cutting and sewing, leading to a much more polished final product. If you’re using jelly rolls, partially unreel them and consider folding two rolls together if you plan to cut multiple layers at once, securing them with Wonder Clips to prevent shifting.
Step 2: Crafting Your Flower Pattern and Cutting Fabric
The core of your coaster is the flower pattern. Minki Kim’s tutorial provides clear guidance on how to draw or create this basic flower shape. You can draw it directly onto cardstock to make a reusable template. Once your pattern is ready, carefully trace it onto the wrong side of your chosen fabric pieces. For the petals, you’ll need multiple identical shapes. Cut these out precisely using your sharp scissors or rotary cutter. Take your time with this step; accurate cutting directly translates to accurate piecing and a beautifully symmetrical flower.
Step 3: Assembling the Petals
With your petals cut, it’s time to bring them together. Following Minki Kim’s instructions, you will begin to sew the individual petal units together. This usually involves placing two petal pieces right sides together and sewing along the curved edges, leaving an opening for turning. Once sewn, carefully clip the curves to reduce bulk, then turn the petals right side out and press them flat. This step is repeated for all petal units. You’ll then arrange and sew these finished petals onto a base fabric piece, forming the full flower shape. Maintaining a consistent seam allowance throughout this process is vital for a neat and professional finish.
Step 4: Adding Backing and Batting (Finishing the Coaster Base)
To give your flower coaster its durable, functional form, you’ll need to add a backing fabric and a layer of batting. Cut a piece of backing fabric and batting slightly larger than your assembled flower top. Layer them in a “quilt sandwich” – backing fabric (wrong side up), batting, and then your patchwork flower top (right side up). Pin or clip all layers securely. Now, you can quilt these layers together. Simple straight lines radiating from the center or following the contours of the petals work beautifully, or you can opt for free-motion quilting to add texture. Once quilted, trim the edges to a neat circle or square, preparing it for the final binding or edge finishing. This step ensures your coaster is sturdy and effective at protecting surfaces.
Step 5: The Art of Embroidery Embellishment
The final touch that truly brings these flowers to life is the embroidery work. This is where you can add intricate details and a pop of texture. Using your embroidery floss, you might add a French knot to the center of the flower to represent stamens, or use a simple running stitch or lazy daisy stitch to define the petal edges or add decorative veins. Choose floss colors that either blend subtly or provide a striking contrast to your fabric. This step allows for immense personalization; experiment with different stitches and patterns to make each coaster uniquely yours. It’s this thoughtful embellishment that elevates a simple coaster into a charming piece of art.
Why You’ll Adore Making These Flower Coasters
This project is much more than just creating a coaster; it’s an opportunity for creative expression and a practical way to enhance your home. There are numerous reasons why you’ll find yourself falling in love with these patchwork flower coasters.
Firstly, they are incredibly versatile. Use them to protect your tables from condensation and heat, or simply arrange them as charming decorative accents on your coffee table or shelves. Their bright, floral design instantly adds a cheerful and welcoming atmosphere to any room, making them perfect for summer gatherings, garden parties, or simply enjoying a quiet cup of tea.
Secondly, these coasters make fantastic gifts! Handmade gifts carry a unique sentiment, showing thought and effort. Imagine gifting a set of these beautiful flower coasters to a friend, family member, or hostess. They’re perfect for birthdays, housewarmings, or as a thoughtful thank-you. You can customize the fabric choices to match the recipient’s decor or favorite colors, making each gift truly personal.
Thirdly, this project is an excellent stash-buster. If you’re a quilter or sewer, you likely have a collection of fabric scraps and remnants. These coasters are ideal for using up those smaller pieces that might otherwise go unused. It’s a satisfying feeling to transform bits and bobs of fabric into something both beautiful and functional, reducing waste and giving new life to forgotten textiles.
Finally, the process itself is incredibly enjoyable and rewarding. Following Minki Kim’s clear tutorial, even beginner quilters can achieve stunning results. The methodical steps of cutting, piecing, and embellishing provide a meditative and creative outlet. There’s immense satisfaction in seeing your fabrics transform into a vibrant flower, knowing you’ve created something lovely with your own hands. This is such a cute pattern, I just love it, and it is super easy to achieve beautiful results.
Tips and Tricks for Perfect Patchwork Coasters
To ensure your patchwork flower coasters turn out beautifully and stand the test of time, consider these helpful tips and tricks:
- Pre-wash Your Fabrics: Especially if you’re mixing fabrics from different sources, pre-washing them helps prevent future shrinking or dye bleeding, ensuring your finished coasters remain vibrant and shapely after washing.
- Use a Fresh Needle: A sharp, new needle in your sewing machine makes a huge difference in stitch quality, preventing skipped stitches and fabric snags. Match the needle type to your fabric (e.g., universal or microtex for quilting cottons).
- Press, Don’t Iron: When piecing, lift your iron and press straight down on your seams, rather than sliding it. This prevents distorting your fabric pieces. Press seams open or to one side consistently for a flatter finish.
- Consistent Seam Allowance: Maintaining a precise seam allowance (usually 1/4 inch for quilting) is crucial for accurate piecing and ensuring your flower components fit together perfectly. Use a quilting foot with a 1/4-inch guide if your machine has one.
- Test Your Embroidery: Before adding permanent stitches to your coaster, practice your embroidery stitches on a scrap piece of fabric. This helps you get comfortable with the tension and look of your chosen stitches.
- Experiment with Batting: While cotton batting is common, consider heat-resistant batting for truly functional hot coasters. You can also experiment with different thicknesses for varying levels of plushness.
- Consider Hand-Stitched Binding: For a truly professional finish, you might opt for a traditional hand-stitched binding around the edge of your coaster. This adds a beautiful, clean edge and is a satisfying final step.
- Batch Produce: If you plan to make a set or multiple gifts, consider chain piecing your petals. This means sewing one petal after another without cutting the thread in between, which can save time and thread.
- Care Instructions: Advise gentle machine washing on a cold cycle and laying flat to dry, especially if using cotton batting. This will help maintain their shape and vibrant colors for years to come.
With these guidelines and Minki Kim’s excellent video tutorial, you’re well-equipped to create a collection of stunning patchwork flower coasters. Whether you’re making them for your own home or as heartfelt gifts, each coaster will be a testament to your creativity and love for the craft. So gather your fabrics, fire up your sewing machine, and let your summer quilting journey blossom!