
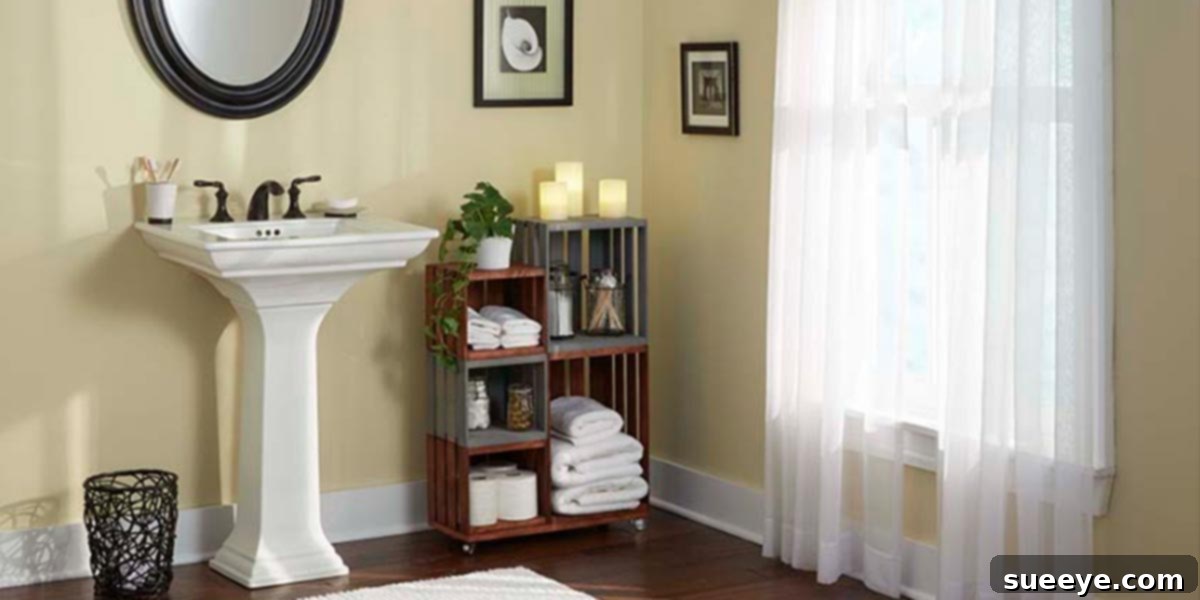
Transform Your Bathroom: Create a Custom DIY Rolling Crate Organizer
Is your bathroom a chaotic mess of toiletries, towels, and cleaning supplies? Do you find yourself constantly searching for items, or worse, knocking things over because every surface is crammed? If you’ve run out of storage space and your cabinets are overflowing, you’re not alone. This common household dilemma can be incredibly frustrating, but thankfully, there’s an ingenious, budget-friendly, and highly customizable solution that can revolutionize your bathroom’s organization: a DIY rolling storage organizer made from simple wooden crates.
Imagine a bathroom where everything has its designated place, easily accessible yet neatly tucked away. This isn’t just a pipe dream; it’s an achievable reality with a handmade rolling organizer. From extra toilet paper rolls and fresh towels to an array of shampoos, conditioners, soaps, and lotions, the bathroom often becomes a repository for countless essentials. Consequently, efficient storage is not just a luxury, but an absolute necessity. This DIY project offers the perfect answer, allowing you to create a versatile and mobile storage unit that perfectly fits your unique space and style.
What makes this project truly exceptional is its simplicity and affordability. Why spend a fortune on generic, store-bought storage units that may not even meet your specific needs when you can craft a bespoke piece for virtually nothing? The beauty of DIY projects, especially those involving repurposing materials like ordinary wooden crates, lies in their incredible cost-effectiveness. Not only do you save money, but the results often surpass the quality, charm, and functionality of mass-produced alternatives. Plus, there’s immense satisfaction in creating something beautiful and practical with your own hands.
Having one of these handmade rolling organizers in your bathroom will dramatically improve its functionality and aesthetic. It instantly frees up valuable countertop space, provides much-needed extra room for neatly folded towels, and keeps all your bathroom essentials organized and within easy reach. No more cluttered sinks or overflowing cabinets – just a serene, well-ordered sanctuary.
Why Choose a DIY Rolling Crate Organizer?
The concept of a rolling organizer brings unparalleled versatility to any room, particularly the bathroom. Its mobility allows you to easily move it for cleaning, redecorating, or simply to access items stored behind it. Beyond functionality, the customizable nature of this project means you can tailor its dimensions, number of shelves, and aesthetic finish to perfectly complement your existing bathroom décor. Whether your style is rustic farmhouse, modern minimalist, or anything in between, a DIY crate organizer can be adapted to fit seamlessly.
Opting for a DIY approach empowers you with creative control. You get to choose the type of wood, the paint or stain color, and even the style of casters, ensuring the final product is exactly what you envisioned. This level of personalization is impossible to achieve with off-the-shelf solutions. Moreover, the act of building something yourself instills a sense of pride and accomplishment, turning a storage problem into a rewarding personal project.
Materials You’ll Need for Your Custom Organizer
One of the most appealing aspects of this project is that it requires only a handful of readily available and inexpensive materials. Before you begin, gather the following:
- **Wooden Crates:** The star of our project! The number depends on the desired height and capacity of your organizer. Standard sizes are typically easy to find. Ensure they are sturdy and relatively uniform.
- **Wood Screws or Wood Glue:** To securely join the crates together. Screws offer greater strength.
- **Casters (Wheels):** Four swivel casters are ideal for easy movement. Choose a size appropriate for the weight and scale of your organizer.
- **Sandpaper:** For smoothing rough edges and preparing the wood for finishing.
- **Wood Stain or Paint (Optional):** To customize the appearance of your organizer.
- **Polyurethane or Wood Sealer (Optional):** To protect the wood from moisture, especially crucial in a bathroom environment.
- **Drill:** For pre-drilling holes and driving screws.
- **Measuring Tape or Ruler:** For accurate measurements.
- **Pencil:** For marking.
- **Safety Glasses and Gloves:** Always essential for DIY projects.
Step-by-Step Guide: Building Your Rolling Bathroom Storage
Now, let’s dive into the exciting part – bringing your custom storage solution to life. Follow these detailed steps to construct your durable and stylish rolling crate organizer:
1. Planning and Measuring Your Space
Before buying materials, accurately measure the area where you intend to place your organizer. Consider both the width, depth, and height. This will help you determine the appropriate size and number of crates you’ll need. Think about what you plan to store – tall bottles might require taller crates or specific crate arrangements. Sketching a simple diagram can be very helpful.
2. Selecting and Preparing Your Crates
Choose wooden crates that are robust and free from significant damage. If purchasing new, inspect them for splintering. If using repurposed crates, clean them thoroughly and ensure they are dry. Once you have your crates, use sandpaper (starting with a coarser grit like 80-100, then moving to a finer grit like 150-220) to smooth any rough edges or splinters. This step is vital for both aesthetics and safety, preventing snags on towels or accidental splinters.
3. Assembling the Crate Structure
Decide on the orientation and stacking pattern of your crates. You can stack them vertically, arrange them side-by-side, or create an L-shape, depending on your space and storage needs. Once you have your desired configuration, carefully align the crates. Use wood glue first to hold them in place temporarily, then reinforce the joints with wood screws. Pre-drill pilot holes before driving screws to prevent the wood from splitting. Aim for at least two screws per joint for maximum stability. Ensure the structure is square and level as you assemble it.
4. Attaching the Casters
Flip your assembled crate structure upside down. Position the four casters at each corner of the bottom crate, approximately 1-2 inches in from the edges. Mark the screw holes with a pencil. Pre-drill pilot holes for the caster screws, then securely attach each caster using the provided screws. Ensure all casters are firmly attached and can swivel freely. Before flipping it back over, test the mobility by gently pushing it while it’s still inverted to ensure the wheels rotate properly.
5. Finishing Touches: Painting, Staining, and Sealing
This is where your organizer truly comes to life! If you choose to paint or stain, apply your chosen finish evenly. For a natural look, a clear wood sealer or polyurethane is excellent for protecting the wood, especially from the bathroom’s humidity. Apply multiple thin coats, allowing each to dry completely according to product instructions, and lightly sand between coats for a smooth finish. This protective layer will make your organizer more durable and easier to clean, crucial for a bathroom environment.
6. Personalization and Customization
Beyond paint or stain, consider adding other personal touches. You could attach small hooks to the sides for hanging loofahs or hand towels. Labels on each crate can help categorize items. You might even line the bottom of some crates with decorative paper or fabric for a softer touch. The possibilities are endless, allowing you to truly make this piece your own.
Ideas for What to Store in Your New Organizer
Once your DIY rolling crate organizer is complete and ready for use, you’ll be amazed at its capacity and versatility. Here are just a few ideas for what you can store to keep your bathroom organized and tidy:
- **Fresh Towels:** Roll or fold bath towels, hand towels, and washcloths.
- **Toilet Paper:** Keep extra rolls easily accessible for guests and family.
- **Toiletries:** Shampoos, conditioners, body washes, lotions, and soaps.
- **Hair Care Products:** Hairdryers, curling irons, brushes, and styling products.
- **Cleaning Supplies:** Sprays, wipes, and brushes can be neatly tucked away.
- **Kids’ Bath Toys:** A convenient spot for quick clean-up after bath time.
- **First Aid Supplies:** Keep essential medical items organized and handy.
- **Decorative Items:** Add a plant, a scented candle, or small decorative accents to enhance the bathroom’s ambiance.
Enjoy Your Organized Bathroom!
Starting this bathroom storage project now means you’ll be enjoying a more organized and stress-free bathroom in no time. The feeling of accomplishment after creating something so functional and aesthetically pleasing is incredibly rewarding. You’ll wonder how you ever managed without this clever, space-saving solution.
Embrace the satisfaction of a decluttered space and the pride of a DIY creation. Get ready to transform your bathroom from chaotic to calm with your very own customized rolling crate organizer. Say goodbye to clutter and hello to serenity!
Watch how she makes this in her step-by-step tutorial to inspire your own project and create even more space for your bathroom essentials!