
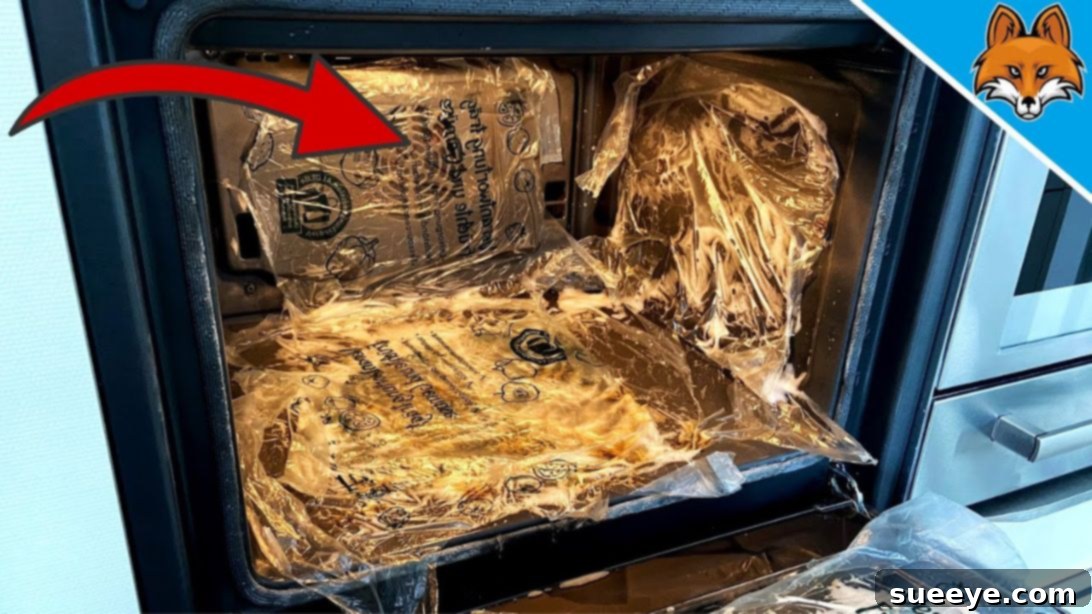
The Ultimate Oven Cleaning Hack: Achieve a Sparkling Clean Oven Effortlessly with Plastic Bags
A dirty oven is a common household challenge, often accompanied by the daunting prospect of tedious scrubbing and harsh chemical fumes. However, what if there was a surprisingly simple, incredibly effective, and almost magical way to restore your oven’s sparkle without breaking a sweat? Thanks to a brilliant trick shared by Smart Fox on YouTube, that dream is now a reality. This ingenious oven cleaning hack utilizes something you likely already have in your home – plastic bags – to create an environment where stubborn grease and baked-on food simply melt away. I was skeptical at first, but after trying this method, it has completely revolutionized my cleaning routine. This isn’t just another tip; it’s a game-changer that promises exceptional results with minimal effort. Prepare to be amazed as your oven transforms from grimy to gleaming, looking as good as new.
Forget the days of back-breaking scrubbing and strong chemical odors filling your kitchen. This method leverages the power of chemistry and containment to do the heavy lifting for you. It’s a testament to how simple innovations can lead to profound differences in our daily lives. If you’re tired of battling baked-on grime and yearn for an oven that sparkles, you’re in the right place. We’ll walk you through everything you need to know, from the essential materials to a detailed, step-by-step guide. You’ll also discover why this particular hack stands out from traditional cleaning methods and gain valuable tips for maintaining your oven’s pristine condition long after the initial clean.
Why This Plastic Bag Oven Cleaning Hack Is So Effective
The secret behind the remarkable effectiveness of this plastic bag oven cleaning hack lies in its clever use of basic scientific principles. When you spray oven cleaner onto baked-on grease and then immediately cover it with plastic, you create a sealed, humid environment. This enclosure is crucial for several reasons that enhance the cleaner’s performance dramatically:
- Prevents Evaporation: Oven cleaners, especially powerful chemical ones, rely on their active ingredients to break down tough grease. If left exposed to air, these active ingredients can evaporate quickly, reducing their potency and requiring longer contact times or more applications. The plastic barrier traps these active compounds, keeping them concentrated on the grime.
- Increases Chemical Action: By preventing evaporation, the plastic allows the cleaner to remain moist and active for a prolonged period. This extended contact time gives the chemicals ample opportunity to penetrate and dissolve even the most stubborn, caked-on food particles and grease layers that have built up over time.
- Creates a Humid Chamber: Some oven cleaners benefit from a humid environment, which can help soften hardened deposits. The sealed plastic bag creates a microclimate that keeps the cleaner from drying out, maximizing its efficacy.
- Reduces Fume Dispersion: While you should always work in a well-ventilated area, the plastic can help to some extent in containing the fumes, allowing them to work directly on the oven surfaces rather than dissipating into the air too rapidly. This localized action ensures that the cleaner’s power is focused exactly where it’s needed.
In essence, the plastic bag transforms your oven into a super-efficient cleaning chamber, allowing the oven cleaner to work its magic undisturbed and at maximum strength. This focused approach significantly reduces the need for strenuous scrubbing, turning a dreaded chore into a surprisingly simple task. You’ll spend less time and effort, yet achieve a deeper, more satisfying clean than traditional methods often allow.
Essential Materials for Your Oven Cleaning Project
Gathering the right tools before you begin is key to a smooth and successful oven cleaning experience. This hack uses readily available items, making it not only effective but also incredibly convenient.
- Plastic Bags or Plastic Wrap: The cornerstone of this hack! You’ll need enough to cover all the sprayed areas of your oven. Strong garbage bags, kitchen bin liners, or even heavy-duty cling film can work perfectly. The idea is to create an airtight seal, so make sure they are tear-resistant and can be cut into large, manageable sheets.
- Oven Cleaner Spray: Choose a high-quality oven cleaner that you trust. There are many options available, including heavy-duty formulas for tough grime and “fume-free” varieties for those sensitive to strong odors. Always read and follow the manufacturer’s instructions for your chosen product, paying close attention to recommended ventilation and safety precautions.
- Rag, Cloth, or Microfiber Towel: You’ll need several clean cloths for wiping down the oven. Microfiber towels are highly recommended because of their excellent absorbency and ability to trap dirt and grease without scratching surfaces. Have a few on hand, as you’ll likely rinse and wring them out multiple times during the wiping process.
- Rubber Gloves: Absolutely essential for protecting your hands from the harsh chemicals in oven cleaners. Do not skip this step!
- Protective Eyewear: Goggles or safety glasses are highly recommended to prevent any accidental splashes from reaching your eyes, which can cause severe irritation.
- Old Newspaper or Drop Cloths: To protect your kitchen floor and surrounding cabinets from drips and spills during the cleaning process.
- Warm Water: For rinsing your cloths and ensuring all chemical residue is removed.
Having all these items ready before you start will ensure you can proceed efficiently and safely, leading to the best possible results.
Step-by-Step Guide to a Spotless Oven
With your materials ready, it’s time to tackle that stubborn oven grime. Follow these detailed steps to achieve a brilliantly clean appliance with minimal effort.
Step 1: Prepare Your Oven and Workspace
First, ensure your oven is completely cool. Remove all racks, baking sheets, and any other items from inside. For extremely dirty racks, consider cleaning them separately using a similar plastic bag method in a utility sink or bathtub (protected by towels) or soaking them in hot soapy water. Lay down old newspapers, towels, or a drop cloth on the floor directly in front of and under your oven to catch any drips and protect your flooring.
Step 2: Prepare the Plastic Barrier
Take your plastic bags or plastic wrap. If using garbage bags, cut along the sides and bottom to open them up into large, flat sheets. The goal is to create pieces of plastic that are large enough to easily cover the areas you intend to spray. You’ll want to ensure you have enough plastic to create a secure, overlapping seal later.
Step 3: Apply the Oven Cleaner Safely
Don your rubber gloves and protective eyewear. Open nearby windows or turn on your kitchen exhaust fan to ensure adequate ventilation. Holding the oven cleaner spray can at the recommended distance (check your product’s label), generously spray all the dirty surfaces inside your oven. Pay particular attention to areas with heavy grease buildup, baked-on food, and the oven door interior. Avoid spraying directly onto heating elements, the fan, or the pilot light opening. Ensure even coverage, but don’t over-saturate to the point of excessive dripping.
Step 4: Create the Airtight Seal
Immediately after spraying, take your prepared plastic sheets and carefully place them over all the sprayed areas. Press the plastic gently against the oven surfaces, ensuring it adheres well and creates an airtight seal. Overlap the plastic pieces if necessary to cover every inch of the treated surface. The objective here is to trap the cleaner’s fumes and moisture, preventing evaporation and allowing the solution to work most effectively.
Step 5: Allow the Cleaner to Work Its Magic
Now comes the waiting game. The precise waiting time depends on the strength of your oven cleaner and the severity of the grime. For moderately dirty ovens, a few hours (e.g., 4-6 hours) might suffice. For heavily soiled ovens, or if using a milder cleaner, you might need to leave it overnight (8-12 hours). Check your oven cleaner’s instructions for specific guidance. During this time, the trapped chemicals will penetrate and dissolve the tough grease and carbonized food, making them easy to wipe away.
Step 6: Check Progress and Remove Plastic
After the recommended waiting period, put your gloves back on. Gently peel back a small section of the plastic to check the progress. The grime should appear softened, loosened, and easily wipeable. If the oven is still heavily soiled and doesn’t wipe clean easily, you can re-apply a light spray of cleaner to those stubborn spots, re-cover with plastic, and allow it to sit for a few more hours. Once you are satisfied with the grime’s looseness, carefully remove all the plastic sheets, folding them inward to contain the dissolved mess, and dispose of them properly.
Step 7: Wipe Clean and Rinse
Grab a damp rag, cloth, or microfiber towel. Begin wiping down the oven’s interior, starting from the top and working your way down. You’ll be amazed at how easily the softened grease and food particles come off. Rinse your cloth frequently with warm water and wring it out thoroughly to remove chemical residue. Continue wiping and rinsing until all traces of grime and oven cleaner are gone. You may need to use several clean cloths and rinse them many times to ensure a residue-free finish. For tight corners, a old toothbrush can be useful.
Step 8: Final Dry and Inspection
Once you’ve wiped the oven clean, use a dry, clean cloth to thoroughly dry all surfaces. This prevents water spots and ensures no lingering moisture. Do a final inspection to make sure every nook and cranny is sparkling clean. Replace your oven racks (which you hopefully cleaned separately!). Allow the oven to air out for a while (perhaps an hour or two with the door slightly ajar) before its next use, even if using a “fume-free” cleaner.
Tips for Best Results and Safety Precautions
To ensure a safe and maximally effective cleaning process, keep these crucial tips and precautions in mind:
- Prioritize Safety: Always wear heavy-duty rubber gloves and protective eyewear throughout the entire process, especially when handling oven cleaner. Work in a well-ventilated area by opening windows and turning on exhaust fans.
- Read Cleaner Instructions: Different oven cleaners have different chemical compositions and instructions. Always read and adhere to the specific guidelines provided by your oven cleaner’s manufacturer regarding application, waiting times, and safety.
- Pre-Cleaning Prep: Before applying the cleaner, remove any loose crumbs or debris from the oven. This ensures the cleaner can act directly on the baked-on grime.
- Consider Oven Racks: For optimal results, remove oven racks and clean them separately. They can be placed in large plastic bags with some oven cleaner (following the same method) or soaked in a bathtub with hot water and dish soap, protected by towels.
- Protect Surrounding Surfaces: Lay down old towels or newspapers around the oven’s exterior to protect your floor and cabinets from accidental drips or splashes.
- Check Periodically: If you’re unsure about the waiting time, check a small area after a few hours. If the grime is not easily lifting, re-seal and allow more time.
- Rinse Thoroughly: It is critical to rinse all surfaces multiple times with clean, damp cloths to remove every trace of oven cleaner residue. Leftover chemicals can cause smoke or odors the next time you use the oven.
- Patience is Key: While this hack significantly reduces scrubbing, the “waiting time” is where the magic happens. Don’t rush this step.
- Ventilate After Cleaning: Even with “fume-free” cleaners, it’s a good practice to leave your oven door ajar for an hour or two after cleaning to ensure complete ventilation before its next use.
Maintaining Your Oven’s Cleanliness
Once your oven is sparkling clean, you’ll want to keep it that way for as long as possible. Regular maintenance can prevent the buildup of tough grime, making future deep cleans much easier:
- Wipe Spills Immediately: The moment food spills or splatters, try to wipe it up as soon as the oven is cool enough to safely do so. Fresh spills are much easier to clean than baked-on ones.
- Use Oven Liners: Placing a silicone oven liner or a sheet of aluminum foil on the bottom rack can catch drips and spills, protecting the oven floor from accumulating gunk.
- Regular Light Cleaning: After a few uses, give the oven a quick wipe-down with a damp cloth and a mild degreaser. This proactive approach prevents heavy buildup.
- Self-Cleaning Feature (if applicable): If your oven has a self-cleaning feature, use it periodically, but always follow the manufacturer’s guidelines carefully, as these cycles use very high temperatures.
By incorporating these simple habits, you can extend the life of your sparkling clean oven and enjoy cooking in a pristine environment.
Conclusion: Your Oven Cleaning Revolution Awaits
This plastic bag oven cleaning hack, championed by Smart Fox on YouTube, truly is a revelation for anyone who dreads the chore of oven cleaning. It’s a testament to the power of a simple, smart approach over brute force. By creating a sealed, concentrated environment, ordinary plastic bags transform your oven cleaner into a super-efficient grease-busting machine, delivering sparkling results with remarkably little effort. No more endless scrubbing, no more lingering chemical odors for days; just an effortlessly clean oven ready for your next culinary adventure.
I can personally attest to the effectiveness and sheer satisfaction this method brings. It’s become my go-to strategy, and I have no doubt it will become yours too. So, gather your materials, follow these straightforward steps, and prepare to witness the magic for yourself. For a visual demonstration, don’t forget to check out the original video tutorial from Smart Fox. Happy cleaning!