
Transform your kitchen from a chore-filled zone into a sparkling sanctuary with these expert cleaning tips and hacks. An efficient and effective cleaning routine not only saves you precious time and hard-earned money but also creates a more hygienic and enjoyable environment for cooking and living. This comprehensive guide, inspired by invaluable insights from the YouTube channel But First, Coffee, provides practical, easy-to-follow strategies for tackling common kitchen cleaning challenges. From revitalizing your stainless steel sink to mastering the art of cast iron care and optimizing your dishwasher’s performance, these methods are designed to simplify your life and elevate your kitchen’s cleanliness.
Often, we approach kitchen cleaning with outdated habits or common misconceptions that lead to less-than-stellar results. This article aims to correct those oversights, presenting streamlined techniques that guarantee a cleaner kitchen, pristine dishware, and well-maintained cooking tools. Get ready to discover how to banish stubborn grime, restore forgotten shine, and ensure every corner of your culinary space is hygienically clean and inviting.
Master Kitchen Cleaning: Essential Tips and Hacks
- Achieving a Spotless Stainless Steel Sink
- Effortless Cleaning for Heavily Soiled Pans
- Proper Maintenance for Cast-Iron Pans and Wooden Cutting Boards
- Optimizing Your Dishwasher for Maximum Cleanliness
- Simple Steps to Deep Clean Your Dishwasher
Detailed Directions for a Pristine Kitchen
Achieving a Spotless Stainless Steel Sink
Your stainless steel sink is one of the most frequently used items in your kitchen, constantly exposed to food particles, soap scum, and hard water minerals. Over time, this leads to unsightly crust and gunk buildup, diminishing its natural luster. While a quick wipe with dish soap might seem sufficient after washing dishes, it often leaves residue that dries and contributes to this problem. The secret to a truly sparkling stainless steel sink lies in a simple yet powerful ingredient: baking soda.
To begin, ensure your sink is empty and free of large food debris. Generously sprinkle a liberal amount of baking soda evenly across the entire surface of the sink – including the sides and drain areas. Baking soda is a mild abrasive and a natural deodorizer, making it ideal for cutting through grime without scratching the delicate surface of stainless steel. Next, dampen a soft sponge or cloth (avoid abrasive scrubbers that can scratch the finish) and gently begin scrubbing the baking soda into the sink in circular motions. These circular movements help to buff out water spots and minor scratches while ensuring thorough cleaning of all surfaces. Continue scrubbing until you’ve covered the entire sink, paying extra attention to any heavily soiled areas or visible grime.
Once you’re satisfied with the scrubbing, rinse the sink thoroughly with clean, warm water. You’ll notice the baking soda and loosened grime washing away, revealing a much cleaner surface. The crucial final step for preventing new water spots and restoring ultimate shine is to immediately wipe the sink dry with a clean, lint-free cloth or paper towel. This prevents mineral deposits from forming as the water evaporates. Following this routine regularly will keep your stainless steel sink gleaming and hygienic, making it a true centerpiece of your clean kitchen.
Effortless Cleaning for Heavily Soiled Pans
Dealing with a pan that has stubborn, caked-on food residue can be incredibly frustrating and often leads to prolonged soaking or aggressive scrubbing that can damage your cookware. Whether it’s burnt-on sauces, caramelized sugar, or dried-on eggs, a crusty pan doesn’t have to be a nightmare to clean. There’s an unexpectedly simple yet highly effective hack that utilizes a common laundry item: a dryer sheet.
Start by placing the crusty pan on a flat surface. Pour enough warm water into the pan to cover all the soiled areas. The warmth of the water will begin to loosen some of the grime. Then, take a single dryer sheet and submerge it in the water within the pan. The softening agents and surfactants present in dryer sheets are designed to break down tough stains and residues, making them surprisingly effective on cookware. Let the pan sit with the water and dryer sheet for approximately 30 minutes. For extremely stubborn or heavily burnt-on messes, you can extend this soaking time to an hour or even overnight.
After the soaking period, carefully pour out the water and remove the dryer sheet. You will be amazed to see how easily the gunk and grease can now be wiped away with minimal effort. The dryer sheet has worked its magic, loosening even the most tenacious residue. Once the bulk of the grime is removed, you can proceed to wash the pan as you normally would with dish soap and a sponge. This method saves you from tiresome scrubbing, protects your pans from damage, and makes the whole cleaning process significantly easier and faster. It’s a game-changer for tackling those challenging cookware messes.
Proper Maintenance for Cast-Iron Pans and Wooden Cutting Boards
Cast-iron pans and wooden cutting boards are revered kitchen tools known for their durability and performance, but they require specific care to maintain their integrity, hygiene, and longevity. Improper cleaning can lead to rust in cast iron or warping and bacterial growth in wood. This method offers a safe and effective way to clean and preserve both.
Caring for Cast-Iron Pans: Beyond Basic Washing
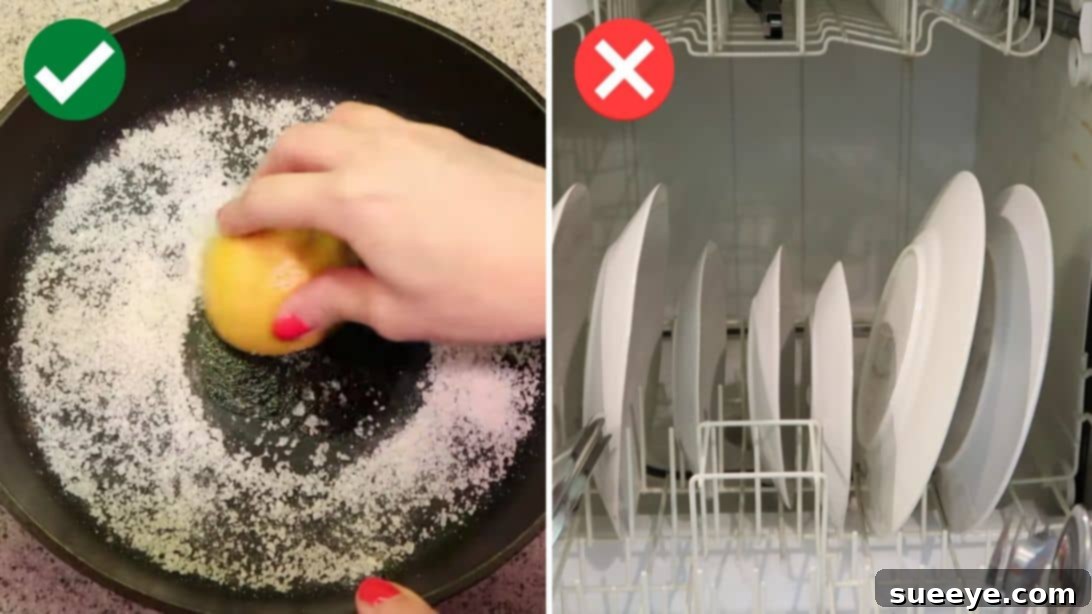
Cast iron’s unique properties mean it should never be washed with harsh detergents or soaked in water for extended periods, as this can strip its essential seasoning and lead to rust. The key to a well-maintained cast-iron pan is a gentle abrasive coupled with proper re-seasoning. Begin by sprinkling a generous amount of coarse sea salt all over the bottom and sides of your cast-iron pan. Sea salt acts as a natural, non-damaging abrasive that can scrub away stuck-on food without scratching the pan’s surface or stripping its seasoning prematurely. Next, cut a lemon or a potato in half. Use the cut side of either the lemon or potato as a scrubbing tool, rubbing it vigorously over the salt and the pan’s surface. The mild acidity from the lemon helps to cut through grease and deodorize, while the potato’s starch helps lift stubborn particles. After thorough scrubbing, rinse the pan well with warm water. Avoid using soap.
Once rinsed, it’s crucial to dry the pan completely to prevent rust. Pat it dry with a clean towel, then place it on a stovetop over low heat for a few minutes to ensure all moisture evaporates. Let it air dry completely. The next step is re-seasoning. Apply a thin, even coat of vegetable oil (such as canola, grapeseed, or flaxseed oil) to the entire inside surface of the pan using a paper towel. Ensure there’s no excess oil; it should look polished, not greasy. Then, place the pan upside down in a preheated oven at 350 degrees Fahrenheit (approximately 175 degrees Celsius). This allows any excess oil to drip off, preventing stickiness. To catch these drips and keep your oven clean, place a sheet of aluminum foil on the rack below the pan. Let the pan “bake” for about an hour. After an hour, turn off the oven and allow the pan to cool completely inside the oven. This seasoning process creates a natural, non-stick surface and protects against rust, ensuring your cast iron remains a cherished cooking companion for years.
Revitalizing Wooden Cutting Boards: Clean and Hygienic
Wooden cutting boards are prized for their knife-friendly surface and aesthetic appeal, but their porous nature can absorb odors and harbor bacteria. Regular, proper cleaning is essential. Similar to cast iron, the sea salt and lemon/potato method is incredibly effective and natural. Start by sprinkling a generous amount of coarse sea salt evenly across the surface of your wooden cutting board. As with cast iron, the salt provides a gentle abrasive action to scrub away food particles and stains without damaging the wood fibers. Take half a lemon or a potato and, using the cut side, rub it vigorously over the salt and the entire surface of the cutting board. The lemon’s acidity helps to sanitize and deodorize, neutralizing odors from garlic, onions, or other strong-smelling foods. The potato can also act as a gentle scrubber to lift grime.
After scrubbing, rinse the cutting board thoroughly with clean, warm water. Be careful not to soak the board, as excessive water exposure can lead to warping or cracking. Once rinsed, immediately wipe the cutting board dry with a clean cloth. Then, allow it to air dry completely by standing it on its side, ensuring air circulation on all surfaces. Once dry, you can further protect and condition your wooden board by occasionally rubbing in a food-grade mineral oil or beeswax conditioner. This helps to hydrate the wood, prevent cracking, and maintain its natural beauty and hygiene. With this routine, your wooden cutting boards will remain pristine, functional, and safe for food preparation.
Optimizing Your Dishwasher for Maximum Cleanliness
Many people assume that simply loading dishes into the dishwasher is enough, but there’s a specific technique that can significantly improve cleaning performance and ensure every item emerges spotless. The way you stack your dishes directly impacts how effectively the water jets and detergent reach their surfaces. Incorrect loading is one of the “5 ways you’re cleaning your kitchen wrong” that many homeowners unknowingly practice.
Instead of stacking dishes randomly or all facing the same direction, adopt the “facing toward the center” method. This means arranging plates, bowls, and even some cookware so that their soiled surfaces are angled towards the central spray arms of the dishwasher. By doing this, you ensure that the powerful jets of water and the cleaning agents have direct access to the dirtiest parts of your dishes, maximizing their impact during each wash cycle. For example, large plates should typically go on the bottom rack, facing the center or slightly angled for best coverage. Bowls and smaller plates can be placed on the top rack, again angled to catch the spray. Cups and glasses should be placed upside down on the top rack between tines, ensuring water can drain freely.
Additionally, avoid overcrowding the dishwasher. Leaving adequate space between items allows water and detergent to circulate freely around each dish. Scrape off large food particles before loading, but there’s generally no need to pre-rinse excessively, as modern dishwashers and detergents are designed to handle common food residues. Proper stacking ensures that every nook and cranny gets thoroughly cleaned, leading to more hygienic dishes and preventing the need for re-washing, saving both water and energy.
Simple Steps to Deep Clean Your Dishwasher
Ironically, the appliance designed to clean your dishes also needs regular cleaning itself. Over time, mineral deposits from hard water, food particles, grease, and detergent residue can build up inside your dishwasher, leading to decreased performance, unpleasant odors, and even less clean dishes. Descaling and deodorizing your dishwasher is a vital maintenance step that can be easily achieved with a common household item: white vinegar.
To deep clean and descale your dishwasher, first ensure it’s completely empty of dishes. Place a dishwasher-safe measuring cup filled with approximately 2 cups (or about 500ml) of white vinegar on the top rack. White vinegar is an excellent natural cleaner because of its acetic acid content, which effectively breaks down mineral deposits (limescale), dissolves grease, and neutralizes odors. Close the dishwasher door and run it on a normal hot water cycle. Do not add any dish soap or other cleaning agents during this cycle, as the vinegar is sufficient on its own and mixing with other chemicals is unnecessary. As the dishwasher runs, the vinegar will slowly mix with the hot water, circulating throughout the appliance and thoroughly cleaning its interior components, including the spray arms, filters, and walls.
After the cycle completes, you’ll find your dishwasher not only descaled and free of grime but also significantly fresher. One important consideration is the temporary scent: this method will indeed make your house smell distinctly of vinegar for a day or two. To mitigate this, consider running the cycle overnight or when you can open windows to ensure good ventilation. For even more effective odor elimination, you can follow up with a short cycle using a cup of baking soda sprinkled on the bottom of the empty dishwasher. This natural absorbent will help neutralize any lingering vinegar smell. Regular deep cleaning with vinegar, ideally once a month or every other month depending on your water hardness and usage, will extend the life of your dishwasher, maintain its efficiency, and ensure your dishes always come out sparkling clean.
Implementing these simple yet powerful cleaning tips and hacks will revolutionize your kitchen maintenance routine. By adopting more effective strategies for your stainless steel sink, crusty pans, precious cast iron, wooden cutting boards, and even your dishwasher, you’ll not only achieve a consistently cleaner and more hygienic kitchen but also save significant time and effort. These methods help preserve your valuable kitchen tools and appliances, extending their lifespan and ensuring they perform at their best. Say goodbye to endless scrubbing and hello to a kitchen that truly shines.
For more innovative home and kitchen tips, be sure to check out and subscribe to the But First, Coffee channel on YouTube. Happy cleaning!