
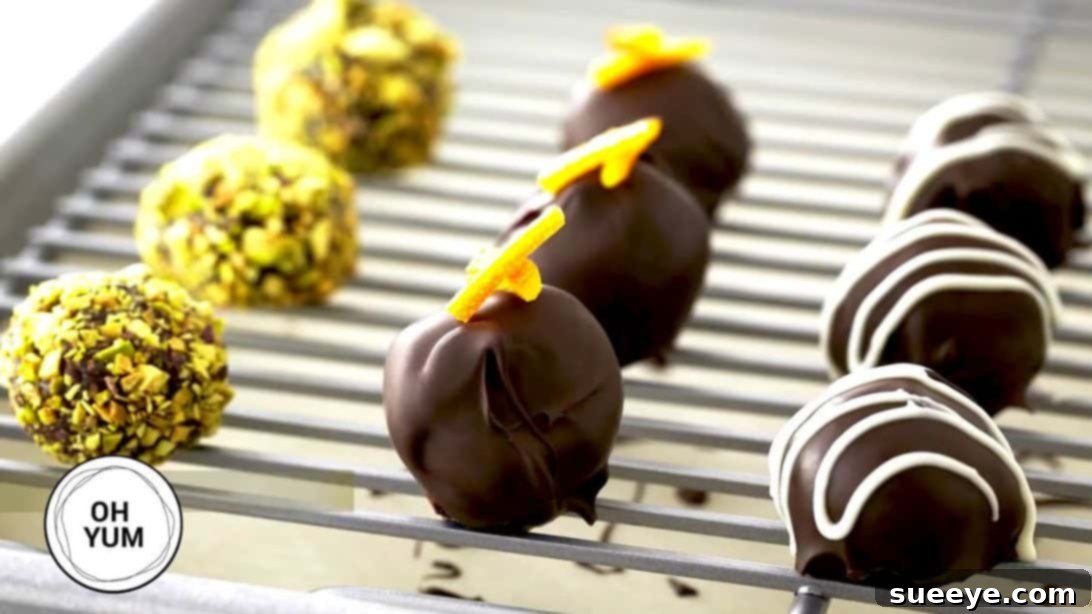
Desserts hold a special place at any gathering, often becoming the much-anticipated grand finale of an event. Among the vast array of sweet treats, chocolate truffles stand out as a quintessential indulgence. They are remarkably simple to prepare, yet possess an unparalleled elegance and versatility, making them perfect for celebrations, thoughtful gifts, or simply a delightful personal treat. From classic dark chocolate to adventurous liqueur-infused varieties, the possibilities for customization are virtually endless, allowing you to tailor them to any palate or occasion.
RELATED: Cream Cheese Chocolate Truffle Recipe
In this detailed guide, inspired by the expert insights and effortless techniques presented in a video tutorial and recipe by Oh Yum with Anna Olson on YouTube, you will learn to craft these exquisite truffles like a seasoned pastry chef. Anna Olson, renowned for her approachable yet sophisticated baking, demystifies the process, making it accessible even for beginners. With just a handful of readily available ingredients and a few straightforward steps, you’ll be able to create stunning, melt-in-your-mouth truffles that are guaranteed to impress your family and friends. Prepare to elevate your dessert game and become the talk of your next event with these divinely decadent chocolate masterpieces.
The Allure of Homemade Chocolate Truffles
There’s something inherently luxurious about chocolate truffles. Their smooth, rich texture and intense chocolate flavor make them an irresistible delicacy. While they might appear complicated, the truth is, making them at home is surprisingly simple and incredibly rewarding. Beyond their deliciousness, truffles offer an exciting canvas for creativity. You can experiment with various types of chocolate, infuse them with different flavors, and coat them in an array of tantalizing toppings. This guide will equip you with the knowledge to craft a batch of perfect truffles, transforming basic ingredients into a gourmet experience.
Essential Ingredients for Decadent Chocolate Truffles
The foundation of any great truffle is its ingredients. Quality matters significantly here, especially when it comes to chocolate. Using premium chocolate will directly translate into a richer, more profound flavor in your finished truffles. Here’s what you’ll need for the base recipe and various exciting flavor variations:
For Classic Plain Chocolate Truffles:
- 2 cups of heavy whipping cream: This is crucial for creating the luscious ganache. Its high-fat content ensures a rich, smooth, and stable base for your truffles.
- 16 ounces of bittersweet chocolate, finely chopped: Bittersweet chocolate provides a deep, intense chocolate flavor that isn’t overly sweet, balancing beautifully with the cream. Chopping it finely ensures it melts evenly and quickly when the hot cream is added, resulting in a perfectly smooth ganache.
For Pistachio Brandy Truffles:
- Brandy: A touch of brandy introduces a warm, sophisticated alcoholic note that pairs wonderfully with chocolate. Choose a good quality brandy for the best flavor.
- Chopped pistachios, for garnish: The vibrant green of pistachios adds a beautiful contrast and a delightful nutty crunch, enhancing both the visual appeal and texture.
For Zesty Orange Liqueur Truffles:
- Orange liqueur: An orange liqueur, such as Grand Marnier or Cointreau, infuses the truffles with a bright, citrusy aroma and flavor that perfectly complements rich chocolate.
- Candied orange peel, for garnish: These sweet and chewy pieces of orange peel provide an extra burst of citrus and an elegant finish.
For Elegant White and Dark Chocolate Swirl Truffles:
- White chocolate, melted: Used for dipping or drizzling, white chocolate offers a sweet, creamy counterpoint to the dark chocolate ganache, creating a beautiful visual and flavor contrast.
- Dark chocolate, melted: An additional layer of dark chocolate can be used for dipping or drizzling to enhance the chocolate intensity and create a sophisticated marbled effect.
How to Make Chocolate Truffles: A Step-by-Step Guide
Crafting perfect chocolate truffles is a rewarding process that relies on careful execution of a few simple steps. Follow this guide to achieve professional-quality results every time.
Step 1: The Art of Crafting the Perfect Ganache
The heart of any truffle is a perfectly emulsified ganache. Begin by gently heating the heavy whipping cream in a saucepan over medium heat. Watch it closely and remove it from the heat just as it begins to simmer around the edges – you don’t want a rolling boil. While the cream heats, ensure your bittersweet chocolate is finely chopped and placed in a heatproof bowl. Once the cream is ready, immediately pour the hot cream over the chopped chocolate. Resist the urge to stir right away; instead, let it sit undisturbed for a full minute. This crucial resting period allows the hot cream to gently melt the chocolate, ensuring a smooth, lump-free consistency.
After a minute, start stirring gently from the center of the bowl, gradually expanding your stirs outwards. Continue this motion until the chocolate is fully melted and beautifully smooth, glossy, and homogenous. This technique helps to emulsify the fat and water, preventing the ganache from breaking. Once your base ganache is complete, if you plan to make multiple flavors, divide it into smaller bowls. Now is the time to stir in your desired liqueurs or extracts for flavored truffles, ensuring they are thoroughly incorporated into each batch.
Step 2: Chilling and Expert Shaping of Truffle Balls
Once your ganache is flavored (if desired), cover the bowls with plastic wrap, ensuring the wrap touches the surface of the ganache to prevent a skin from forming. Place the ganache in the refrigerator and allow it to chill until it becomes firm enough to scoop and shape. This typically takes a few hours, or even overnight, depending on the consistency of your ganache. The key is to have a texture that is firm but still pliable.
When the ganache is properly set, prepare a baking tray by lining it with parchment paper; this will prevent the truffles from sticking. Using a small ice cream scoop, a melon baller, or even a teaspoon, scoop out uniform portions of the chilled ganache. For perfectly rounded truffles, quickly roll each scooped portion between your palms. Work efficiently, as the warmth of your hands can cause the ganache to soften. Place the shaped ganache balls onto the prepared baking tray. Uniform size is key for a professional presentation.
Step 3: The Elegant Finish – Coating and Garnishing
After shaping, it’s essential to chill your ganache balls again. Return the baking tray with the formed truffles to the refrigerator for at least 30 minutes, or until they are very firm. This second chilling step is crucial; it ensures the truffles hold their shape beautifully and makes them much easier to roll or dip without melting or deforming. Once thoroughly chilled and ready, it’s time for the fun part: rolling and garnishing!
Set up several shallow dishes with your chosen coatings. This could be high-quality cocoa powder, finely chopped nuts (like pistachios, almonds, or hazelnuts), shredded coconut, colorful sprinkles, or even finely crushed freeze-dried fruit. Gently roll each truffle ball in your desired coating until it is completely covered. For a truly professional finish, you might opt to dip some truffles in tempered melted white or dark chocolate, allowing the excess to drip off before placing them back on parchment paper. Garnish immediately if using additional toppings like candied orange peel or a drizzle of contrasting chocolate. Allow the finished truffles to rest at room temperature or back in the fridge until the coatings are set. Serve your homemade gourmet truffles and revel in the delight they bring!
Tips for Truffle Perfection: Achieving Professional Results
While making truffles is relatively simple, a few expert tips can elevate your homemade treats to professional standards:
- Quality Chocolate is Key: Invest in the best quality chocolate you can find. It makes a noticeable difference in flavor and texture. Look for couverture chocolate for dipping for the best shine and snap.
- Chop Finely: Ensure your chocolate is uniformly and finely chopped. This allows it to melt smoothly and evenly into the hot cream, preventing lumps in your ganache.
- Patience with Ganache: Don’t rush the ganache-making process. The resting time after pouring hot cream over chocolate is crucial for a stable emulsion. Stir gently and consistently from the center.
- Proper Chilling: Truffles need ample chilling time to set properly. This makes them easier to scoop, shape, and coat without becoming a sticky mess. If your kitchen is warm, you might need extra chilling time.
- Work Quickly: When shaping and coating, work swiftly. The heat from your hands can melt the ganache. If the ganache becomes too soft, pop it back into the fridge for a few minutes to firm up.
- Gloves for Shaping: Wearing food-safe gloves can help keep the truffles from sticking to your hands and also reduces heat transfer, making shaping easier and more hygienic.
- Experiment with Flavors: Don’t be afraid to try different liqueurs, extracts (like peppermint, almond, or vanilla bean paste), spices (cinnamon, chili powder), or even fruit purees in your ganache for unique flavor profiles.
- Diverse Coatings: Beyond cocoa, experiment with toasted coconut, finely crushed cookies, sprinkles, chopped dried fruit, or a mix of spices for a variety of textures and visual appeal.
- Storage: Store finished truffles in an airtight container in the refrigerator for up to two weeks, or in the freezer for up to a month. Bring them to room temperature for about 15-20 minutes before serving for the best flavor and texture.
Creative Variations and Serving Suggestions
The beauty of homemade truffles lies in their endless customizability. Once you master the basic ganache, the world of flavors and textures opens up:
- Spice It Up: Add a pinch of cayenne pepper for a Mexican hot chocolate truffle, or a dash of cardamom for an exotic twist.
- Coffee Infusion: Dissolve instant espresso powder in the hot cream before adding it to the chocolate for a rich mocha flavor.
- Nut Butters: Swirl in a spoonful of smooth peanut butter, almond butter, or hazelnut spread into a portion of ganache for a creamy, nutty delight.
- Fruity Zest: Incorporate finely grated lemon or lime zest into your ganache for a bright, refreshing counterpoint to the chocolate.
- Herbaceous Notes: Believe it or not, finely chopped fresh mint or basil can add an unexpected and delightful complexity to chocolate truffles.
- Gourmet Salt: A sprinkle of flaky sea salt over dark chocolate truffles enhances the chocolate’s depth and adds a sophisticated touch.
Truffles make magnificent edible gifts. Arrange an assortment in a decorative box, perhaps tied with a ribbon, for a truly impressive present. They are also perfect for dessert platters, afternoon tea, or as a small, luxurious treat after dinner. Enjoy the process of creating these small bites of heaven, and delight in the reactions of those who get to savor them!
*All images for this recipe are credited to Oh Yum with Anna Olson via YouTube. We highly recommend visiting her channel and subscribing for more incredible baking tutorials and recipes!
How To Make Chocolate Truffles Like A Pro!
With this comprehensive guide, creating exquisite chocolate truffles at home is no longer a daunting task but an enjoyable culinary adventure. By following Anna Olson’s straightforward methods and incorporating these professional tips, you’re now equipped to produce a batch of rich, velvety truffles that rival those from the finest patisseries. Whether you prefer the classic elegance of plain chocolate, the vibrant kick of orange liqueur, or the sophisticated warmth of brandy and pistachios, the power to customize and create truly unique treats is in your hands. So gather your ingredients, unleash your inner pastry chef, and prepare to delight everyone with your homemade masterpieces. Happy truffle making!