
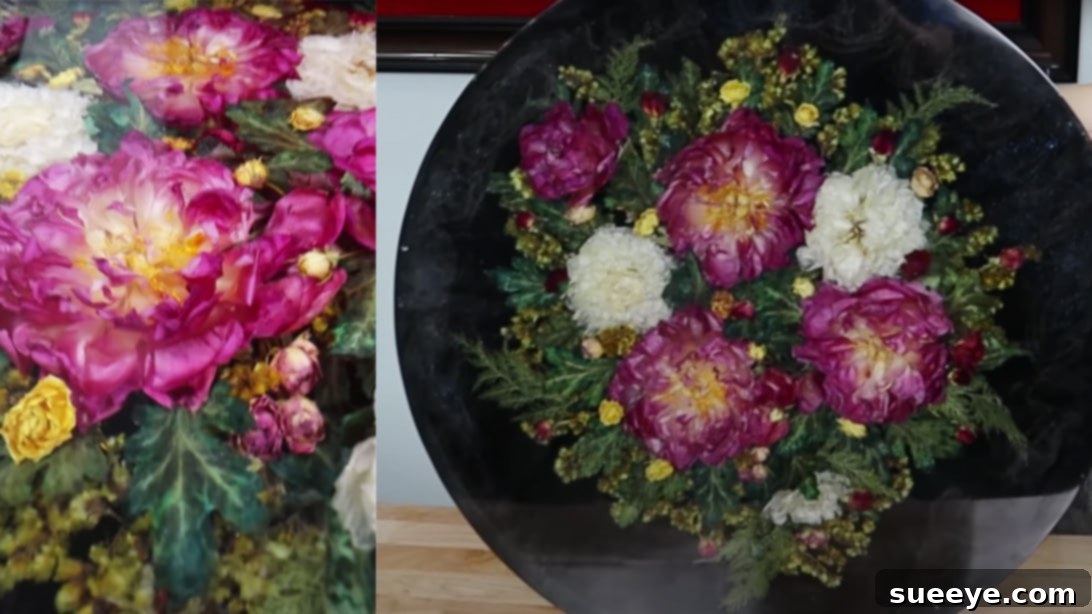
Crafting Timeless Beauty: A Comprehensive Guide to Dried Flower Epoxy Resin Art for Your Home
Imagine preserving the fleeting beauty of your most cherished flowers, transforming them into everlasting works of art that capture memories and add a unique touch to your living space. With the magic of epoxy resin, you can encapsulate the delicate elegance of dried blooms, creating stunning decorative pieces, and even functional items like tabletops. This comprehensive guide will walk you through every step of crafting your own dried flower epoxy resin art, ensuring a result that’s both beautiful and enduring. Whether it’s a bouquet from a special occasion, garden favorites, or simply flowers that hold sentimental value, this DIY project allows them to remain “in bloom” forever.
Why Preserve Flowers with Epoxy Resin?
Flower preservation is an ancient art, but combining it with modern epoxy resin technology elevates it to new heights. Here’s why this method is incredibly rewarding:
- Eternal Beauty: Unlike traditional drying methods that can leave flowers brittle and faded, resin encasement protects them from dust, moisture, and decay, maintaining their vibrant colors and intricate forms for decades.
- Sentimental Value: Weddings, anniversaries, graduations, or even a simple gift – flowers from special moments hold deep emotional significance. Resin art allows you to keep these memories alive, creating a tangible keepsake that tells a story.
- Unique Home Decor: From small decorative coasters and paperweights to impressive wall hangings and custom tabletops, resin art with dried flowers offers unparalleled opportunities for personalization. Each piece is truly one-of-a-kind, reflecting your personal style and the natural beauty of the blooms.
- Creative Expression: The process itself is a therapeutic and rewarding creative outlet. Experiment with different flower arrangements, colors, and resin layers to design something truly unique.
- Durability: Once cured, epoxy resin is incredibly durable, resistant to impact, scratches, and UV light (especially if you choose UV-resistant resin). This makes it perfect for functional items that will see daily use.
OHE, a renowned creative channel, shares a straightforward tutorial that demystifies this process, making it accessible even for beginners. Let’s delve into the materials and step-by-step directions to bring your floral visions to life.
Essential Materials for Your Dried Flower Resin Project
Before embarking on your crafting journey, gathering all necessary materials is crucial. High-quality supplies will ensure a smoother process and a more professional finish.
Materials List:
- Flowers of Your Choice: Opt for fresh, vibrant blooms. Roses, hydrangeas, daisies, and smaller filler flowers work wonderfully.
- Silica Gel (or Silica Sand): This desiccant is paramount for drying flowers while preserving their color and shape. Look for fine-grain silica gel for best results.
- Tweezers: Essential for delicate handling of dried flowers and arranging them precisely in resin.
- Airtight Containers with Lids: Various sizes will be needed for drying flowers in silica gel.
- Epoxy Resin Kit: Consists of two parts: resin and hardener. Choose a high-quality, clear casting resin, preferably with UV resistance.
- Black Paint (optional): For tinting your resin base, if desired, to create contrast or a specific aesthetic. Other resin pigments can also be used.
- Round Mold (or any desired shape): Silicone molds are ideal as they are flexible and allow for easy demolding. Ensure it’s suitable for resin casting. For a tabletop, you’d be using a larger form or frame.
- Hot Glue Gun and Glue Sticks: To temporarily secure flowers in place during the initial resin pour.
- Sand Buffer / Sandpaper (various grits): For smoothing and refining the cured resin surface. Start with coarser grits (e.g., 220, 400) and move to very fine ones (e.g., 1000, 2000, 3000).
- Cloth Buffing Wheels & Polishing Compound: For achieving a crystal-clear, high-gloss finish on your resin art.
- Plastic Mixing Containers & Stirring Sticks: Disposable cups and craft sticks are perfect for mixing resin components.
- Heat Gun or Blow Torch: To effectively remove air bubbles from the mixed resin.
- Protective Gear: Nitrile gloves, safety glasses, and a respirator mask (especially important for ventilation when working with resin).
- Clean Scissors or Floral Snips: For preparing your flowers.
- Misting Bottle with Water: For hydrating fresh flowers.
Step-by-Step Directions for Creating Your Dried Flower Epoxy Resin Masterpiece
This process is divided into several key phases, each requiring precision and patience for the best outcome.
Phase 1: Expert Flower Drying with Silica Gel
The success of your resin art heavily depends on properly dried flowers. Silica gel is the superior choice for preserving shape and color.
- Prepare Your Flowers: Start with fresh, healthy flowers. If they seem a bit wilted, place their stems in a jar of water and mist the blooms gently. Allow them to hydrate for a few hours. This ensures they are plump and vibrant before drying.
- Gentle Trimming: Using clean, sharp scissors or floral snips, carefully remove each flower bud from its main stem, leaving about an inch of stem for easier handling if desired, or removing it completely for a flat presentation. Clean tools are vital to prevent contamination, which can lead to premature rot or browning during the drying process. Handle the petals with extreme care to avoid bruising or tearing.
- Silica Gel Application: Choose an airtight container that is appropriately sized for your flowers, allowing them space without crushing. Pour a base layer of silica gel, about 1-2 inches deep, at the bottom of the container.
- Positioning the Flowers: Carefully place each flower onto the silica gel layer. For larger blooms, you might place them face down, while smaller, flatter flowers can be placed face up. Ensure the petals are not squished or distorted. Use tweezers for precise placement if needed.
- Covering the Flowers: Gently and slowly pour more silica gel over the flowers. The goal is to cover every single petal, getting into all the nooks and crannies. You can gently tap the container to help the silica gel settle around the petals. Continue until the flowers are completely submerged.
- Sealing and Waiting: Secure the lid tightly onto the container. This prevents moisture from the air re-entering and allows the silica gel to effectively absorb moisture from the flowers. Place the container in a cool, dry place. The drying time varies depending on the flower type, size, and humidity, typically ranging from a few days to a week. Delicate flowers might dry faster, while dense blooms like roses could take longer.
Phase 2: Preparing Your Workspace and Resin Mixture
Safety and proper mixing are paramount when working with epoxy resin.
- Safety First: Put on your gloves, safety glasses, and ensure you’re working in a well-ventilated area, preferably with a respirator mask. Lay down a protective sheet to cover your work surface.
- Careful Extraction: Once dry, carefully open the container. Using tweezers or a small spoon, gently remove the silica gel from around each flower. Take your time to avoid damaging the now delicate, preserved blooms. Gently brush off any remaining silica gel.
- Resin Preparation: In a clean plastic mixing cup, prepare your epoxy resin mixture according to the manufacturer’s instructions. This typically involves mixing specific ratios of resin (Part A) and hardener (Part B). Accurate measurement is crucial for proper curing – use precise measuring cups or a digital scale.
- Thorough Mixing: Stir the resin and hardener slowly and continuously for the recommended time (usually 3-5 minutes). Scrape the sides and bottom of the cup to ensure thorough incorporation. Slow stirring minimizes air bubbles.
- Coloring (Optional): If you desire a colored base, add a small amount of black paint (or other resin pigment) to your mixed resin. Mix thoroughly until the color is evenly dispersed. This can create a striking contrast that makes the dried flowers pop.
Phase 3: Arranging Your Floral Masterpiece in the Mold
This is where your creativity truly shines, as you design the layout of your preserved flowers.
- Initial Resin Pour: Pour a thin layer of your prepared resin mixture into your chosen round mold. This initial layer will form the base of your artwork and provide a sticky surface for arranging flowers. For a tabletop, this would be a foundational layer across the entire surface.
- De-bubbling the Base: Use a heat gun or blow torch to gently go over the surface of this first resin layer. The heat will cause any trapped air bubbles to rise and pop. Hold the heat source a few inches away and keep it moving to avoid scorching the resin.
- Planning Your Arrangement: Before placing anything, you might want to do a “dry run” by arranging your flowers on a piece of paper cut to the size of your mold. This helps visualize the final design.
- Securing the Flowers: Carefully place your dried flowers onto the thin resin layer. To prevent them from floating up when subsequent layers are poured, use small dabs of hot glue on the back of each flower and press them onto the partially cured (or slightly tacky) resin layer. Arrange them to form a cohesive design, perhaps a beautiful circle or a scattered, organic pattern. Let your creativity guide you!
- Adding Accents: This is an excellent time to incorporate other preserved elements like tiny leaves, smaller flowers, or even small decorative beads or glitter to enhance your design.
Phase 4: Layering and Curing for Depth and Durability
Building up layers of resin creates depth and ensures all elements are fully encased.
- First Encapsulation Layer: Mix another batch of resin. Gently pour this mixture over your arranged flowers. Aim to cover about three-quarters of the height of the arranged flowers. Be careful not to pour too quickly, which could disturb your arrangement.
- De-bubbling Each Layer: Immediately after pouring, use your heat gun or blow torch to remove any bubbles that have risen to the surface. Repeat this several times over the next 30-60 minutes as more bubbles may emerge.
- Adding More Elements (Optional): Once this layer has partially cured (it should be tacky but not liquid, usually a few hours), you can add another layer of dried leaves or smaller flowers if you wish to create more depth and visual interest within your piece.
- Final Resin Layers: Prepare additional batches of resin and pour them in layers until your flowers are completely submerged and the mold is filled to your desired height. For thicker projects like tabletops, multiple thin layers (e.g., 1/4 inch at a time) with full curing in between are recommended to prevent excessive heat generation, which can yellow or crack the resin.
- Final Cure: Allow your resin art to cure fully. This can take anywhere from 24 to 72 hours, depending on the resin type, temperature, and humidity. Avoid disturbing the piece during this time.
Phase 5: Finishing Touches: Polishing Your Resin Art
The final steps transform a raw resin piece into a professional, gleaming work of art.
- Demolding: Once the resin is completely cured and hard to the touch, carefully remove your artwork from the mold. Silicone molds are flexible, making this relatively easy. For rigid molds or larger tabletops, you might need to use specific techniques or tools to release the piece.
- Sanding and Shaping: If there are any rough edges, drips, or an uneven surface, you’ll need to sand your piece. Start with a coarser grit sandpaper (e.g., 220 or 400 grit) to remove imperfections. Progress to finer grits (e.g., 600, 800, 1000, 2000, 3000) for a smoother finish. Wet sanding (using water with your sandpaper) is highly recommended as it reduces dust and gives a smoother result. Always sand in a well-ventilated area and wear a dust mask.
- Buffing for Clarity: After sanding, the resin surface might appear cloudy. This is normal. Prepare your buffing wheel (attached to a rotary tool or bench grinder) and apply a small amount of specialized resin polishing compound.
- Polishing to a High Gloss: Gently buff the entire surface of your resin art with the cloth buffing wheel. Use light to moderate pressure and keep the piece moving to avoid overheating. This process will gradually remove the micro-scratches left by sanding, revealing a crystal-clear, high-gloss finish. Continue buffing until you achieve the desired shine.
Tips for Success and Common Pitfalls in Dried Flower Resin Art
Pro Tips for Stunning Results:
- Patience is Key: Rushing any step, especially drying flowers or curing resin, can lead to undesirable results.
- Work in Layers: For thicker pieces or those with many elements, pouring resin in multiple thin layers prevents excessive heat generation, reduces bubbles, and ensures a solid cure. Allow each layer to partially cure (become tacky) before pouring the next.
- Perfect Your Mix: Always measure resin and hardener accurately by volume or weight, according to manufacturer instructions. Improper ratios are the most common cause of sticky or uncured resin. Stir slowly and thoroughly to avoid incorporating air.
- Control Bubbles: A heat gun is your best friend for bubble removal. Pass it evenly over the resin surface immediately after pouring and again after a few minutes.
- Cleanliness is Next to Godliness: A dust-free workspace is crucial. Even tiny dust particles can settle on wet resin and mar the finish.
- Experiment with Flowers: Different flowers dry and react to resin differently. Experiment with less valuable blooms first. Some flowers might become translucent or change color slightly when encased.
- UV Protection: If your art will be exposed to sunlight, choose a UV-resistant resin to prevent yellowing over time.
Common Pitfalls and How to Avoid Them:
- Sticky or Uncured Resin: Almost always due to improper mixing ratios or insufficient stirring. Double-check measurements and stir thoroughly.
- Excessive Bubbles: Mixing too fast, pouring too quickly, or not de-bubbling adequately. Slow down, use a heat gun, and pour in thinner layers.
- Yellowing: Caused by UV exposure or using non-UV resistant resin. Use UV-stable resin and keep finished pieces out of direct sunlight.
- Flowers Turning Brown: Usually indicates the flowers were not completely dry before being encased in resin. Ensure thorough drying with silica gel.
- Dust and Debris: Work in a clean environment. Cover your curing piece with a box or dome to protect it from airborne particles.
Displaying and Caring for Your Dried Flower Resin Art
Once your beautiful dried flower epoxy resin art is complete, choosing the right spot to display it will enhance its charm. Whether it’s a stunning tabletop, a wall hanging, or a decorative accent piece, place your resin art on your favorite side of the house where it can be admired. Avoid prolonged direct sunlight, even with UV-resistant resin, to ensure its longevity.
To clean your resin art, simply wipe it with a soft, damp cloth. Avoid abrasive cleaners or harsh chemicals, as these can scratch or dull the resin surface.
Conclusion: Your Everlasting Floral Legacy
Crafting dried flower epoxy resin art is a deeply rewarding endeavor that allows you to capture fleeting beauty and transform it into a lasting legacy. From the delicate process of drying flowers with silica gel to the meticulous pouring and polishing of resin, each step contributes to creating a truly unique and personalized piece. By following this detailed guide, you’re not just making a decorative item; you’re preserving memories, expressing your creativity, and adding a touch of timeless elegance to your home.
So gather your materials, embrace the process, and get ready to create stunning dried flower resin art that will be cherished for years to come!