
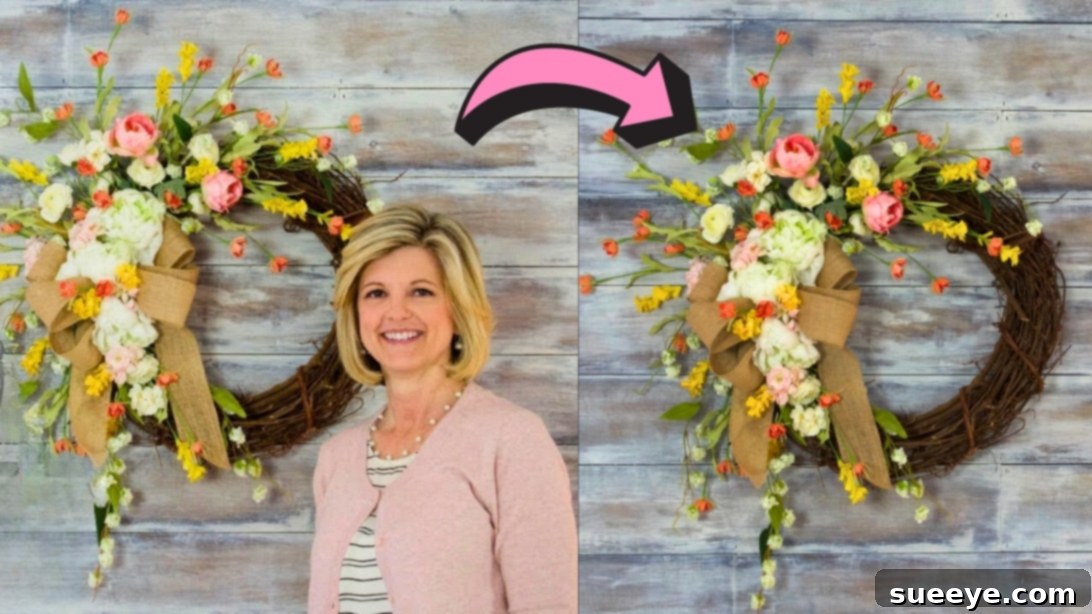
As the days grow longer and the world awakens with fresh colors, there’s no better way to celebrate the arrival of spring than by adorning your home with a beautiful, vibrant wreath. Imagine returning home each day to be greeted by a burst of colorful blooms, a warm and inviting welcome that instantly brightens your mood. This simple yet elegant DIY spring wreath project, inspired by the talented Jennifer Decorates on Youtube, offers a delightful opportunity to infuse your personal style into your seasonal decor. Forget generic store-bought options; with a few materials and less than 30 minutes, you can craft a unique masterpiece featuring a stunning array of flowers in various sizes and hues.
Creating your own spring wreath is more than just a craft; it’s an expression of joy and a wonderful way to personalize your living space. This tutorial makes it incredibly accessible, even for beginners, ensuring a rewarding experience and a stunning result. Get ready to transform your front door into a focal point of spring beauty!
Why Craft Your Own Spring Wreath?
Embracing a DIY approach to home decor, especially for seasonal items like a spring wreath, comes with a multitude of benefits. Firstly, it allows for unparalleled personalization. You get to handpick every flower, every color, and every texture, ensuring the final product perfectly matches your home’s aesthetic and your personal taste. Unlike mass-produced wreaths, your handmade creation will possess a unique charm and story.
Secondly, crafting is a wonderfully therapeutic activity. The process of selecting materials, arranging flowers, and bringing your vision to life can be incredibly relaxing and satisfying. It’s a chance to unwind, tap into your creativity, and enjoy a moment of mindful creation. Plus, seeing the beautiful outcome of your efforts provides a fantastic sense of accomplishment.
Finally, a DIY spring wreath is often a more cost-effective solution than purchasing a high-quality, pre-made floral arrangement. You can select artificial flowers that fit your budget while still achieving a luxurious and full appearance. It’s a smart way to elevate your spring home decor without breaking the bank, all while adding a touch of handmade elegance.
Materials You’ll Need:
To embark on this delightful crafting journey, gather the following items. Choosing high-quality artificial flowers will ensure your wreath looks vibrant and lasts for many seasons to come. Feel free to mix and match colors and flower types to suit your preference, but this list provides a beautiful starting point:
- Pink Tulips: Select a few stems with blooming heads to add height and a classic spring touch.
- Ranunculus: These delicate, multi-petaled flowers offer a sophisticated texture and come in various soft shades.
- Pink Hydrangea: Hydrangea clusters provide excellent volume and a lush base for other blooms.
- White Peony: Larger white peonies will serve as striking focal points due to their impressive size and elegant appearance.
- Small White Flowers: Think small filler flowers like baby’s breath or tiny daisies to add delicate accents and fill gaps.
- Small Yellow Flowers: A touch of yellow brings cheerful warmth and contrast to the pinks and whites.
- Small Orange Flowers: These will add an unexpected pop of vibrant color, enhancing the spring palette.
- Glue Gun and Glue Sticks: An essential tool for securely attaching your floral elements. Ensure you have plenty of glue sticks.
- Grapevine Wreath Base: A sturdy 18-inch or 24-inch grapevine wreath provides a natural and versatile foundation.
- Burlap Bow with Wire Edges: A rustic burlap bow adds texture and a charming, country-chic feel. The wire edges help it maintain its shape.
- Wire Cutter or Floral Snips: Crucial for trimming flower stems to the desired length.
Preparation and Design Tips Before You Begin:
Before you dive into gluing, take a moment to plan your design. Lay out all your flowers and the wreath base on a flat surface. This allows you to visualize the arrangement and decide where each type of flower will go. Consider creating a focal point with your larger blooms and using smaller flowers to fill in and add texture. Think about balance – you want an even distribution of color and volume around the wreath, even if you’re aiming for an asymmetrical design.
Safety is also paramount. When using a hot glue gun, always be cautious to avoid burns. Keep a heat-resistant mat handy and ensure children are supervised if they are helping. Having all your tools and materials within reach will make the crafting process smoother and more enjoyable.
Step-by-Step Guide to Your Easy DIY Spring Wreath:
Step 1: Secure Your Burlap Bow
Begin by positioning your burlap bow onto the top part of your grapevine wreath. This bow will act as a foundational element and often helps define the “top” of your wreath. Carefully thread the wire from the bow through the grapevine branches and tie it securely at the back of the wreath. To ensure the bow remains perfectly in place and withstands outdoor elements, you can add a small dab of hot glue to the knot at the back. This extra step provides stability and peace of mind, knowing your beautiful bow won’t shift.
Step 2: Establish Your Main Floral Elements with Peonies and Ranunculus
Next, take three of your large white peony flowers. Using your wire cutters, carefully clip the stems to a manageable length, leaving just enough to insert into the grapevine. Apply a generous amount of hot glue to the trimmed stems and securely attach these peonies around the center and sides of your burlap bow, allowing them to gently frame it. These substantial blooms will instantly create visual impact. Following this, take your ranunculus white flowers. For these, there’s no need to clip the stems; simply add a good amount of hot glue to the lower part of each stem. Insert three ranunculus onto the grapevine near the top, nestled among the peonies and bow. Add one more ranunculus near the bottom of the bow. Remember, the larger flowers should be positioned closer to your bow to draw the eye and establish the primary floral arrangement.
Step 3: Integrate Vibrant Orange Accents
Now it’s time to introduce some vibrant pops of color! Take your small orange flowers. Apply hot glue to the base of their stems. Instead of pushing the stems deep into the grapevine, gently insert them on top of or slightly around your smaller white flowers, particularly in the upper sections of the wreath. This layering technique adds depth and dimension. Repeat this process for the bottom section of your wreath, ensuring a balanced distribution of the cheerful orange hues. These smaller flowers are excellent for filling in any gaps and adding intricate detail.
Step 4: Weave in Cheerful Yellow Blooms
To further enhance the wreath’s sunny disposition, bring in your small yellow flowers. Apply a small bead of hot glue to the bottom of each stem. Artfully mix and mingle these yellow blooms with the orange flowers you just placed. This blending creates a harmonious and natural transition between colors, giving your wreath a more organic and professional appearance. Distribute them evenly on both the top and bottom sections, paying attention to the overall visual balance.
Step 5: Add Lush Hydrangeas and Elegant Tulips
Select two of your pink hydrangea flowers. Using your wire cutters, trim their stems to a length that allows them to be comfortably inserted into the wreath without protruding too much. Spread a generous amount of hot glue on the trimmed stem and carefully insert these hydrangeas between the small white flowers you’ve placed on the top section of the wreath. Their fullness will add a beautiful, lush texture. Next, take your elegant pink tulips. Apply glue to their stems and strategically add them to both the top and bottom sections of the wreath, allowing their graceful shapes to emerge among the other blooms. Tulips offer a distinct form that elevates the overall design.
Step 6: Final Touches with Small White Fillers
For the grand finale, take your remaining small white flowers. These are perfect for filling any remaining small gaps and adding a delicate, ethereal quality to your wreath. Apply glue to their stems and strategically insert them into both the top and bottom sections, tucking them in among the other flowers. These tiny blooms act as fantastic filler, tying all the elements together and giving your wreath a complete, professional, and abundant look. Step back and admire your work, making any final adjustments to flower placement to ensure a balanced and visually appealing arrangement.
Design Variations & Personalization
While this tutorial provides a fantastic foundation, the beauty of DIY lies in its endless possibilities for customization. Don’t hesitate to experiment with different types of artificial flowers. Imagine a wreath adorned with bright sunflowers and daisies for a rustic farmhouse look, or pastel lavender and eucalyptus for a more subdued, elegant aesthetic. You could also incorporate various embellishments like decorative ribbons, small bird nests, faux butterflies, or even tiny LED fairy lights for an enchanting evening glow. Changing the type of bow, from a burlap one to a satin or lace ribbon, can dramatically alter the wreath’s overall feel. Consider adding natural elements like dried lavender sprigs or small pinecones (for year-round appeal) if they complement your chosen floral scheme. The goal is to create a piece that truly reflects your unique style and enhances your home’s character.
Caring for Your Handcrafted Spring Wreath
One of the many advantages of using artificial flowers for your wreath is their incredible longevity and minimal maintenance. To keep your beautiful spring wreath looking fresh and vibrant season after season, a few simple care tips will suffice. Periodically, gently dust the flowers and leaves with a soft brush or a dry cloth to prevent dust buildup. If displayed outdoors, especially in areas exposed to direct sunlight or harsh weather, colors might fade slightly over time. To minimize this, consider applying a UV-protective spray designed for artificial plants. When the spring season concludes, store your wreath in a clean, dry container or a breathable wreath storage bag to protect it from dust and crushing. Proper storage ensures your handcrafted decor will be ready to greet next spring with renewed beauty.
Beyond the Front Door: Displaying Your Wreath
While the front door is a classic and welcoming spot for a spring wreath, don’t limit its potential! Your handmade masterpiece can bring cheer to various areas of your home. Consider hanging it above a mantelpiece in your living room, where it can serve as a stunning focal point. It can also brighten up a plain wall in your dining room or kitchen, adding a touch of nature indoors. For a unique display, hang it on a large mirror or even use it as a centerpiece for a festive spring table, perhaps with a tall candle nestled in the middle (just be mindful of fire safety with artificial flowers). This versatile decoration makes a thoughtful handmade gift for friends and family, too, sharing the joy of spring with those you love.
Celebrate Spring with Your Own Masterpiece
There you have it – a comprehensive guide to crafting an easy and utterly beautiful DIY spring wreath! This project is a fantastic way to embrace your creativity, add a personal touch to your home decor, and welcome the rejuvenating spirit of spring. With quality materials and these straightforward instructions, you’ll not only have a stunning front door decoration but also the immense satisfaction of knowing you created it with your own hands. So, gather your supplies, put on some cheerful music, and get ready to transform your entryway into a vibrant celebration of the season!