
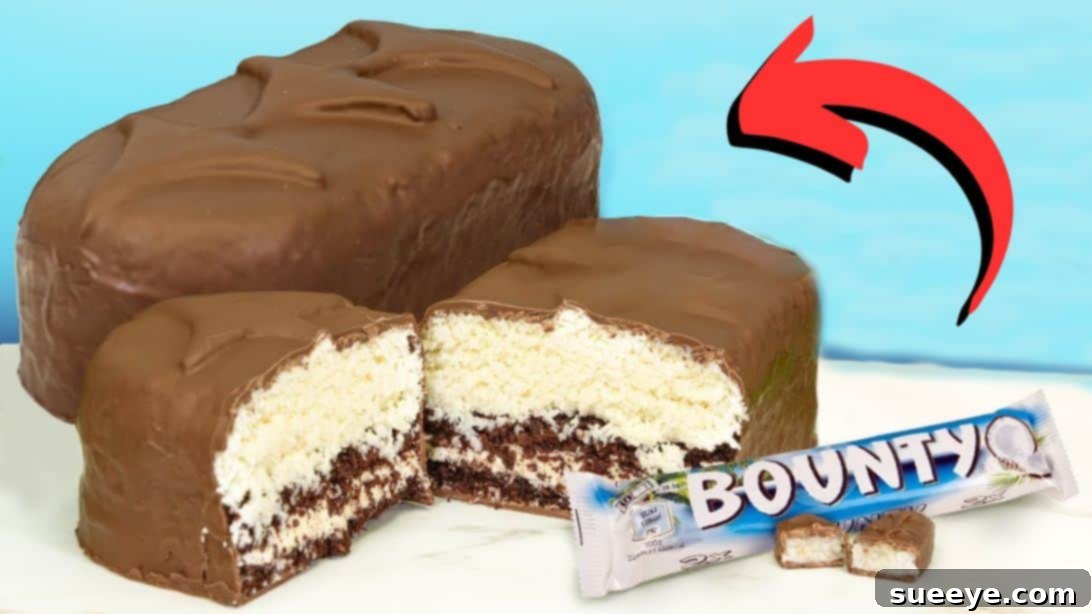
Indulge Your Cravings: How to Make an Epic Giant Bounty Bar Cake
For lovers of the classic Bounty bar, that irresistible combination of sweet, shredded coconut enrobed in rich milk chocolate, the experience is often too fleeting. We’ve all wished for just one more bite, a larger portion to truly savor that tropical escape. Imagine a Bounty bar so grand, so substantial, that it satisfies every craving and leaves you utterly content. That very dream became a delicious reality when I stumbled upon a brilliant video tutorial by How To Cake It on YouTube. This revelation was precisely what I had been searching for – a comprehensive guide to crafting a monumental, homemade version of my favorite chocolate-coconut treat.
The concept of transforming a beloved candy bar into a show-stopping cake immediately captivated me. The idea of a giant Bounty bar wasn’t just appealing; it promised an unparalleled dessert experience. Inspired, I decided to recreate this culinary marvel in my own kitchen, and the results were nothing short of spectacular. This isn’t just a cake; it’s an edible tribute, a celebration of coconut and chocolate harmony, scaled up to magnificent proportions. If you’re ready to elevate your dessert game and embark on a sweet adventure, join me as we delve into the detailed steps for creating your very own Giant Bounty Bar Cake – a dessert so satisfying, you might just find yourself making it a new staple!
Essential Ingredients for Your Giant Bounty Bar Cake
Crafting this incredible dessert requires a thoughtful selection of ingredients, ensuring each component contributes to the authentic Bounty bar flavor and texture, elevated to cake form. The beauty of this recipe lies in its balance of convenience and gourmet flair.
- 1 Premade Chocolate Cake: Opting for a good quality premade chocolate cake is a brilliant shortcut that saves significant time without compromising on flavor. Choose a dense, moist cake that can hold its shape well when cut and handled. A standard 9×13 inch rectangular cake is ideal for shaping.
- Coconut Simple Syrup: This crucial element infuses the cake layers with extra moisture and a subtle, tropical coconut essence. You can easily make this by simmering equal parts water and sugar with a splash of coconut extract or a few flakes of shredded coconut, then straining.
- Italian Meringue Buttercream: This particular buttercream is renowned for its silky-smooth texture, stability, and less sweet profile compared to American buttercream. Its delicate richness provides a perfect counterpoint to the intense coconut filling. The linked tutorial provides a fantastic guide to mastering this elegant frosting.
- Cream of Coconut: Not to be confused with coconut milk, cream of coconut is a sweetened, thicker product, often found in the cocktail mixer aisle. It’s vital for adding an intense coconut flavor and a luscious consistency to the buttercream, enhancing the overall tropical theme.
- 6 cups of Sweetened Shredded Coconut: This is the heart of your Bounty bar. Sweetened shredded coconut provides the classic texture and robust flavor that defines the candy. Ensure it’s fresh for the best results.
- 1½ cups of Condensed Milk: This acts as the binder and sweetener for your coconut filling, creating that distinctively chewy, rich core of a Bounty bar. It helps form a cohesive mixture that holds its shape.
- Chocolate Chips: A generous amount of good quality chocolate chips (milk chocolate or semi-sweet, depending on your preference) will be used to create the iconic chocolate shell. Choose a brand that melts smoothly for a perfect coating.
Recommended Equipment
Having the right tools at hand will make the baking and assembly process much smoother and more enjoyable, ensuring your giant Bounty bar cake turns out perfectly every time.
- Large Mixing Bowls
- Sharp Serrated Knife
- Measuring Cups and Spoons
- Rubber Spatula or Offset Spatula
- Parchment Paper or Silpat Mat
- Wire Rack
- Baking Sheet (to catch excess chocolate)
- Template for Bounty Bar Shape (cardboard or sturdy paper)
- Piping Bag and Star Tip (optional, for decorative frosting)
- Whisk or Electric Mixer (for buttercream)
Step-by-Step Guide to Crafting Your Giant Bounty Bar Cake
Transforming these simple ingredients into a confectionery masterpiece is an exciting process. Follow these detailed steps to build your magnificent Giant Bounty Bar Cake, layer by delicious layer.
Step 1: Prepare the Cake Base and Coconut-Infused Buttercream
The foundation of our giant Bounty bar is a perfectly prepared chocolate cake, imbued with moisture and flavor. Begin by ensuring your premade chocolate cake is completely cooled. Carefully trim off the domed top of the cake to create a perfectly flat, level surface. This precision is key for a stable and aesthetically pleasing final product. Next, you’ll need to create a template in the classic elongated oval shape of a Bounty bar. You can draw this freehand on a piece of cardboard or sturdy paper, or search online for a printable template. Place this template squarely on top of your trimmed cake and, using a sharp serrated knife, meticulously cut out the distinctive Bounty bar shape. Take your time with this step to ensure clean, precise edges.
Once you have your shaped cake, carefully slice it horizontally through the middle, creating two even cake layers. This will allow for multiple layers of delicious filling. Now, it’s time to generously moisten these cake layers with your homemade coconut simple syrup. Brush the syrup over both cut surfaces until the cake is noticeably moist but not soggy. This step is vital for preventing a dry cake and adding an extra layer of coconut flavor. Set these syrup-soaked layers aside to absorb the liquid while you prepare the frosting.
For the buttercream, prepare the Italian meringue buttercream according to your preferred recipe or the detailed instructions provided by How To Cake It. Once your Italian meringue buttercream is smooth and fluffy, incorporate the cream of coconut. Add it gradually, tasting as you go, to achieve your desired level of rich coconut flavor. Mix thoroughly until the cream of coconut is fully combined, resulting in a luscious, coconut-infused buttercream that will be both a binder and a flavor enhancer for your cake.
Step 2: Assemble the Layers and Craft the Signature Coconut Filling
With your cake layers and buttercream ready, it’s time to start building. Place one of your syrup-soaked cake layers onto your serving platter or a flat surface. Dollop a generous amount of your coconut Italian meringue buttercream onto this layer. Using an offset spatula, spread the buttercream evenly across the entire surface, ensuring it reaches the edges. This layer provides a beautiful, creamy texture and acts as an adhesive for the next cake layer. Carefully place the second cake layer on top, aligning it perfectly with the first, creating a stable, two-tier chocolate cake base.
Now, prepare the iconic coconut filling that truly transforms this cake into a giant Bounty bar. In a separate, large mixing bowl, combine the six cups of sweetened shredded coconut with the one and a half cups of condensed milk. Using your hands (which is often the most effective method for this mixture), thoroughly mix the ingredients until the coconut is fully coated and the mixture becomes cohesive and pliable. It should be sticky enough to hold its shape when pressed together. This meticulous mixing ensures every strand of coconut is infused with that sweet, milky goodness.
Carefully transfer this coconut mixture on top of your assembled cake layers. Begin to shape and press the coconut mixture down gently, forming the distinct domed or rounded top of a Bounty bar. Use your hands and an offset spatula to smooth the surface and sculpt the edges, aiming for a neat, elongated oval shape that mirrors the cake base. This step requires a bit of artistic flair and patience to achieve that authentic look. Once shaped, place the entire cake in the refrigerator. Allowing it to chill until the coconut filling is firm and set, which typically takes at least 1-2 hours, is crucial for easy handling during the final chocolate coating stage.
Step 3: The Chocolate Shell and Final Presentation
The chocolate coating is what truly brings our giant Bounty bar to life. Before you begin the chocolate work, you can pipe some of your leftover coconut buttercream (if you have any remaining) onto the top of the chilled coconut filling to imitate the signature wavy mark often found on a Bounty bar. This adds an extra touch of authenticity. Next, prepare your chocolate. Melt your chocolate chips using a double boiler method or in a microwave-safe bowl, heating in short intervals and stirring frequently until completely smooth and melted. Be careful not to overheat the chocolate, as this can cause it to seize.
Lay out a sheet of parchment paper or a Silpat mat on a flat surface. Pour a portion of the melted chocolate onto the mat and spread it out using an offset spatula to create a rectangle roughly the same size as your cake base. This will form the bottom layer of your chocolate shell. Carefully remove your chilled cake from the refrigerator and gently place it on top of this spread-out chocolate layer, ensuring it’s centered. Now, using your offset spatula, carefully spread the melted chocolate upward from the base, coating the sides of the cake. Work quickly and smoothly to achieve an even layer. Once the sides are coated, place the cake back into the refrigerator to allow this first layer of chocolate to set completely, ensuring a firm structure for the final pour.
Once the first chocolate layer is firm, remove the cake from the fridge. Place it on a wire rack, which should be positioned over a baking sheet or a large piece of parchment paper to catch any excess chocolate drips. Reheat your remaining melted chocolate if necessary, ensuring it’s smooth and pourable. Generously pour the remaining melted chocolate all over the top and sides of the cake, allowing it to cascade down and completely enrobe your giant Bounty bar. Use an offset spatula if needed to gently guide the chocolate and ensure full coverage. Allow any excess chocolate to drip off through the wire rack. Once fully coated, transfer the cake, still on the wire rack, back into the refrigerator one last time. This final chilling step allows the chocolate shell to set firmly and beautifully, creating that satisfying snap when cut. Once the chocolate is completely set, your magnificent Giant Bounty Bar Cake is ready to be admired, sliced, and devoured. Enjoy this truly epic dessert!
Tips for a Perfect Giant Bounty Bar Cake
To ensure your giant Bounty bar cake is as successful and delicious as possible, keep these expert tips in mind:
- Quality Ingredients Matter: While a premade cake is a convenient shortcut, ensure it’s a high-quality, moist cake. Use good quality chocolate chips that melt smoothly, as this will significantly impact the final shell.
- Don’t Rush the Chilling: Each chilling step is crucial. Rushing will lead to a messy assembly and a less stable cake. Allow ample time for the coconut filling and chocolate layers to set completely.
- Precision in Shaping: Take your time cutting the cake and shaping the coconut filling. A well-defined shape will make your giant Bounty bar look more authentic and professional.
- Proper Chocolate Melting: Melt chocolate gently. Overheating can cause it to seize and become grainy. Use a double boiler for even heat or microwave in short bursts, stirring frequently. If the chocolate is too thick, a tiny bit of coconut oil (not water) can help thin it slightly.
- Even Chocolate Coating: When pouring the final chocolate layer, ensure it’s smooth and flowing evenly. Tilting the wire rack gently can help distribute the chocolate.
- Clean Cuts: Once the cake is completely set, use a sharp knife that has been warmed slightly (by dipping in hot water and wiping dry) to make clean slices. This prevents the chocolate shell from cracking excessively.
Creative Variations and Customizations
While the classic Bounty bar flavor is irresistible, don’t hesitate to get creative and customize your giant cake:
- Chocolate Preference: Experiment with different types of chocolate for the coating. Use dark chocolate for a richer, more intense flavor, or white chocolate for a sweeter, creamier finish.
- Cake Flavor: Instead of a standard chocolate cake, try a devil’s food cake for extra richness, or even a vanilla cake for a delightful contrast.
- Nutty Additions: For an extra layer of texture and flavor, finely chop some almonds or hazelnuts and mix them into your coconut filling, or sprinkle them over the top of the chocolate coating before it sets.
- Extracts: A few drops of rum extract or almond extract can be added to the coconut simple syrup or the coconut filling for a subtle, gourmet twist.
- Mini Bounty Bites: Instead of one giant bar, cut the cake base into smaller rectangles and create individual, mini giant Bounty bars. Perfect for portion control or party treats!
Storage Instructions
To keep your Giant Bounty Bar Cake fresh and delicious:
- Refrigeration: Due to the fresh coconut and buttercream, the cake must be stored in the refrigerator. Place it in an airtight container to prevent it from drying out or absorbing other odors.
- Shelf Life: Properly stored, the cake will remain fresh for up to 3-5 days in the refrigerator.
- Serving Temperature: For the best flavor and texture, allow the cake to sit at room temperature for about 15-20 minutes before serving. This softens the chocolate slightly and enhances the flavors.
*All image credit belongs to How To Cake It via YouTube. Follow and subscribe to her channel for more incredible baking tutorials!
Conclusion: Your Ultimate Chocolate-Coconut Dream
Crafting this Giant Bounty Bar Cake is more than just baking; it’s an exhilarating journey into the heart of dessert perfection. From the moment you slice into the tender chocolate cake layers, through the assembly of that luscious, sweet coconut filling, and finally to the satisfying snap of the rich chocolate shell, every step is a testament to the joy of homemade treats. This recipe, inspired by the innovative creations of How To Cake It, transforms a beloved candy into a magnificent centerpiece, perfect for any celebration or simply for indulging your most profound chocolate-coconut cravings.
The satisfaction of presenting (and devouring!) a dessert of this scale and flavor is truly unmatched. It’s a project that is both fun and rewarding, yielding a confection that is moist, intensely coconutty, and perfectly balanced with chocolate – just like your favorite Bounty bar, but bigger and better. So, gather your ingredients, unleash your inner baker, and prepare to impress everyone with this epic creation. We encourage you to try this recipe, share your creations, and let us know how your giant Bounty bar cake turns out. Happy baking!