
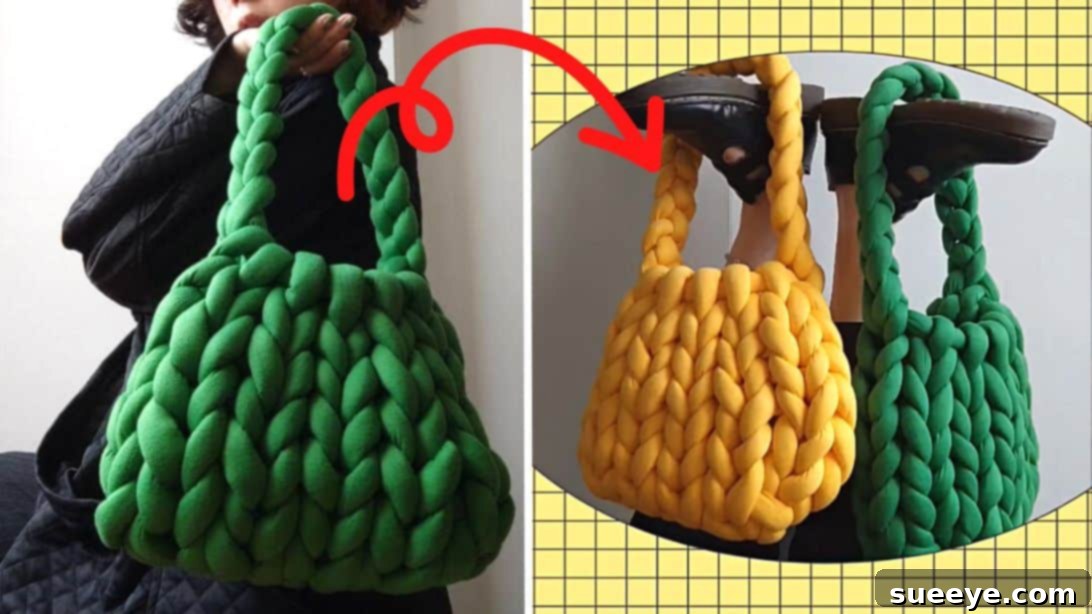
Create Your Own Stylish Hand-Knit Chunky Yarn Bag: An Easy DIY Tutorial
There’s a unique satisfaction in crafting something beautiful with your own hands, especially when it’s a stylish accessory that turns heads. The allure of chunky yarn bags has been growing, seen everywhere from high-end boutiques to everyday fashion statements. What if we told you that creating your very own elegant, hand-knitted chunky yarn bag is not only possible but also incredibly simple, requiring no traditional knitting needles?
Inspired by the stunning designs spotted in stores, we embarked on a quest to master the art of making these trendy bags ourselves. Fortunately, we discovered an exceptional and incredibly clear hand-knit chunky yarn bag tutorial by the talented day la hanh on YouTube. This particular design, with its contemporary flair and robust structure, surpassed our initial expectations and became our definitive guide. Get ready to dive into the rewarding world of finger knitting and craft a bag that reflects your personal style. Follow along with our detailed instructions, inspired by this brilliant tutorial!
Why Hand-Knit Your Own Chunky Yarn Bag?
Beyond the simple act of creation, making your own chunky yarn bag offers a multitude of benefits:
- Uniqueness and Personal Style: Mass-produced bags often lack character. A handmade bag allows you to choose your perfect color, size, and even add unique embellishments, ensuring your accessory is truly one-of-a-kind. It’s a statement piece that no one else will have.
- Cost-Effective Fashion: High-quality chunky knit bags can be surprisingly expensive in retail. By crafting your own, you can achieve a luxurious look for a fraction of the price, making designer-inspired fashion accessible on a budget.
- Therapeutic Crafting Experience: The rhythmic motion of finger knitting is incredibly calming and meditative. It’s a wonderful way to de-stress, unwind after a long day, and engage your creativity. Many find the process itself as enjoyable as the finished product.
- Sustainable Choice: Opting for durable, high-quality yarn and creating something by hand contributes to a more sustainable lifestyle. You’re investing in an item designed to last, reducing reliance on fast fashion and minimizing waste.
- A Perfect Gift: A hand-knitted chunky yarn bag makes an incredibly thoughtful and personalized gift for friends, family, or loved ones. It’s a gift that carries the warmth of your effort and care.
Materials You’ll Need for Your Chunky Yarn Bag
One of the beauties of this project is its simplicity, requiring minimal tools. The most crucial element is selecting the right yarn to achieve that coveted chunky texture and durability.
- Super Soft and Bulky Yarn: The tutorial specifically recommends a cotton tube yarn filled with polyester fiber. This type of yarn is ideal because it’s incredibly soft, lightweight, and maintains its structure well, making it perfect for finger knitting and creating a plush, comfortable bag. Look for “chunky,” “super bulky,” or even “jumbo” weight yarns. Consider the texture – some are smoother, others more textured. The color choice is entirely yours!
- Sharp Scissors: Essential for cleanly cutting your yarn at the beginning and end of the project, as well as for trimming any loose ends.
- Optional: A measuring tape (useful for ensuring consistent strap length or bag dimensions, though not strictly necessary for this free-form style) and a large-eye needle (for weaving in ends more securely if preferred over knotting).
Ensure you have enough yarn. The exact amount will depend on the desired size of your bag, but for a medium-sized tote, typically 2-3 large skeins (around 200-300 yards or meters) of super bulky yarn should suffice. Always check the yarn label for recommended hook/needle size equivalents to gauge its bulkiness.
Step-by-Step Instructions: Crafting Your Hand-Knit Chunky Yarn Bag
This tutorial utilizes a simple yet effective finger knitting technique, meaning you won’t need any traditional knitting needles. Your hands will be your primary tools, making this project accessible even for absolute beginners. Let’s get started!
Step 1: Creating Your Foundation – The Slip Knot
Every successful knitting project begins with a secure slip knot. This knot forms the initial loop from which all your subsequent stitches will grow.
- Take the short tail end of your yarn and hold it comfortably in your right hand.
- Lay this short tail across the longer working yarn, creating a crossover point. The short tail should be underneath the longer, continuous strand coming from the skein.
- Using your left hand, reach through the loop you’ve just formed with your two fingers (usually index and middle).
- Gently grasp the longer working yarn that passes over the short tail and pull it up through the loop.
- Pull both the working yarn and the short tail to tighten the loop around the piece of yarn you just pulled through. You’ll now have a single adjustable loop on your fingers. Ensure it’s snug but not overly tight, allowing your fingers to move freely. This is your first stitch.
Step 2: Building the Base Chain – Forming Your Initial Loops
Now that you have your foundational slip knot, you’ll begin to build the base chain of your bag. This chain determines the initial width of your bag’s base.
- Insert your two fingers (index and middle, or preferred fingers) into the loop created in Step 1.
- Reach down and take the longer working yarn (the strand coming from your yarn skein) with your inserted fingers.
- Pull this working yarn back up through the existing loop, creating a new loop.
- Carefully remove your fingers from the old loop, leaving the new loop on your fingers.
- Repeat this process. Each time you pull a new loop through the previous one, you are forming a “chain stitch.” Continue until you have a total of 6 visible chains (or loops), including the very first slip knot loop. Aim for consistent tension to ensure your base is even.
Step 3: Beginning the First Row – Establishing the Bag’s Width
With your base chain complete, it’s time to work back along it, establishing the initial width of your bag’s foundation.
- Hold your chain of 6 loops. Turn the very last loop (the one currently on your fingers) slightly to the left. This helps in identifying the “bumps” or “stitches” along the back of your chain.
- Insert your two fingers into the loop of the fifth chain (counting back from the loop currently on your fingers, or the second-to-last chain if counting from the first slip knot).
- Pull the working yarn through this fifth chain loop, creating a new loop on your fingers.
- Repeat this action for each of the remaining chains along the row, working your way back towards the starting slip knot. You will be pulling a new loop through each chain.
- Once you’ve worked through all the chains, you’ll have several loops on your fingers (or a collection of loops ready to be joined). At this point, carefully gather all these newly formed loops and make a secure knot at the base where they connect to the initial chain. This knot helps to stabilize the first row and gives a clean edge.
Step 4: Shaping the Base – Expanding the Foundation
This step builds upon the previous row, expanding the base of the bag to create its oval or rectangular shape.
- Locate the “holes” or spaces along the edge where you just pulled your loops through in Step 3. Specifically, focus on the *same hole* where the first loop of the previous step was made.
- Insert your two fingers into this first hole. Pull the working yarn through, creating another loop. This effectively adds an extra stitch at this point.
- Continue this process, inserting your fingers into each subsequent “hole” along the edge and pulling through another loop. The goal here is to create a second set of loops along this edge.
- After completing this row, you should now have 6 distinct “pairs” of loops or stitches across the base. These pairs form the foundation from which the sides of your bag will rise.
Step 5: Beginning the Sides – Working in Rounds
Now that the base is established, you’ll start working in rounds to build the body of your bag, creating its height.
- Take the working yarn and insert it into the pair of the *last* loop you created in Step 4. This ensures a seamless transition to the next row.
- Continue this pattern: insert your fingers into the next available “loop pair” or stitch along that row, grab the working yarn, and pull through to create a new loop.
- Work your way along one side of the bag base. Once you reach the end of that side, gently turn your work around.
- Repeat the same process on the other side of the bag’s base, working into each loop pair. This method allows you to build up the sides of the bag in a continuous, spiral fashion. Maintain an even tension to keep the stitches uniform and prevent the bag from becoming lopsided.
Step 6: Building Height – Rows 3 to 7
You’re now moving into the main body of the bag, consistently building its height. This repetitive process helps create a sturdy and even structure.
- For the third row, follow the same exact process as you did for the second row (Step 5). You will continuously work into the available loops, effectively creating a spiral.
- As you knit, you’ll begin to notice the formation of “V” shapes in your stitches. These “V”s are characteristic of knitting and indicate that your rows are forming correctly. Each “V” represents a stitch.
- It’s crucial to always work counterclockwise in a continuous spiral. This ensures the bag grows evenly upwards without creating a visible seam.
- Repeat this process for the 4th, 5th, 6th, and 7th rows. At the end of the 7th row, your bag should have a substantial height and a clear, defined structure. Feel free to add more rows if you desire a taller bag, ensuring you maintain the consistent counterclockwise motion.
Step 7: Finishing the Edge – Creating a Defined Border
A well-defined border not only makes the top edge of your bag look neat and professional but also adds strength and prevents stretching.
- Once you’ve reached your desired height (after the 7th row, or more if you chose), take the working yarn.
- Insert your fingers into *all* the loops around the top edge of the bag. Essentially, you’re gathering all the open stitches onto your hands.
- Carefully pull the working yarn through all these gathered loops simultaneously. This creates a strong, neat closing stitch.
- Gently but firmly pull the yarn to tighten this border. Be careful not to pull too hard and distort the shape, but just enough to create a firm, clean finish that secures all the top stitches. This technique creates a beautiful, braided-like edge.
Step 8: Crafting the Strap – Personalizing Your Carry Style
The strap is a crucial element for both function and style. You can customize its length to create a shoulder bag, a crossbody bag, or even shorter handles.
- Identify a starting point for your strap, typically imitating the “loops” or chain-like structure on the sides of your bag. You’ll essentially be creating a new chain directly off the bag.
- Using the same finger knitting technique you used for the base chain (Step 2), begin making new chains. Instead of pulling through a single loop, you might pull through two adjacent loops from the bag’s body to create a wider, sturdier strap base.
- Continue creating chains until the strap reaches your desired length. Hold the strap up to your body to test the length before proceeding. Remember that chunky yarn can have some give, so aim for a slightly shorter length if you prefer a tighter fit.
Step 9: Attaching the Strap – Secure and Seamless Connection
A well-attached strap is essential for the durability and usability of your bag. This step focuses on securely fastening the strap to the other side of your bag.
- Once your strap is the desired length, cut the working yarn, leaving a generous tail (at least 12-18 inches) for attachment.
- Locate the center point on the *other side* of your bag where the strap will be attached. This ensures the strap is centered and balanced.
- Take the end of the yarn tail you just cut. Insert this tail into the *last loop* of the handle you just created. Pull it through to secure that end of the strap.
- Now, to connect the strap to the bag, insert the yarn tail through a loop or stitch on the bag’s body at your chosen center point. Then, insert it back through a loop on the strap, effectively sewing the strap to the bag.
- Repeat this back-and-forth motion several times, weaving the yarn tail securely through the strap and the bag stitches. The goal is to create a strong, invisible join.
- Once the strap is firmly attached, carefully hide any remaining yarn tail by weaving it discreetly inside the existing chains or stitches of the bag and strap. This prevents unraveling and gives a professional finish.
Step 10: Final Touches – Trimming and Securing Ends
The final steps involve tidying up any loose ends to ensure your bag is durable, beautiful, and ready for use.
- If your chosen yarn type has a cotton tube filled with polyester fiber, you might find that the fiber occasionally pokes out or creates an uneven end. Carefully cut the cotton tube part of the yarn near where you finished, exposing the inner fiber slightly.
- Cut any excess seams or loose strands that might be visible.
- Take these trimmed ends and carefully hide them inside the nearest chains or stitches of your bag. Use your fingers or a large-eye needle to push them deep into the fabric.
- Once hidden, tie these hidden ends into small, secure knots (if possible, without making them visible from the outside) to prevent them from unraveling over time. This step is crucial for the longevity of your handmade bag.
Customization Ideas for Your Hand-Knit Bag
Your chunky yarn bag is a blank canvas! Here are some ideas to make it even more uniquely yours:
- Color Blocking: Use two or more different colored yarns for the base, body, or strap to create a striking color-blocked effect.
- Lining: For added durability and to prevent small items from slipping through the knit, consider sewing a fabric lining inside your bag. Choose a complementary or contrasting fabric.
- Embellishments: Attach decorative pins, brooches, or even make a small knitted tassel or pom-pom to hang from the strap.
- Closures: Add a magnetic snap, a button, or a zipper to the top of your bag for added security.
- Strap Variations: Experiment with different strap widths or even create two shorter handles for a classic tote look. You could also attach D-rings and use a removable, store-bought strap.
- Size Adjustments: Adjust the initial chain length (Step 2) to make a wider or narrower bag base. Add or subtract rows (Step 6) to control the height.
Caring for Your Handmade Chunky Yarn Bag
To ensure your beautiful hand-knit bag lasts for years to come, proper care is essential. Always refer to your specific yarn’s care instructions, but here are some general guidelines:
- Spot Cleaning: For minor spills or marks, gently spot clean with a damp cloth and mild soap. Avoid harsh scrubbing.
- Hand Washing: If a more thorough cleaning is needed, hand wash in cool water with a gentle detergent formulated for delicates. Submerge the bag, gently squeeze out excess water (do not wring or twist), and rinse thoroughly.
- Drying: Lay the bag flat on a clean towel to air dry. Reshape it as it dries to maintain its form. Avoid hanging, as the weight of the water can stretch the yarn. Keep it away from direct sunlight or heat sources.
- Storage: When not in use, store your bag stuffed with tissue paper or bubble wrap to help it retain its shape, especially if it’s a slouchy style. Keep it in a dust bag to protect it.
Conclusion: Your Unique Hand-Knitted Masterpiece Awaits!
And there you have it! With a little patience and the joy of creation, you’ve transformed simple yarn into a stunning, functional, and deeply personal accessory. This hand-knit chunky yarn bag isn’t just a carry-all; it’s a testament to your creativity and the therapeutic power of crafting.
Whether you’re making it for yourself or as a heartfelt gift, the process of finger knitting this bag is incredibly rewarding. Each loop and stitch carries a piece of your dedication, resulting in a unique item that perfectly complements any outfit. So grab your yarn, unleash your inner artisan, and proudly carry your new, handmade masterpiece!