
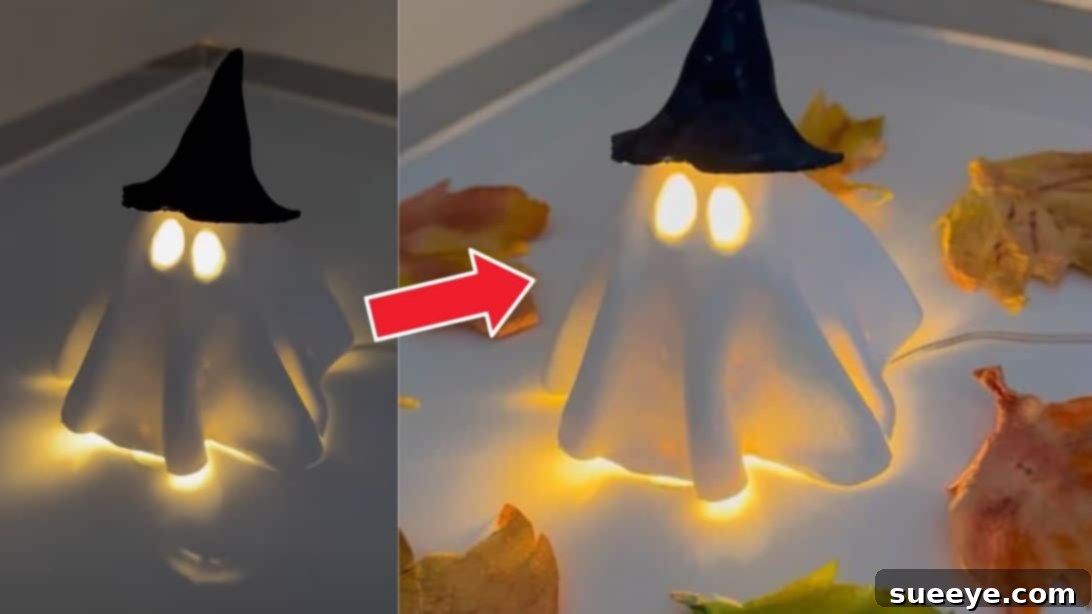
DIY Air Dry Clay Ghost Tea Light Holders: A Spooky & Easy Halloween Craft
As the air turns crisp and spooky season approaches, finding creative and engaging Halloween projects is always a delight. If you’re searching for a charming yet simple craft to make with your family, or a unique decoration to add a touch of spectral elegance to your home, look no further than these enchanting DIY clay ghost tea light holders! This delightful project, inspired by the creative brilliance found on Sonya Art 22‘s YouTube channel, is not only incredibly easy to make but also promises to cast a captivating glow, making it seem as if your little ghosts are magically floating.
These adorable spectral figures come to life when illuminated from within. The soft, flickering light passing through the clay creates an ethereal effect, giving the illusion that these charming spirits are gracefully hovering. It’s a truly magical addition to any Halloween setup, transforming simple materials into something truly memorable.
RELATED: Cute Mini Sherpa Ghosts DIY
Why Choose Air Dry Clay for Your Halloween Ghosts?
The beauty of this clay ghost decor lies in its simplicity and accessibility. It utilizes air dry clay, a fantastic medium that eliminates the need for a kiln or any complex firing processes. You can easily find air dry clay at most craft stores, making this project convenient and budget-friendly. Unlike traditional pottery clay, air dry clay hardens simply by being exposed to air, making it an ideal choice for crafters of all skill levels, especially those working with children.
Working with air dry clay is wonderfully forgiving. It’s pliable, easy to mold, and smooths out beautifully. This means you have ample opportunity to infuse your personal touch into each ghost. Imagine crafting a ghost with a whimsical wizard hat, adding tiny accessories like a miniature broomstick or a candy bucket, or even painting it in a vibrant array of Halloween hues beyond the traditional white. The creative possibilities are endless, allowing each ghost to develop its own unique personality.
Here’s another project you might want to try: Last Minute Halloween Candle Decor On a Budget
Materials for Your Easy Clay Ghost Tea Light Holders
Gathering your materials is the first exciting step in bringing your clay ghosts to life. The list is straightforward and most items are likely already in your craft stash or easily obtainable:
- Air Dry Clay: The star of our project! Choose a good quality air dry clay that is easy to manipulate and dries to a strong finish. White or natural clay is perfect as a base for painting.
- Aluminum Foil: Essential for forming the internal structure of your ghost, providing support while the clay dries.
- Stencil Cutter or Craft Knife: For precisely cutting out the ghost’s eyes and any other intricate details. A sharp pencil tip can also work in a pinch for small details.
- Fine-Grit Sandpaper: To smooth out any rough edges or imperfections after the clay has dried, giving your ghosts a polished look.
- Small Brush: For applying paint to your ghost’s hat and any other decorative touches.
- Acrylic Paints: Black is traditional for the hat, but feel free to experiment with other colors like purple, orange, or even metallic shades for a unique twist.
- Tea Light or Battery-Operated Fairy Lights: The magical element! LED tea lights are highly recommended for safety, especially when crafting with children, as they produce no heat. Fairy lights offer a more diffused glow.
- Pen or Rolling Pin: To flatten the clay evenly. A pen is also handy for shaping and detailing.
- Working Surface: A non-stick mat, parchment paper, or even a clean tabletop will work.
- Damp Cloth: To keep your hands and tools clean, and to smooth clay imperfections.
How to Make Your DIY Clay Ghost Tea Light Holders: Step-by-Step Guide
Let’s dive into the fun part! Follow these simple steps to craft your very own charming clay ghosts.
Step 1: Preparing Your Clay Base
Begin by taking a generous piece of air dry clay. Knead it slightly between your hands to make it more pliable and remove any air bubbles. Then, roll it into a perfectly smooth ball. Place this clay ball on your working surface and use a pen or a small rolling pin to flatten it. Aim for an even thickness of about 1/4 to 1/8 inch (0.6 to 0.3 cm). Don’t worry about achieving a perfect circle; an organic, slightly irregular shape will lend itself beautifully to the flowing form of a ghost.
Step 2: Crafting the Foil Cone
Next, take a piece of aluminum foil and crumple it gently, then shape it into a stable cone. This cone will serve as the internal structure, providing support for your clay ghost as it dries and ensuring it maintains its spectral form. Make sure the cone is sturdy enough to stand on its own and is proportionate to the size of your flattened clay piece. You can experiment with different cone heights and widths to create a variety of ghost sizes for a charming ghostly family.
Step 3: Shaping Your Ghostly Form and Eyes
Carefully drape the flattened clay over your aluminum foil cone. Gently press and smooth the clay around the cone, allowing the edges to fall naturally, creating flowing drapes and folds that mimic a spectral robe. Mold the clay to ensure it can stand stably on its own base, even without the foil inside. Once satisfied with the shape, use your stencil cutter or craft knife to carefully cut out two eyes for your ghost. You can make them simple circles, oval, or even triangular for a more mischievous look. Ensure the openings are clean so light can pass through easily.
Step 4: Adding the Hat and Initial Drying
Now for the iconic hat! Take a small piece of clay and roll it into a cone shape, then gently bend the tip to create a pointed hat, much like a witch’s or wizard’s hat. Ensure it’s sized appropriately to fit snugly on the head of your ghost. Carefully place the hat on top of the ghost’s head, pressing gently to secure it. If desired, you can add small details to the hat, like a tiny brim or a buckle. Once assembled, place your clay creations in a well-ventilated area and let them dry completely. This is a crucial step; refer to your air dry clay package instructions for the recommended drying time, which can range from 24 to 72 hours, depending on thickness and humidity. Patience here will prevent cracks and ensure durability.
Step 5: Refinement and Preparation for Painting
Once your clay ghost and hat are thoroughly dry and hard, it’s time for some refinement. Carefully remove the aluminum foil from inside the ghost. Use fine-grit sandpaper to gently sand any rough spots, sharp edges, or minor imperfections on the clay surfaces. This step creates a smooth, professional finish. After sanding, use a clean, dry brush or a damp cloth to meticulously remove all dust particles from your ghost. This ensures that your paint will adhere smoothly and evenly.
Step 6: Painting the Hat
With your ghost now smooth and clean, it’s time to add a splash of color. Using your brush and black acrylic paint, carefully paint the ghost’s hat. Apply thin, even coats to avoid drips and ensure full coverage. If you prefer, you could opt for other colors like deep purple, forest green, or even a sparkly silver for a more magical effect. Allow the paint to dry completely before moving on to the final step. Depending on the paint and humidity, this could take an hour or two.
Step 7: The Grand Illumination!
The moment of truth! Once your ghost and hat are fully dry, simply insert a battery-operated tea light or a string of small fairy lights into the base of your clay ghost. Arrange the lights so they illuminate the interior evenly, allowing the light to glow through the eyes and the base, creating that enchanting floating effect. And just like that, your DIY clay ghost tea light holder is complete and ready to cast its spooky yet adorable glow!
Customization Ideas to Make Your Ghosts Unique
While the basic ghost is charming on its own, don’t hesitate to unleash your creativity! Here are some ideas to personalize your clay ghosts:
- Hat Variations: Instead of a witch’s hat, try a mini wizard’s hat, a party hat, a small crown, or even a tiny top hat.
- Facial Expressions: Experiment with different eye shapes – angry brows, sleepy eyes, or even tiny ‘O’ mouths for a classic ghost scream.
- Accessories: Add tiny clay embellishments like a bow tie, a scarf, a pair of glasses, or even a mini pumpkin in their “hands” (if you’ve shaped them to have little arms).
- Paint & Texture: Consider painting subtle shading on the ghost’s body, adding glitter for a sparkling effect, or using glow-in-the-dark paint for an extra spooky surprise after dark. You can also press textures into the clay before drying, like lace or fabric, for intricate patterns.
- Grouping & Scenes: Create a family of ghosts in varying sizes and poses. Arrange them on a spooky mantelpiece, a Halloween-themed tiered tray, or as part of a miniature haunted house scene.
Displaying Your DIY Clay Ghosts for Halloween
Once your adorable clay ghosts are finished, it’s time to find the perfect spot for them! These tea light holders are versatile and can enhance your Halloween decor in numerous ways:
- Windowsills: Place them on windowsills to greet trick-or-treaters and passersby with a gentle, spooky glow.
- Mantelpieces: Arrange a cluster of ghosts on your fireplace mantel, perhaps alongside other seasonal decorations like pumpkins, spiders, or dried leaves.
- Dining Table Centerpiece: Create a captivating Halloween dinner centerpiece by grouping several ghosts with varying hat colors and sizes.
- Outdoor (Covered) Spaces: If protected from rain, they can add a welcoming touch to a covered porch or patio area.
- Kids’ Rooms: These friendly ghosts make excellent nightlights or decorative accents in a child’s bedroom during the Halloween season.
- Party Favors: Craft a few extra to give as unique and handmade party favors for your Halloween gathering.
Conclusion: Your Charming Halloween Creation
Making these DIY air dry clay ghost tea light holders is more than just a craft project; it’s an opportunity to create cherished memories, especially when made with children. It’s an easy, affordable, and incredibly rewarding way to add a unique, handmade touch to your Halloween decor. The magical glow these little ghosts emit will undoubtedly bring a sense of wonder and warmth to your home during the spooky season. So grab your clay, gather your loved ones, and embark on this delightful crafting adventure. Happy crafting, and may your Halloween be filled with joy, creativity, and plenty of friendly ghosts!