
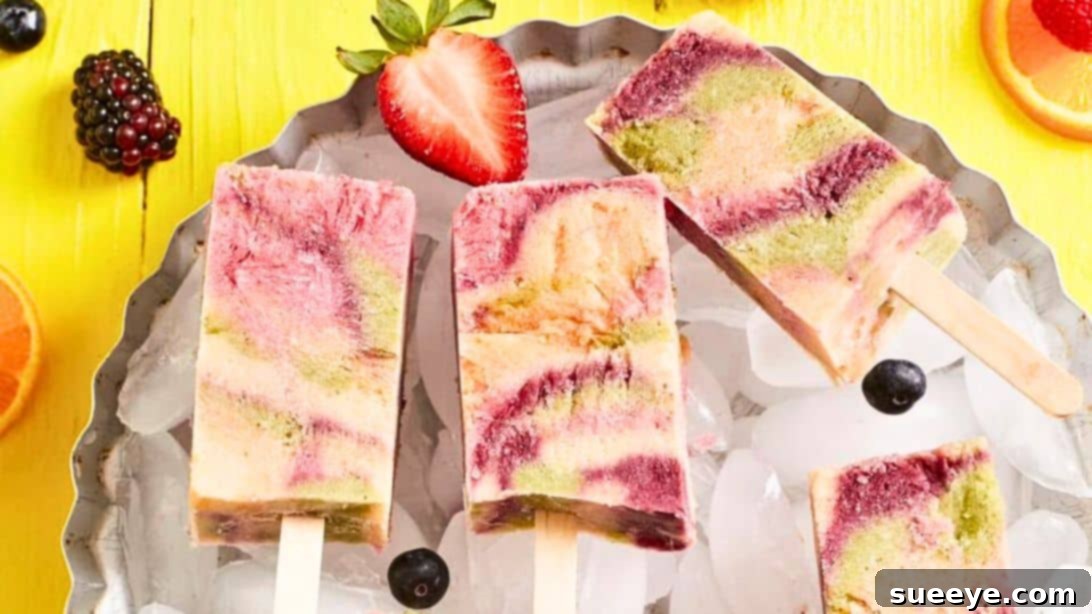
Unleash Your Inner Artist: The Ultimate Vibrant Tie-Dye Popsicles Recipe
Searching for the ultimate summer treat that’s as delightful to look at as it is to eat? Look no further! This incredible tie-dye popsicle recipe, inspired by the culinary genius of Bigger Bolder Baking with Gemma Stafford, promises to be the highlight of your warm-weather days. Imagine a kaleidoscope of flavors and colors, perfectly chilled and incredibly refreshing. These homemade popsicles are not just sweet, creamy, and wonderfully cold; they’re a burst of healthy goodness that will captivate everyone, especially the little ones. Forget artificial flavors and colors – this recipe uses real fruit to create a naturally vibrant and absolutely delicious treat.
There’s something uniquely satisfying about crafting your own frozen delights. These tie-dye popsicles take the concept of a simple refreshment to an entirely new level. They’re not just a snack; they’re an experience, a playful fusion of art and flavor that truly embodies the spirit of summer fun. Dive into this guide and discover how easy it is to bring this colorful magic to your kitchen.
RELATED: Craving more frozen treats? Try this 3-Ingredient Chocolate Ice Cream Recipe!
Why These Tie-Dye Popsicles Are Your Perfect Summer Companion
What makes these tie-dye popsicles stand out? It’s their unique combination of aesthetic appeal, health benefits, and sheer deliciousness. Featuring five distinct colors – yellow, orange, red, purple, and green – each layer brings its own delightful flavor profile. This means every bite offers a new taste adventure, from tangy berries to sweet tropical fruits. Beyond their vibrant appearance, these popsicles are a healthier alternative to store-bought options, packed with natural fruit goodness and sweetened with just a touch of honey.
The beauty of this recipe also lies in its simplicity. You don’t need fancy equipment like an ice cream maker or specialized popsicle molds. All you really need are a trusty blender and a standard loaf pan. This accessibility makes it a fantastic project for home cooks of all skill levels, and a particularly fun activity to do with kids. Imagine the joy of creating something so beautiful and tasty together!
Looking for another fantastic popsicle idea? Check out this Easy Tropical Sunrise Rum Popsicles Recipe for an adult-friendly twist!
The Colorful Palette of Ingredients for Your Tie-Dye Masterpiece
The secret to these popsicles’ incredible flavor and creamy texture lies in a thoughtful combination of frozen fruits, plain yogurt, and a hint of natural sweetness. Each color layer is a carefully curated blend designed to deliver a unique taste sensation, making every bite a delightful surprise. Using frozen fruits is key here, as it contributes to the thick, milkshake-like consistency required for layering and also ensures the popsicles freeze solid without becoming too icy.
Essential Tie-Dye Popsicle Ingredients
Yellow Mixture: Tropical Sunshine Blend
- Frozen Banana: The backbone of creaminess for all layers, offering a natural sweetness and smooth texture.
- Frozen Pineapple: Adds a bright, tangy tropical flavor and a lovely yellow hue.
- Plain Yogurt: Contributes to the creamy consistency and a subtle tang that balances the fruit’s sweetness.
- Honey: A natural sweetener that enhances the fruit flavors without being overpowering.
This sunny yellow blend evokes images of sandy beaches and clear skies, a perfect start to your flavor journey.
Orange Mixture: Zesty Citrus Burst
- Frozen Banana: Maintains the smooth, creamy base.
- Plain Yogurt: Adds to the richness and creaminess.
- Frozen Peaches: Provides a soft, sweet, and slightly floral note.
- Small Orange (peeled and pith removed): Infuses a fresh, zesty citrus punch and vibrant orange color.
- Frozen Mango: Delivers an intense tropical sweetness and enhances the orange color.
- Honey: Balances the tartness of the orange and enhances overall sweetness.
A burst of sunshine in every bite, this orange layer is both invigorating and deliciously sweet.
Red Mixture: Berry Blast Delight
- Frozen Banana: Ensures the characteristic creamy texture.
- Plain Yogurt: Keeps the mixture smooth and adds a slight tang.
- Frozen Raspberries: Offers a tart, intense berry flavor and a beautiful deep red.
- Frozen Strawberries: Contributes a classic sweet berry taste and brightens the red color.
- Honey: Sweetens the tart berries, creating a harmonious flavor.
A vibrant red layer that’s bursting with the classic taste of summer berries, perfect for a tangy-sweet kick.
Purple Mixture: Rich Berry Medley
- Frozen Banana: The essential ingredient for a rich, smooth base.
- Frozen Blueberries: Imparts a subtly sweet and slightly tart flavor, yielding a gorgeous purple hue.
- Frozen Blackberries: Adds a deeper berry note and contributes to the intense purple color.
- Plain Yogurt: For that luxurious creamy consistency.
- Honey: To sweeten the berries and enhance their natural flavors.
This mystical purple layer is a delightful blend of dark berries, offering a sophisticated and slightly sweet flavor.
Green Mixture: Refreshing Garden Fresh
- Frozen Banana: Provides the necessary creaminess and sweetness.
- Frozen Spinach: The secret ingredient for a natural, vibrant green color! Don’t worry, you won’t taste it; it’s expertly masked by the other fruits.
- Frozen Pineapple: Adds sweetness and helps to completely disguise the spinach flavor.
- Plain Yogurt: Ensures a smooth, creamy finish.
A surprising yet delicious green layer, packed with hidden nutrients and a fresh, tropical taste.
Note: You will also need a supply of standard popsicle sticks to complete your colorful creations.
Crafting Your Masterpiece: Step-by-Step Tie-Dye Popsicle Guide
Creating these beautiful tie-dye popsicles is an enjoyable process that yields stunning results. Follow these detailed steps to ensure each layer is perfectly blended and your final popsicles are a work of art.
Step 1: Prepare Your Vibrant Color Mixtures
Begin by gathering all the ingredients for your yellow mixture. Place the frozen banana, frozen pineapple, plain yogurt, and honey into a high-speed blender or food processor. Blend until the mixture is completely smooth and creamy, resembling a thick milkshake or soft-serve ice cream. The consistency is crucial here; it should be thick enough to hold its shape for layering, but still pourable. Once blended, transfer this sunny yellow mixture into a separate bowl. To ensure it stays firm while you prepare the other colors, pop the bowl into the freezer temporarily. Remember to thoroughly rinse your blender or food processor after each color blend. This prevents colors from mixing prematurely and ensures each layer maintains its distinct hue. Repeat this process for the orange, red, purple, and green mixtures, transferring each completed color into its own separate bowl and briefly chilling them.
Step 2: Line Your Loaf Pan for Easy Release
The key to easy removal and those perfectly shaped popsicles without a mold is proper lining. Take a standard 9 x 5 inch loaf pan and carefully line it with three layers of cling wrap. Ensure the cling wrap extends well over the edges of the pan on all sides. These extra flaps will serve as handles later, making it incredibly simple to lift the frozen block of popsicles out of the pan. Press the cling wrap firmly into the corners and against the sides of the pan to create a smooth surface, minimizing air bubbles and wrinkles.
Step 3: Create the Signature Tie-Dye Swirl
Now comes the fun, artistic part! Get a separate spoon for each of your vibrant color mixtures. Begin by dolloping generous spoonfuls of different colors into the cling-wrap-lined loaf pan. Don’t overthink it; the beauty of tie-dye is its organic, free-form nature. Alternate colors, dropping spoonfuls randomly across the bottom and then building up layers. The goal is to create contrasting patches of color that will eventually swirl together. Once you’ve added all your mixtures, gently tap the loaf pan on your counter a few times. This helps to settle the mixture, eliminate any large air pockets, and slightly spread the colors. Next, take a knife or a skewer and, using a quick, fluid motion, perform a few gentle swirls through the different colored layers. Be careful not to over-swirl, as this can cause the colors to muddy together rather than creating distinct tie-dye patterns. Finally, cover the entire loaf pan tightly with aluminum foil, ensuring a good seal.
Step 4: Freeze and Enjoy Your Homemade Popsicles
With the foil securely in place, it’s time to prepare for the popsicle sticks. Carefully measure approximately an inch in from the edge of the pan for your first popsicle, and then about 3 cm (just over an inch) in between each subsequent popsicle. Using a sharp knife, gently score the aluminum foil at these measured points to create small slits. Through these slits, carefully insert your popsicle sticks. The foil will help hold the sticks upright and evenly spaced as the mixture freezes. Once the sticks are in place, transfer the loaf pan to your freezer and allow the popsicles to freeze completely overnight, or for a minimum of 8-10 hours. This ensures they are perfectly solid and easy to slice. Once thoroughly frozen, remove the pan from the freezer. Use the cling wrap overhangs to lift the entire frozen block out of the loaf pan. Place it on a cutting board, then use a sharp knife (running it under hot water can help for cleaner cuts) to slice in between each popsicle, creating individual tie-dye treats. Peel off any remaining cling wrap, serve immediately, and savor the refreshing, colorful delight!
Pro Tips for the Perfect Tie-Dye Popsicle Experience
- Use Ripe, Frozen Fruit: For the best flavor and texture, always use ripe fruit. Freezing it beforehand is crucial for achieving that thick, creamy consistency. If your fruit isn’t perfectly ripe, a little extra honey can compensate.
- Consistency is Key: Each mixture should be thick enough to layer without immediately blending into the previous color, yet still smooth and pourable. If it’s too thin, add a bit more frozen fruit or yogurt. If too thick, a tiny splash of milk (dairy or non-dairy) can help.
- Don’t Over-Swirl: A few quick passes with a knife or skewer are all you need to create the tie-dye effect. Too much swirling will cause the colors to muddy and lose their distinct patterns.
- Freezing Time Matters: Patience is a virtue here. Allowing the popsicles to freeze overnight ensures they are fully solid, preventing them from melting too quickly once removed from the freezer and making them much easier to slice neatly.
- Hot Water for Clean Cuts: If you find slicing difficult, run your knife under hot water for a few seconds before each cut. This will warm the blade slightly, allowing it to glide through the frozen mixture more smoothly.
- Storage: Once sliced, store your individual popsicles in an airtight container or freezer bag in the freezer. They will remain fresh and delicious for up to 2-3 weeks.
Endless Creativity: Variations and Substitutions for Your Popsicles
While this recipe provides a fantastic starting point, don’t hesitate to get creative and customize your tie-dye popsicles to suit your taste preferences or dietary needs. The beauty of homemade treats is their adaptability!
- Fruit Combinations: Feel free to experiment with other frozen fruits. Think kiwi for another green, blackberries for a deeper purple, or even dragon fruit for an exotic pink. Just ensure you maintain the balance of creamy banana/yogurt to fruit for the right consistency.
- Dairy-Free Options: For a vegan or dairy-free alternative, simply substitute the plain yogurt with a dairy-free yogurt (like coconut or almond yogurt) and use maple syrup or agave nectar instead of honey.
- Sweetener Alternatives: If you prefer to avoid honey, maple syrup, agave, or even a few pitted dates can be used to sweeten your mixtures. Adjust to your desired sweetness level.
- Hidden Veggies: Just like the spinach in the green layer, you can discreetly add other veggies like cooked carrots or pureed zucchini into other layers. The fruit flavors are powerful enough to mask them, boosting the nutritional content!
- Textural Add-ins: For an extra layer of texture, consider adding a sprinkle of shredded coconut, mini chocolate chips, or finely chopped nuts to the layers before swirling, though this might make slicing a little trickier.
Frequently Asked Questions About Homemade Tie-Dye Popsicles
- How long do homemade popsicles last in the freezer?
- When stored properly in an airtight container or freezer bag, homemade fruit popsicles can last in the freezer for up to 2-3 weeks. Beyond that, they might start to develop ice crystals or lose some of their vibrant flavor.
- Can I make these popsicles without a blender?
- A powerful blender or food processor is highly recommended for achieving the smooth, creamy consistency required for these popsicles. Without it, you’ll struggle to fully break down the frozen fruit and create the desired texture.
- What if my popsicle mixture is too thin?
- If your mixture is too thin after blending, it might lead to colors bleeding together too much or a less creamy popsicle. To thicken it, add more frozen banana or a bit more plain yogurt and blend again until the desired consistency is reached.
- What if my popsicles are too hard/icy?
- If your popsicles turn out too hard or icy, it usually means there wasn’t enough fat (from yogurt) or sugar (from honey/fruit) to prevent ice crystal formation, or too much water. Ensure you’re using frozen fruit and the correct ratio of ingredients. Adding a touch more honey can also help with a smoother texture.
- Can I use fresh fruit instead of frozen?
- While you can use fresh fruit, it will result in a much thinner mixture. You would need to add ice to achieve a thick, frothy consistency for layering, which might dilute the flavors. For the best creamy, non-icy result, frozen fruit is highly recommended.
- How do I prevent the popsicle sticks from falling over?
- The aluminum foil covering the loaf pan is essential for holding the sticks in place. Make sure the foil is taut and the slits you create for the sticks are just large enough for them to pass through, holding them firmly upright as the mixture freezes.
Ready to Chill? Your Ultimate Tie-Dye Popsicle Recipe
This recipe transforms simple ingredients into a stunning, healthy, and incredibly refreshing summer treat. Perfect for hot days, parties, or just a fun family activity, these tie-dye popsicles are sure to be a hit!
Yields: Approximately 8-10 popsicles (depending on slice thickness)
Prep time: 30 minutes
Freeze time: Overnight (8+ hours recommended)
Ingredients Summary
- Yellow Mixture: Frozen banana, frozen pineapple, plain yogurt, honey.
- Orange Mixture: Frozen banana, plain yogurt, frozen peaches, small orange (peeled), frozen mango, honey.
- Red Mixture: Frozen banana, plain yogurt, frozen raspberries, frozen strawberries, honey.
- Purple Mixture: Frozen banana, frozen blueberries, frozen blackberries, plain yogurt, honey.
- Green Mixture: Frozen banana, frozen spinach, frozen pineapple, plain yogurt.
- Popsicle sticks.
Instructions Summary
- Blend ingredients for each color separately until smooth and creamy. Transfer each color to a bowl and chill in the freezer. Rinse blender between colors.
- Line a 9×5 inch loaf pan with three layers of cling wrap, leaving an overhang on the sides.
- Dollop alternating colors into the lined loaf pan. Tap gently to settle, then use a knife or skewer to create a quick tie-dye swirl. Cover with aluminum foil.
- Measure and score the foil for popsicle sticks (approx. 1 inch from edge, 3 cm between sticks). Insert sticks and freeze overnight. Slice between popsicles and serve!
So, there you have it – a comprehensive guide to making the most vibrant, delicious, and healthy tie-dye popsicles right in your own kitchen. Whether you’re aiming to beat the summer heat, entertain the kids, or simply enjoy a guilt-free sweet treat, this recipe delivers on all fronts. Get your blender ready, embrace your inner artist, and prepare to delight your taste buds with these extraordinary frozen masterpieces. Happy chilling!