
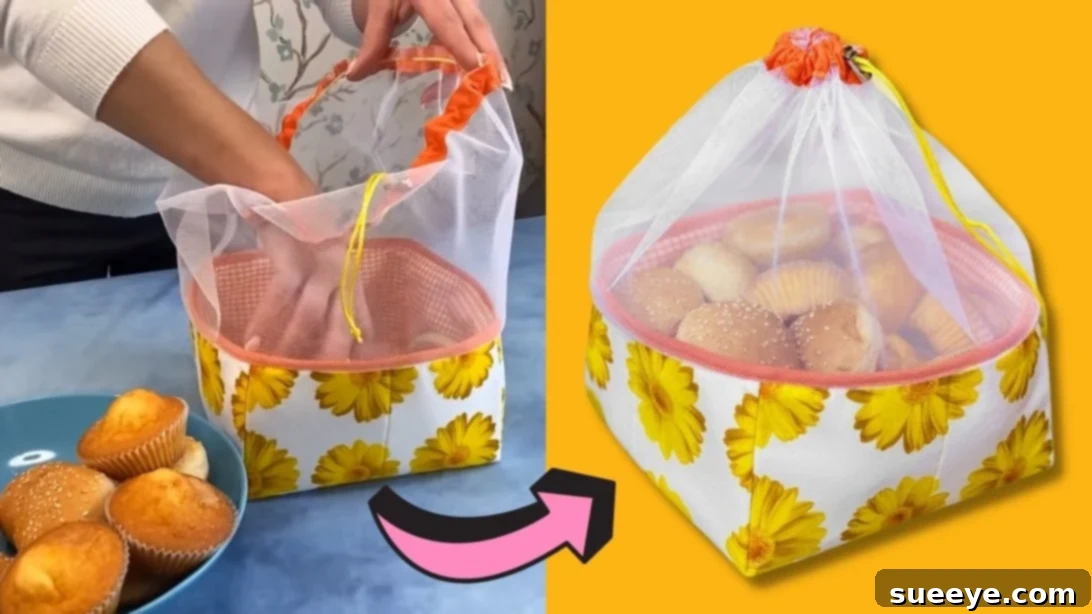
Are you searching for a delightful and incredibly useful sewing project that will add a touch of handmade charm to your home or next outdoor gathering? Look no further! This comprehensive DIY tutorial will guide you through creating a beautiful and practical Bread Basket Food Cover. Perfect for keeping your freshly baked bread, muffins, or pastries safe from inquisitive insects and dust, this project combines functionality with lovely aesthetics.
Whether you’re planning a serene picnic in the park, hosting a backyard BBQ, or simply want to elevate your everyday dining experience, a fabric food cover is an indispensable accessory. This particular design doubles as a charming bread basket liner, making it a versatile addition to your kitchen arsenal. Imagine serving warm, crusty bread, protected and presented in your own handmade creation!
We’ve discovered this brilliant and beginner-friendly Bread Basket Food Cover DIY Tutorial originally shared by Estadistica Datos del Mundo on YouTube. The steps are clearly laid out, making it accessible for even novice sewers to follow along and achieve fantastic results. No advanced techniques or complicated patterns are required; just basic sewing skills and a desire to create something wonderful. Dive into this rewarding project and craft a piece that is both functional and a true reflection of your personal style. Let’s get started on bringing this charming and practical food cover to life!
Why Every Home Needs a DIY Bread Basket Food Cover
In a world increasingly focused on sustainability and personalization, a homemade bread basket food cover stands out as a smart and stylish choice. Here’s why this DIY project is more than just a craft; it’s an investment in practicality and charm:
- Superior Food Protection: Whether you’re dining outdoors or simply keeping baked goods on the counter, this cover acts as an effective barrier against dust, curious insects, and other environmental elements. Your food stays fresh, clean, and appetizing for longer.
- Eco-Friendly & Reusable: Say goodbye to wasteful plastic wraps or disposable foils. This fabric cover is washable and reusable, aligning perfectly with a sustainable lifestyle and reducing your household waste.
- Adds Aesthetic Appeal: Beyond its practical benefits, a fabric food cover instantly elevates your table setting. You can choose fabrics that complement your kitchen decor, seasonal themes, or special occasions, transforming a simple bread basket into a delightful focal point.
- Perfect for Outdoor Dining & Picnics: This food cover is an absolute game-changer for picnics, garden parties, and barbecues. It keeps your bread, rolls, or pastries pristine while adding a charming, rustic touch to your outdoor spread.
- Thoughtful Handmade Gift: A handmade bread basket food cover makes a wonderful, heartfelt gift. Personalize it with the recipient’s favorite colors or patterns for a truly unique present they’ll cherish and use regularly.
- Easy Customization: The beauty of DIY lies in customization. Adjust the size, select unique fabrics, add decorative elements, or even try different mesh materials to create a cover that perfectly meets your needs and expresses your creativity.
Embrace the joy of crafting and create a functional piece that brings both beauty and convenience to your home.
Materials and Essential Tools for Your Fabric Food Cover
Gathering your materials is the first exciting step in any sewing project. For this charming bread basket food cover, you’ll need a few key items, along with some basic sewing tools. The beauty of this project lies in its flexibility, allowing you to choose fabrics that truly reflect your style.
Fabric and Textile Essentials:
- 2 Cotton Fabrics for Inner and Outer (each 15.7 in by 15.7 in / approx. 40 cm by 40 cm): Opt for high-quality, breathable cotton fabrics. One will be for the outer basket and the other for the inner lining. Consider a fun pattern for the outer fabric and a coordinating solid or subtle print for the inner. The specified size (15.7 x 15.7 inches) is a great starting point, but remember you can easily adjust these dimensions to fit different bread basket sizes or dishware. Always pre-wash and iron your fabrics before cutting to prevent shrinking after your project is complete.
- Fine Wadding (17.3 in by 17.3 in / approx. 44 cm by 44 cm): Also known as batting or fusible fleece. This material provides structure, a soft feel, and a slight insulation to your basket. The slightly larger size (17.3 x 17.3 inches) ensures you have enough to work with, allowing for trimming once it’s attached to the fabric. You can choose between sew-in wadding or fusible wadding, which has adhesive on one side.
- Bias Tape: This strip of fabric, cut on the bias (diagonal grain), is essential for neatly finishing the top edge of your food cover and creating a channel for the drawstring. You can purchase pre-made bias tape in various widths and colors to match your fabrics, or you can make your own for a truly custom look. Approximately 1 inch (2.5 cm) wide double-fold bias tape works well for this project.
- Tulle Fabric (Mesh): This light, airy, and transparent fabric is crucial for the food cover’s main function: allowing visibility while keeping pests away. Choose a fine-mesh tulle or a similar lightweight netting material. Ensure it’s durable enough to withstand gentle washing. The color can either blend with your fabrics or provide a subtle contrast.
- Rope (or Cord/Ribbon): A durable piece of rope will act as the drawstring, allowing you to gather and secure the mesh cover. Choose a thin yet strong rope, cord, or even a decorative ribbon that complements your fabric choices. The length will be determined in Step 6, so start with a generous piece.
Essential Sewing Tools:
- Sewing Machine: A standard sewing machine with basic stitches will be perfect.
- Matching Thread: High-quality polyester thread that matches or complements your fabrics.
- Fabric Scissors: Sharp scissors specifically for cutting fabric to ensure clean, precise edges.
- Rotary Cutter & Mat (Optional but Recommended): For even more precise and quick cutting, especially for straight lines.
- Fabric Ruler or Measuring Tape: For accurate measurements.
- Fabric Marker or Tailor’s Chalk: For marking lines and cutting guides on your fabric.
- Straight Pins or Fabric Clips: To hold fabric layers together securely before sewing.
- Iron and Ironing Board: Crucial for pressing seams, which creates a professional finish and helps in accurate construction.
- Seam Ripper: Every sewer’s best friend, just in case you need to undo a stitch or two!
With these materials and tools at hand, you’re fully prepared to embark on this rewarding sewing adventure!
Step-by-Step Instructions: Crafting Your Bread Basket Food Cover
Follow these detailed instructions carefully to construct your very own beautiful and functional bread basket food cover. Take your time with each step, paying close attention to accuracy for the best results.
Step 1: Preparing the Outer Fabric with Wadding
Begin by taking one of your chosen cotton fabrics, which will serve as the outer layer of your bread basket. Lay it flat and smooth on your work surface. Using a fabric ruler and a fabric marker or tailor’s chalk, carefully measure and mark lines to divide the fabric into four equal rectangles, both horizontally and vertically. This will create a grid of 16 smaller squares. Next, center your fine wadding (batting) underneath this fabric piece, ensuring the wadding extends slightly beyond the edges of the cotton fabric. Secure both layers together by generously placing straight pins along the marked lines and around the perimeter. Now, carefully stitch along all the marked lines, creating a quilted effect that secures the wadding to the fabric. Use a consistent stitch length and backstitch at the beginning and end of each seam to reinforce it. Once all the quilting seams are complete, trim off any excess wadding that extends beyond the cotton fabric edges, making sure both layers are perfectly aligned.
Step 2: Shaping the Outer Basket
With the quilted outer fabric now prepared, it’s time to form the basket shape. Locate the four square corners of your fabric piece. Precisely cut out these four square corners. The size of the squares you cut will determine the depth of your basket, so ensure they are uniform. After cutting, you will have a shape resembling a cross. Now, take two adjacent raw edges of one of the cut-out corners and bring them together, aligning them perfectly to form a boxed corner. Pin these edges securely in place. Repeat this process for all four corners, effectively creating the sides of your basket. Once all corners are pinned, take your project to the sewing machine and stitch these raw edges together with a straight seam, using your chosen seam allowance (typically 3/8 inch or 1 cm). Backstitch at the start and end of each seam. After sewing, carefully trim off any excess fabric close to the seam, especially at the corners, to reduce bulk and ensure a neat finish when turned right side out. You now have the structured outer shell of your bread basket.
Step 3: Constructing the Inner Lining
Now, take your second cotton fabric, which will form the inner lining of your bread basket. Lay it flat and, similar to Step 2, carefully cut out the same size square corners from its four corners. It’s crucial that these cut-out squares are identical in size to those you cut from the outer fabric, ensuring the lining will fit perfectly inside. Just as before, bring the raw edges of each cut-out corner together and align them to form the four boxed corners of your lining. Pin these edges securely and stitch them together using a straight seam and the same seam allowance. After sewing, you should have a complete inner basket lining. Now, carefully place this lining inside the outer fabric shell you created in Step 2, ensuring that the right sides of both fabrics are facing each other and the raw top edges align perfectly. Pin the top edges of the outer fabric and the inner lining together all the way around. Sew these top edges together with a straight stitch, again using your preferred seam allowance. This step joins the two main components of your bread basket, creating a clean finish at the top.
Step 4: Preparing the Tulle Mesh Cover
The mesh cover is key to keeping your food protected. First, carefully measure the entire contour (perimeter) of the top edge of your assembled fabric basket. This measurement will be the required length for your tulle or mesh fabric. Add an allowance for seams (approximately 1 inch or 2.5 cm) to this length. Next, determine the desired height of your mesh cover, considering how much space you want above your food. With these two measurements – the calculated length and desired height – cut a precise rectangular piece from your tulle or mesh fabric. Once cut, take this rectangle and fold it in half crosswise, bringing the two shorter ends together. Align these ends perfectly and sew them together with a straight seam, creating a continuous loop of mesh. To ensure durability and a neat finish, flip the mesh inside out and sew the same seam again, encasing the raw edges. This French seam technique is excellent for delicate fabrics like tulle, preventing fraying and providing a professional look.
Step 5: Attaching the Tulle Mesh to the Basket
With your mesh cover now a continuous loop, it’s time to attach it to the main basket structure. Carefully place the top raw edge of the tulle mesh around the top edge of your fabric basket, making sure that the mesh is evenly distributed. You might want to gently gather the mesh slightly if your perimeter measurement was generous, to ensure it fits smoothly around the basket. Align the raw edge of the mesh with the sewn top edge of the basket where the inner and outer fabrics meet. Use plenty of pins to secure the mesh firmly in place, ensuring it remains even and doesn’t shift during sewing. Once pinned, take your project to the sewing machine and carefully sew the tulle mesh to the top edge of the basket. Use a consistent seam allowance and a strong straight stitch, backstitching at the start and end to secure the seam. This creates the foundational attachment for your protective mesh cover.
Step 6: Finishing with Bias Tape and Drawstring
This final step adds a professional finish and the crucial drawstring mechanism. First, take your bias tape and fold it in half lengthwise, pressing it with an iron to create a crisp crease. This helps in achieving an even application. Now, open up one edge of the folded bias tape. Place the raw edge of the tulle mesh, where it’s attached to the basket, inside the fold of the bias tape. Secure it with pins all around the top edge, ensuring the bias tape neatly encloses the raw edges of the mesh and the basket. Before you start sewing, fold one end of the bias tape inward by about half an inch (1.25 cm) to create a clean, finished edge. Pin this folded end to the top edge of the tulle, aligning it carefully. Sew the bias tape along its first fold, stitching through all layers (bias tape, mesh, and basket fabric). Once this first seam is done, flip the bias tape over to the other side of the top edge, covering the raw seam allowances completely. Pin it down neatly and topstitch along the free edge of the bias tape. This creates a clean, enclosed channel. Leave a small opening (about 1 inch / 2.5 cm) in this final topstitch, typically where you began, to create an entry point for your rope. Using a safety pin or a bodkin, carefully thread your chosen rope or cord through this channel. Once threaded all the way around, cut the rope to your preferred length, allowing enough slack to tie a bow or knot. Finally, secure the ends of the rope with a knot, a decorative bead, or a cord stopper (a “closure”) to prevent it from pulling back through the channel. And just like that, your beautiful, functional, and handmade bread basket food cover is complete!
Tips for Success and Customization
To ensure your bread basket food cover turns out perfectly and truly reflects your style, consider these additional tips:
- Pressing is Your Best Friend: Ironing seams flat at each stage of the project will make a significant difference in the overall neatness and professional appearance of your finished cover. Don’t skip this step!
- Test Your Stitch: Before sewing on your final project, always test your sewing machine tension and stitch length on a scrap piece of your chosen fabrics. This is especially important when working with different fabric weights, like cotton and delicate tulle.
- Walking Foot for Wadding: If your sewing machine has a walking foot attachment, consider using it when sewing the wadding to the fabric. This attachment helps feed multiple layers of fabric evenly, preventing shifting and puckering.
- Embellish Creatively: Personalize your bread basket food cover with small details. You could add a decorative label, a small fabric loop for hanging, or use a contrasting thread color for your topstitching.
- Adjusting Size: The provided measurements are for a standard bread basket. If you have a different size in mind, simply measure the base and height of your desired basket or dish, then adjust the fabric and wadding dimensions accordingly, ensuring to maintain appropriate seam allowances.
- Care Instructions: Since it’s made from fabric, your food cover can be easily cleaned. Most cotton fabrics and tulle can be machine washed on a gentle cycle with cold water and air-dried to maintain their shape and vibrant colors.
Conclusion: Enjoy Your Handmade Bread Basket Food Cover
Congratulations on completing your very own DIY Bread Basket Food Cover! You’ve successfully transformed simple materials into a beautiful, practical, and eco-friendly accessory for your home. This project is a testament to the joy of handmade creations, offering both a sense of accomplishment and a functional item that will serve you well for years to come.
Whether it’s gracing your kitchen counter, joining you on a delightful picnic, or protecting pastries at your next potluck, this food cover is sure to be admired. Its thoughtful design keeps your baked goods fresh and protected, while its customizable nature allows your personal style to shine through. We hope you enjoyed this beginner-friendly sewing adventure and are inspired to tackle more creative projects.
Now, go forth and protect your delicious treats with pride! Don’t forget to share your finished bread basket food cover with friends and family, inspiring them to embrace the wonderful world of DIY sewing.