
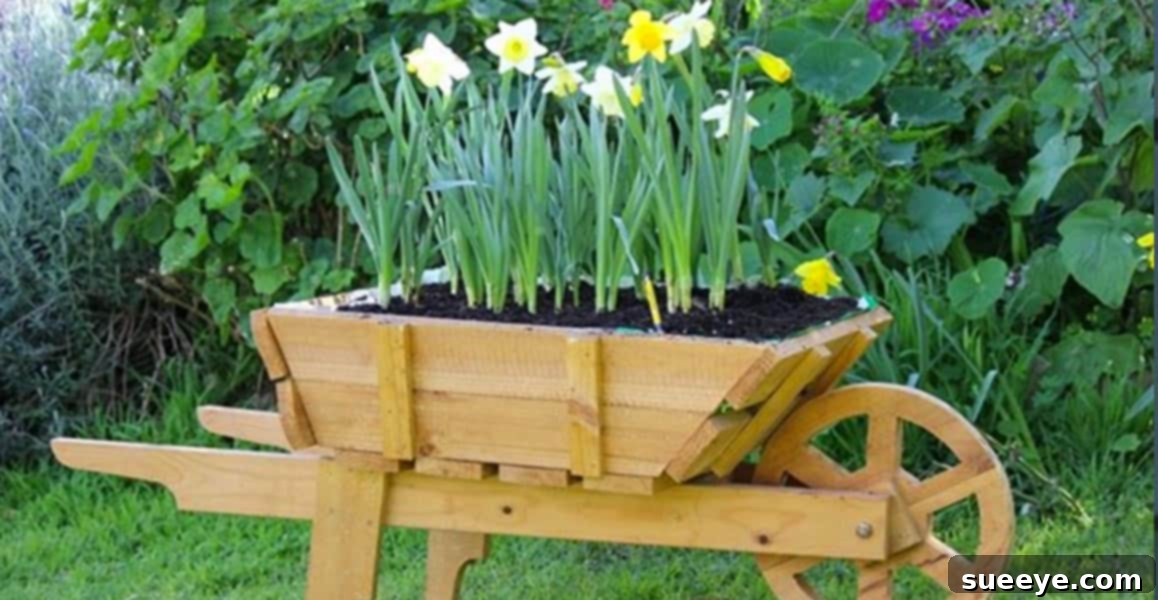
Craft Your Own Rustic Oasis: The Ultimate Guide to DIY Wooden Wheelbarrow Planters
In the realm of garden aesthetics, certain elements possess an undeniable charm that transforms an ordinary outdoor space into an enchanting retreat. Among these captivating features, the rustic wooden wheelbarrow planter stands out as a timeless accent, breathing life and character into any landscape. We’ve all admired these picturesque displays, often gracing the pages of garden magazines or popular social media feeds like Pinterest, and perhaps wondered how to bring such rustic elegance to our own homes. The journey to creating your very own eye-catching garden centerpiece is not only achievable but immensely rewarding. This comprehensive guide will inspire and equip you with the knowledge to craft a beautiful, functional, and uniquely personalized wooden wheelbarrow planter that will become the envy of your neighborhood. Dive into the world of DIY and discover the satisfaction of enhancing your garden’s appeal with a touch of handcrafted artistry.
Why a DIY Wooden Wheelbarrow Planter is a Must-Have for Your Garden
A wooden wheelbarrow planter transcends its practical function, evolving into a potent statement piece that infuses your garden with warmth, history, and a touch of whimsical flair. It’s an invitation for creativity, offering a dynamic canvas for your horticultural and decorative aspirations. Far from being just another container for plants, it becomes a focal point, drawing the eye and adding depth to your outdoor design.
- Instant Visual Appeal: These charming wooden structures effortlessly add a rustic, country-chic vibe, instantly elevating your garden’s aesthetic. Whether nestled amongst lush greenery or standing proudly by your entrance, a wheelbarrow planter provides an immediate decorative uplift, signaling a thoughtfully curated space. It acts as a natural focal point, guiding visitors’ eyes and adding an element of surprise and delight to your landscape design.
- Unmatched Versatility for All Seasons: The beauty of a DIY wooden wheelbarrow planter lies in its adaptability. While perfectly suited for vibrant floral displays in spring and summer, its decorative potential extends far beyond blooming seasons. Imagine it overflowing with rich autumn hues—pumpkins, gourds, and dried corn—or adorned with festive evergreens and twinkling lights during winter. This single garden accent offers endless possibilities for seasonal transformations, keeping your outdoor decor fresh and engaging year-round.
- Embrace Sustainability with Pallet Wood: Opting for a DIY garden project, especially one utilizing reclaimed materials like pallet wood, is a commendable step towards sustainable living. Pallet wood is often readily available, giving new life to materials that might otherwise end up in landfills. This eco-friendly approach not only reduces waste but also infuses your creation with a unique, weathered character that new wood struggles to replicate. It’s a testament to responsible craftsmanship and ingenuity.
- A Personal Touch and Customization: There’s unparalleled satisfaction in crafting something with your own hands. A DIY wooden wheelbarrow planter allows for complete customization to match your personal style and garden theme. From choosing the specific dimensions and wood finish to selecting the perfect plants or seasonal adornments, every decision reflects your unique vision. This personal investment makes your planter much more than an object; it becomes a cherished expression of your creativity.
- Cost-Effective Charm: While beautiful garden decor can often come with a hefty price tag, building your own wheelbarrow planter, especially with salvaged materials like pallets, can be remarkably budget-friendly. The primary investment will be your time and perhaps a few hardware supplies, making it an accessible project for anyone looking to enhance their outdoor space without breaking the bank. Enjoy high-end garden aesthetics at a fraction of the cost.
Sourcing Your Materials: The Pallet Wood Advantage for Rustic Garden Accents
The foundation of many stunning DIY projects, including our rustic wheelbarrow planter, often lies in the humble pallet. Pallet wood is an excellent choice due to its accessibility, cost-effectiveness, and the inherent rustic character it brings to any project. It’s a fantastic way to upcycle and contribute to environmental sustainability, transforming discarded shipping platforms into beautiful garden features.
When sourcing pallets, safety is paramount. Always look for pallets stamped with “HT” (Heat Treated), which indicates they’ve been treated with heat to prevent pests, rather than chemicals. Avoid “MB” (Methyl Bromide) treated pallets, as these chemicals can be toxic and unsuitable for garden use. Also, inspect pallets for any spills, excessive grime, or signs of damage that might compromise their structural integrity or introduce unwanted contaminants to your garden. Local businesses, construction sites, and warehouses are often good places to inquire about free or low-cost pallets, but always ask permission before taking them.
While pallet wood offers a unique aesthetic and eco-friendly appeal, other wood types can also be used for your wooden wheelbarrow planter, depending on your budget and desired longevity. Cedar is naturally rot-resistant and beautiful, making it a premium choice for outdoor projects. Treated pine lumber is another durable option, designed to withstand the elements, though it lacks the immediate rustic charm of weathered pallets. Reclaimed fence pickets or old barn wood can also provide fantastic character and a weathered look, aligning perfectly with a rustic garden theme.
Essential Tools for Your DIY Project
Embarking on any DIY woodworking project requires a basic set of tools. Having the right equipment not only makes the process smoother and more efficient but also ensures a safer working environment. Most of these tools are commonly found in a home workshop, making this project accessible for many aspiring DIY enthusiasts looking to create their own outdoor planter box.
- Safety Gear: Always prioritize safety. This includes sturdy work gloves to protect your hands from splinters and rough wood, and safety glasses or goggles to shield your eyes from flying debris during cutting and sanding.
- Measuring Tape & Pencil: Precision is key in woodworking. A reliable measuring tape and a pencil are indispensable for accurate marking and cutting, ensuring all your pieces fit together perfectly.
- Saw: You’ll need a saw for cutting your pallet wood or other lumber to size. A circular saw is excellent for straight cuts, while a jigsaw is ideal for curves or more intricate shapes. A simple hand saw can also suffice for smaller projects or if power tools aren’t available.
- Drill & Screws: A cordless drill will be your best friend for quickly and securely assembling the planter. Use exterior-grade screws (e.g., galvanized or stainless steel) to prevent rust and ensure the longevity of your wheelbarrow, especially since it will be exposed to moisture.
- Sander & Sandpaper: Pallet wood, in particular, can be rough. An orbital sander or even sanding by hand with various grits of sandpaper (from coarse to fine) will smooth out surfaces, making your planter safe to handle and ready for finishing.
- Pry Bar & Hammer (for pallet disassembly): If you’re using pallets, a pry bar and hammer are crucial for safely and efficiently disassembling them into individual planks without causing too much damage to the wood.
- Wood Glue (optional but recommended): For added strength and stability, apply a weather-resistant wood glue to joints before screwing pieces together. This creates a much more robust structure for your DIY garden project.
- Wood Finish (stain, paint, sealant): Once assembled, you’ll want to protect your creation. Have your chosen stain, paint, or clear sealant ready to apply. This not only enhances the aesthetic but also provides crucial protection against weather and moisture.
Designing Your Dream Wheelbarrow Planter: Planning for Perfection
Before you even pick up a saw, a thoughtful design phase is crucial. Planning ensures your wheelbarrow planter meets your aesthetic desires, fits your space, and functions effectively as a planter. Sketching out your ideas and taking measurements will save time and prevent costly mistakes down the line, ultimately leading to a more satisfying finished product that enhances your front yard decor or backyard oasis.
- Size & Dimensions: Consider where your wheelbarrow will be placed and what type of plants you intend to grow. A larger planter can accommodate more substantial floral arrangements or even a small herb garden, while a compact version might be better suited for a porch or balcony. Measure your intended space to ensure a perfect fit and visual balance, making it a true garden focal point.
- Style & Aesthetic: Do you envision a classic, rustic farmyard look, a clean modern farmhouse appeal, or a distressed shabby chic vibe? Your choice of wood, finish (natural, stained, painted), and specific design elements will dictate the overall style. Pallet wood naturally leans towards rustic, but a crisp paint job can transform it into a more refined accent.
- Functionality: Drainage & Lining: Proper drainage is paramount for plant health. Ensure your design incorporates several drainage holes at the bottom of the planter box. To further protect the wood from constant moisture and prolong its life, consider lining the interior with heavy-duty landscape fabric or a plastic pond liner, puncturing holes for drainage through the liner as well.
- Handle & Leg Design: The handles and legs contribute significantly to the wheelbarrow’s iconic silhouette and stability. Decide if you want fixed legs for a stationary planter or functional wheels and sturdy handles if you intend to move it (though for decorative planters, fixed legs are common). Ensure the design is balanced and robust enough to support the weight of soil and plants.
A Glimpse into the Building Process: From Pallet to Planter
While a full, detailed step-by-step tutorial is beyond the scope of this inspirational guide, understanding the general construction sequence will demystify the process and build your confidence. Many excellent video tutorials, like the one mentioned from Big JC 12000, or detailed blog posts are available online to guide you through each cut and joint. This overview aims to give you a roadmap for your DIY garden project journey.
- Pallet Disassembly & Preparation: This is often the most labor-intensive part if you’re using pallets. Carefully pry apart the planks, removing all nails. Once separated, sort the wood, and thoroughly sand each piece to remove splinters and smooth the surface. This also prepares the wood for any finishes you plan to apply to your upcycled garden project.
- Cutting & Shaping Your Components: Based on your design plan, measure and cut the planks to create the base, sides, and ends of your planter box. You’ll also cut the pieces for the handles and the legs, ensuring they are sturdy and proportionate to the main body.
- Assembly of the Planter Box: Begin by attaching the side pieces to the base, forming the main trough of the wheelbarrow. Use exterior-grade screws and, if desired, wood glue for enhanced strength. Ensure all joints are tight and square for a professional finish.
- Adding Handles & Legs: Securely attach the pre-cut handle pieces to the front of the planter box, creating the iconic wheelbarrow silhouette. For stability, construct and attach the leg supports to the underside of the box. If you choose to add decorative (or functional) wheels, attach them at this stage according to your design.
- Finishing Touches: Once the structure is complete, give it a final sanding to smooth any rough edges. Then, apply your chosen wood finish—a rich stain to highlight the grain, a vibrant paint color to match your garden theme, or a clear sealant for natural protection. Allow ample drying time as per product instructions.
- Lining & Drainage: Finally, prepare the interior for planting. If using a liner, fit it snugly inside the planter box, stapling it to the top edges. Puncture several drainage holes through both the liner and the bottom of the wood to prevent waterlogging, which is vital for healthy plant growth.
Cultivating Beauty: Planting Ideas for Your Wheelbarrow Planter
Once your DIY wooden wheelbarrow planter is complete, the fun truly begins: transforming it into a vibrant, living display. Its unique shape and elevated position make it ideal for showcasing a variety of plants, creating an attractive garden focal point.
- Seasonal Flower Power: For spring, fill it with cheerful pansies, primroses, or early bulbs like daffodils and tulips. In summer, cascade colorful petunias, impatiens, lobelia, or fuchsias over the sides. For a dramatic effect, plant taller sun-loving annuals like coleus or salvia in the center.
- Edible Gardens in Miniature: Your wheelbarrow planter can also become a compact herb garden or a spot for small vegetables. Imagine fresh basil, mint, rosemary, or thyme within arm’s reach. Cherry tomatoes, strawberries, or various lettuces can also thrive in this contained environment, offering both beauty and bounty.
- Succulent & Drought-Tolerant Displays: For a low-maintenance yet stunning option, create a succulent garden. The diverse shapes, textures, and colors of succulents and sedums make for an intriguing display, requiring minimal watering and care, perfect for busy gardeners.
- Mix & Match for Dynamic Interest: Don’t shy away from combining different types of plants. Think “thriller, filler, spiller” – a taller plant for vertical interest (thriller), mounding plants to fill the space (filler), and trailing plants to spill over the edges (spiller). This creates a lush, professional-looking arrangement.
Beyond Flowers: Creative Seasonal Decor Transformations
Your beautiful wooden wheelbarrow isn’t just for plants; it’s a year-round decorative asset, capable of transforming your outdoor space for every holiday and season. It offers endless opportunities for easy DIY garden projects and seasonal garden displays.
- Spring Fling: After the last frost, usher in spring with pastel-colored eggs, faux birds’ nests, and blossoming branches. You can also incorporate small potted hyacinths or tulips for early spring cheer.
- Summer Soiree: During the warmer months, dress up your wheelbarrow for summer parties. Think beach-themed props like seashells and sand, or a mini lemonade stand setup with lemons and vintage bottles. Add solar lights for an evening glow.
- Autumn Harvest: This is where the wheelbarrow truly shines for fall decor. Fill it to the brim with a bountiful display of pumpkins, colorful gourds, dried corn stalks, hay bales, and vibrant mums. This creates an inviting and classic autumnal scene, perfect for the holiday season kickoff.
- Winter Wonderland: As temperatures drop, transition your planter into a festive winter display. Adorn it with evergreen boughs, pinecones, faux berries, and twinkling fairy lights. You can even add festive ornaments or a cozy plaid blanket for a warm, welcoming touch.
Placement and Styling Tips for Maximum Impact
Strategic placement and thoughtful styling are key to maximizing the visual impact of your DIY wooden wheelbarrow planter. A well-placed accent can transform an entire area, drawing attention and adding character to your outdoor living space.
- Front Yard Focal Point: Position your wheelbarrow planter prominently in your front yard to enhance curb appeal. Near the main entrance, by a garden gate, or at the end of a pathway, it serves as a warm, welcoming statement piece.
- Backyard Oasis: In the backyard, integrate it into your patio decor, on a spacious deck, or as a charming addition within a garden bed. It can define a seating area or add a vertical element to a flat landscape.
- Grouping for Grandeur: For an even more impressive display, group your wheelbarrow planter with other complementary garden decor. This could include varying sizes of terracotta pots, vintage lanterns, birdbaths, or other garden art. This layering creates depth and visual interest.
- Lighting for Evening Charm: Don’t forget the magic of lighting. Drape solar-powered string lights around your wheelbarrow, or place small solar spotlights to illuminate your plants and seasonal decor after dusk. This extends its beauty into the evening hours, creating an enchanting ambiance.
Longevity and Care for Your Wooden Planter
To ensure your handcrafted wooden wheelbarrow planter remains a beloved garden accent for years to come, a little maintenance goes a long way. Proper care will protect the wood from the elements and keep your plants thriving.
- Regular Cleaning: Periodically wipe down the exterior of your planter to remove dirt, dust, and any plant debris. This prevents buildup and allows you to inspect the wood for any signs of wear.
- Re-sealing: Depending on your climate and the type of finish used, consider re-applying a wood sealant, stain, or paint every one to two years. This crucial step protects the wood from moisture, UV rays, and temperature fluctuations, preventing rot and fading.
- Winter Protection: In regions with harsh winters, consider moving your wheelbarrow planter to a sheltered location, such as a garage or shed, or at least covering it with a waterproof tarp. This minimizes exposure to snow and ice, which can significantly shorten the wood’s lifespan.
- Drainage Check: Regularly ensure that the drainage holes at the bottom of the planter remain clear of soil or debris. Clogged drainage can lead to waterlogging, which is detrimental to plant roots and can accelerate wood decay.
Get Inspired and Start Building!
The allure of a wooden wheelbarrow planter is undeniable, offering a perfect blend of rustic charm, functionality, and artistic expression for any garden. From the satisfaction of working with reclaimed materials like pallet wood to the joy of seeing your vibrant floral or seasonal displays come to life, this DIY project is immensely rewarding. There are many fantastic resources available online, including detailed step-by-step guides and video tutorials, to walk you through every phase of construction. Take that first step, gather your materials, and embark on a creative journey that will transform your outdoor space.
Imagine the compliments and the pride you’ll feel every time you gaze upon your unique, handcrafted garden accent. It’s more than just a planter; it’s a reflection of your creativity and a testament to the beauty that can be created with your own hands. So, go ahead, get inspired, and add this unique, charming wooden wheelbarrow planter to your yard!