
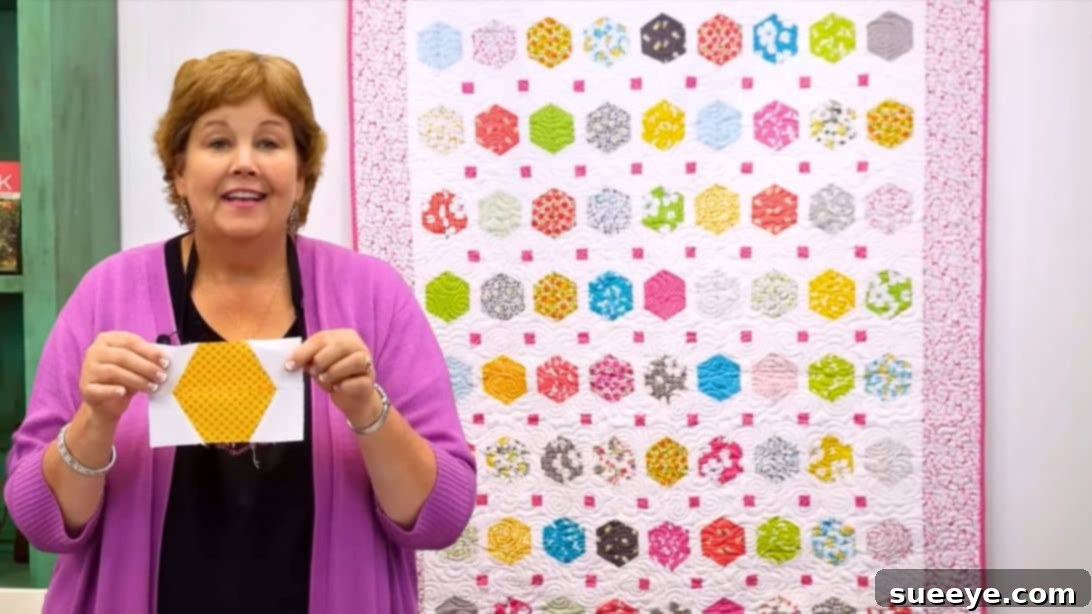
Are you searching for a delightful and rewarding quilt project that offers both visual charm and a satisfying sense of accomplishment? Look no further than the mesmerizing Floating Hexagons Quilt by Missouri Star Quilt Company! This pattern, championed by the beloved Jenny Doan, is an absolute gem – incredibly simple in construction yet stunningly sophisticated in its final appearance. Imagine vibrant, colorful hexagons seemingly suspended against a contrasting background, creating an illusion of depth and movement that captivates the eye. The bright pink cornerstones, paired with an array of lively hexagons, infuse the design with a festive and energetic vibe that instantly draws attention. It’s no wonder this pattern is perfect for adding a touch of cheer to any space. With its playful aesthetic, it can easily transform into a magnificent Christmas quilt, with the hexagons resembling charming ornaments sparkling from a distance. Envision crafting this beauty using traditional holiday colors like rich reds, verdant greens, crisp whites, and sunny yellows to create an exquisite wall-hanging or a cozy lap quilt, ready to embrace the upcoming festive season. This tutorial makes the intricate-looking design accessible for every quilter, promising a project that’s as enjoyable to make as it is beautiful to behold.
RELATED: Enhance your quilting skills with another fantastic project: Hexagon Log Cabin Quilted Hot Pad. For those interested in more hexagon fun, also check out the Easy Pinwheel Hexagon Quilt Block Tutorial to expand your repertoire of block designs.
The beauty of the Floating Hexagons Quilt lies in its surprising simplicity. Despite its intricate appearance, the actual sewing process is remarkably straightforward, making it an ideal choice for quilters across all experience levels, especially beginners. The secret to its ease is the clever use of a specialized half-hexi template, which streamlines the cutting process and ensures precision without the fuss often associated with geometric shapes. With clear, step-by-step instructions provided in this comprehensive guide, even those new to the world of quilting will find themselves confidently creating beautiful blocks and assembling a stunning quilt in no time. Prepare to embark on a creative journey that yields a visually striking and uniquely personalized quilt without the typical challenges often associated with complex designs, proving that impressive results are within reach for everyone.
The Enduring Charm of Hexagons in Quilting History and Modern Design
Hexagons have long held a special place in the heart of quilters, revered for their unique geometric beauty and remarkable versatility. These six-sided shapes naturally tessellate, meaning they fit together perfectly without any gaps, allowing for the creation of intricate, continuous, and visually appealing patterns. From the iconic “Grandmother’s Flower Garden” design, which has gracefully adorned homes for generations and evokes a sense of timeless tradition, to more contemporary interpretations found in modern quilt art, hexagons offer an endless spectrum of creative possibilities. They can be hand-pieced for a meditative, portable project or machine-pieced for efficiency and speed.
What truly sets the “Floating Hexagons Quilt” apart in the vast world of quilting patterns is its innovative approach to this classic shape. Unlike traditional methods that typically involve simply joining full hexagons edge-to-edge, this brilliant design utilizes half-hexagons paired with contrasting background fabric to achieve a dynamic, almost three-dimensional effect. This ingenious method creates an optical illusion where the vibrant, colorful hexagons appear as if they are gracefully ‘floating’ or suspended above the quilt’s surface. This technique adds a contemporary twist to a timeless motif, leveraging clever piecing and strategic color contrast to create a depth that is both captivating and, surprisingly, easy to achieve with the right guidance and tools.
Understanding the “Floating” Effect: A Masterclass in Visual Design and Fabric Play
The magic behind the captivating “floating” effect in this quilt lies in the strategic and intentional use of color, value, and fabric placement. By pairing vibrant, often patterned, half-hexagons with solid or low-volume background fabric halves, and then meticulously assembling these into full hexagon units, a striking visual contrast is immediately established. This contrast is the key ingredient. When these unique hexagon units are then thoughtfully arranged on the quilt top, interspersed with sashing strips and punctuated by cornerstone squares, the background fabric appears to recede into the distance. This visual trick pushes the colorful, prominent hexagons forward, creating an optical illusion where they seem to hover or glide above the quilt’s surface, detached from their surroundings.
Choosing the right fabrics is paramount to maximizing this effect. Typically, a light or neutral background fabric (such as crisp white, creamy ivory, or a subtle pale grey) will significantly enhance the floating illusion, allowing the brighter, more saturated colors and intricate patterns of your charm pack squares to truly pop and command attention. Conversely, opting for a dark or deep-toned background fabric can yield a dramatically different yet equally stunning result, making the bright hexagons glow with an almost celestial or jewel-like quality. Experimenting with various color schemes and value contrasts can unlock a myriad of aesthetic possibilities, ensuring that each Floating Hexagons Quilt becomes a unique and personal work of art, reflecting your individual style and creativity.
Essential Materials for Your Floating Hexagons Quilt Project
Gathering your materials is often the most exciting first step in any quilting adventure, as it’s where your vision truly begins to take shape. For this enchanting Floating Hexagons Quilt, you’ll need a carefully selected array of fabrics, along with a few indispensable tools. The beauty and convenience of this project are significantly enhanced by its clever use of pre-cut fabrics, specifically charm packs, which make preparation a breeze and allow you to dive straight into the joyful process of sewing without extensive initial cutting. Here’s a detailed list to ensure you have everything meticulously prepared:
- 2 packs of 42 pieces of 5″ squares (Charm Packs): These delightful pre-cut fabric squares are the heart of your colorful hexagons. A charm pack typically contains a coordinated collection of fabrics, often from a single designer line, ensuring your quilt has a harmonious and designer-curated look without the guesswork and effort of matching individual fabrics. Having two packs provides not only ample variety in prints and colors but also sufficient quantity for a generously sized quilt. Consider how your chosen prints will interact with each other and, most importantly, with your selected background fabric to achieve the desired floating effect.
- 2 yards of background fabric: This fabric plays a starring role in creating the signature “floating” illusion. It’s crucial to select a fabric that provides a clear and effective contrast to your colorful charm pack squares. A solid color, a subtle tone-on-tone pattern, or a very low-volume print that reads as a solid from a distance are excellent choices. A light color, such as classic white, soft cream, or a sophisticated pale grey, will make your vibrant hexagons truly stand out. Alternatively, a darker background can create a more dramatic and luxurious, jewel-toned appearance for your floating elements.
- 1/4 yard of cornerstone fabric: Cornerstones are small, yet mighty, squares that add visual punctuation and intricate detail at the intersections of your sashing strips. Despite the small amount of fabric required, the color choice for your cornerstones can make a significant impact on the overall aesthetic. Choose a color that either beautifully complements your hexagon fabrics or provides a bold, unexpected accent, much like the bright pink mentioned in the original inspiration, which adds a lively pop of color.
- 1 1/2 yards of border fabric: The border serves as the elegant frame for your quilt, providing a polished, finished look and often adding an extra layer of design and visual appeal. Select a fabric that effectively ties all your interior colors together or offers a pleasing, contrasting element that highlights the quilt’s core design.
- 3/4 yards of binding fabric: The binding is the crucial final touch that meticulously encases the raw edges of your quilt, providing essential durability and a professional, clean finish. This can be a continuation of your border fabric for a seamless look, a complementary solid to softly frame the quilt, or a bold contrasting print to make a vibrant statement.
- Half Hexi Template: This specialized quilting ruler is the absolute cornerstone of this pattern’s ease, accuracy, and efficiency. It simplifies the often-tricky process of cutting perfect half-hexagons, ensuring consistent shapes and sizes for seamless, stress-free piecing. If you don’t already own one, investing in this versatile tool is highly recommended, as it will undoubtedly become a favorite for many future hexagon-themed quilting projects.
- Other Essential Quilting Tools: Beyond the fabric and template, ensure your basic quilting toolkit is well-stocked. This includes a sharp rotary cutter (with fresh blades for clean cuts), a self-healing cutting mat (to protect your work surface), various quilting rulers (for straight cuts and squaring up), a reliable sewing machine (well-oiled and threaded), a good quality iron and ironing board (for precise pressing), high-quality thread (preferably 100% cotton to match your fabrics), sharp fabric scissors, and plenty of pins or fabric clips to hold everything securely in place.
Step-by-Step Guide: Crafting Your Enchanting Floating Hexagons Quilt
With all your essential materials thoughtfully gathered and organized, it’s now time to embark on the exciting journey of bringing your Floating Hexagons Quilt to life! This comprehensive tutorial meticulously breaks down the entire process into clear, manageable steps, placing a strong emphasis on precision and ease. Following these instructions will ensure a stunning, professional-looking outcome for every quilter, from novice to expert.
Step 1: Preparing Your Background Squares with Precision
Begin your quilting adventure by meticulously preparing your background fabric. Using your trusty rotary cutter, an accurate quilting ruler, and your self-healing cutting mat, carefully cut your 2 yards of background fabric into numerous 5″ squares. This initial cutting step demands precision, as consistently sized squares are absolutely paramount for ensuring that your half-hexagons fit together perfectly and that your final quilt blocks are uniform. Take your time to measure and cut each square with unwavering accuracy. Depending on the standard width of your fabric (typically 42-44 inches), you should be able to yield a significant number of 5″ squares, more than enough for your project. Once cut, set these pristine background squares aside; they are crucial components and will be paired with your vibrant charm pack squares in the very next step.
Step 2: Expertly Cutting Half-Hexagon Units Using Your Template
This step is where the ingenious design of the Floating Hexagons Quilt truly begins to take shape, and the specialized half-hexi template proves its invaluable worth. Take one of your freshly cut background 5″ squares and one of your colorful 5″ solid or patterned squares from your charm packs. Place these two squares precisely right sides together, ensuring all edges are perfectly aligned and flush. Now, carefully position your half-hexi template on top of this stacked fabric pair. Align one of the long, straight edges of the template precisely along the middle of your layered squares. With steady hands, use your rotary cutter to meticulously slice along both sides of the template. Once the first cut is made, carefully rotate the stacked squares and the template to cut the other half. Through this efficient process, you will effectively be cutting two identical half-hexagon shapes from each stacked pair of 5-inch squares. Repeat this precise cutting procedure with all your background squares and charm pack squares. This method is incredibly efficient, as you’re simultaneously cutting two perfectly identical units at once, saving valuable time and ensuring impeccable symmetry across all your half-hexagon pieces.
Step 3: Artfully Assembling the Floating Half-Hexagon Units
After the cutting phase, you will have two distinct piles: one of crisp white (background) half-hexagons and another of vibrant colored (charm pack) half-hexagons. Now, it’s time to bring them together to create the unique “floating” effect. Take one white half-hexagon and one colored half-hexagon. For the signature “floating” effect, you will be joining them in a very specific, intentional way. Place them right sides together. This next detail is crucial: the straight edges of the half-hexagons will not perfectly align edge-to-edge if your goal is to achieve that distinct floating illusion. Instead, you will deliberately offset them slightly. Lay out the colored half-hexagon, then carefully place the white half-hexagon on top, shifted so that the straight raw edge of the white piece aligns with the inner point of the colored piece on one side, and vice-versa on the other. This creates a tiny, controlled “peek” of the colored fabric on either side of the white piece, forming a subtle border effect. Essentially, you’re aligning the anticipated sewing lines, rather than the raw edges of the fabric. Using a consistent 1/4″ seam allowance, meticulously sew them together along the long, straight edges. Repeat this precise step on both sides of each combined unit. The 1/4″ seam allowance is the standard in quilting for a reason – it helps create crisp, flat seams and facilitates accurate block construction. Once sewn, it’s imperative to press the seams flat. You have the option to press them open to reduce bulk or to one side, depending on your personal preference and how the seams will interact with subsequent piecing. Consistent and careful pressing is an often-underestimated key to achieving a smooth, professional-looking quilt top.
Step 4: Forming Complete Hexagon Blocks with Precision and Care
Now that you have successfully pieced your individual half-hexagon units, it’s time to bring them together to form complete, visually stunning hexagon blocks. Take two of your freshly assembled half-units. Place them precisely right sides together, exercising great care to align both the raw edges and, most importantly, the seams where you joined the white and colored fabrics in the previous step. Accurate alignment here is crucial for beautiful points and a seamless look. Pin them securely at the seams and along the edges to prevent any shifting while sewing. Sew these two units together with a consistent 1/4″ seam allowance, ensuring your stitches are even. Once sewn, carefully open up the unit, and you will be delighted to see a beautiful, complete floating hexagon block taking its final shape! Press this newly formed block flat, being mindful of your seams. If necessary, use a square-up ruler to meticulously trim your hexagon blocks to a uniform size. This squaring-up step, while seemingly minor, is absolutely crucial for ensuring that all your blocks are precisely the same dimensions. This consistency will significantly simplify the entire quilt top assembly process later on and will result in crisp, perfectly aligned rows and columns. Aim for unwavering precision in this step to prevent common quilting frustrations such as wavy borders, mismatched points, or skewed blocks in your ultimately finished quilt.
Step 5: Assembling the Quilt Top with Sashing and Cornerstones for a Lattice Effect
This pivotal step brings all your individual, beautiful hexagon blocks together into a cohesive and visually striking quilt top. You will be adding sashing strips and cornerstone squares to meticulously define your blocks and create an elegant lattice effect that further enhances the “floating” illusion. First, meticulously cut your border fabric into 1 1/2″ wide strips. These carefully cut strips will serve as your sashing. Concurrently, you will also need to cut your 1/4 yard of cornerstone fabric into 1 1/2″ wide strips, and then meticulously sub-cut those strips into individual 1 1/2″ squares. These small squares will become your essential cornerstones.
Begin by systematically creating your block rows: Sew 9 of your perfectly assembled hexagon blocks together in a row. Crucially, insert a 1 1/2″ wide sashing strip in between each block. Ensure you maintain a consistent 1/4″ seam allowance throughout this process. Once your desired number of block rows are completely assembled, you will then proceed to create your sashing rows. These rows will consist of alternating 1 1/2″ sashing strips and your 1 1/2″ cornerstone squares. The length of your sashing strips within these sashing rows should precisely match the length of the sashing strips you used between your blocks in the previous step, ensuring perfect alignment. You will then meticulously sew these completed sashing rows in between each of your finished block rows. This sequential assembly creates a beautifully integrated and visually appealing grid, making your hexagons appear to “float” even more distinctly and dramatically against the background. Remember to press all seams meticulously after each sewing step to ensure your quilt top remains perfectly flat, accurate, and free from bulk. The careful placement and consistent cutting of both sashing and cornerstones are absolutely vital for achieving the overall symmetry, stability, and professional finish of your spectacular Floating Hexagons Quilt.
Finishing Your Floating Hexagons Quilt: From Top to Cozy Blanket
Once your quilt top is meticulously assembled and pressed to perfection, the creative journey is far from over! The next crucial steps involve transforming your beautiful pieced top into a finished, durable, and wonderfully cozy quilt. This involves three essential stages: basting, quilting, and binding – each step fundamental for ensuring the quilt’s longevity, adding texture, and providing a polished, professional look.
Basting Your Quilt for Stability
Basting is the critical process of temporarily holding the three distinct layers of your quilt – the intricately pieced quilt top, the soft inner batting, and the supportive backing fabric – securely together before the permanent quilting stitches are added. There are several popular and effective methods for basting: spray basting (which uses a temporary adhesive for quick and easy application), pin basting (involving numerous safety pins strategically placed across the quilt), or needle basting (using a long needle and thread for a more traditional approach). Whichever method you choose, it is paramount to ensure your layers are smooth, completely flat, and entirely free of any wrinkles, puckers, or folds. This meticulous preparation prevents any shifting or bunching during the quilting process, which can lead to unsightly folds or distortions in your cherished finished quilt. Begin by laying your backing fabric wrong side up, securing it smoothly to a clean floor or large table with painter’s tape. Then, carefully layer your batting on top, followed by your quilt top, right side up. Smooth each layer thoroughly before proceeding with your chosen basting method.
Quilting Your Layers for Texture and Durability
Quilting is the artistic stage where you stitch through all three layers of your basted quilt to secure them permanently, prevent the batting from shifting, and add beautiful texture and dimension to your project. For a beginner-friendly approach that yields elegant results, consider “stitch-in-the-ditch,” where you meticulously stitch directly along the existing seam lines of your pieced blocks and sashing. This method is excellent for highlighting your block design without requiring complex free-motion quilting skills. Straight-line quilting, either running parallel to your sashing strips or in a regular grid pattern, is another straightforward and modern option that provides a clean, contemporary aesthetic. If you’re feeling a bit more adventurous and wish to explore, simple meandering or stippling patterns can add lovely organic texture without being overly challenging. The thoughtful choice of quilting pattern can significantly impact the final look, drape, and overall feel of your Floating Hexagons Quilt, transforming it into a truly unique textile art piece.
Binding Your Quilt for a Professional Finish
Binding provides the final, essential, and elegant frame for your quilt, meticulously encasing all the raw edges of the three layers and adding that professional, polished touch. Typically, binding strips are precisely cut 2 1/2″ wide from your chosen binding fabric, then joined end-to-end (often on the bias for flexibility) to create one continuous, long strip. This strip is then pressed in half lengthwise to create a double-fold binding. The binding is first carefully sewn to the front of the quilt’s perimeter, ensuring neat corners (often mitered for a crisp look), then it is meticulously wrapped around to the back of the quilt and either hand-stitched for an invisible, heirloom finish or machine-stitched for speed and durability. Take your time with this crucial final step, as neatly mitered corners and consistent, even stitching will elevate the overall appearance and enhance the perceived quality of your beautifully finished Floating Hexagons Quilt.
Essential Tips for Quilting Success: Elevate Your Craft and Enjoy the Process
To ensure your Floating Hexagons Quilt, and indeed all your future quilting projects, turn out beautifully and bring you immense satisfaction, here are some invaluable tips gleaned from years of quilting experience. Incorporating these practices into your routine will significantly enhance your results and make your quilting journey even more enjoyable:
- Precision is Your Best Friend: In the world of quilting, accuracy in cutting and maintaining a consistent 1/4″ seam allowance are absolutely paramount. Even a slight variation of an eighth of an inch can accumulate across multiple blocks and rows, throwing off your block alignment, distorting your design, and ultimately affecting the overall dimensions of your quilt. Invest in good quality, sharp rotary blades, precise rulers, and a reliable sewing machine that can consistently deliver a true 1/4″ seam.
- “Press,” Don’t “Iron”: When working with fabric and pressing seams, always use an up-and-down motion with your iron (this is called “pressing”) rather than a back-and-forth motion (“ironing”). Pressing prevents stretching, distorting, or skewing your fabric and quilt blocks, helping to maintain their exact shape and size, which is critical for accurate piecing.
- Embrace Chain Piecing for Efficiency: To significantly save time and thread, especially when you are constructing many identical units or blocks, master the technique of chain piecing. This involves sewing multiple units one after another without lifting the presser foot or cutting the thread in between each piece. Once all units are sewn, you simply snip the threads to separate them, creating a neat chain of pieced units.
- Perfect Points with Nesting Seams: When joining blocks or rows where seams will meet, achieve perfectly matched points by pressing your seams in opposing directions on adjacent pieces. This allows the seams to “nest” or interlock perfectly when you sew them together, reducing bulk at the intersection and helping you achieve crisp, perfectly aligned points and corners.
- Always Test Your Seam Allowance: Before embarking on your main project, take a few scrap strips of fabric, sew them together with your standard 1/4″ seam allowance, and then measure the resulting seam. If it’s not a true 1/4″, adjust your sewing machine (e.g., needle position, foot pressure) until you can consistently achieve the accurate seam. This small step can save hours of frustration later.
- Pre-Wash or Not? Understand Your Fabrics: Decide whether to pre-wash your fabrics before cutting and sewing. Pre-washing can prevent fabric shrinkage and color bleeding in the finished quilt. However, some quilters prefer not to pre-wash to maintain fabric crispness, especially with pre-cuts like charm packs. Be consistent in your choice for all fabrics in a single quilt.
- Cultivate Patience and Enjoy the Journey: Quilting is a deeply rewarding journey of creativity, skill development, and relaxation. Don’t strive for absolute, unattainable perfection, especially if you are a beginner. Embrace any minor “quilting character” (affectionately known as small imperfections) as a sign of handmade artistry, and truly celebrate the joy of creating something beautiful, functional, and heartfelt with your own hands.
The Floating Hexagons Quilt: A Missouri Star Masterpiece with Jenny Doan’s Touch
This delightful Floating Hexagons Quilt truly embodies the core spirit and guiding philosophy of the Missouri Star Quilt Company – making seemingly intricate and visually complex designs remarkably accessible and genuinely enjoyable for everyone, regardless of their quilting background. Inspired and brought to life through the insightful guidance and boundless enthusiasm of Jenny Doan, a true icon and beloved educator in the global quilting world, this pattern masterfully combines the timeless appeal of traditional quilting with a fresh, modern, and undeniably eye-catching twist. Its unique construction ensures a dynamic visual impact that is both sophisticated and inviting.
Whether you find yourself to be a seasoned quilter looking for a refreshing, engaging project that offers creative satisfaction, or a beginner eager to confidently dive into the vibrant world of fabric, thread, and creative expression, this Floating Hexagons Quilt offers an exceptionally rewarding and confidence-building experience. The innovative and intuitive use of the specialized half-hexi template brilliantly simplifies a potentially complex geometric design, allowing you to bypass common frustrations and instead focus wholeheartedly on the exciting process of fabric selection, color play, and the pure joy of creation. So, with your newfound knowledge and enthusiasm, gather your chosen supplies, lovingly prepare your workspace, fire up your trusty sewing machine, and embark on the fulfilling journey to create a stunning quilt that will undoubtedly become a cherished, conversation-starting piece in your home or a deeply heartfelt, handmade gift for someone truly special. Happy quilting, and may your stitches be straight and your creative spirit soar!