
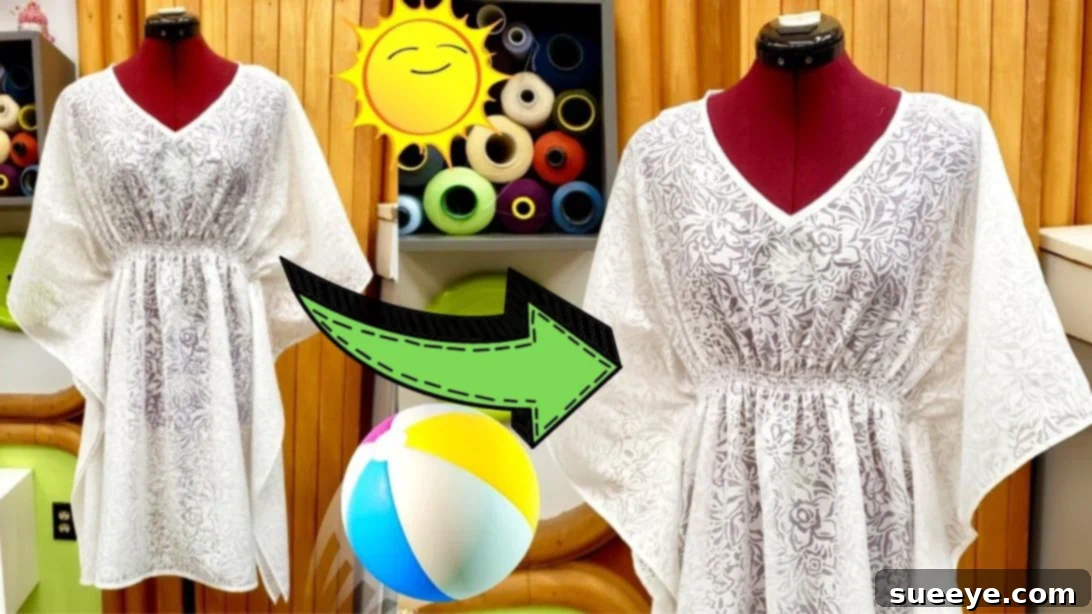
Easy DIY Swimsuit Cover-Up: Your Ultimate Sewing Tutorial for Summer Style
As the long-awaited summer season finally arrives, bringing with it the promise of sunshine, refreshing dips, and unforgettable moments, it’s time to prepare for all those delightful outdoor activities. Think barbecue gatherings, serene picnics, and, of course, relaxing days by the pool or at the beach. What better way to complement your summer wardrobe than with a stunning, custom-made swimsuit cover-up? Forget the generic, often pricey store-bought options; with this incredible sewing project, you can craft a personalized and budget-friendly piece that perfectly matches your style.
This detailed sewing tutorial, brought to you by the talented Downtown Tailoring on YouTube, will expertly guide you through every step of creating a beautiful, flowing cover-up. Not only is it a fantastic way to enhance your own summer look, but it also makes for a thoughtful, handmade gift for friends and family, or even a charming item to sell if you’re looking to turn your passion into a small business. If you’re eager to dive into this rewarding project, continue reading our expanded guide below, and be sure to complement your learning by watching the full video tutorial and consulting the comprehensive pattern instructions. We’re confident you’ll adore this sewing endeavor as much as we do. Happy sewing!
Why Sew Your Own Swimsuit Cover-Up? The Benefits of Handmade Summer Style
Embarking on a DIY sewing project for a swimsuit cover-up offers numerous advantages over simply purchasing one off the rack. Firstly, cost-effectiveness is a major factor. By selecting your own fabric and investing a little time, you can create a high-quality garment for a fraction of the price of designer beachwear. This allows you to allocate more of your summer budget to other fun activities!
Beyond savings, personalization is key. When you sew your own cover-up, you have complete creative control. You can choose the exact fabric that speaks to you – from vibrant tropical prints to sophisticated solids, lightweight cottons to luxurious chiffons. This ensures your cover-up isn’t just an accessory, but a true reflection of your unique style and personality. Furthermore, you can tailor the fit precisely to your body, ensuring comfort and confidence, something often lacking in mass-produced clothing.
Finally, there’s an immense sense of satisfaction that comes with creating something beautiful with your own hands. It’s a rewarding hobby that allows you to express your creativity, learn new skills, and produce a one-of-a-kind item that you’ll cherish. Plus, handmade items are often more durable and ethically produced, making them a more sustainable choice for your wardrobe.
Choosing the Perfect Fabric for Your Custom Swimsuit Cover-Up
The success and comfort of your swimsuit cover-up largely depend on your fabric choice. For a garment designed for summer and beach environments, certain characteristics are paramount. Look for fabrics that are lightweight, breathable, and quick-drying. Natural fibers like cotton or linen blends are excellent choices as they allow air circulation, preventing you from feeling overheated. Opt for a fabric with a soft drape; this will ensure your cover-up flows elegantly over your swimwear, creating a flattering silhouette.
Viscose, rayon, or a lightweight polyester blend can also be suitable, especially if you desire a silkier feel or wrinkle resistance. Consider the opacity – do you want a sheer, airy cover-up, or something with a bit more coverage? The pattern of your fabric can also make a statement. Bold floral prints, classic stripes, or subtle textures can all elevate your cover-up. Pre-wash your fabric before cutting to prevent any shrinkage or color bleeding after your cover-up is finished. This essential step ensures your garment maintains its size and vibrancy wash after wash.
Materials: Crafting Your Beach-Ready Cover-Up
Before you begin your exciting sewing journey, gather all the necessary tools and materials. Having everything at hand will ensure a smooth and enjoyable crafting experience.
- Fabric: As discussed, choose a lightweight, breathable, and quick-drying fabric with a good drape. Consider a width that accommodates your pattern pieces easily.
- Ban-roll: This is a stiffening material often used in tailoring, particularly for hems, to provide structure and a clean, crisp finish. It will give your cover-up’s hem a professional and slightly weighted feel.
- Matching Thread: Select a high-quality polyester thread that closely matches the color of your fabric. This ensures your stitches blend seamlessly into the garment.
- Elastic Thread: This special thread, usually used in the bobbin, creates a shirring or gathering effect, perfect for cinching the waist of your cover-up for a flattering, custom fit.
- Needle: Ensure you have the correct type and size of sewing machine needle for your chosen fabric (e.g., universal needle for most wovens, sharper needle for finer fabrics).
- Pins: Essential for holding fabric layers together securely before and during sewing, ensuring accuracy.
- Sewing Machine: A standard sewing machine will be perfect for this project. Ensure it’s in good working order and recently cleaned/oiled for optimal performance.
- Pattern Guide: This crucial link provides the downloadable pattern and detailed instructions specific to the design, guiding you on fabric layout and cutting.
Step-by-Step Sewing Tutorial: Crafting Your Beautiful Swimsuit Cover-Up
Now that you have all your materials ready, let’s get started on bringing your custom swimsuit cover-up to life. Follow these detailed steps carefully, and remember to refer to the video tutorial and pattern guide for visual aids and precise measurements.
Step 1: Pattern Preparation and Precision Cutting
Your first task is to meticulously prepare and cut your fabric. Begin by downloading and printing the pattern instructions provided by Downtown Tailoring. Lay out your chosen fabric smoothly on a large, flat surface, ensuring it’s free of wrinkles. Pin the pattern pieces securely onto your fabric, aligning with the grainline markings. Using sharp fabric shears or a rotary cutter, carefully cut out all the fabric pieces according to the pattern outlines. Precision at this stage is crucial for a well-fitting garment. Once cut, transfer any necessary markings (such as dart lines or notch placements) from the pattern onto your fabric using tailor’s chalk or a fabric marker. With all your pieces ready, you can now begin the exciting process of construction.
Step 2: Constructing the Garment – Shoulders and Seams
Start assembling your cover-up by joining the main fabric pieces. The pattern guide will indicate which pieces to join first, but typically, you’ll begin with the shoulder seams. For a professional and durable finish, especially on lightweight fabrics like those suitable for a cover-up, consider using a French seam. A French seam encloses the raw edges within the seam itself, resulting in a clean, strong finish that looks beautiful from both the inside and outside of the garment. To create a French seam, place the wrong sides of the fabric together, sew a narrow seam (e.g., 1/4 inch), trim the seam allowance, then press it open. Fold the fabric again, this time with right sides together, encasing the raw edge, and sew another seam slightly wider than the first (e.g., 3/8 inch). This traps the raw edge neatly inside. Throughout the construction, remember to press your seams after each sewing step. Pressing is a non-negotiable step in quality garment construction; it flattens seams, shapes the fabric, and gives your project a much more refined and professional appearance.
Step 3: Hemming with Ban-Roll for Structure and Shape
Once the main body pieces are joined and your seams are pressed, it’s time to address the hem of your cover-up. The original pattern suggests incorporating a ban-roll around the hem to add stiffness and structure. This technique is fantastic for creating a hem that drapes beautifully and resists clinging, giving your cover-up a more elegant and substantial feel. To do this, measure and cut your ban-roll to the exact circumference of your cover-up’s hem. Pin the ban-roll to the wrong side of your fabric, along the raw edge of the hem, following the pattern’s instructions for placement. Carefully stitch the ban-roll in place, making sure your stitches are neat and secure. After attaching the ban-roll, you will likely turn up the hem and topstitch it, effectively encasing the ban-roll and creating a crisp, weighted finish. This detail is what often distinguishes a homemade item from a professionally tailored piece, adding a touch of sophistication to your beachwear.
Step 4: Crafting and Attaching the Bias Tape for a Refined Collar
Next, focus on the neckline of your swimsuit cover-up. This typically involves finishing the raw edges with bias tape, which provides a clean, durable, and decorative finish. If your pattern requires you to make your own bias tape, cut a strip of fabric on the bias (at a 45-degree angle to the selvage) from the same fabric you used for the main cover-up. This allows the tape to stretch and conform to curves beautifully. Fold the raw edges of the bias tape towards the center and press them firmly, then fold the entire strip in half lengthwise and press again. This creates a neat, finished edge. Now, open up one of the folds and pin the bias tape to the raw edge of your cover-up’s collar, right sides together. Stitch it in place. Then, fold the bias tape over to the inside of the garment, enclosing the raw edge, and topstitch it down. Topstitching not only secures the bias tape but also adds a professional and decorative touch around the collar, making it look polished and complete.
Step 5: The Shirred Waistline with Elastic Thread for a Custom Fit
The final, exciting step brings your cover-up to life with a flattering, adjustable waistline. This involves using elastic thread to create a shirring effect, which gently gathers the fabric for a comfortable and customized fit. First, change the bobbin thread on your sewing machine to elastic thread. It’s important to wind the elastic thread onto the bobbin by hand, without stretching it, as you want the tension to come from the machine’s upper thread. Keep your top thread as regular matching polyester thread. Adjust your stitch length to a longer setting (e.g., 3.0-4.0 mm) and increase your top tension slightly. Then, starting from the side seam or center back, begin sewing around the waist area of your fabric. Sew multiple parallel rows, about 1/2 to 1 inch apart, until you achieve the desired gathered look. As you sew, the elastic thread in the bobbin will automatically gather the fabric, creating that beautiful shirred effect. Once you’re satisfied with the shirring, secure your threads, and your stunning swimsuit cover-up is complete! For the most detailed instructions on these advanced techniques, don’t forget to click the pattern link and watch the comprehensive video tutorial.
Customizing Your Swimsuit Cover-Up: Make It Uniquely Yours
One of the greatest joys of sewing is the ability to personalize your creations. While the Downtown Tailoring pattern provides a fantastic base, feel free to add your unique flair to make your cover-up truly one-of-a-kind. Consider adding decorative elements like delicate lace trim along the hem or sleeves for a touch of elegance. You could also experiment with different neckline finishes, perhaps a deeper V-neck or a square neckline, if the pattern allows for easy modification.
Think about incorporating side slits for increased movement and a breezy feel, or adding a drawstring to the waist for even more adjustability. Pockets, while sometimes challenging on lightweight fabrics, can be a practical addition. Don’t be afraid to play with fabric combinations – a contrasting fabric for the bias tape or shoulder accents can create an eye-catching detail. The possibilities are endless, allowing you to transform a beautiful pattern into your signature summer piece.
Care and Maintenance Tips for Your Handmade Cover-Up
To ensure your beautiful, handmade swimsuit cover-up lasts for many summers to come, proper care is essential. Always refer to the care instructions for your specific fabric choice, as this will dictate the best washing method. Generally, most lightweight cottons, linens, and rayon blends used for cover-ups can be machine washed on a gentle cycle with cold water. It’s often best to use a mild detergent to preserve fabric colors and elasticity.
When it comes to drying, air-drying is usually the safest option. Hang your cover-up on a padded hanger or lay it flat to dry to prevent stretching or damage to the shirring. If machine drying is necessary, use the lowest heat setting and remove the garment while it’s still slightly damp. Ironing, if needed, should be done on a low to medium heat setting, especially for rayon or delicate blends. Always test an inconspicuous area first. Proper care will help maintain the fabric’s integrity, color, and the integrity of your stitches, keeping your cover-up looking fresh and vibrant.
Frequently Asked Questions About Sewing Swimsuit Cover-Ups
Embarking on a new sewing project can bring up questions. Here are some common queries about sewing your own swimsuit cover-up:
- Q: Is this project suitable for beginner sewers? A: Absolutely! While it involves a few techniques like French seams and bias tape, the step-by-step guidance from Downtown Tailoring and the video tutorial make it accessible for motivated beginners. Patience and careful pressing are your best friends.
- Q: What’s the best fabric if I want a really quick-drying cover-up? A: Lightweight polyester blends or specific swimwear-type fabrics (like performance knits) are excellent for quick-drying properties. However, for breathability and comfort in hot weather, cotton or linen blends are often preferred, even if they take a bit longer to dry.
- Q: Can I adjust the length of the cover-up? A: Yes! One of the biggest advantages of sewing your own is customization. Before cutting, simply adjust the pattern piece for the hem to your desired length. Always add a bit extra for hemming.
- Q: Do I need a serger for this project? A: While a serger can give very clean, professional finishes, it’s not essential. This tutorial specifically uses techniques like French seams and bias tape, which are perfectly achievable with a standard sewing machine and provide beautiful, enclosed finishes.
We extend our sincerest gratitude to Downtown Tailoring via YouTube for generously sharing their expertise and inspiring images used throughout this guide. If you’ve enjoyed creating this project and appreciate the clear, professional instructions, we wholeheartedly encourage you to visit her YouTube channel. You’ll find a treasure trove of other fantastic sewing videos that are sure to spark your next creative endeavor. Give her channel a visit, hit that subscribe button, and join a community of passionate sewers!