
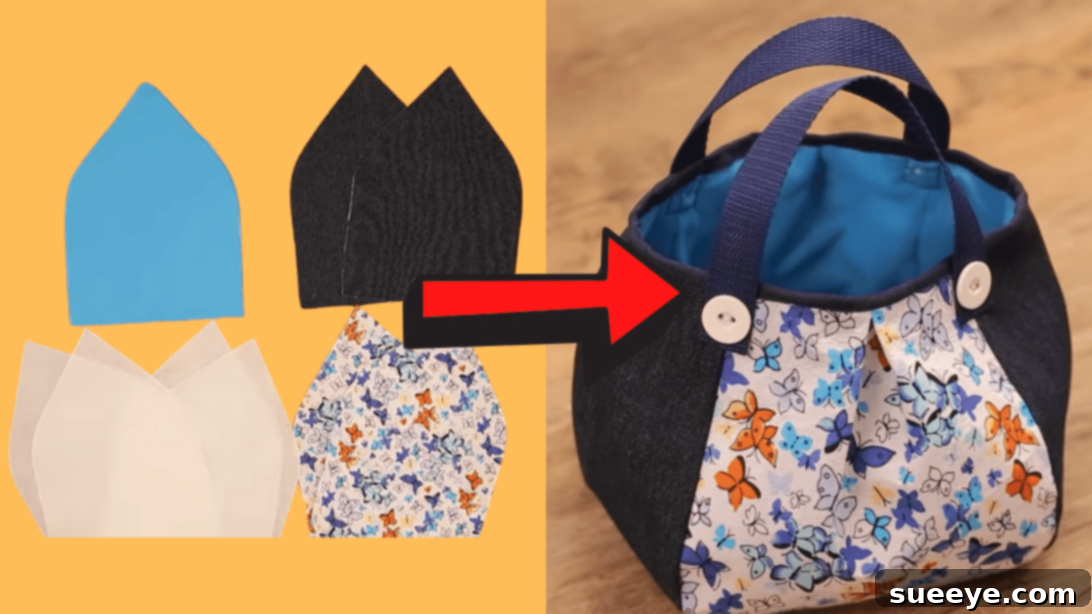
Craft Your Own Stylish Accessory: The Easy Patterned Handbag Sewing Project
Are you searching for fresh inspiration for your next creative endeavor? Dive into the wonderful world of DIY sewing with this delightful and remarkably easy patterned handbag project, inspired by the innovative minds at Miarti – Reuse. This project isn’t just about crafting a beautiful new accessory; it’s a celebration of sustainability and personal expression. By transforming fabric scraps, forgotten ribbons, and even old straps into a chic and functional handbag, you’re embracing the art of upcycling while unleashing your inner designer.
Perfect for both seasoned sewers looking for a quick, satisfying make and absolute beginners eager to try their hand at sewing, this tutorial guides you through each step with clarity and simplicity. The result? A charming, unique handbag that’s not only practical but also perfectly embodies a vibrant, summery spirit—though its appeal certainly extends beyond just one season! Imagine the satisfaction of carrying a bag you’ve lovingly created yourself, showcasing your personality with every stitch. Get ready to gather your materials and let your creativity flow. For a comprehensive visual guide, be sure to watch the full instructional video provided by Miarti – Reuse.
Essential Materials for Your Handmade Handbag
Before you embark on your sewing journey, ensure you have all the necessary components. Selecting your materials is the first exciting step in bringing your vision to life. This project encourages creativity and resourcefulness, making it ideal for utilizing items you might already have around the house.
- Paper: Essential for creating your custom pattern. Standard printer paper, craft paper, or even newspaper can work. The larger your paper, the easier it will be to draft the full pattern accurately.
- Ruler: A crucial tool for precise measurements. Accuracy in pattern drafting directly impacts the final shape and symmetry of your handbag. A clear quilting ruler or a standard measuring tape will be invaluable.
- Two Different Styles or Patterns of Cloth: This is where your handbag’s personality truly shines! Choose two contrasting or complementary fabrics that speak to your style. Think about textures, colors, and patterns. Cotton, canvas, denim, or even upholstery scraps can work wonderfully. This is an excellent opportunity to reuse fabric remnants from previous projects or give new life to old garments. You will need enough fabric for the main outer body of the bag.
- Lining Cloth: A separate fabric for the interior of your bag. The lining provides a clean finish, adds durability, and can introduce an unexpected pop of color or pattern. Lightweight cotton or polyester blends are often good choices. You’ll need enough to mirror the main outer fabric pieces.
- Interfacing Fabric: This unsung hero provides structure, body, and stability to your bag, preventing it from collapsing and giving it a professional finish. Fusible interfacing (which adheres with heat from an iron) is typically the easiest for beginners. Choose a medium-weight fusible interfacing for a well-structured yet flexible bag.
- Ribbon: A versatile decorative element. This can be a contrasting color, a delicate lace, or a simple grosgrain ribbon to add a touch of elegance or fun to your bag’s top edge or handles. Consider the width and texture that best complements your chosen fabrics.
- Two Straps: These will form the handles of your handbag. You can repurpose straps from an old bag, create your own from matching or contrasting fabric, or purchase pre-made straps. Ensure they are comfortable and durable enough to support the bag’s contents.
- Four Buttons: Primarily for decoration, these buttons can be used to embellish the strap attachment points or add a focal point. Choose buttons that harmonize with your fabric choices in terms of size, color, and style.
- General Sewing Supplies (Highly Recommended):
- Sewing Machine: While hand sewing is possible, a machine will make the process much faster and result in stronger seams.
- Matching Thread: Choose thread that matches your main outer fabrics for an invisible finish, or contrasting thread for a decorative effect.
- Fabric Scissors: Sharp scissors dedicated solely to fabric will ensure clean, precise cuts.
- Pins or Fabric Clips: To hold fabric layers together while sewing, ensuring alignment.
- Iron and Ironing Board: Essential for pressing seams and fusing interfacing, resulting in a crisp, professional finish.
- Measuring Tape: For flexible measurements on fabric.
- Chalk or Fabric Marker: To transfer pattern markings onto your fabric.
Step-by-Step Guide: Crafting Your Easy Patterned Handbag
Follow these detailed instructions to transform your chosen materials into a beautiful and functional handbag. Take your time with each step, and don’t hesitate to refer to the video for visual clarification.
Step 1: Crafting Your Custom Pattern Piece
Begin by creating the foundation of your bag: the pattern. This unique design gives the handbag its distinctive shape.
- Take a large piece of paper and fold it neatly in half. This ensures symmetry for your pattern.
- From the folded edge, measure 4.7 inches (approximately 12 cm) inwards along the top edge and mark this point. This will define the upper width of one side of your bag.
- From this 4.7-inch mark, draw a diagonal line extending down to the lower corner of the paper (the corner opposite the folded edge). This diagonal will form a significant part of your bag’s side profile.
- Now, focus on the upper end of that diagonal line. Gently curve this section inwards, smoothing it out until the curve reaches the middle point of the paper along the top edge. This softening of the corner creates a more elegant and ergonomic top edge for the bag.
- Using a sharp pair of scissors, carefully cut along this newly drawn curve. Once cut and unfolded, this paper piece will serve as one half of your main bag pattern, featuring a distinctive contoured top edge. Ensure your cuts are smooth for a professional-looking pattern.
Step 2: Precisely Cutting Your Fabric Pieces
With your paper pattern ready, it’s time to cut your fabrics. Accuracy here is key for a well-proportioned bag.
- Lay your first chosen outer fabric smoothly on a flat surface, ensuring it’s wrinkle-free. Place your newly created paper pattern piece on top of the fabric.
- Carefully trace around the pattern piece using a fabric marker or tailor’s chalk. Repeat this process to cut two identical pieces from your first outer fabric. These will form the main front and back panels of your bag.
- Next, repeat the tracing and cutting process for your second outer fabric. Again, cut two identical pieces. These will create a contrasting or complementary design element on your bag.
- Now, for the lining: using the same paper pattern, trace and cut four pieces from your chosen lining fabric. You need four pieces to create a sturdy and neatly finished inner bag, often constructed as two separate lining panels that are then joined.
- Finally, for the interfacing: trace and cut four pieces from your interfacing fabric. These four pieces will provide structure to both the front and back outer panels of your bag.
Step 3: Fusing the Interfacing for Structure
Interfacing is vital for giving your handbag body and preventing it from looking flimsy. This step focuses on attaching it securely.
- Take one of your cut outer fabric pieces (from either the first or second style). Lay it with its wrong side facing up.
- Carefully place a corresponding piece of interfacing fabric on top, ensuring the fusible (glue) side of the interfacing is down against the wrong side of your fabric.
- Following the manufacturer’s instructions for your specific interfacing, use a hot iron to press the interfacing onto the fabric. Apply firm, even pressure and appropriate heat for the recommended duration. This process will bond the interfacing to the fabric, adding stiffness and durability.
- Repeat this fusing process for all four outer fabric pieces. After this step, you will have four main outer fabric pieces, each backed with interfacing, ready for assembly.
Step 4: Assembling the Outer Bag Panels
Now, let’s start constructing the main body of your handbag. This step focuses on joining two of your interfaced outer fabric pieces.
- Take one of your interfaced outer fabric pieces (let’s say from your first style). Lay it flat with its right side facing up.
- Take another interfaced outer fabric piece (perhaps from your second style, to create the patterned effect). Place it directly on top of the first piece, ensuring their right sides are facing each other (Right Sides Together, RST). Align the edges carefully.
- Pin the two pieces together along one of the curved side edges. This refers to the longer, diagonal-curved edge that you created with your pattern.
- Using your sewing machine, sew these two pieces together along that pinned curved edge. Use a standard seam allowance (e.g., 3/8 inch or 1 cm). Backstitch at the beginning and end to secure the seam. This creates one half of your bag’s outer shell, showcasing the two different patterns.
Step 5: Refining Seams and Forming the Outer Bag Shell
This step ensures a smooth finish for your curves and begins to give your bag its three-dimensional form.
- After sewing the curved seam in Step 4, carefully trim the seam allowance down slightly. More importantly, make small clips or notches into the seam allowance along the curve, being careful not to cut through the stitching. These clips allow the fabric to spread and lie flat when turned right side out, preventing puckering and ensuring a smooth curve.
- Open up the sewn pieces and press the seam open using your iron. This helps to “flatten the cloth neatly” and provides a professional finish.
- Now, take this assembled panel (which forms one side of your bag) and place it right sides together with the remaining two interfaced outer fabric pieces that you prepared (which will form the other side of your bag).
- Align all the edges precisely. Pin around the entire perimeter of the bag, leaving the top opening unsewn. Sew all the remaining side and bottom edges together, again using your chosen seam allowance and backstitching at the start and end.
- Once all the side and bottom seams are sewn, carefully clip the corners (if applicable) and notch any remaining curves. Turn the entire outer bag shell right side out. Use a point turner or a blunt object to gently push out all the corners and curves, ensuring a neat shape. Press the entire outer bag with an iron.
Step 6: Assembling and Attaching the Lining
The lining creates a clean interior for your bag and hides all the raw seams, giving it a polished look.
- Take your four pieces of lining cloth. Just as you did with the outer bag, you will assemble these into a complete lining shell. Place two lining pieces right sides together and sew one curved side seam. Repeat for the other two lining pieces.
- Then, join these two halves of the lining, right sides together, sewing around the remaining side and bottom edges. Critically, leave an opening of about 3-4 inches (7-10 cm) along one of the bottom seams of the lining. This opening will be used later to turn the entire bag right side out.
- Once your lining shell is assembled (with the turning hole), place it inside the outer bag shell. Ensure that the outer bag is right side out and the lining bag is inside-out. The right side of the lining should be facing the right side of the outer bag. Align the top raw edges of both the outer bag and the lining bag, carefully matching any side seams.
- Pin the top edges of the outer bag and the lining together all the way around.
- Sew a seam around the entire top edge of the bag, joining the outer fabric and the lining fabric. Use your standard seam allowance and backstitch at the beginning and end.
Step 7: Finishing the Top Edge and Preparing for Straps
This step brings the bag together, allowing it to take its final shape and preparing it for the handles.
- Through the opening you left in the bottom of the lining (Step 6), carefully pull the entire bag right side out. Gently push out all corners and smooth out the curves. The lining will now be on the outside, and your bag’s outer fabric will be on the inside.
- Carefully align the top edges of the bag, making sure the seam you just sewed is neatly tucked inside and forms a crisp top edge. Press this top edge with an iron to create a clean, sharp crease.
- To prepare for strap attachment and ensure a tidy top finish, measure approximately 1.2 inches (about 3 cm) down from the very top finished edge of the bag. Mark this line around the entire perimeter of the bag.
- Sew a stitch line along this mark. This creates a sturdy channel or casing effect at the top of your bag. You might also create small, neat openings on the sides of the bag within this channel, by stitching a small box, leaving an unsewn gap, and reinforcing it. This will be where your straps can be inserted if they are to pass through a casing. Alternatively, if your straps are sewn on top, this stitching line simply reinforces the top edge. For this design, it appears to be creating neat, reinforced points for strap attachment directly onto the top edge, or to create distinct sections for the ribbon in the next step.
- Ensure all raw edges within the lining opening are tucked inwards. Hand stitch or machine stitch this opening closed neatly. Your bag now has a fully enclosed lining.
Step 8: Adding the Decorative Ribbon Accent
A simple ribbon can add a charming finish and enhance the aesthetic appeal of your handmade bag.
- Select your chosen ribbon. Consider its width and how it will complement the overall design.
- Position the ribbon along the top finished edge of your bag, either just above the stitching line from Step 7, or centered along the very top edge. This ribbon can serve as a beautiful decorative accent or a functional element if you wish to thread it through the bag as a drawstring (though for this project, it seems purely decorative).
- Carefully pin the ribbon in place, ensuring it is even all the way around.
- Stitch the ribbon securely onto the top edge of the bag. You can sew along both the top and bottom edges of the ribbon for a flat, neat application, or just along one edge if you prefer a different look. Use matching thread for an invisible finish.
Step 9: Attaching the Functional Straps
Now, transform your fabric creation into a functional handbag by adding the handles.
- Determine the ideal placement for your two straps. They should be evenly spaced on the front and back of the bag, providing balance and comfort when carried. Mark these points with a fabric marker or pins.
- Take one strap end and position it securely onto the top edge of the bag, aligning it with one of your marks. You can tuck the raw end of the strap under slightly for a cleaner finish.
- Using your sewing machine, attach the strap firmly to the bag. Sew a strong rectangular box stitch, or an ‘X’ within a box, to ensure maximum durability. Repeat for all four attachment points (two for each strap). Ensure that the straps are not twisted before sewing them down.
Step 10: Personalizing with Decorative Buttons
The final touch—adding buttons—allows you to infuse even more personality into your handmade bag.
- With your straps securely in place, decide where you’d like to position your four decorative buttons. A common and appealing placement is at the base of each strap attachment point, covering the stitching and adding a charming detail.
- Carefully hand-stitch or machine-stitch each button onto the bag. Ensure they are securely fastened. These buttons are not just functional but serve as a delightful embellishment, enhancing the overall look of your easy patterned handbag.
Your Unique Easy Patterned Handbag: A Sustainable Style Statement
Congratulations! You’ve successfully completed your easy patterned handbag. This project is a testament to the joy of creation, the beauty of sustainable practices, and the satisfaction of personalizing your style. From repurposing fabric scraps to adding unique embellishments, every step allows for creative input, resulting in a truly one-of-a-kind accessory.
This beginner-friendly guide empowers you to craft a stylish and functional bag that’s perfect for daily use, a casual outing, or as a thoughtful handmade gift. Embrace the versatility of this design by experimenting with different fabric combinations, strap styles, and button choices for future projects. Remember, the most beautiful creations often come from a willingness to experiment and a passion for making. We encourage you to share your finished Miarti – Reuse inspired handbags with the sewing community!