
Craft a Stunning Dollar Tree Christmas Centerpiece: Your Guide to Festive DIY Decor
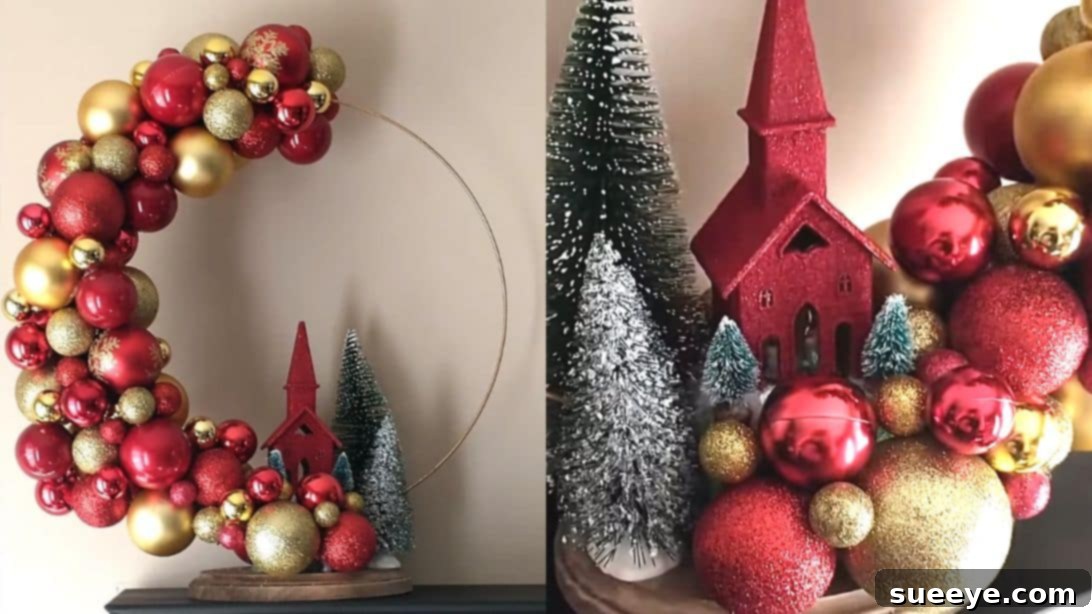
Transforming your home for the holidays doesn’t have to break the bank. With a little creativity and a trip to your local Dollar Tree, you can craft breathtaking decorations that look far more expensive than they are. Today, we’re diving into a magnificent Dollar Tree Christmas centerpiece decor DIY, inspired by the brilliant work of Jamie’s Creations on Youtube. This elegant design perfectly balances festive charm with minimalist sophistication, making it an undeniable statement piece for any room. Imagine a beautifully adorned brass ring, featuring a charming miniature Christmas scene – all brought to life with incredibly affordable materials. This guide will walk you through each step, ensuring you can replicate this gorgeous centerpiece and infuse your space with personalized holiday cheer.
Why DIY Your Christmas Centerpiece This Year?
Opting for a DIY Christmas centerpiece offers a plethora of benefits beyond just saving money. It allows you to inject a unique, personal touch into your holiday decor, creating something truly one-of-a-kind that reflects your style. Handmade decorations often carry a sentimental value that mass-produced items simply can’t match. Moreover, crafting can be a wonderfully therapeutic and enjoyable activity, perfect for getting into the festive spirit, or even as a fun project to share with family and friends. This specific Dollar Tree DIY project is particularly appealing due to its accessibility, requiring only basic crafting skills and readily available materials, proving that stunning holiday decor is within everyone’s reach.
Materials You’ll Need: Your Dollar Tree Holiday Haul
The beauty of this project lies in its affordability and the ease of sourcing materials, predominantly from Dollar Tree. Here’s a comprehensive list of what you’ll need to gather:
- Brass Wreath Rings: Look for packs of three; you’ll typically use the largest ring for the main structure of your centerpiece, providing a grand and elegant base.
- Oval Wood Plaque (5×7 inches): This serves as the sturdy foundation for your entire creation, offering stability and a classic look.
- Floral Foam (approx. 2.9 x 3.9 x 3.9 inches): Essential for anchoring your decorative elements firmly in place. Its density makes it ideal for holding picks and ornaments.
- Wood Stain: To give your wood plaque a rich, finished look, enhancing its natural beauty and adding warmth to your centerpiece.
- Gold Metallic Spray Paint: For transforming ordinary items into glittering accents, adding a touch of luxury and festive sparkle.
- Hot Glue Gun & Glue Sticks: Your primary adhesive for securely attaching all components. Ensure you have plenty of sticks on hand.
- Garland Ties (3 pieces): These flexible ties will be used to wrap around the wreath ring, providing a textured base and a pop of green.
- Assorted Ball Ornaments (Red and Gold): Various sizes are crucial for creating depth and visual interest on your wreath ring. Red and gold are classic Christmas colors that evoke warmth and joy.
- Glitter Filler Balls: Perfect for filling in any small gaps between larger ornaments, adding extra sparkle and a cohesive finish.
- Small Church Ornament: This charming piece will be the focal point of your miniature scene, giving it a nostalgic and serene touch.
- Mod Podge: An all-in-one glue, sealer, and finish, indispensable for applying glitter evenly and sealing it in place.
- Fine Glitter: To add an enchanting shimmer to your church ornament and possibly other elements, catching the light beautifully.
- Mini Tree (or small decorative tree): To create a festive miniature forest around your church, enhancing the scene’s realism.
- Faux Snow: For adding a delightful, wintry touch around the base of your church and trees, completing the snowy landscape.
- Bottle Brush Trees (2 pieces): Larger than the mini tree, these will frame your centerpiece on the wood plaque, adding height and dimension.
Step-by-Step Guide: Crafting Your Festive Masterpiece
Step 1: Preparing Your Foundation
Begin by taking your floral foam block and carefully cutting it in half. Precision here helps with stability later. Next, select one of these halves and cut it in half again. The goal is to create a piece of foam approximately 2 ½ inches wide. This specific dimension is crucial as it will provide the ideal base for securely holding your wreath ring and other decorative elements without being too bulky on your wood plaque. Use a sharp craft knife for clean cuts, ensuring the surfaces are relatively flat for good adhesion.
Step 2: Securing the Wreath Ring
Now, take the 2 ½-inch wide floral foam piece and center it on your 5×7 inch oval wood plaque. Apply a generous amount of hot glue to the bottom of the foam piece and press it firmly onto the center of the wood, holding it in place until the glue sets. This creates a stable anchor. Once secure, carefully cut a ¼-inch deep slit right down the middle of the foam. This slit will cradle your brass wreath ring. Apply hot glue into this slit and immediately insert the largest brass wreath ring, ensuring it stands upright and is perfectly centered. For added stability, apply more hot glue around the base of the ring on top of the foam and allow it to dry completely. A strong bond here is vital for the centerpiece’s structural integrity.
Step 3: Adorning Half the Ring with Ornaments
With your wreath ring firmly in place, it’s time to add some festive sparkle. Take your garland ties and begin wrapping them tightly around one half of the brass ring, starting from the bottom and working your way up to the top center. Secure the ends with a dab of hot glue. Next, prepare your ball ornaments by carefully removing any existing hooks or hangers to ensure a flush application. Begin gluing the smaller ornaments first, strategically placing them along the garland-wrapped half of the ring. Follow this with two larger ornaments, placing them towards the front for a prominent display. Continue layering and gluing ornaments of various sizes and colors (red and gold for a classic look) until you’ve completely filled one half of the ring, creating a lush, abundant cascade. Don’t forget to use your glitter filler balls to fill in any small gaps or empty areas, adding extra shimmer and a polished finish to your ornament cluster.
Step 4: Crafting the Glittering Church Scene
Now, let’s create the enchanting focal point. Carefully remove any existing pine sprigs or embellishments from your small church ornament. Give the entire church a thorough coat of metallic gold spray paint, ensuring even coverage for a truly opulent look. Allow it to dry completely. Once dry, apply a layer of Mod Podge all over the painted church. While the Mod Podge is still wet, liberally sprinkle fine glitter over the entire surface, rotating the church to catch all sides. Tap off any excess glitter and allow it to dry fully. Once sparkling, use hot glue to firmly attach the glittered church to the center of the floral foam, ensuring it stands tall and proud. Arrange your mini trees around the base of the church, securing them with hot glue to create a quaint winter forest scene. Finish this section by adding a generous amount of faux snow around the base of the church and trees, creating a magical, frosty landscape that truly brings the scene to life.
Step 5: Final Touches and Base Embellishment
With your main elements in place, it’s time to perfect the base and add some grandeur. Continue to cover any exposed floral foam on the base with more assorted ball ornaments and glitter filler balls. Arrange them artfully to create a seamless, festive display that flows from the wreath ring to the plaque. The goal is to hide all visible foam, creating a lush, full appearance. Finally, take your two larger bottle brush trees and glue them strategically to the sides of the oval wood plaque, flanking your centerpiece. These trees add height, symmetry, and a beautiful natural element, completing the magnificent Christmas scene. Ensure they are securely attached and stand upright. Step back and admire your handiwork – a truly enchanting Dollar Tree Christmas centerpiece!
Tips for a Perfect Dollar Tree Christmas Centerpiece
- Plan Your Layout: Before gluing, arrange your ornaments and other elements on the ring and base to visualize the final look.
- Layering is Key: For a rich, full appearance, layer ornaments from smallest to largest, or mix sizes for dynamic texture.
- Patience with Hot Glue: Allow each glued element to set properly before moving on to the next, ensuring maximum stability.
- Don’t Be Afraid to Customize: While this guide provides a fantastic template, feel free to adapt colors and elements to match your existing decor or personal style.
- Safety First: When using a hot glue gun, always exercise caution to prevent burns.
Customization Ideas to Make it Uniquely Yours
While the red and gold theme is classic, feel free to unleash your creativity! Here are some ideas to personalize your centerpiece:
- Color Schemes: Experiment with different color palettes – silver and blue for a frosty winter wonderland, jewel tones for a sophisticated look, or pastels for a whimsical touch.
- Natural Elements: Incorporate small pinecones, faux berries, or sprigs of evergreen for a more rustic feel.
- Lighting: Weave tiny battery-operated LED fairy lights through the ornament cluster or around the miniature scene for an extra magical glow.
- Miniature Figurines: Instead of a church, you could use a small Santa, reindeer, or even tiny carolers to create a different theme.
- Scented Elements: Add a few drops of essential oil (like pine or cinnamon) to non-visible parts of the foam for a delightful sensory experience.
Frequently Asked Questions (FAQs)
How long does this DIY project take?
Typically, this project can be completed within 1 to 2 hours, depending on your crafting speed and how quickly the glue and paint dry. It’s an ideal project for an afternoon of creative fun!
Can I use different colors of ornaments?
Absolutely! The beauty of DIY is customization. Feel free to choose any color scheme that matches your holiday decor. Silver, blue, purple, or even multi-colored ornaments would look fantastic.
What if I can’t find specific items at Dollar Tree?
Dollar Tree inventory can vary. If you can’t find an exact item, look for alternatives! For instance, a small house ornament can replace the church, or other types of greenery can substitute garland ties. Craft stores and other discount retailers are also great places to find affordable alternatives.
How can I store my centerpiece after Christmas?
To ensure your beautiful creation lasts for years, gently wrap it in tissue paper or bubble wrap and store it in a sturdy box. Keep it in a cool, dry place away from direct sunlight to prevent fading or damage.
Conclusion: Your Handmade Holiday Delight
There you have it – a comprehensive guide to crafting a stunning, affordable, and deeply personal Dollar Tree Christmas centerpiece. This project proves that with a little inspiration and readily available materials, you can create holiday decor that not only elevates your space but also fills it with the warmth and joy of a handmade touch. Whether gracing your dining table, mantelpiece, or entryway, this centerpiece is sure to spark conversations and spread festive cheer throughout the season. Embrace the spirit of DIY, and enjoy the satisfaction of knowing you created something truly magical for your home this Christmas!