
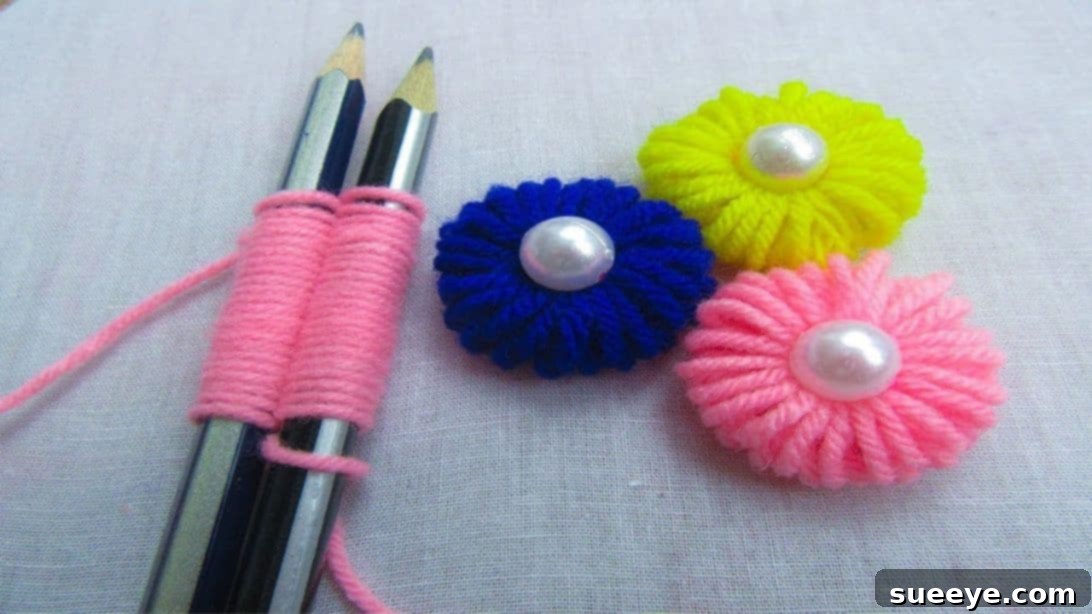
Master the Easy Hand Embroidery Trick: Create Beautiful Yarn Flowers for Any Project
Are you ready to unlock your creativity and add a touch of handmade charm to your world? Dive into the delightful art of hand embroidery with an incredible trick that will transform simple yarn into breathtakingly beautiful flowers. Whether you’re a seasoned crafter or just starting your journey into the world of needlework, this tutorial is designed to be super simple, straightforward, and incredibly rewarding. Imagine adorning your favorite bag, hat, or jacket with a vibrant, unique flower that you made yourself, or adding a charming decorative accent to your home decor. The possibilities are endless, and the process is surprisingly uncomplicated. No prior embroidery experience? No problem! Our step-by-step guide ensures everyone can follow along with ease, turning what might seem intricate into an accessible and enjoyable weekend project. Let’s gather our supplies and get ready to craft some magic, inspired by this fantastic technique from Nakshi Kantha World on YouTube.
Hand embroidery has a timeless appeal, offering a wonderful way to personalize items and express your unique style. This particular trick stands out for its speed and simplicity, allowing you to produce charming floral embellishments in no time. Forget complicated stitches and intricate patterns; this method uses everyday items to create a foundation for stunning yarn flowers that look far more elaborate than they are. Not only is it a fun activity to share with friends, but it also provides a calming, meditative outlet for creative expression. So, grab your yarn and pencils – it’s time to create something truly special!
Why Choose This Easy Hand Embroidery Trick?
In a world full of complex crafting techniques, this hand embroidery method shines brightly for several compelling reasons:
- Beginner-Friendly: Designed for absolute novices, requiring no prior embroidery knowledge. If you can loop yarn around a pencil and tie a knot, you can make these flowers!
- Quick & Easy: Unlike traditional embroidery that can take hours, this trick allows you to create a beautiful flower in a relatively short amount of time.
- Cost-Effective: Uses minimal and readily available materials, making it an affordable craft project.
- Highly Versatile: The finished flowers can be used in countless ways – from fashion accessories to home decor and unique gift embellishments.
- Customizable: Easily adapt the size, color, and texture of your flowers by choosing different yarns and beads.
- Relaxing & Rewarding: Engages your creative mind, providing a peaceful and satisfying crafting experience.
Materials: Everything You Need for Your DIY Yarn Flowers
One of the beauties of this craft is how few materials you need. Most of these items you might already have around your home. Gather these essentials before you begin:
- Yarn: Choose your favorite color and texture. Acrylic, cotton, or wool yarns all work well. Thicker yarns will produce fuller flowers, while thinner yarns will create a more delicate look. Experiment with different colors to match your projects or create striking contrasts.
- Two Pencils or Markers: These will serve as your winding base. Ensure they are relatively smooth and of similar thickness. Markers or even chopsticks can work if you don’t have pencils. The diameter of the pencils will influence the size of your flower petals, so consider using thicker pens for larger flowers.
- Scissors: A sharp pair of scissors is essential for cleanly cutting yarn and thread.
- Needle: A standard sewing needle with an eye large enough to accommodate your chosen thread is perfect.
- Thread (Matching Yarn Color): Using a thread that matches your yarn color will make your stitches invisible, ensuring a seamless and professional finish for your flower. If you want a subtle contrast, a slightly different shade can also look appealing.
- Bead or Pearl: This will be the beautiful centerpiece of your flower. Choose a bead that complements your yarn color and flower size. Pearls, glass beads, wooden beads, or even buttons can add that perfect finishing touch.
Step-by-Step Instructions: Creating Your Easy Hand Embroidery Flowers
Follow these simple steps carefully, and you’ll have a stunning handmade flower in no time. Take your time with each stage, and don’t be afraid to rewind the linked video tutorial if anything is unclear!
Step 1: Prepare Your Winding Base
Begin by taking your two pencils or markers. Hold them firmly together in one hand, parallel to each other. It’s important to keep them stable and close, as this forms the core structure for your flower’s loops. Ensure they are aligned evenly.
Step 2: Start Looping the Yarn
With your other hand, take the end of your chosen yarn. Place this end onto the pencils, near one side, and secure it firmly against the pencils with your thumb. This initial hold is crucial to prevent the yarn from slipping as you begin to create your loops.
Step 3: Create the Yarn Loops
Now, this is where the magic begins! Loop the yarn over the first pencil, bringing it around and inserting it in between the two pencils. Then, take the yarn and loop it over the second pencil, again bringing it into the center space between the pencils. This creates a figure-eight or infinity-like pattern around the two pencils. Continue this looping motion, ensuring your loops are snug but not overly tight, around both pencils and through the center. Consistency in tension is key here for a uniform flower. Repeat this process until you have filled approximately one-third of the length of your pencils with loops, or aim for around 25 loops. More loops will result in a fuller, denser flower, while fewer loops will create a more delicate appearance. Feel free to adjust the number of loops to suit your desired flower volume.
Step 4: Secure the Yarn Loops
Once you’ve created enough loops, carefully cut the yarn, leaving a generous tail. Now, take both ends of the yarn (the starting end and the newly cut end) and tie them together into a secure knot right in the middle of the looped section, between the two pencils. This knot will hold all your loops together, forming the center of your flower. After tying, trim any excess yarn close to the knot, ensuring it doesn’t interfere with the flower’s shape.
Step 5: Thread the Petals for Structure
Now, prepare your needle with the matching thread. Take one of the pencils, still holding its loops in place. Carefully insert the needle with the thread through all the loops on that single pencil. Pull the thread through, leaving a substantial allowance on both sides – you’ll need enough to tie a knot later. Cut the thread from the spool, ensuring both ends extending from the loops are of equal length. Tie these two ends together into a firm knot, securing the loops on that pencil. Repeat this exact process for the loops on the second pencil. This step is crucial as it binds the individual loops, giving structure to each half of your flower.
Step 6: Form Your Embroidery Flower
Gently slide the yarn loops off both pencils. You will now have two distinct bundles of loops, each secured by a thread. Carefully open up these two bundles. Bring the two bundles together, forming them into a circular shape. The central knot from Step 4 should naturally become the center of your flower. Gently press the entire formation with your hand to help it settle into a flat, well-formed floral shape. Arrange the loops evenly to create a harmonious petal arrangement. This is where your flower truly starts to take shape!
Step 7: Add the Finishing Touch – The Bead
With your needle and thread, securely sew your chosen bead or pearl onto the very center of your newly formed yarn flower. Stitch through the center knot and through the bead several times to ensure it’s firmly attached. This bead not only adds a beautiful decorative element but also helps to hold the center of the flower together, giving it a polished and professional finish. Once the bead is secure, tie off your thread on the back of the flower and trim any excess.
Creative Applications for Your Handmade Yarn Flowers
Now that you’ve mastered this amazing hand embroidery trick, it’s time to explore the endless possibilities for showcasing your beautiful yarn flowers. Their versatility makes them perfect for a wide range of projects:
- Fashion Embellishments: Elevate your wardrobe by attaching them to denim jackets, sweaters, scarves, or even hair accessories like headbands and clips.
- Bag & Hat Decorations: Transform a plain tote bag, backpack, or straw hat into a unique statement piece.
- Home Decor Accents: Use them to adorn throw pillows, curtain tie-backs, picture frames, or create stunning floral garlands. They can also add charm to a plain lampshade or a decorative wreath.
- Gift Wrapping & Card Making: Attach a handmade flower to a gift package or a greeting card for an extra special, personalized touch that recipients will cherish.
- Scrapbooking & Journaling: Bring a tactile dimension to your memory keeping by incorporating these soft, vibrant flowers into your scrapbook layouts or art journals.
- Jewelry Making: With a little creativity, these flowers can even be turned into unique brooches, pendants, or earrings.
Let your imagination run wild! Mix and match colors, sizes, and textures to create truly unique pieces that reflect your personal style.
Tips for Success and Customization
To ensure your hand embroidery flowers turn out perfectly every time, consider these additional tips:
- Yarn Choice Matters: Experiment with different yarn weights and fibers. A chunky wool yarn will create a robust, cozy flower, while a mercerized cotton yarn will give a smoother, shinier finish. Variegated yarns can produce stunning multi-colored flowers with minimal effort.
- Consistent Tension: Maintaining even tension when looping the yarn in Step 3 is crucial for symmetrical and well-formed petals. Practice a few loops to get a feel for it.
- Varying Sizes: To make different sized flowers, simply use pencils or markers of varying diameters. Thicker pencils will yield larger flowers, while thinner ones will result in smaller, more delicate blooms. You can also adjust the number of loops; more loops for a fuller flower, fewer for a sparser one.
- Embellishment Options: Beyond beads, consider using small buttons, sequins, tiny fabric scraps, or even a small embroidered initial in the center for added personalization.
- Secure Attachment: When attaching your finished flower to another item, use strong sewing thread and ensure several secure stitches are made, especially around the base of the flower, to prevent it from coming loose.
- Practice Makes Perfect: Don’t be discouraged if your first flower isn’t absolutely perfect. Each one you make will improve your technique and confidence.
Conclusion: Your Journey into Easy Embroidery Blossoms
And there you have it – an amazing hand embroidery trick that transforms simple materials into gorgeous, versatile yarn flowers! This accessible tutorial empowers anyone, regardless of their crafting background, to create beautiful embellishments with ease. We hope you found this guide inspiring and clear, encouraging you to bring out your creative side. From personalizing your accessories to adding bespoke touches to your home, these handmade flowers are a testament to the joy of DIY. Remember, the beauty of crafting lies in the process as much as the final product. Embrace the therapeutic rhythm of looping yarn, the satisfaction of seeing your creation take shape, and the pride of wearing or displaying something truly unique. So, go ahead, choose your favorite colors, gather your simple tools, and let your imagination blossom. Happy crafting, and we can’t wait to see the beautiful embroidery flowers you create!