
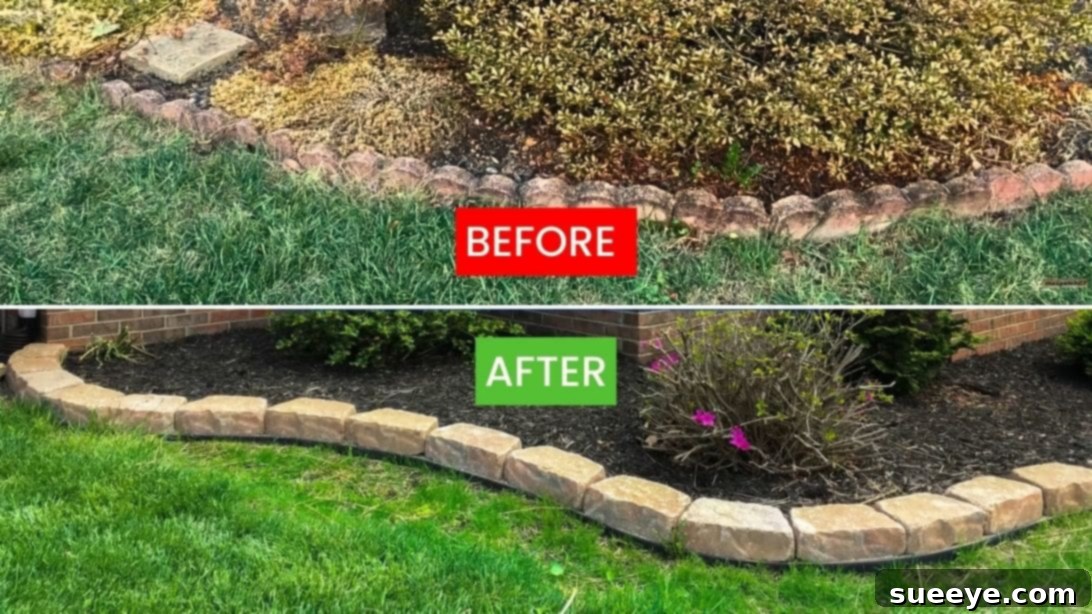
Transform your garden effortlessly with this ingenious no-dig landscaping border tutorial, inspired by the creative insights of maxpatch67. Say goodbye to strenuous digging and tedious installations! This DIY method offers an incredibly simple and time-efficient way to define your garden beds, pathways, or lawn edges. Not only is it remarkably easy to install, requiring minimal energy, but it also provides a robust solution for long-term weed control and a significant aesthetic upgrade to your outdoor space. If you’re looking for a durable, beautiful, and hassle-free garden edging solution, you’ve come to the right place. Read on for a comprehensive guide, or watch the original video below for a visual walkthrough of the process.
Why Choose a No-Dig Landscaping Border?
Traditional garden edging often involves extensive trenching, heavy lifting, and a significant time commitment. This innovative no-dig method revolutionizes the process, making professional-looking landscaping accessible to everyone, regardless of their gardening experience or physical prowess. Here are some compelling reasons why this no-dig landscaping border stands out as an superior choice for your home:
- Unmatched Ease of Installation: The primary benefit is the elimination of digging. This saves immense time and effort, making it a perfect weekend project. You won’t need to break your back or hire expensive equipment.
- Superior Weed Control: By creating a solid barrier, especially when utilizing fast-setting concrete, this border effectively deters weeds from invading your garden beds. The integrated concrete fill strengthens this defense, keeping your plants healthy and your garden neat.
- Exceptional Durability: Unlike flimsy plastic or temporary solutions, this concrete-reinforced border offers incredible longevity. It’s built to withstand the elements, general wear and tear, and maintain its structure and beauty for many years to come.
- Instant Aesthetic Upgrade: A well-defined border instantly elevates the curb appeal of your property. It provides a crisp, clean line that separates different garden zones, making your landscaping appear more organized and professionally designed.
- Design Flexibility: The initial layout with a garden hose allows for boundless creativity. You can easily create flowing curves, sharp angles, or simple straight lines that perfectly complement your home’s architecture and garden style.
- Cost-Effective: By doing it yourself, you save on labor costs. The materials, while sturdy, are generally affordable, offering a high return on investment for the durability and beauty they provide.
- Protects Plants and Soil: A clear border helps retain mulch and soil within your garden beds, preventing erosion and keeping valuable nutrients where they belong. It also protects plants from accidental damage by lawnmowers or trimmers.
Materials for Your Easy No-Dig Border:
Gathering the right materials is the first step towards a successful project. Each item plays a crucial role in creating a durable and attractive landscaping border. Ensure you have everything on hand before you begin to streamline your workflow.
- No-Dig Edging: This forms the foundational structure of your border. Typically made from heavy-duty plastic or composite material, it’s designed to be flexible enough for curves yet sturdy enough to hold its shape once secured.
- Fast-Setting Concrete Mix: This is the secret weapon for quick installation and rock-solid durability. One 50-pound bag will generally cover approximately five linear feet, but always check the product’s specific coverage instructions. Its rapid curing time means less waiting and a faster completion.
- Galvanized 8-inch Long Spikes: These robust spikes are essential for anchoring the no-dig edging securely into the ground, providing stability before the concrete sets.
- Landscaping Blocks: Choose blocks that complement your home’s exterior and your desired garden aesthetic. These will form the visible, decorative top layer of your border. Options range from rustic natural stone to sleek, modern concrete pavers.
- Gloves: Essential for protecting your hands from the concrete mix, which can be irritating to the skin.
- Mask: A dust mask is vital when working with dry concrete mix to prevent inhaling fine particles, which can be harmful to your respiratory system.
- Eyewear: Safety glasses or goggles are indispensable for shielding your eyes from concrete dust and any potential splatters during mixing and application.
- Garden Hose: For planning your layout.
- Rubber Mallet (Optional but Recommended): For gently tapping the landscaping blocks into place.
- Level (Optional but Recommended): To ensure your blocks are perfectly aligned.
- Small Shovel or Trowel: For spreading concrete and filling gaps.
- Old Cup or Scoop: For easily transferring concrete mix into block gaps.
- Watering Can or Hose with Spray Nozzle: For misting the concrete to initiate setting.
- Piece of Cardboard or Small Board: For leveling the concrete bed.
Step-by-Step Instructions for Your DIY Garden Border:
Step 1: Planning Your Design and Laying Out the Edging
The success of your landscaping border begins with careful planning. Start by using a garden hose to practice laying out your desired shape. This flexible tool allows you to visualize curves and lines, adjusting until you achieve a design that perfectly complements your house and existing landscaping. Take your time during this crucial stage; a well-planned layout saves effort later. Once you’re satisfied with the design, lay out the plastic no-dig border along the hose line. The beauty of this method is its versatility – you can create a brand new garden area, expand an existing one, or simply define a lawn edge directly on top of grass. After positioning the plastic border, use the galvanized spikes to firmly hammer it into the ground. These spikes provide the initial stability, ensuring your border holds its intended shape before the concrete is introduced.
Step 2: Preparing the Concrete Bed for Your Blocks
Safety first! Before handling the concrete mix, make sure you grab a pair of sturdy gloves, wear a protective mask, and put on your eyewear. Fast-setting concrete can be abrasive and dusty. Once prepared, spread the dry concrete mix evenly along the inside of your laid-out border. Aim for a bed about one foot wide, ensuring it’s deep enough to partially embed your landscaping blocks. The goal is to create a solid foundation for your blocks. Using a piece of cardboard or a small board, carefully level out the concrete mix. Use the top edge of your plastic border as a guide to achieve a consistent height and smooth, even surface. This meticulous leveling ensures your landscaping blocks will sit uniformly and present a professional finish.
Step 3: Laying the Landscaping Blocks with Precision
With your concrete bed prepared, it’s time to place your landscaping blocks. Carefully set each block down onto the leveled concrete mix, ensuring they are aligned flush against the plastic border. The goal is to gently tap them into place so they settle slightly into the dry concrete. While a rubber mallet can be useful for this, it’s not strictly necessary; you can often achieve good results by firmly pressing them down by hand. The key is to ensure each block makes good contact with the concrete bed, creating a stable base. Take your time to check the alignment and levelness of each block as you go. This attention to detail will ensure your finished border is straight, even, and aesthetically pleasing, providing a beautiful edge to your garden or lawn.
Step 4: Filling Gaps for Strength and Weed Control
Once your landscaping blocks are in place, the next crucial step is to fill the gaps between them with more dry concrete mix. Using any old cup or a small scoop, carefully toss the concrete mix into the spaces between the blocks, working from the backside of the border. This ensures that the concrete fills all crevices thoroughly, creating a seamless and sturdy connection between each block. This step is vital for two main reasons: firstly, it significantly strengthens the entire finished border, making it incredibly resilient. Secondly, and equally important, it forms an impenetrable barrier against weeds, preventing them from sprouting up between your beautiful blocks and marring your garden’s pristine appearance.
Step 5: Curing the Concrete with a Fine Mist of Water
The final step brings your no-dig landscaping border to life. With all the blocks laid and gaps filled, it’s time to initiate the setting process for the fast-setting concrete. Thoroughly spray the entire border with a fine mist of water. The beauty of fast-setting concrete mix is its specific formulation; it will absorb just the right amount of water needed for its chemical reaction and begin to set almost immediately, even before you’ve finished spraying the entire length of your border. This rapid action means you won’t disturb your carefully placed blocks or leveled concrete. Continue to mist the border for a few minutes, ensuring all the concrete is adequately dampened without being oversaturated. You’ll notice it hardening before your eyes, quickly transforming your loose materials into a solid, durable, and attractive garden edge.
Tips for a Flawless Finish
To ensure your no-dig landscaping border not only looks professional but also lasts for years, consider these additional tips:
- Work in Sections: If you have a very long border, consider working in smaller sections. This allows the concrete to be fresh and workable as you lay the blocks and fill gaps, especially with fast-setting mixes.
- Check Levelness Frequently: Use a spirit level regularly when placing blocks. This helps maintain a consistent height and prevents your border from appearing uneven, which can detract from its professional look.
- Clean Up Spills Immediately: If any concrete mix spills onto your blocks or surrounding areas, wipe it away with a damp cloth before it sets. Once dry, concrete is much harder to remove.
- Consider Drainage: When designing your border, think about how water will drain from your garden beds. Ensure the border doesn’t inadvertently create dams that could lead to waterlogging.
- Weather Conditions: Avoid installing on extremely windy days, as concrete dust can be a nuisance and dangerous. Also, check the forecast; while fast-setting concrete handles light misting well, heavy rain shortly after installation could wash away uncured mix.
- Backfill with Soil or Mulch: Once the concrete has fully cured, backfill the area behind your blocks with soil or mulch. This not only enhances the finished look but also helps to further stabilize the border and prevent weeds.
- Don’t Rush the Curing: While it’s fast-setting, allow the concrete the full recommended curing time (usually 24-48 hours, but check packaging) before putting heavy pressure on the border or disturbing it significantly.
Maintaining Your Beautiful Border
One of the many advantages of this concrete-reinforced no-dig border is its low maintenance. Once installed and cured, it requires very little upkeep. Occasionally, you may want to:
- Brush Off Debris: Sweep or brush away any leaves, dirt, or garden debris that collects on your border to keep it looking clean and crisp.
- Inspect for Cracks: While highly durable, extreme weather shifts over many years might cause minor hairline cracks. These are usually superficial and can be left, or if desired, repaired with a concrete sealant.
- Reapply Weed Barrier: If you notice persistent weeds trying to sneak through the edges (though unlikely with proper concrete filling), you can always add additional landscaping fabric or a layer of mulch behind the border.
Conclusion: Your Garden Awaits Its Transformation
Creating a beautiful, functional, and durable landscaping border doesn’t have to be a daunting task. With this easy, no-dig method, inspired by maxpatch67, you can achieve professional results without the strenuous effort of traditional methods. This project not only enhances the aesthetic appeal of your garden with clean, defined lines but also provides a highly effective solution for weed control, saving you countless hours of future weeding. By carefully following these steps, from planning your design to the final mist of water, you’ll quickly enjoy a garden space that is more organized, easier to maintain, and truly a joy to behold. So, gather your materials, embrace your inner DIY enthusiast, and embark on this rewarding project. Your upgraded garden is just a few simple steps away!