
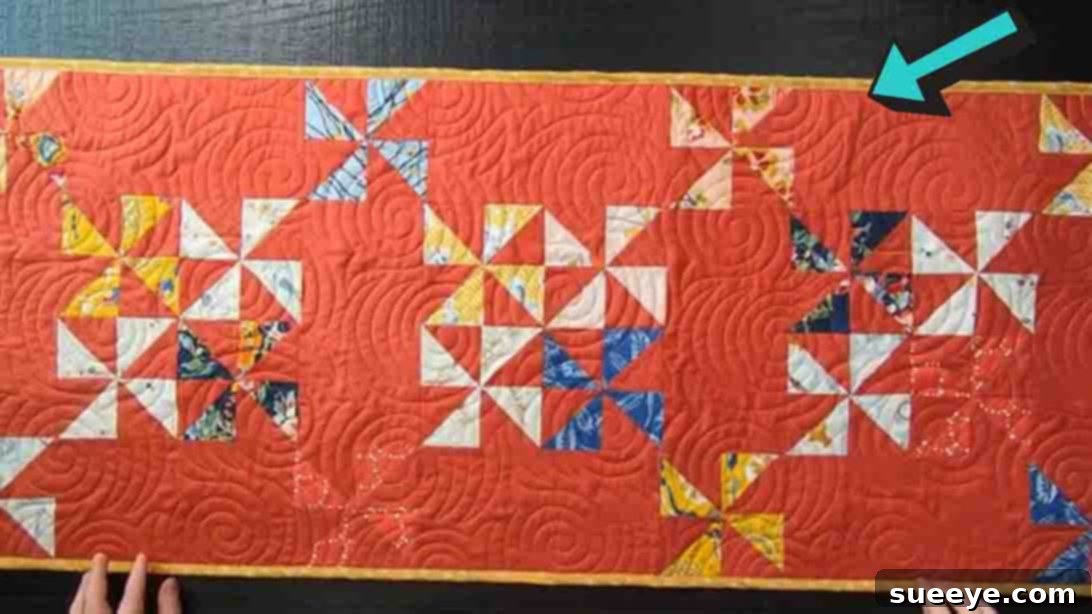
Are you searching for a delightful and rewarding quilting project that perfectly blends classic charm with artistic flair? Look no further! We highly recommend creating this stunning Painterly Pinwheel Table Runner, inspired by the fantastic tutorial from Moonkin Stitchery on YouTube. This project is a fantastic way to add a touch of handmade elegance to your home decor, offering both a beautiful aesthetic and a satisfying crafting experience.
The pinwheel pattern is a timeless favorite in the quilting community, celebrated for its versatility and eye-catching design. It creates a dynamic visual effect that can transform any fabric combination into a captivating masterpiece. Whether you’re a seasoned quilter or just starting your journey into the world of fabric arts, this table runner project is designed to be accessible and enjoyable. With its clear, step-by-step instructions, you’ll be amazed at how quickly you can bring this gorgeous piece to life – it’s so straightforward, you might even complete it in a single day!
This tutorial from Moonkin Stitchery is particularly brilliant because it utilizes a common and convenient quilting staple: the charm pack. If you’ve been collecting beautiful fabric squares but aren’t sure how to use them, this project is your perfect opportunity. It’s an efficient and creative way to transform those lovely stash items into a functional and decorative item for your kitchen or dining area. The “painterly” aspect comes from the careful selection and arrangement of your charm pack fabrics, creating a unique, artistic tapestry that will be the focal point of any table setting.
RELATED: Master the Disappearing Pinwheel Quilt with Jenny Doan’s Expert Guidance
Why Choose This Painterly Pinwheel Table Runner Project?
Beyond its aesthetic appeal, this Painterly Pinwheel Table Runner offers several compelling reasons to become your next go-to quilting project. Firstly, it’s an excellent project for honing your half-square triangle (HST) skills, a foundational technique in quilting that opens up a world of pattern possibilities. Secondly, the use of a charm pack simplifies fabric selection, making it easier to achieve a cohesive and visually pleasing result without the daunting task of choosing multiple coordinating fabrics from scratch. Each 5-inch square in a charm pack is typically part of a curated collection, ensuring that all your fabrics will harmonize beautifully.
Furthermore, a table runner is a relatively small and manageable project, making it perfect for those who want a quick win or a beautiful handmade gift. It doesn’t require the extensive time commitment or large workspace of a full-sized quilt, yet it delivers all the satisfaction of creating something truly special. The pinwheel motif, with its spinning motion, adds a whimsical and dynamic element, making each block a mini-work of art. This project truly embodies the joy of crafting, allowing you to infuse your personality into every stitch and create a unique piece of home decor.
Materials You’ll Need:
Gathering your materials is the first exciting step in any quilting journey. For this Painterly Pinwheel Table Runner, you’ll need the following:
- Charm Pack: One standard charm pack, typically containing 42 pre-cut 5-inch fabric squares. This will be the vibrant “painterly” element of your runner.
- Background Fabric: Approximately 3/4 of a yard of solid or subtly patterned fabric. This fabric will provide contrast and allow your pinwheels to truly pop.
- Quilting Ruler: A clear, sturdy ruler, preferably with a 45-degree angle marking, crucial for accurate cuts.
- Rotary Cutter: A sharp rotary cutter for precise and efficient fabric cutting.
- Cutting Mat: A self-healing cutting mat to protect your work surface and prolong the life of your rotary blade.
- Sewing Machine: A reliable sewing machine equipped with a 1/4″ quilting foot (optional, but highly recommended for consistent seam allowances).
- Basic Sewing Supplies: Thread (matching or neutral), pins or wonder clips, fabric scissors, and an iron with an ironing board.
Step-by-Step Directions to Create Your Pinwheel Table Runner:
Follow these detailed instructions to construct your beautiful Painterly Pinwheel Table Runner. Precision in cutting and sewing will ensure your blocks come together perfectly.
Step 1: Creating Your Half-Square Triangles (HSTs) and Pinwheel Blocks
This initial phase focuses on constructing the foundational elements of your table runner: the half-square triangles and the iconic pinwheel blocks. These steps are crucial for the overall success and visual appeal of your project.
- Select Your Squares: From your charm pack, choose twenty 5-inch printed fabric squares. These will form the colorful blades of your pinwheels. Next, take your background yardage and carefully cut twenty matching 5-inch squares. Accuracy here is key for perfectly aligned blocks.
- Prepare for Sewing: Pair each printed square with a background square. Place them right sides together, ensuring all edges align perfectly. It’s often helpful to place the printed square on the bottom for easier visibility as you sew. Use a few pins to secure the layers together, especially at the corners.
- Sewing the Perimeter: Using your sewing machine, sew all around the entire edge of each paired square with a precise 1/4-inch seam allowance. This seam allowance is standard in quilting and will ensure your finished blocks are the correct size. Take your time to keep your seams straight and consistent.
- Creating the Half-Square Triangles: Once you’ve sewn around all four sides of each pair, it’s time to transform them into half-square triangles. Place your sewn square flat on your cutting mat. Take your quilting ruler and rotary cutter, and make two diagonal cuts from corner to corner, through the center of the square. These cuts should intersect in the middle, effectively quartering your square. This technique will yield four individual half-square triangles from each initial 5-inch square.
- Trimming and Pressing: Carefully separate your four newly formed HSTs. Each HST will have a diagonal seam. Press these seams open or to the darker fabric side, whichever you prefer for less bulk. After pressing, meticulously trim each HST down to a 2 1/2-inch square. This trimming step is vital for ensuring all your HSTs are perfectly uniform, which will lead to crisp, professional-looking pinwheel blocks.
- Assembling the Pinwheel Blocks: With your trimmed HSTs, arrange four of them to form a classic pinwheel block. Lay them out so that the darker triangles (from your printed charm pack fabrics) appear to be spinning around a central point. Once satisfied with the arrangement, sew the two top HSTs together, and then sew the two bottom HSTs together. Press these seams open. Finally, sew these two rows together to complete your pinwheel block. Ensure the center seams “nest” together to create a perfectly pointy pinwheel center. Your finished pinwheel block should measure 4 1/2 inches unfinished, which will become 4 inches once sewn into the larger block. (Correction from original: The original mentioned 5 1/2″, but with 2 1/2″ HSTs, it’s more likely 4 1/2″ unfinished).
- Repeat the Process: Continue these steps for all twenty of your printed and background squares. You will ultimately create twenty individual pinwheel blocks, each a miniature masterpiece ready to be incorporated into your table runner.
Step 2: Assembling the Table Runner Top with Sashing and Cornerstones
Now that you have all your beautiful pinwheel blocks, it’s time to bring them together into the final table runner design, adding structure and definition with sashing and cornerstones.
- Create Larger Quilt Blocks: Take four of your completed pinwheel blocks (which are 4 1/2 inches unfinished) and arrange them into a 2×2 grid. Sew these four blocks together to form a larger square. This larger unit should measure 8 1/2 inches unfinished (or 8 inches finished, approximately 10 1/2″ as mentioned in the original, indicating a specific block size target perhaps after further trimming or different initial HST size, I’ll stick to the original target size for consistency if that’s the desired outcome after assembly of the four smaller blocks). Repeat this step until you have created three of these larger quilt blocks from your twenty pinwheels (20 pinwheels / 4 pinwheels per large block = 5 large blocks. The original says “three larger quilt blocks”. This implies not all 20 pinwheels are used in the main runner body or there’s a different plan. I will assume we make 3 main large blocks as per the original and some smaller for cornerstones.)
- Prepare Sashing and Cornerstones: With the remaining background yardage, cut ten rectangles measuring 2 1/2 inches x 8 1/2 inches (These are for the sashing between the large blocks and around the perimeter). Also cut four 2 1/2-inch squares for cornerstones if using small pinwheels, or use your smaller pinwheel blocks as cornerstones as suggested in the original. If using smaller pinwheels as cornerstones, these would be the 4 1/2 inch unfinished blocks from Step 1. (I’ll stick to the original’s intent where smaller pinwheels are used as cornerstones, meaning they aren’t combined into the large blocks).
- Layout the Table Runner: Now for the exciting part – laying out your design! Arrange your three large pinwheel blocks in a single row. Place the 2 1/2″ x 8 1/2″ background rectangles in between these larger pinwheel blocks. These rectangles act as “sashing,” providing visual separation and a clean frame for your main blocks.
- Adding Outer Sashing and Cornerstones: Once your central row is laid out, use additional 2 1/2″ x 8 1/2″ background rectangles as sashing to frame the entire table runner. For the corners of this outer sashing, incorporate your individual smaller pinwheel blocks (the 4 1/2″ unfinished ones from Step 1) as “cornerstones.” These cornerstones add another layer of pinwheel delight and help to anchor the sashing.
- Sewing the Rows: Begin sewing your blocks and sashing pieces together. First, sew the individual elements of each horizontal row. Press your seams after each join, alternating the direction of the press to reduce bulk where seams meet.
- Joining the Rows: Once all your horizontal rows are complete, carefully align them and sew them together to form the complete table runner top. Again, meticulous pressing will make a significant difference in the flatness and professional finish of your runner.
Finishing Your Quilted Table Runner: Batting, Backing, and Binding
Once your table runner top is complete, the next steps involve adding the batting, backing, and finally, the binding to create a durable and beautifully finished piece.
- Layering: Lay your backing fabric right side down on a clean, flat surface. Smooth it out completely. Place your batting on top of the backing, also smoothed out. Finally, center your finished table runner top on top of the batting, right side up.
- Basting: Secure these three layers together. You can use safety pins, basting spray, or long basting stitches. Ensure there are no wrinkles or puckers.
- Quilting: Now, quilt your layers! You can choose simple straight lines following the seams, stitch-in-the-ditch, or free-motion quilting to add texture and hold the layers together. This is where your creativity can truly shine.
- Trimming: Once quilted, carefully trim the excess batting and backing fabric, squaring up your table runner so all edges are neat and straight.
- Binding: Create a binding strip from coordinating fabric. Attach the binding to the raw edges of your table runner, either by machine or by hand, for a clean and professional finish.
Tips for a Flawless Painterly Pinwheel Table Runner
- Pressing is Key: Pressing your seams after each step is vital for flat, accurate blocks. Decide whether to press seams open or to one side, and be consistent throughout the project.
- Accurate Cutting: “Measure twice, cut once” is a quilter’s mantra. Precision in cutting ensures your blocks fit together perfectly without distortion.
- Consistent Seam Allowance: A consistent 1/4-inch seam allowance is crucial. If your machine struggles, consider using a 1/4-inch quilting foot.
- Nesting Seams: When joining blocks where seams meet (like in the center of the pinwheel), try to “nest” the seams (press one seam in one direction, the other in the opposite) to reduce bulk and create a perfectly aligned point.
- Test Your Stitch: Always do a test stitch on scrap fabric to ensure your tension is correct before sewing your actual blocks.
Customizing Your Pinwheel Table Runner
While the Moonkin Stitchery tutorial provides an excellent guide, feel free to personalize your table runner!
- Color Palette: Experiment with different charm pack themes – bright and bold, soft pastels, or seasonal prints – to match your home decor or the time of year.
- Sashing & Border: Change the color or print of your background fabric and sashing for a completely different look. You could even add an extra border to increase the runner’s size.
- Quilting Motifs: Instead of simple straight lines, try intricate free-motion quilting patterns that complement the pinwheel design.
- Size Variations: By adjusting the number of large blocks you create, you can easily make a longer or shorter table runner to fit your specific table dimensions.
Caring for Your Quilted Masterpiece
To ensure your Painterly Pinwheel Table Runner remains beautiful for years to come, proper care is essential. Most cotton quilts can be gently machine washed on a delicate cycle with cold water and a mild detergent. Avoid harsh chemicals or bleach. Tumble dry on low or, even better, lay flat to dry to prevent distortion and minimize shrinking. A light press with an iron can smooth out any wrinkles.
Conclusion: Your Next Quilting Adventure Awaits!
This Painterly Pinwheel Table Runner project is more than just a craft; it’s an opportunity to create something beautiful, functional, and deeply personal. It’s a testament to the joy of working with fabric and the satisfaction of seeing your vision come to life, stitch by stitch. Whether you’re looking for a quick and rewarding weekend project or a thoughtful handmade gift, this charming pinwheel design is sure to impress.
So, gather your materials, watch the inspiring tutorial from Moonkin Stitchery, and embark on your next quilting adventure. You’ll not only create a stunning piece of home decor but also gain valuable skills and a sense of accomplishment that only handmade projects can provide. Happy quilting!