
Transform Your Old Rake: The Ultimate DIY Rustic Wall Hanging & Storage Solution
Do you have an old, rusty rake gathering dust in your shed or garage, destined for the trash? Hold that thought! Before you discard it, imagine transforming that forgotten garden tool into a stunningly unique and practical piece of rustic home decor. This guide will show you how to repurpose an old rake into a versatile wall hanging that can hold anything from kitchen utensils to delicate jewelry, adding a charming farmhouse touch to any room.
Upcycling old items is not only an eco-friendly practice but also an incredible way to inject character and personality into your living space without breaking the bank. A DIY rake wall hanging offers both aesthetic appeal and clever storage, making it a truly dual-purpose addition to your home. Whether you’re a seasoned DIY enthusiast or a beginner looking for a rewarding project, this simple craft promises impressive results in minimal time.
Why Upcycle an Old Rake for Home Decor?
The beauty of repurposing an old rake lies in its inherent rustic charm and functional design. The tines of a rake are naturally perfect for hanging items, while the head itself provides a sturdy base. This project resonates particularly well with lovers of farmhouse, shabby chic, industrial, or rustic interior design styles. It’s a fantastic way to:
- Reduce Waste: Give a new lease on life to an item that would otherwise end up in a landfill.
- Create Unique Decor: Craft a one-of-a-kind piece that none of your neighbors will have.
- Add Functional Storage: Solve small storage dilemmas in a stylish way.
- Personalize Your Space: Infuse your home with handmade character and a story.
- Save Money: Achieve a high-end look using reclaimed materials.
Regardless of whether you choose to keep a section of the rake handle intact for a more integrated look or remove it completely for a sleeker profile, the finished product will be an eye-catching statement piece. It’s practical storage beautifully disguised as wall art!
Getting Started: Materials & Tools You’ll Need
Before you dive into transforming your old rake, gather the necessary materials and tools. Most of these items you might already have around your house or can easily find at a local hardware store. Remember, safety first! Always wear appropriate protective gear like gloves and eye protection when working with tools.
Essential Materials:
- An old metal rake: The star of our project! Look for one with sturdy metal tines.
- Sandpaper or sanding block: Various grits (coarse to fine) for smoothing surfaces and removing rust.
- Paint: Choose a color and type that suits your decor (e.g., spray paint, acrylic, chalk paint).
- Sealer/Protective Coat (optional): Clear coat, lacquer, or wax to protect the paint and metal.
- Mounting hardware: Screws, wall anchors, picture hanging wire, or D-rings, depending on your preferred hanging method.
Tools You’ll Need:
- Saw: Hand saw, hacksaw, or power saw (jigsaw, reciprocating saw) for cutting the handle.
- Drill: With appropriate drill bits for metal and wood (if modifying the handle) and for mounting.
- Measuring tape and pencil: For accurate marking.
- Screwdriver: To install mounting hardware.
- Protective gear: Safety glasses, gloves.
- Work surface: A stable area to work on.
Your 5-Step Guide to Creating a Rustic Rake Wall Hanging
This incredibly rewarding DIY project is surprisingly straightforward and can be completed in just five simple steps. Let’s turn that old rake into a stunning decorative storage piece!
Step 1: Prepare the Rake Handle (Cut or Remove)
This initial step sets the tone for the overall aesthetic of your finished rake wall hanging. You have two primary options, each offering a distinct look:
- Remove the Handle Completely: For a minimalist, clean look where only the rake head is visible, carefully detach the handle from the metal head. This might involve unscrewing bolts, prying out nails, or simply sawing off the handle very close to the head. Ensure any protruding bits are ground down for safety and a smooth finish. This style works well for sleek modern farmhouse or industrial interiors.
- Cut the Handle at an Angle: If you desire a more integrated, polished, and visibly rustic appearance, you can cut a portion of the wooden handle. Measure approximately 6-12 inches from where the handle meets the rake head, then use a saw to cut the handle at a 45-degree angle. This angled cut adds visual interest and a professional touch, reminiscent of a crafted wooden piece. The remaining part of the handle can be incorporated into the design, providing a solid anchor point and emphasizing the repurposed nature of the item.
Make sure your cut is clean and even. If you’re using a power saw, secure the rake head in a vice or clamp for stability and safety.
Step 2: Drill Holes for Mounting
Now it’s time to prepare your rake for hanging. Based on your preferred orientation and the weight of what you plan to hang, decide where you want the mounting points to be. Generally, two holes drilled through the rake head (or the remaining handle segment) provide the most stable attachment to the wall.
- Mark the Spots: Use a pencil to mark the exact locations for your holes. Ensure they are evenly spaced for balanced hanging.
- Choose the Right Drill Bit: Select a drill bit appropriate for the material of your rake head (metal or wood). If drilling through metal, a metal-specific drill bit is essential.
- Drill Carefully: Secure the rake firmly to a workbench or use clamps. Slowly and steadily drill through the marked spots. If drilling metal, a drop of cutting oil can help ease the process and preserve your drill bit.
These holes will later accommodate screws or other mounting hardware to securely fasten your rake to the wall.
Step 3: Sand and Smooth Surfaces
Before painting, it’s crucial to prepare all surfaces. This step ensures a smooth, durable finish and helps the paint adhere properly. Pay attention to both the metal rake head and any remaining wooden handle.
- Remove Rust and Debris: Use a wire brush or coarse-grit sandpaper (60-80 grit) to aggressively remove any rust, flaking paint, dirt, or other imperfections from the metal rake head and tines. A clean surface is key for adhesion.
- Smooth Wooden Edges: If you cut the wooden handle, use sandpaper (starting with 100-120 grit, then moving to 220 grit) to smooth out any rough edges or splinters from the cut. This not only makes it safer to handle but also gives it a more refined look.
- Overall Smoothing: Once major imperfections are gone, use medium-grit sandpaper (120-150 grit) over all surfaces you intend to paint. This will create a slightly scuffed texture, ideal for paint adhesion. Finish with fine-grit sandpaper (220 grit) for an exceptionally smooth feel.
- Clean Thoroughly: After sanding, wipe down the entire rake with a damp cloth to remove all dust and residue. Allow it to dry completely before proceeding to the next step.
A well-sanded surface is the secret to a professional-looking paint job.
Step 4: Paint and Personalize Your Rake
This is where your creativity truly shines! Painting allows you to transform the old rake into a decor piece that perfectly matches your home’s aesthetic. You have full creative control over what to paint and what colors to use.
- Choose Your Coverage:
- Entire Rake: For a unified look, paint the whole rake (head, tines, and any remaining handle) in a single color.
- Head Only: Paint just the metal rake head and tines, leaving the wooden handle natural or stained for contrast.
- Distressed Look: Apply a base coat, then a top coat, and lightly sand areas to create a shabby chic or aged effect.
- Select Your Paint:
- Spray Paint: Excellent for metal, offers even coverage, and is quick to apply. Primer + paint options work well for rusty surfaces.
- Chalk Paint: Ideal for a matte, distressed farmhouse look. It adheres well to most surfaces with minimal prep.
- Acrylic or Enamel Paint: Can be brushed on for a more controlled application, especially if you want to leave parts unpainted.
- Application Tips:
- Work in a well-ventilated area.
- Apply thin, even coats to prevent drips.
- Allow each coat to dry completely before applying the next.
- For a distressed look, lightly sand edges or raised areas once the paint is fully cured.
- Optional Sealer: Once the paint is dry, consider applying a clear topcoat (matte or glossy polyurethane, clear spray sealer, or wax) to protect the finish, especially if your rake will be in a high-traffic area or used for wet items.
Popular color choices for rustic decor include matte black, antique white, distressed grey, sage green, or even bold accent colors.
Step 5: Install Your Rake Wall Hanging and Decorate!
The final step is to securely mount your newly transformed rake onto the wall and begin enjoying its unique charm and functionality.
- Choose Your Location: Decide where your rake will look best and be most useful – kitchen, entryway, bedroom, bathroom, or even a craft room.
- Mark and Drill Wall Holes: Hold the rake against the wall at your desired height. Use a level to ensure it’s straight. Mark the wall through the drilled holes in the rake head. Use your drill to create pilot holes in the wall. If drilling into drywall, consider using wall anchors for extra stability, especially if you plan to hang heavier items.
- Secure the Rake: Align the rake’s holes with the wall holes and screw it firmly into place. Ensure it feels sturdy and doesn’t wobble.
- Alternative Hanging Methods:
- Picture Wire: Attach D-rings to the back of the rake head (or handle) and hang it like a picture frame.
- Command Strips (for lighter items): While less secure than screws, heavy-duty Command strips could work if your rake is light and you’re hanging very light items.
- Decorative Hooks: If the rake itself is light, you could simply hang it from two decorative wall hooks.
- Personalize and Enjoy: Once your rake is securely mounted, the fun begins! Start hanging your chosen items. The possibilities are truly endless, limited only by your imagination.
Creative Uses for Your Upcycled Rake Wall Organizer
The beauty of this DIY project is its incredible versatility. The tines of the rake act as perfect hooks, making it suitable for a multitude of organizational and decorative purposes across different rooms in your home. Here are some inspiring ideas:
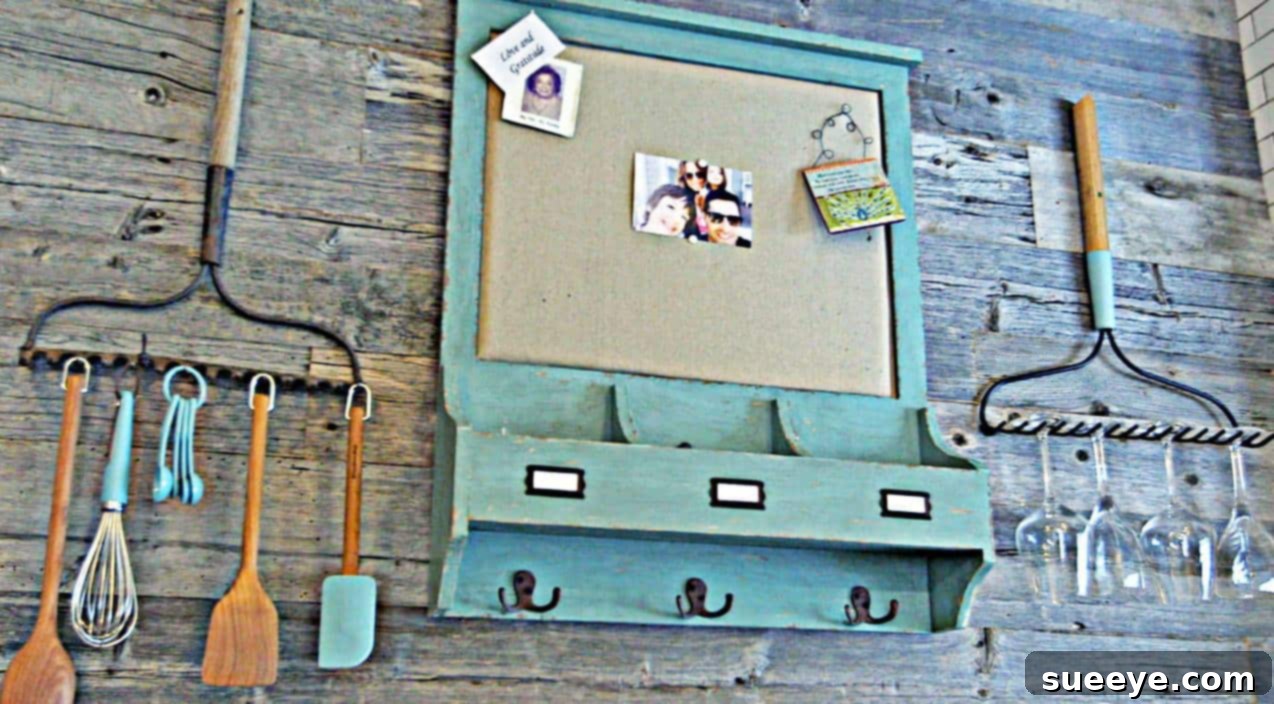
- Kitchen Utensil Holder: This is arguably one of the most popular uses. Hang spatulas, ladles, whisks, measuring spoons, and even coffee mugs. It frees up drawer space and keeps frequently used items within easy reach, adding a delightful farmhouse touch to your kitchen.
- Wine Glass Rack: Invert the rake head and slide the bases of wine glasses between the tines. This creates an ingenious and stylish way to display your stemware, perfect for a rustic dining room or home bar.
- Jewelry Organizer: Hang necklaces, bracelets, and even dangle earrings from the tines in your bedroom or dressing area. It keeps your jewelry untangled and beautifully displayed.
- Entryway Key & Coat Rack: Place it near your front door to hang keys, scarves, small bags, or even lightweight jackets.
- Craft Room Storage: Organize spools of ribbon, scissors, small tools, or even skeins of yarn.
- Garden Tool Display (Indoors): While it started as a garden tool, it can now artfully display smaller, prettier garden implements like hand trowels or pruners.
- Bathroom Towel & Accessory Holder: Hang hand towels, washcloths, or small loofahs.
- Kids’ Room Organizer: Perfect for holding small toys, hair accessories, or displaying lightweight art projects.
The possibilities are genuinely limitless! Experiment with different items until you find the perfect function and look for your unique rake wall hanging. This project is not just a DIY; it’s an opportunity to express your personal style and embrace sustainable living.
Tips for a Perfect DIY Rake Project
- Choose the Right Rake: While any old metal rake can work, those with sturdy, slightly curved tines tend to hold items better. Avoid flimsy or heavily rusted rakes that might break during modification.
- Safety First: Always wear safety glasses when cutting, drilling, or sanding. Use gloves to protect your hands from sharp edges or splinters.
- Cleanliness is Key: Thoroughly clean and degrease your rake before sanding and painting for optimal results.
- Ventilation: When spray painting, ensure you are in a well-ventilated area or outdoors to avoid inhaling fumes.
- Patience with Paint: Allow ample drying time between paint coats and before handling or sealing. Rushing this step can lead to a sticky, uneven finish.
- Consider a Primer: If your rake is heavily rusted or you’re using a light-colored paint, a metal primer will provide better adhesion and rust prevention.
- Check Weight Limits: Before loading up your new organizer, ensure your mounting hardware and wall can support the combined weight of the rake and the items you intend to hang.
Benefits of Upcycling and DIY Projects
Engaging in DIY projects like this rake upcycle offers more than just a new decor piece. It provides numerous benefits:
- Environmental Impact: By repurposing items, you divert waste from landfills and reduce the demand for new manufactured goods.
- Cost Savings: DIY projects are often significantly cheaper than purchasing similar items from stores.
- Skill Development: Each project helps you learn new skills and gain confidence in your abilities.
- Personal Satisfaction: There’s immense pride and satisfaction in creating something beautiful and functional with your own hands.
- Unique Home: Your home becomes a reflection of your creativity and personal style, filled with items that have stories.
Frequently Asked Questions (FAQ)
Q: What kind of rake is best for this project?
A: A standard metal garden rake with sturdy, slightly curved tines is ideal. Avoid plastic rakes as they are not durable enough for this purpose. Look for one with a wooden handle if you plan to incorporate part of it into the design.
Q: Can I use this rake outside?
A: Yes, but you’ll need to use outdoor-grade paint and a weather-resistant sealer to protect it from the elements. Ensure the metal is thoroughly prepped and sealed to prevent rust.
Q: How do I remove stubborn rust?
A: For light rust, sandpaper or a wire brush will suffice. For heavier rust, consider using a rust converter spray or soaking the metal part in vinegar for several hours, then scrubbing it clean.
Q: What if my rake head is bent or damaged?
A: Minor bends can sometimes be straightened with a hammer and pliers. However, if the rake head is severely damaged or the tines are broken, it might be better to find a different rake for your project to ensure stability and safety.
Q: Do I have to paint the rake?
A: No, painting is optional. For a truly authentic industrial or rustic look, you can clean the rake thoroughly, remove loose rust, and then apply a clear protective sealant directly over the natural patina of the metal and aged wood. This can create a beautiful, raw aesthetic.
Conclusion: Embrace Your Inner DIYer!
This DIY rake wall hanging project is one of those wonderfully simple yet impactful crafts that truly transforms a neglected item into a beloved home accent. It’s an opportunity to embrace sustainable living, showcase your creativity, and add truly unique storage and decoration to your space.
Whether it becomes the charming centerpiece of your farmhouse kitchen, an elegant organizer for your treasured jewelry, or a functional entryway catch-all, this upcycled rake is guaranteed to draw compliments. So, don’t let that old rake go to waste! Grab your tools, unleash your imagination, and create something awesome. We can’t wait to see what you make!