
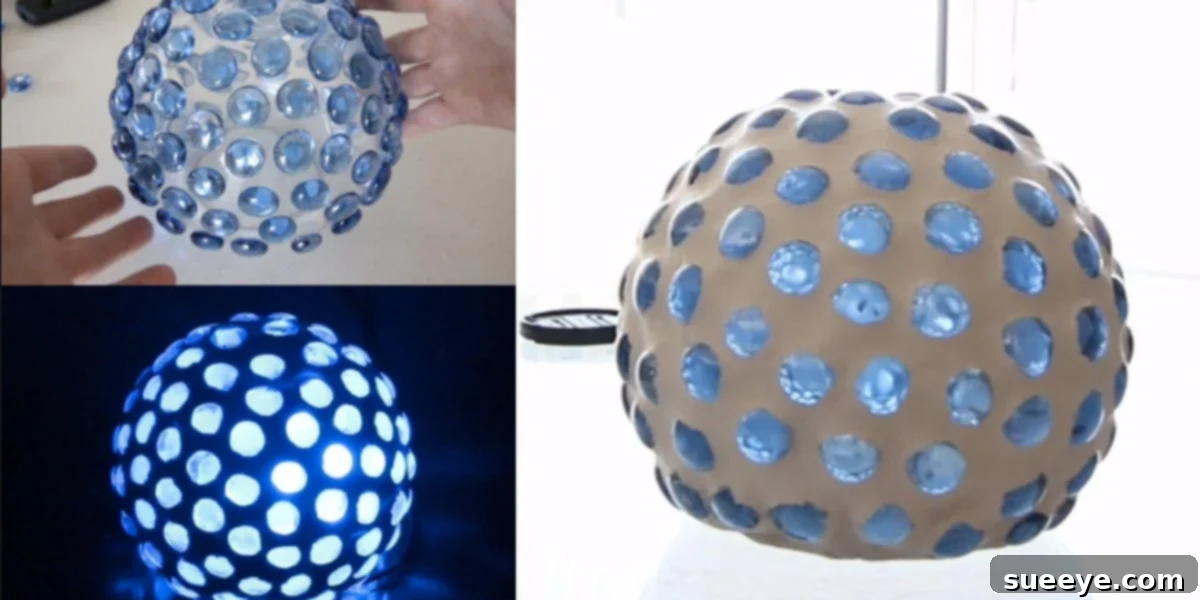
DIY Glass Pebble Mood Lamp: Illuminating Your Space with Serenity and Style
Transforming the atmosphere of your home doesn’t have to be complicated or expensive. There’s a unique satisfaction that comes from creating something beautiful with your own hands, especially when it adds a touch of personalized warmth to your living space. Today, we’re diving into an incredibly rewarding and surprisingly simple DIY project: crafting your very own glass pebble mood lamp. This beautiful creation not only injects a personalized elegance into any room but also offers a safe, clean, and utterly serene alternative to traditional candles. Get ready to illuminate your surroundings and uplift your spirits with a project that’s as enjoyable to make as it is to behold.
The magic of lighting is undeniable; it subtly influences our moods, creates ambiance, and transforms ordinary spaces into inviting sanctuaries. While many of us intuitively reach for candles to “set the mood,” their charm often comes with hidden drawbacks. Our DIY mood lamp project directly addresses these concerns, offering a superior and sustainable solution for creating that perfect, tranquil glow. Let’s explore why this project isn’t just a creative endeavor but a smart, practical, and beautiful addition to your home.
Why Choose a DIY Mood Lamp Over Traditional Candles?
For centuries, candles have been synonymous with creating a cozy or romantic atmosphere. However, in our modern world, there are more effective, safer, and cleaner ways to achieve similar effects. Our glass pebble mood lamp elegantly sidesteps the common issues associated with burning candles, providing peace of mind alongside stunning aesthetics.
The Hidden Costs and Hazards of Relying on Candles
- Fire Hazard: The most significant concern with candles is the inherent fire risk. An open flame, even when seemingly contained, always carries a risk. Leaving a burning candle unattended, placing it too close to flammable materials, or even a curious pet or child can lead to dangerous accidents. Your DIY mood lamp, especially when powered by low-heat LED lights, completely eliminates this critical worry, offering unparalleled safety and peace of mind for your home and family.
- Soot and Residue: As highlighted in the original inspiration for this project, candles, particularly those made from paraffin wax, often leave behind unsightly and stubborn black soot. This residue is more than just an aesthetic nuisance; it can cling to walls, ceilings, furniture, and even fabrics, requiring constant cleaning and potentially causing long-term discoloration and damage. Imagine the frustration of finding your freshly laundered sheets or pristine kitchen surfaces marred by candle soot! Beyond the visual impact, this soot can also impact indoor air quality, contributing to respiratory issues for sensitive individuals. Our mood lamp ensures a clean, residue-free ambiance, keeping your home pristine and your air fresh and healthy.
- Ongoing Expense: Quality candles, especially those with appealing scents, natural waxes, and long burn times, can be surprisingly expensive. If you enjoy creating a cozy atmosphere frequently, the cost of continually repurchasing candles can quickly add up, becoming a significant recurring household expense. A DIY mood lamp, on the other hand, is primarily a one-time investment in materials. Once crafted, it offers endless hours of beautiful illumination at a fraction of the recurring cost, proving to be far more economical in the long run.
- Limited Lifespan: Once a candle burns down, it’s gone, leaving behind a used container and requiring replacement. Your mood lamp, however, with its durable components and a replaceable, long-lasting LED light source, is designed to provide consistent beauty and functionality for years to come. This makes it a sustainable choice that continues to give back.
- Allergies and Scents: While many enjoy scented candles, others find them irritating or triggering for allergies, asthma, or chemical sensitivities. Some synthetic fragrances can also contain volatile organic compounds (VOCs) that may be harmful to indoor air quality. A DIY mood lamp offers pure, unscented light, making it a perfect choice for those with sensitivities or for creating a neutral, calming environment where the focus is solely on the visual beauty of the light.
The Distinct Advantages of Crafting Your Own Mood Lamp
- Unmatched Safety: Enjoy beautiful, ambient light without any open flame, smoke, heat, or the worry of accidental fires.
- Cost-Effective Elegance: Achieve a sophisticated, high-end look on a budget, often far more affordably than purchasing designer lamps.
- Completely Personalized Design: You have full control to choose your own colors, textures, and light types to match your home decor perfectly, reflecting your unique style.
- An Eco-Friendly Choice: This project often involves repurposing a glass bowl, reducing waste. Additionally, LED lights are incredibly energy-efficient and boast an exceptionally long lifespan, further minimizing environmental impact.
- Clean and Low Maintenance: Say goodbye to soot, wax drips, and melted puddles. Simply turn your lamp on and enjoy its clean, consistent glow with minimal fuss.
- The Profound Joy of Creation: There’s immense satisfaction and a boost of personal pride that comes from creating something beautiful and functional with your own hands, adding a truly personal touch to your home.
Gathering Your Materials: The Foundation of Your Beautiful Mood Lamp
The inherent beauty of this DIY project lies in its simplicity and the readily available nature of its materials. You won’t need specialized tools or hard-to-find components, making it accessible for crafters of all skill levels. Here’s a comprehensive list of what you’ll need to gather to begin your creative journey:
Essential Materials List:
- A Sturdy Rounded Glass Bowl: This will serve as the primary structure and canvas for your lamp. Look for a robust, clear glass bowl. Sizes can vary significantly, from small (perfect for a bedside table or accent shelf) to larger (ideal for a living room centerpiece or floor lamp accent). Consider bowls that are wider at the top than the bottom for easier pebble placement, but ultimately, any smooth, rounded shape that appeals to you will work beautifully. Excellent and often affordable places to find unique options include thrift stores, dollar stores, craft shops, and even your own kitchen cabinet!
- An Abundance of Glass Pebbles or Gems: These translucent elements are the stars of your lamp, creating that captivating play of light and shadow. They come in a vast array of colors – clear, frosted, serene blues, vibrant greens, warm ambers, and even multicolored mixes. The quantity you’ll need depends on the size of your chosen bowl and the individual size of your pebbles, but it’s always advisable to have more than you think you’ll need to avoid running out midway through the project. A good starting point might be 2-3 bags (typically 1-2 lbs each) for a medium-sized bowl.
- Reliable Glue Gun and Plenty of Glue Sticks: A standard hot glue gun is an excellent choice for this project due to its quick-setting properties, which make the assembly process fast and efficient. Ensure you have a generous supply of glue sticks on hand, as you’ll be adhering many individual pebbles. For a more permanent, potentially waterproof, or stronger bond, especially if the lamp will be in a high-traffic area or exposed to slight humidity, consider a strong, clear craft adhesive or silicone sealant. Be aware that these alternatives will require significantly longer drying and curing times.
- White Modeling Clay: This essential component is used to fill the small gaps between the pebbles, creating a smooth, unified surface that also helps to diffuse the light evenly, enhancing the lamp’s soft glow. Air-dry modeling clay is typically ideal for this purpose due to its ease of use and no-bake requirement. If white isn’t your preferred aesthetic, you could certainly experiment with other colors of modeling clay, or even use colored grout or caulk for a different texture and potentially more durability (though these options can be messier and require more precise application and cleanup).
- Your Chosen Light Kit or LED Lights: This is the very heart of your mood lamp, bringing it to life with illumination. You have several excellent and safe options, prioritizing LED technology to prevent heat buildup:
- LED Fairy Lights: These thin, flexible, battery-operated string lights are incredibly versatile, produce minimal heat, and are easy to coil and tuck inside the bowl for even light distribution. Many varieties come with different light modes (e.g., steady, flashing, fading) and even remote controls for brightness and color adjustments.
- LED Puck Lights: Small, self-contained, and often battery-operated, puck lights can be simply placed at the bottom of the bowl. Many models offer color-changing options and remote control functionality, allowing for dynamic lighting effects.
- Small LED Bulb Kit: If you’re comfortable with basic electrical safety and setup, a small, low-wattage LED bulb attached to a plug-in cord can provide a brighter, more permanent, and potentially dimmable solution. Crucially, ensure the bulb is LED to absolutely prevent any significant heat buildup within the enclosed space of the lamp.
- Color-Changing LED Options: For the ultimate in dynamic mood lighting, look for any of the above LED options that allow you to change colors with a remote or app. This feature lets you adapt the lamp’s ambiance to any occasion, mood, or season with a simple click.
Optional but Highly Recommended Tools for a Smoother Process:
- Craft Mat or Old Newspaper: To diligently protect your work surface from glue drips and clay residue.
- Wet Wipes or Damp Cloth: Invaluable for quickly cleaning hands and any stray glue or clay before it dries.
- Disposable Gloves: If you opt for modeling clay, grout, or caulk, gloves can keep your hands significantly cleaner and protect sensitive skin.
Step-by-Step Guide to Crafting Your Enchanting Mood Lamp
Now that you have meticulously gathered all your materials, it’s time to bring your vision to life! This crafting process is remarkably straightforward, incredibly satisfying, and designed for success, even for beginners.
Step 1: Prepare Your Workspace and Materials for Success
Begin by setting up a clean, well-lit, and comfortable workspace. Lay down a protective craft mat or several layers of old newspaper to shield your table or surface from any potential glue or clay mess. Unpack your glass pebbles and, if they appear dusty or have manufacturing residue, give them a quick rinse under water and allow them to air dry completely. Finally, plug in your hot glue gun and allow it ample time to heat up thoroughly, ensuring the glue flows smoothly and adheres effectively.
Step 2: Adhere the Glass Pebbles to the Bowl with Care
This is where the transformation truly begins! Turn your glass bowl upside down on your protected work surface. You will be applying the glass pebbles to the outer, curved surface of the bowl.
- Application Technique: Apply a small, pea-sized dab of hot glue to the flat side of each glass pebble. Immediately and firmly press the pebble onto the glass bowl. Work in small sections (e.g., a few pebbles at a time) to prevent the hot glue from drying and hardening before you can securely attach the pebble.
- Pebble Placement and Pattern: You have creative freedom here! You can arrange the pebbles in neat, concentric rows, create a captivating spiraling pattern, or opt for a more organic, random mosaic look. The key objective is to cover the entire outer surface of the bowl with pebbles, ensuring there are small, consistent gaps between each one. These gaps are crucial, as they will be filled in the next step, creating a cohesive and diffused lighting effect. Don’t strive for absolute machine-like perfection; the charm and character of a handmade DIY project often lie in its unique, subtle imperfections.
- Ensuring Full Coverage: Continue this process systematically until the entire outer surface of the bowl, from the rim down to the base, is completely covered with your chosen glass pebbles. Once all pebbles are attached, allow the hot glue to cool and set completely before proceeding. With hot glue, this usually takes only a few minutes.
Step 3: Artfully Fill the Gaps with Modeling Clay for a Seamless Finish
Once your beautiful pebbles are securely attached and the glue has set, it’s time to meticulously fill in those small spaces between them. This step is vital for diffusing the light and creating a finished, polished look.
- Working with Modeling Clay: Take small, manageable pieces of your white (or chosen color) modeling clay. Begin pressing the clay firmly and evenly into the gaps between each glass pebble. The primary goal is to create a relatively smooth, continuous surface that encases the pebbles, effectively covering the visible glue and connecting them visually into a unified whole.
- Achieving Even Distribution and Smoothness: Methodically work your way around the entire bowl, ensuring that all significant gaps are thoroughly filled. Use your fingertips to smooth out the clay as you go, wiping away any excess that might inadvertently cover the top surface of the pebbles themselves. Remember, you want the light to shine brilliantly through the translucent glass pebbles, not through opaque clay.
- Proper Drying and Curing: Carefully follow the specific instructions for your chosen modeling clay regarding its drying time. Air-dry clay can take anywhere from several hours to a full day (or even longer, depending on thickness and humidity) to harden completely. It is absolutely crucial to ensure the clay is fully dry and cured before moving on to the final steps to prevent smudging, cracking, or damage to your delicate work.
- Alternative Finish Considerations: If you opted for a different material like grout or caulk, apply it strictly according to the product’s instructions, ensuring you wipe off any excess from the pebble surfaces promptly and thoroughly before it has a chance to dry and harden.
Step 4: Seamlessly Integrate Your Chosen Light Source
With the pebble-covered bowl now complete and fully dry, it’s time to add the element that brings your creation to life: the illumination!
- Optimal Placement: Carefully turn the bowl right-side up. Gently place your chosen light source (whether it’s LED fairy lights, an LED puck light, or a small LED bulb kit) inside the bowl, ensuring it rests securely at the bottom.
- Arranging Fairy Lights: If you are using LED fairy lights, delicately coil them loosely at the bottom of the bowl, striving for an even distribution of light across the base. You might find it convenient to secure the battery pack discreetly outside the bowl or tuck it artfully underneath the lamp for easy access when changing batteries or operating the lights.
- Positioning Puck Lights: For LED puck lights, simply center the light at the very bottom of the bowl. Many puck lights come with a gentle adhesive back, which can be useful for securing it in place.
- Securing a Bulb Kit: If you’ve opted for a small LED bulb kit, ensure the bulb sits upright and is securely positioned in the center. You might add a few small dabs of hot glue to the bottom of the bowl to keep the base of the light kit centered and stable. Critically, ensure that the power cord exits cleanly from under the bowl without interfering with the lamp’s stability or posing a tripping hazard.
Step 5: Test, Admire, and Enjoy Your Exquisite New Mood Lamp!
The moment of truth has arrived! Plug in your lamp or activate the battery-operated lights. Lean back and watch in awe as the light beautifully refracts and diffuses through the hundreds of glass pebbles and the soft clay, casting a warm, enchanting, and utterly unique glow into your space. Adjust the placement of the internal light source if necessary to achieve your desired optimal brightness and spread of light. Congratulations, you have successfully created your very own stunning and personalized glass pebble mood lamp!
Customization and Creative Ideas: Make It Truly Yours
The true charm of DIY lies in the boundless ability to personalize and innovate. Don’t feel limited by the basic design! Here are some exciting ideas to make your mood lamp an even more profound reflection of your style and personality:
- A Kaleidoscope of Color Play: Experiment with different colored glass pebbles. A serene mix of blues and greens can evoke a calming ocean or tranquil forest feel, while warm oranges, reds, and yellows create a cozy, fiery, or autumnal glow.
- Mastering Light Temperature: Choose warm white LEDs for a traditional, inviting, and intimate ambiance, or opt for cool white LEDs for a modern, crisp, and clean look. As mentioned, color-changing LEDs offer virtually endless possibilities for adapting the lamp’s mood to any occasion or personal preference.
- Exploring Bowl Variations: Seek out glass bowls with interesting textures, subtle patterns, or unique shapes. You could even use other clear glass containers like elegant vases, larger jars, or even glass cloches for different forms and sizes of lamps, each offering a distinct aesthetic.
- Incorporating Glow-in-the-Dark Elements: For an extra touch of magic, consider mixing in a few glow-in-the-dark pebbles or applying a small amount of glow-in-the-dark paint (sparingly, perhaps on portions of the clay) for a subtle, ethereal luminescence even when the primary light source is off.
- Seasonal and Themed Lamps: Create bespoke lamps for specific holidays or seasons. Use vibrant red and green pebbles for a festive Christmas lamp, delicate pastels for an enchanting Easter display, or rich autumnal colors for a warm fall centerpiece.
- Embracing Mixed Media: For the adventurous crafter, carefully incorporate other small, heat-resistant decorative elements. Think tiny polished shells for a beach theme, small sturdy beads, or even artfully arranged dried botanicals (ensuring they don’t block too much light or pose a fire risk if using non-LEDs).
Where to Place Your Serene Illumination: Enhancing Every Corner
Your newly crafted mood lamp is incredibly versatile and can beautifully enhance almost any space in your home, adding a touch of sophisticated ambiance wherever it rests:
- The Sanctuary of Your Bedroom: Place it on your nightstand or dresser for a soft, calming glow before sleep, offering a gentle alternative to harsh overhead lighting. It’s perfect for winding down after a long day.
- The Heart of Your Living Room: It serves as a perfect accent on a side table, mantelpiece, coffee table, or bookshelf, adding depth, warmth, and visual interest to your primary living space.
- A Spa-Like Bathroom Retreat: Create a truly luxurious, spa-like atmosphere with its gentle, diffused light, ideal for relaxing baths and unwinding. Just ensure it’s placed safely away from direct water splashes, especially if using an electrical light source.
- An Intimate Dining Area: Use it as a subtle yet captivating centerpiece for intimate dinners, providing elegant ambiance without the formality, constant attention, or fire risk of multiple candles.
- A Welcoming Entryway: Position it in your foyer or entryway to offer a warm, inviting glow for guests as they arrive, immediately setting a pleasant and hospitable tone for your home.
- Home Office or Studio: Add a touch of soft, non-distracting light to your workspace, helping to create a more relaxed and inspiring environment during creative endeavors or focused work.
Final Thoughts: Embrace Your Inner Crafter and Illuminate Your World
This DIY glass pebble mood lamp project is far more than just a craft; it’s a delightful opportunity to infuse your personal living space with personality, warmth, tranquility, and a truly unique sense of calm. It stands as a testament to how simple, readily available materials, combined with a little creativity and a few easy-to-follow steps, can culminate in a truly stunning and highly functional piece of home decor. Bid farewell to sooty ceilings, the perpetual cycle of purchasing expensive candles, and the lingering worry of open flames. Instead, warmly welcome a sustainable, safe, beautiful, and personalized source of ambient light into your cherished home.
So, gather your chosen materials, carve out some dedicated creative time, and prepare to embark on a truly delightful and rewarding journey. You’ll not only be amazed at how effortlessly easy it is to make this captivating lamp, but also by the immense satisfaction and constant joy your handmade mood lamp will undoubtedly bring to your life and environment. Happy crafting, and may your newly illuminated spaces be filled with peace and beauty!