
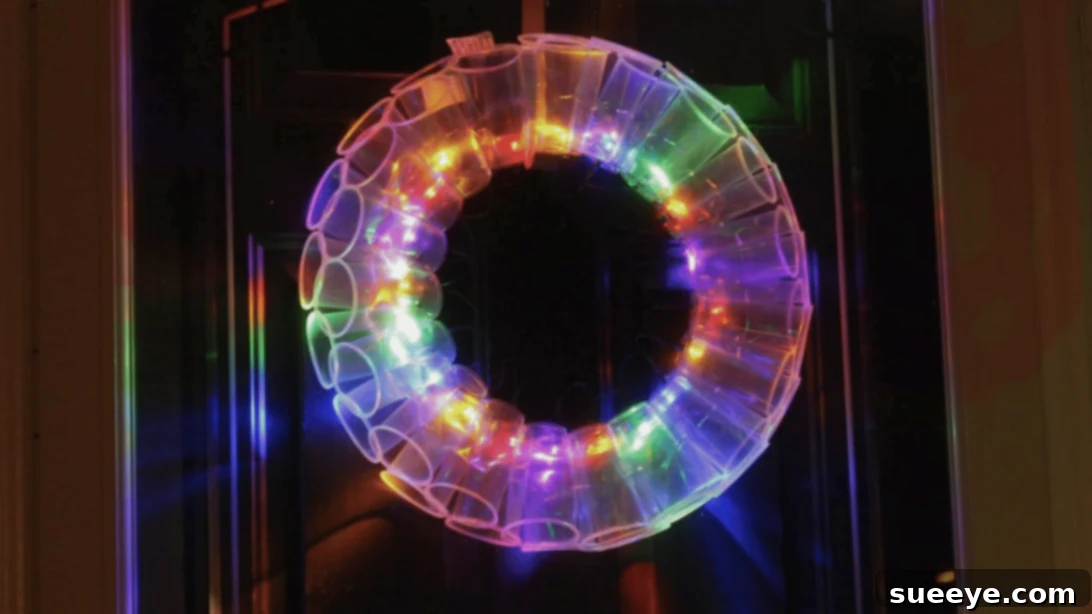
Illuminate Your Holidays: Crafting a Dazzling LED Wreath from Repurposed Plastic Cups
The holiday season is a magical time, perfect for infusing your home with warmth, sparkle, and unique personal touches. There’s something truly special about DIY Christmas decorations; they allow you to unleash your creativity, embrace vibrant colors, and create pieces that perfectly reflect your festive spirit. Beyond the joy of crafting, handmade decor often comes with the added benefit of being incredibly budget-friendly, especially when you can transform everyday items into dazzling masterpieces. This approach not only saves money but also promotes sustainability by giving new life to materials that might otherwise go to waste. It’s a win-win for your wallet and the planet!
One of my absolute favorite recent projects, and one that consistently garners compliments, is a brilliant LED wreath inspired by the incredible creativity of Fentertainment on YouTube. What makes this particular wreath so fascinating and appealing is its surprisingly simple core material: ordinary plastic cups. Yes, you read that correctly – this vibrant, glowing wreath is entirely constructed from humble plastic cups! It’s a testament to how imaginative crafting can transform the mundane into the magnificent.
Why Choose a Plastic Cup LED Wreath for Your Holiday Decor?
At first glance, you might not even realize this spectacular wreath is made from such a common, everyday item. Its innovative design truly elevates the humble plastic cup into a stunning decorative element. Plastic cups are incredibly easy to source, widely available, and remarkably affordable, making this an ideal project for anyone looking to create impactful decor without a hefty investment. Beyond the cost-effectiveness, crafting this unique wreath is an ingenious way to showcase your Christmas lights, turning a simple string of bulbs into a captivating focal point.
This project is also remarkably approachable, requiring minimal crafting skills and tools. You won’t need to be an expert crafter to achieve impressive results. The core construction involves simple stapling, and the integration of lights is straightforward, making it a fantastic activity for a crafting afternoon. It’s an excellent project for beginners and seasoned DIY enthusiasts alike, promising a brilliant, custom decoration that will light up your home and bring smiles to everyone who sees it.
RELATED: Enhance your outdoor display with another fantastic DIY idea: Make DIY Light-Up Christmas Presents for the Yard – perfect companions for your new wreath!
Gather Your Materials: What You’ll Need for Your Plastic Cup LED Wreath
Before diving into the creative process, ensure you have all your materials ready. The beauty of this project lies in its simplicity and the accessibility of its components. You likely already have some of these items around your home, further reducing the cost and effort involved.
- Plastic Cups: The star of our show! You’ll need a good quantity of clear or translucent plastic cups. The exact number will depend on the desired size and fullness of your wreath. Standard party cups (9-12 oz) work perfectly, offering enough rigidity and space for the lights. Consider experimenting with different cup sizes for varied textures or even colors for a truly unique wreath.
- Christmas Lights (LED recommended): A string of festive Christmas lights is essential for bringing your wreath to life. LED lights are highly recommended as they are energy-efficient, produce less heat, and typically have a longer lifespan, making them safer and more sustainable for this type of project. Choose a string length appropriate for the size of your wreath – longer strings will create a denser, brighter glow.
- Plier Stapler: This tool will be your best friend for quickly and securely joining the plastic cups. A standard plier stapler, often used in offices, is ideal for reaching into the cups and creating tight bonds. Make sure you have plenty of staples on hand!
- Soldering Iron: While it might sound intimidating, a soldering iron is used here for a very specific, simple task: creating clean holes in the bottom of each plastic cup. This allows for a snug fit for your light bulbs. If you don’t have a soldering iron, a small craft knife or even a drill with a tiny bit can work, but a soldering iron provides the cleanest, safest holes by melting the plastic rather than cutting it, which prevents cracking. Always exercise caution and ensure proper ventilation when using a soldering iron.
- Optional Embellishments: Get ready to personalize! Think ribbons, bows, small ornaments, faux berries, or even glitter spray. These additions will give your wreath a finished, festive look that perfectly matches your personal style or home decor.
- Hanging Hook or Loop Material: You’ll need something sturdy to hang your finished wreath. This could be a piece of strong ribbon, floral wire, or even a small metal hook.
Step-by-Step Guide: How to Craft Your Dazzling Plastic Cup LED Wreath
Creating this eye-catching LED wreath is a straightforward and rewarding process. Follow these detailed steps to assemble your glowing holiday masterpiece:
Step 1: Assembling the Plastic Cup Base
Begin by preparing all your materials, ensuring they are within easy reach. Take two plastic cups and align their rims, then firmly staple them together in the middle. The goal is to create a secure bond that will form the backbone of your wreath. Next, add a third cup to one side of the stapled pair, positioning its rim flush against the existing cups, and secure it with another staple. Repeat this process on the opposite side, attaching a fourth cup. Continue adding cups one at a time, always stapling them securely to their neighbors, ensuring each cup is tightly joined. Gradually, you’ll see a circular shape begin to form. Maintain consistent spacing and alignment as you work your way around until the circle is complete, and the first and last cups are securely stapled together. This forms the foundational ring of your wreath.
Step 2: Integrating the Enchanting LED Lights
This step requires a bit of caution. Plug in your soldering iron and allow it sufficient time to heat up completely. Once hot, carefully use the tip to create a small, neat hole in the center of the bottom of each plastic cup. The hole should be just large enough to comfortably insert the individual light bulbs from your string of Christmas lights. Aim for a clean, precise melt to ensure a snug fit for the bulbs. After making all the holes, unplug the soldering iron immediately and set it aside on a heat-resistant surface to cool down safely. Now, take your string of Christmas lights and carefully insert one bulb into each hole you’ve created in the cups. Ensure the bulbs are pushed through completely so that the light source is inside the cup, ready to diffuse a beautiful glow. This method effectively transforms each cup into a mini light diffuser, creating a soft, inviting radiance.
Step 3: Adding Embellishments and Preparing for Display
With the lights in place, it’s time to personalize your wreath! Carefully unplug the soldering iron and place it somewhere safe to cool down completely. Now, let your creativity shine. You can add a variety of embellishments to enhance the festive look of your wreath. Consider tying colorful ribbons around individual cups or weaving them through the gaps. Attach small, lightweight ornaments, faux berries, or pinecones for a traditional touch. A light dusting of glitter spray can also add a magical sparkle. Once your embellishments are complete, determine where you want to hang your wreath. Attach a sturdy hanging hook or create a loop using strong ribbon or wire at the top of your wreath. Ensure it’s securely fastened to support the weight of the wreath. Now your dazzling, custom-made plastic cup LED wreath is ready to be proudly displayed on your door, wall, or anywhere you want to add a touch of handmade holiday charm!
Tips for Success and Customization
To ensure your plastic cup LED wreath turns out perfectly and to inspire further creativity, consider these helpful tips:
- Cup Choice: While clear plastic cups are standard, experiment with translucent colored cups for different lighting effects. Red and green cups could create a vibrant traditional look, while blue or silver might offer a frosty, winter wonderland feel.
- Light Type: For outdoor use, ensure your Christmas lights are rated for exterior conditions. Battery-operated LED lights offer greater flexibility for placement if you don’t have access to an outlet.
- Staple Security: Double-check all staples to ensure they are firmly holding the cups together. A loose staple could compromise the integrity of the wreath over time.
- Embellishment Ideas:
- Natural Elements: Add sprigs of artificial pine, holly, or mistletoe.
- Sparkle & Shine: Use glitter glue or spray on the cup rims or embellishments.
- Ribbons & Bows: Weave festive ribbons between cups or create a large central bow.
- Thematic Ornaments: Attach small, lightweight ornaments that match your holiday theme.
- Safety First: When using a soldering iron, always work in a well-ventilated area, wear protective eyewear, and place the hot iron on a heat-resistant stand. Ensure the lights are unplugged before handling any electrical components or making holes.
- Hanging Solutions: If hanging outdoors, ensure your hanging mechanism is weatherproof and strong enough to withstand wind.
Why Repurpose? The Benefits of Sustainable Holiday Crafting
Choosing to craft decorations from repurposed materials like plastic cups isn’t just about saving money; it’s a powerful step towards more sustainable living. Every plastic cup you divert from a landfill and transform into something beautiful helps reduce waste and minimize your environmental footprint. This project embodies the spirit of upcycling, turning potential trash into a treasured item. It also encourages a thoughtful approach to consumption, inspiring us to see the potential in everyday objects rather than constantly buying new ones. Plus, the unique, slightly rustic charm of upcycled decor often stands out and sparks conversation, making your holiday display even more memorable.
Showcase Your Creation: Inspiring Display Ideas
Once your LED wreath is complete, the possibilities for display are endless! It makes a welcoming statement on your front door, inviting guests with its warm glow. Indoors, it can serve as a stunning centerpiece above your fireplace mantel, adding a cozy ambiance to your living room. Hang it in a window to share its festive brilliance with passersby, or incorporate it into a larger holiday display. Because of its lightweight nature, it can also be easily hung on interior walls or even used as a unique table decoration if placed flat with a decorative centerpiece in the middle. Let your imagination guide you to the perfect spot!
Frequently Asked Questions (FAQs) About Your Plastic Cup LED Wreath
- Can I use paper cups instead of plastic cups?
- While technically possible, plastic cups are highly recommended. Paper cups are less durable, especially if stapled, and are not suitable for outdoor use. They also pose a fire risk with certain types of lights due to heat and flammability, even with LEDs (though LEDs produce less heat, caution is still advised).
- How many cups will I need?
- The number of cups depends on the desired diameter and fullness of your wreath. A standard wreath (approx. 18-24 inches) might require 50-80 cups. It’s always a good idea to have a few extra on hand.
- What type of Christmas lights work best?
- Small, mini LED lights are ideal. They fit well into the cup holes, are energy-efficient, and produce minimal heat, making them safer for plastic. Ensure the string length is sufficient for your wreath’s circumference.
- Is this wreath suitable for outdoor use?
- Yes, if you use plastic cups and outdoor-rated LED lights. Ensure all electrical connections are weatherproofed and protected from rain or snow. Battery-operated outdoor LED lights are a great option for simpler outdoor placement.
- How can I make the holes in the cups without a soldering iron?
- If a soldering iron isn’t available, you can use a small drill bit (start with a very small pilot hole and gradually increase), or a sharp craft knife. Be very careful to avoid cracking the plastic and always work on a protected surface.
Conclusion: Brighten Your Holidays with Handmade Charm
Crafting this LED wreath from plastic cups is more than just a DIY project; it’s an opportunity to create something truly unique, sustainable, and beautiful for your holiday celebrations. It’s a testament to how simple, repurposed materials can be transformed into stunning decorations that spark joy and conversation. Embrace the spirit of creativity, save a few dollars, and make an eco-conscious choice this holiday season. Your handmade LED wreath will undoubtedly become a cherished part of your festive decor, shining brightly year after year.
So, gather your supplies, put on some festive music, and embark on this delightful crafting adventure. You’ll be amazed at the enchanting result and the compliments it brings!