
The Ultimate Guide: How to Cut a Watermelon Perfectly Every Time
Summer days are synonymous with vibrant colors, refreshing flavors, and the joy of sharing delicious fruit with loved ones. And when we talk about summer fruits, the magnificent watermelon undoubtedly reigns supreme. Its crisp, sweet flesh is the perfect antidote to a scorching afternoon, especially after a fun beach trip or a lively backyard barbecue. However, for many, the sheer size and unwieldy nature of a whole watermelon can transform the simple act of slicing it into a daunting, messy, and sometimes even frustrating task.
You’re not alone if you’ve struggled with sticky counters, uneven slices, or a watermelon that seemed to fight back. But what if there was a method that promised not only ease and efficiency but also a beautifully presented, less-messy outcome? Good news! We’ve discovered a game-changing technique, popularized by Everyday Reviews, that will revolutionize how you approach this summer staple. This method isn’t just about cutting; it’s about transforming a chore into a simple, satisfying step towards enjoying perfectly portioned watermelon.
Say goodbye to awkward wedges and hello to neat, bite-sized pieces ready for snacking, salads, or serving at your next gathering. This guide will walk you through every step of this ingenious technique, ensuring you master the art of watermelon preparation. Get ready to impress your friends and family with your newfound slicing prowess, making every summer moment a little sweeter and a lot less sticky!
Why This Watermelon Cutting Method Is a Game-Changer
Before we dive into the step-by-step instructions, let’s explore why this particular method stands out among the myriad ways to tackle a watermelon. Many traditional approaches involve cutting the melon into large wedges, which, while iconic, can be cumbersome to eat, especially for children. They often lead to juice dripping everywhere and require extra plates or napkins.
This technique, however, focuses on transforming the entire melon into manageable, uniform cubes or sticks, right within its own rind, before easily transferring them to a serving bowl. Here are the key advantages:
- Reduced Mess: By working systematically and containing the cutting process, you minimize sticky countertops and juice spills, making cleanup a breeze.
- Perfect Portions: Achieve consistent, bite-sized pieces that are ideal for snacking, fruit salads, or for little hands to enjoy without making a huge mess.
- Enhanced Presentation: Neatly cubed watermelon elevates your fruit platter, making it look professionally prepared and inviting.
- Safety First: The method creates stable cutting surfaces, reducing the risk of slips and knife accidents, which is crucial when dealing with a large, round fruit.
- Maximized Yield: By efficiently removing the rind and sectioning the flesh, you minimize waste, ensuring you get the most delicious fruit from your purchase.
- Effortless Serving: The innovative flip-and-serve step makes transferring a large batch of cut watermelon incredibly simple and quick.
Once you try this method, you’ll wonder how you ever managed without it. It’s truly the best and easiest way to prepare this beloved summer fruit.
Essential Materials for Effortless Watermelon Slicing
Having the right tools is the first step to a smooth and safe watermelon-cutting experience. While you don’t need specialized equipment, these items will make the process significantly easier and more efficient:
- A Large, Sturdy Bowl: This is crucial for the final, magical flip-and-serve step. Ensure it’s large enough to comfortably cover half of your cut watermelon.
- A Big, Sharp Knife: A chef’s knife or a carving knife with a blade length of at least 8-10 inches is ideal. A sharp knife is not only more efficient but also safer, as it requires less force and is less likely to slip.
- A Large, Stable Cutting Board: A non-slip cutting board that can accommodate the entire watermelon is essential for safety and stability during the initial cuts.
With these simple tools at hand, you’re well-equipped to embark on your journey to perfectly cut watermelon.
Step-by-Step Guide to Perfectly Cut Watermelon
Follow these detailed instructions, and you’ll be slicing watermelon like a seasoned pro in no time. Remember to always exercise caution when handling sharp knives.
Step 1: Prepare Your Watermelon for Cutting
Before any cutting begins, hygiene is paramount. Thoroughly wash the entire exterior of the watermelon under cool running water. Use a clean brush if necessary to scrub away any dirt, sand, or potential contaminants that may have accumulated on the rind. Even though you’ll be removing the skin, bacteria on the outside can transfer to the flesh when your knife passes through. Pat it dry with a clean cloth or paper towel to ensure a non-slippery surface for cutting.
Step 2: Create a Stable Base by Trimming the Ends
Place your clean watermelon horizontally on your large, stable cutting board. The first critical step is to create flat, stable surfaces on both ends. Carefully use your large, sharp knife to slice off about 1/2 to 3/4 inch from each end of the watermelon. The goal is to remove just enough of the rind to expose a flat, green or light-colored surface, without cutting too deep into the red flesh. These flat ends will prevent the watermelon from rolling, making all subsequent cuts much safer and easier.
Step 3: Halve the Watermelon with Precision
With both ends trimmed and the watermelon stable, stand it upright on one of the newly flattened ends. Carefully cut the watermelon in half lengthwise, from one flat end to the other. If you have a very large watermelon or a slightly smaller knife, you may need to make several passes, rotating the watermelon slightly after each cut to work your way around. Maintain a steady hand and a firm grip on the melon to ensure a clean, even split. This will give you two symmetrical halves, ready for the next phase of preparation.
Step 4: Efficiently Remove the Rind
Take one of the watermelon halves and place it cut-side down on your cutting board. This again creates a stable, flat surface. Now, it’s time to remove the rind. Starting from the top, carefully slice downwards, following the natural curvature of the watermelon from top to bottom. Use a slight sawing motion if needed, guiding your knife just between the red flesh and the white rind. Rotate the watermelon slightly after each slice, working your way around the entire perimeter until all the green and most of the white rind have been removed. Aim to remove as little of the red flesh as possible, but don’t fret over minor imperfections. If you see any remaining white parts, simply trim them off with your knife.
Step 5: Master the Art of Sectioning (Cubing or Sticking)
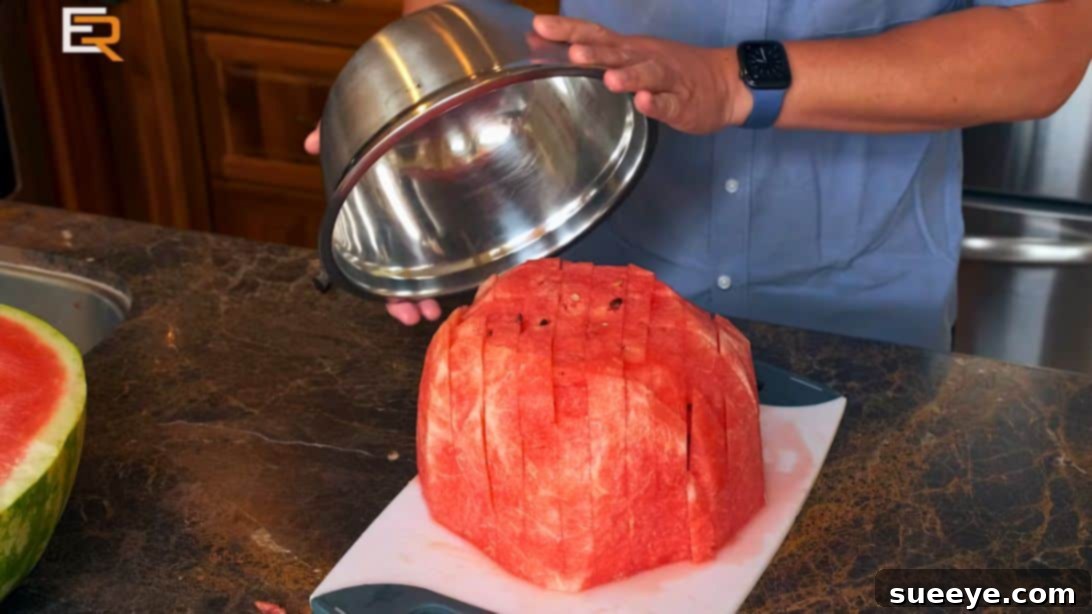
Once your watermelon half is rind-free, you’re left with a large, beautiful block of red fruit. Place it flat-side down on your cutting board. Now, you’ll create your desired pieces. Begin by cutting the watermelon into uniform slices, approximately 3/4 to 1 inch thick, moving across the entire length of the melon. Ensure your knife cuts all the way through to the board. Once you have a series of parallel slices, rotate the entire melon 90 degrees. Now, make parallel cuts perpendicular to your first set of cuts, again aiming for 3/4 to 1-inch thickness. This cross-hatch pattern will create perfectly sized cubes or sticks. Try your best to keep all the cut pieces together on the cutting board; this is crucial for the final step.
Step 6: The Effortless Flip-and-Serve Technique
This is where the magic happens! Take your large bowl and invert it over the precisely sectioned watermelon on your cutting board, ensuring it covers all the cut pieces. Now, carefully but confidently, place one hand firmly on the bottom of the bowl and the other under the cutting board. In one swift, smooth motion, flip the cutting board and the bowl over. When you lift the cutting board, you’ll reveal all your beautifully cut watermelon pieces neatly collected in the bowl! This ingenious method eliminates the need to painstakingly transfer individual pieces, saving you time and preventing mess. Repeat the process with the other watermelon half, using a separate large bowl if needed. Serve immediately and enjoy the fruits of your labor!
Tips for Watermelon Cutting Success and Beyond
To ensure your watermelon cutting experience is always a triumph, consider these additional tips:
- Choose a Ripe Watermelon: A ripe watermelon will be easier to cut and, of course, taste much better. Look for a dull, not shiny, skin, a prominent creamy yellow spot (where it rested on the ground), and a deep, hollow sound when thumped.
- Keep Your Knife Sharp: A sharp knife is paramount for safety and efficiency. A dull knife requires more force, increasing the risk of slips and accidents.
- Stabilize Your Cutting Board: Place a damp paper towel or a non-slip mat under your cutting board to prevent it from sliding during cuts.
- Seedless vs. Seeded: This method works equally well for both seedless and seeded watermelons. If you have a seeded variety, the cubes make it easier to spot and remove any stubborn seeds.
- Adjust Slice Thickness: Feel free to adjust the 3/4 to 1-inch slice thickness in Step 5 according to your preference. Thicker slices are great for grilling, while thinner ones might be preferred for salads.
- Utilize Scraps: Don’t throw away the smaller pieces or ends. They can be blended into refreshing smoothies, infused water, or even frozen for later use.
The Many Benefits of Perfectly Cubed Watermelon
Beyond the sheer convenience, preparing your watermelon in neat cubes or sticks offers a plethora of benefits that enhance your summer fruit enjoyment:
- Effortless Eating: No more awkward dripping and struggling with large wedges. Cubes are perfect for popping into your mouth with a fork or directly by hand.
- Ideal for Entertaining: Serve a beautiful platter of uniform watermelon cubes at parties. They’re easy for guests to grab and enjoy.
- Versatile in Recipes: Cubed watermelon integrates seamlessly into fruit salads, savory salads (think feta and mint!), gazpachos, or even as a refreshing garnish for drinks.
- Kid-Friendly: Small, manageable pieces are much easier and less messy for children to eat, encouraging them to enjoy healthy fruit.
- Portion Control: It’s easier to gauge serving sizes when the fruit is uniformly cut.
- Storage Efficiency: Cubes fit more compactly into storage containers, taking up less space in your refrigerator.
Serving Suggestions & Storage Tips
Once you’ve mastered the art of cutting, the possibilities for enjoying your watermelon are endless. Serve it chilled on its own for a refreshing snack, or get creative:
- Fruit Salads: Combine with berries, melon, grapes, and a squeeze of lime juice.
- Savory Salads: Pair with feta cheese, fresh mint, and a drizzle of balsamic glaze.
- Smoothies & Juices: Blend frozen watermelon cubes for an icy treat.
- Grilled Watermelon: Lightly grill thicker slices for a unique smoky flavor.
- Watermelon Skewers: Thread cubes onto skewers with other fruits or cheese for a fun appetizer.
- Infused Water: Add watermelon cubes and mint leaves to a pitcher of water for a naturally flavored drink.
For storage, place your cut watermelon pieces in an airtight container and refrigerate. Properly stored, it will stay fresh and delicious for 3-5 days. Avoid freezing fresh watermelon cubes directly, as the texture can become mushy upon thawing, though they work wonderfully for smoothies if frozen.
Embrace the Summer with Perfectly Prepared Watermelon
There you have it – the ultimate guide to cutting a watermelon with unparalleled ease and precision. This method, inspired by the practical insights of Everyday Reviews, transforms a potentially daunting kitchen task into a quick, enjoyable, and incredibly satisfying experience. By following these steps, you’ll not only minimize mess and maximize yield but also consistently produce beautifully presented, perfectly portioned watermelon, ready to be enjoyed in countless ways.
So, the next time you bring home that glorious green orb, approach it with confidence. With a sharp knife, a sturdy cutting board, and this step-by-step guide, you’re now equipped to unlock the sweet, refreshing heart of summer’s most iconic fruit. Go ahead, try this technique, and elevate your fruit-serving game. Your taste buds, your guests, and your clean countertops will thank you!