
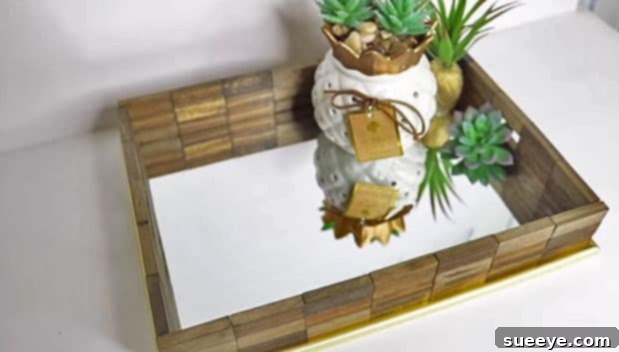
DIY Jenga Block Mirror Tray: Transform Your Old Game into Stunning Home Decor
Remember the exhilarating suspense of a Jenga game? That heart-pounding moment as you carefully extracted a block, hoping not to be the one who caused the magnificent tower to spectacularly tumble. For many, Jenga wasn’t just a game; it was a test of nerve and precision, creating lasting memories.
If you’re like me, those intense Jenga sessions are a fond memory, but the game itself might now be a forgotten relic in your closet – perhaps with a tattered box and dusty blocks. Instead of letting those wooden pieces gather dust, imagine giving them a brand-new purpose, transforming them into a chic and functional piece of home decor. This article will guide you through creating a stunning DIY mirror tray using those very Jenga blocks, an elegant solution for organization and display that breathes new life into an old favorite.
This ingenious craft project offers a fantastic opportunity to repurpose, recycle, and create something truly unique for your living space. Whether you’re seeking a stylish vanity tray for your perfumes and jewelry, a sophisticated centerpiece for your coffee table, or a decorative accent for your entryway, this Jenga block mirror tray perfectly blends rustic charm with modern elegance. And the best part? It’s surprisingly simple to make, requiring minimal tools and a dash of creativity.
Why Repurpose Jenga Blocks for Your DIY Project?
At first glance, Jenga blocks might seem an unusual choice for a mirror tray. However, their uniform size, natural wooden aesthetic, and readily available nature make them ideal. Here’s why they’re perfect for this particular DIY:
- Cost-Effective: If you already own an old Jenga set, your main material cost is virtually zero. Even if you need to purchase a new set, budget-friendly “tumbling block” games are often available at dollar stores or discount retailers, making this a highly economical project.
- Natural Aesthetic: The light, natural wood of Jenga blocks provides a warm, organic texture that complements almost any decor style, from minimalist to bohemian. They offer a raw, unfinished beauty that can be enhanced with stains or paints, or left in their natural state for a rustic feel.
- Ease of Use: Jenga blocks are designed to stack perfectly, which translates into an incredibly straightforward construction process for your tray. Their consistent dimensions ensure a neat, professional finish with minimal effort.
- Sustainability: Upcycling an old game is a fantastic way to practice sustainability. Instead of throwing away an item that still has potential, you’re giving it a second life, reducing waste, and contributing to a more eco-conscious lifestyle.
- Unique Texture and Dimension: The stacked blocks create a beautiful three-dimensional edge around the mirror, adding visual interest and a handcrafted touch that mass-produced trays often lack.
The Allure of a Mirror Tray in Home Decor
Mirror trays are more than just pretty objects; they are versatile decorative elements that can elevate the aesthetic and functionality of various spaces:
- Vanity Organization: A mirror tray on your dresser or bathroom counter provides a designated, elegant space for perfumes, jewelry, makeup, and other essentials, keeping them organized and easily accessible. The reflective surface adds a touch of glamour.
- Coffee Table Centerpiece: Use it to group candles, small plants, books, or decorative objects, creating a curated display that instantly tidies and beautifies your coffee table. The mirror reflects light, making the display appear brighter and more spacious.
- Entryway Catch-All: Place it on an entryway console table to hold keys, mail, or loose change, adding a stylish touch to a often-cluttered area.
- Bar Cart Elegance: A mirror tray can beautifully showcase liquor bottles, glassware, and cocktail accessories on a bar cart, creating a sophisticated display for entertaining.
- Making Spaces Feel Larger: Mirrors inherently reflect light and space, making smaller areas appear more open and airy. A mirror tray subtly contributes to this illusion, brightening its surroundings.
Materials You’ll Need for Your DIY Mirror Tray
Gathering your materials is the first step towards bringing your vision to life. The beauty of this project lies in its simplicity and the accessibility of its components:
- Jenga Blocks:
- One standard Jenga set (or a similar tumbling block game). If your set is old, give the blocks a quick wipe-down to remove any dust or grime. You might not use every single block, but it’s good to have extras.
- Mirror:
- The base of your tray. A round, square, or rectangular mirror will work beautifully. Consider the dimensions you want for your finished tray. You can find affordable mirrors at dollar stores, craft stores, or even by repurposing an old picture frame with a mirrored insert. Ensure the mirror is flat and robust enough to serve as a tray base.
- Strong Adhesive/Glue:
- This is crucial for securing the blocks to each other and to the mirror. Options include:
- E6000 Craft Adhesive: Known for its strong bond, flexibility, and ability to adhere to multiple surfaces, including wood and glass. It’s a popular choice for DIY projects.
- Wood Glue: Excellent for bonding the wooden Jenga blocks together securely.
- Hot Glue Gun: While great for quick temporary bonds, hot glue might not provide the lasting strength needed for a functional tray, especially if it will hold heavier items. Use it primarily for quick placement before a stronger glue sets, or for less functional decorative trays.
- Construction Adhesive: For a super strong, permanent bond, consider a clear construction adhesive.
Choose a glue that is suitable for both wood and glass for the strongest overall construction.
- This is crucial for securing the blocks to each other and to the mirror. Options include:
- Optional Materials for Personalization:
- Wood Stain or Paint: To alter the color of your Jenga blocks and match your existing decor. Jay Munee DIY, the inspiration for this project, used wood stain on hers for an elegant touch.
- Sanding Paper: Fine-grit sandpaper can smooth rough edges on blocks if desired, especially if you plan to stain or paint.
- Felt Pads: Small adhesive felt pads for the bottom of the tray to protect your furniture surfaces from scratches.
- Clear Sealer/Varnish: To protect the wood and enhance its finish, especially if you’re staining or painting.
Step-by-Step Guide to Crafting Your Jenga Mirror Tray
Creating this stunning mirror tray is a straightforward process, primarily involving careful gluing. Here’s how to do it:
1. Prepare Your Workspace and Materials
Choose a clean, flat, and well-ventilated area for your project. Lay down some newspaper or a drop cloth to protect your surface from glue. Ensure all your Jenga blocks are clean and dry. If you plan to stain or paint your blocks, it’s often easier to do so before assembly, ensuring even coverage.
2. Plan Your Layout
Before applying any glue, arrange your Jenga blocks around the perimeter of your mirror. This allows you to visualize the final look and determine how many blocks you’ll need for each side and how they will fit together. You can create a single layer, or stack them two or three high for a taller, more substantial edge. Experiment with different orientations of the blocks (e.g., all flat, alternating flat and on edge) to find a design you love.
3. Begin Gluing the First Layer
Start by gluing the first layer of Jenga blocks directly onto the edge of the mirror. Apply a consistent bead of your chosen adhesive along the bottom edge of each block that will meet the mirror, and a small amount on the side of each block where it will connect to its neighbor. Carefully press each block into place, ensuring it’s flush with the mirror’s edge and aligns with the previous block.
- Tip for Round Mirrors: For a round mirror, you’ll need to angle the blocks slightly to follow the curve. This might require a bit more patience and careful placement.
- Secure and Hold: For optimal adhesion, you might need to hold each block in place for a few seconds or use painter’s tape to secure them while the glue begins to set.
4. Build Additional Layers (Optional)
If you desire a taller tray edge, continue by gluing subsequent layers of Jenga blocks on top of the first. Staggering the blocks (like a brick wall) will create a stronger, more visually appealing structure. Apply glue to both the top surface of the lower block and the side surface where it meets its neighbor in the same layer. Ensure each layer is level and the blocks are securely bonded.
5. Allow for Ample Drying Time
This is perhaps the most crucial step for a durable tray. Refer to your glue’s instructions for recommended drying and curing times. It’s often best to let the tray sit undisturbed for at least 24 hours (or even longer, depending on the glue) before handling it extensively or placing items on it. Rushing this step can lead to weak bonds and a flimsy tray.
6. Apply Finishing Touches (Optional)
- Staining or Painting: If you didn’t pre-stain or paint, you can now carefully apply your chosen finish to the Jenga blocks. Use painter’s tape to protect the mirror if needed.
- Sealing: A clear coat of varnish or sealer will protect the wood from moisture and wear, giving it a more polished look.
- Felt Pads: Glue small felt pads to the bottom corners or edges of the Jenga blocks on the underside of the tray. This prevents scratches on your furniture surfaces.
Tips for a Perfect DIY Jenga Mirror Tray
- Measure Twice, Glue Once: Always dry-fit your blocks before applying glue to ensure they fit perfectly and you like the layout.
- Use a Level Surface: Work on a completely flat surface to ensure your tray is level and stable.
- Don’t Over-Glue: While you need a strong bond, too much glue can squeeze out and create a messy finish. Apply a consistent, moderate amount.
- Clean Up Excess Glue Immediately: If any glue oozes out, gently wipe it away with a damp cloth or cotton swab before it dries, especially if it’s on the mirror surface.
- Patience is Key: Allow adequate drying time between layers and for the final cure. This ensures a robust and long-lasting tray.
- Personalize Your Creation: Don’t be afraid to experiment with different block arrangements, colors, or even adding small embellishments like decorative handles or feet.
- Consider Your Mirror Edge: If your mirror has a sharp edge, you might want to consider using a mirror with a beveled edge or finding a way to cover the inner edge of the Jenga blocks to create a smoother, safer finish.
Unleash Your Creativity: Variations and Customization Ideas
This Jenga mirror tray project is incredibly versatile. Here are a few ideas to spark your imagination and make your tray truly unique:
- Stacked Height: Instead of just one layer, create a taller, more prominent tray by stacking two or three layers of Jenga blocks.
- Alternating Colors: Paint or stain blocks in two different complementary colors and alternate them in your design for a striped or checkerboard effect.
- Distressed Look: Sand the Jenga blocks lightly, apply a coat of paint, then sand some areas away again for a charming distressed or farmhouse aesthetic.
- Geometric Patterns: Instead of simple straight rows, try arranging blocks in a chevron pattern or another geometric design, especially for square or rectangular mirrors.
- Added Embellishments: Consider gluing small decorative gems, faux flowers, or even tiny handles onto the Jenga blocks for an extra touch of flair.
- Alternative Bases: If a mirror isn’t quite what you’re looking for, consider using a piece of cut wood, a thick cork board, or even a ceramic tile as the base for a different kind of decorative tray.
- Theme-Specific Trays: Customize your tray for holidays (e.g., paint blocks red/green for Christmas) or specific room themes (e.g., coastal blue and white for a beach-themed bathroom).
The Reward of DIY: A Unique, Handcrafted Piece
There’s a special satisfaction that comes with creating something beautiful with your own hands. This DIY Jenga block mirror tray is more than just a craft project; it’s a testament to creativity, resourcefulness, and the joy of transforming everyday objects into extraordinary decor. You’ll end up with a high-end looking tray that didn’t break the bank, and a conversation starter that proudly displays your DIY prowess.
Whether you’re looking to declutter your vanity, enhance your living room’s aesthetic, or simply enjoy a rewarding craft, this project offers an elegant solution. So, dust off that old Jenga game, gather your materials, and get ready to create a stunning piece of home decor that truly reflects your personal style.
For a visual walkthrough and more inspiration, watch the excellent tutorial that sparked this idea. Jay Munee DIY’s Jay Garcia provides clear instructions that will guide you through each step of the process. Her innovative approach shows just how simple and rewarding this project can be:
Happy crafting!