
Build Your Own Backyard Oasis: The Ultimate Guide to a DIY Cinder Block Fire Pit
Transforming your backyard into a cozy haven for relaxation and entertaining doesn’t have to break the bank. Imagine gathering around a crackling fire on a cool evening, sharing stories, and making memories with loved ones. This dream can become a reality with a simple, budget-friendly DIY project: a cinder block fire pit. Inspired by an incredible DIY cinder block fire pit video by StatUpBox on YouTube, the vision of creating this backyard centerpiece instantly captivated me. I could vividly picture this gorgeous addition to my outdoor space, complete with comfortable cinder block stools topped with plush outdoor cushions, making it the perfect spot for intimate gatherings.
The excitement to complete this project and invite friends over was immense. Envisioning everyone snuggled around our newly built fire pit, I knew it would be a beloved feature. This project stands out because it requires only the most basic skills. If you can dig a shallow hole and place a stone, you possess all the necessary expertise! The final result is not only aesthetically pleasing but also incredibly functional, promising countless evenings of enjoyment. This guide will walk you through every step of building your own stunning, affordable cinder block fire pit, ensuring you achieve a professional-looking finish without extensive effort or expense.
Why Choose a Cinder Block Fire Pit for Your Backyard?
When considering outdoor fire features, many options exist, from elaborate stone structures to prefabricated metal pits. However, a DIY cinder block fire pit offers a unique blend of advantages that make it an overwhelmingly popular choice for homeowners:
- Unbeatable Affordability: This is perhaps the most significant draw. Cinder blocks, also known as concrete blocks or retaining wall stones, are incredibly inexpensive. Coupled with readily available materials like sand and lava rocks, you can construct a substantial, beautiful fire pit for a fraction of the cost of store-bought alternatives. The initial inspiration for this project, valued at around $50, perfectly illustrates its cost-effectiveness, making a backyard upgrade accessible to almost any budget.
- Simplicity and Speed: Unlike complex masonry projects, building a cinder block fire pit requires minimal tools and no specialized skills. It’s a project that can often be completed in a single weekend, from gathering materials to having your first crackling fire. The stacking method for the blocks means no mortar is typically needed, streamlining the construction process significantly.
- Durability and Longevity: Cinder blocks are robust and designed to withstand outdoor elements. Once properly constructed, your fire pit will be a durable feature in your backyard for many years, resisting weather and the heat of regular fires.
- Versatility and Customization: While the basic design is straightforward, cinder block fire pits offer immense potential for customization. You can choose different sizes, shapes (round, square, rectangular), and even finish the blocks with stone veneer, paint, or caps to match your existing landscaping and personal style. This allows you to create a truly unique focal point that reflects your taste.
- Enhanced Backyard Aesthetics and Functionality: A fire pit instantly elevates your outdoor living space. It creates a natural gathering point, encouraging conversation and relaxation. It’s perfect for entertaining guests, roasting marshmallows with kids, or simply enjoying a quiet evening under the stars. It transforms a simple yard into a welcoming outdoor room.
- Safety: A well-constructed fire pit provides a contained and safer environment for a fire compared to an open ground bonfire. The walls of the cinder blocks help keep embers and sparks within the designated area, provided proper fire safety precautions are followed.
Embracing this DIY project means not only saving money but also gaining the satisfaction of building something beautiful and functional with your own hands. It’s an investment in your home’s outdoor appeal and in countless future memories.
Gathering Your Essential Materials for Fire Pit Construction
Before you begin digging, it’s crucial to have all your materials and tools ready. This ensures a smooth and efficient building process. The items listed below are generally easy to find at most hardware stores, home improvement centers, or landscape supply yards. When sourcing, consider the aesthetics and durability, especially for the retaining wall stones.
Materials:
- Cinder Blocks or Retaining Wall Stones: The core of your fire pit. The original project suggests “retaining wall stones 41.98 each” (likely referring to the quantity needed, not cost per block, as 42 blocks would be a substantial number and cost). For a typical 3-foot diameter circular fire pit with two courses (layers) of blocks, you might need approximately 24-30 blocks. For a larger or taller pit, adjust accordingly. Look for blocks designed for outdoor use and direct ground contact.
- A Bag of Sand: Essential for creating a perfectly level and stable base for your first layer of blocks. A standard 50lb bag is usually sufficient for a medium-sized fire pit.
- A Bag of Pea Pebbles or Crushed Gravel: Used for the bottom of the fire pit to provide excellent drainage and help dissipate heat. This layer prevents water from pooling and helps maintain the integrity of the fire pit’s base.
- A Bag of Lava Rocks or Fire Glass: These are not strictly necessary for the fire pit’s structure, but they serve as an excellent, heat-resistant, and aesthetically pleasing base for your fires. They help absorb and radiate heat, creating a more consistent and enjoyable fire. Lava rocks are more traditional and cost-effective, while fire glass offers a modern, shimmering look.
Tools:
- A Level: Absolutely critical for ensuring your fire pit is straight, stable, and safe. A long carpenter’s level (2-4 feet) is ideal for checking across multiple blocks, while a smaller torpedo level can be useful for individual blocks.
- A Shovel: For digging the initial foundation trench and moving sand and gravel. A sturdy garden shovel will work perfectly.
- A Wheelbarrow (Optional but Recommended): Great for transporting sand, gravel, and blocks around your yard, saving your back and time.
- A Rubber Mallet: Used for gently tapping and adjusting blocks into place to ensure they are perfectly level and snugly fit together. Avoid metal hammers as they can chip the blocks.
- A Tape Measure: For accurately marking the fire pit’s diameter and ensuring consistent sizing.
- Work Gloves and Safety Glasses (Highly Recommended): Protect your hands from rough blocks and prevent debris from entering your eyes, ensuring safety throughout the project.
Having all these items ready before you start will make the construction process much more enjoyable and efficient, allowing you to focus on the task at hand rather than making multiple trips to the store.
Step-by-Step Fire Pit Construction: Building Your Dream Backyard Feature
With your materials gathered and enthusiasm high, it’s time to bring your vision to life. This detailed guide will walk you through each step, ensuring a stable, safe, and beautiful fire pit.
Step 1: Planning and Site Selection for Your Fire Pit
The success and safety of your fire pit begin with careful planning of its location. This is one of the most critical initial decisions you’ll make.
- Choose a Safe Location: Select a spot that is a safe distance (at least 10-20 feet) away from your home, any wooden structures, fences, low-hanging tree branches, and dense foliage. Consider wind direction; embers can travel.
- Check Local Regulations: Before you dig or light a fire, always check with your local municipality or fire department for any specific ordinances regarding outdoor burning, fire pit dimensions, or material requirements. Some areas have burn bans during dry seasons.
- Mark the Area: Determine the desired diameter of your fire pit. A common size is 3 to 4 feet in outer diameter, providing ample space for a fire without being too large. Use a stake, a string, and spray paint or flour to accurately mark a perfect circle on the ground. This will be your digging guideline. Clear the area of any grass, weeds, or debris within and slightly beyond your marked circle.
Step 2: Preparing a Stable and Level Base
A solid, level foundation is paramount for the stability and longevity of your fire pit.
- Digging the Foundation: Using your shovel, dig a shallow trench or circular bed within your marked area. Aim for a depth of about 4-6 inches, ensuring the bottom of the trench is as flat as possible. The width of this trench should accommodate the cinder blocks you’re using.
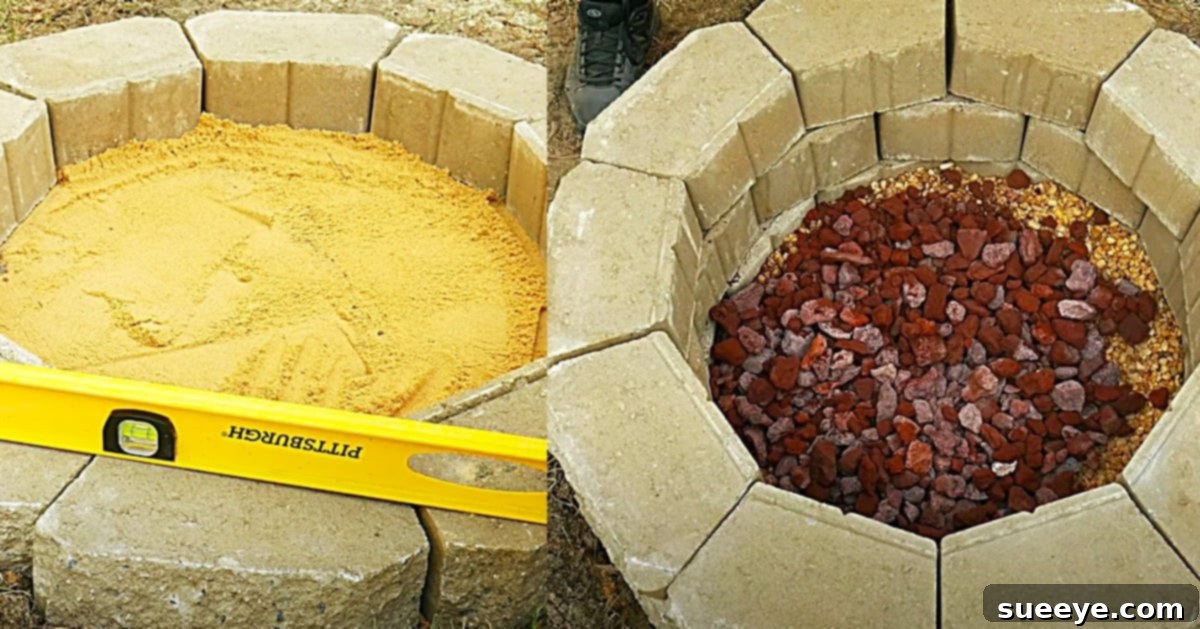
- Adding a Sand Base: Pour a layer of sand (about 2-3 inches deep) into the excavated trench. Spread it evenly using your shovel or rake.
- Compacting and Leveling the Sand: Lightly mist the sand with water and then compact it firmly. You can use a hand tamper, the back of your shovel, or even just walk on it. The goal is to create a very dense, stable surface. Crucially, use your level to ensure the entire sand bed is perfectly flat and level in all directions. Make any necessary adjustments by adding or removing sand until it’s absolutely perfect. This step takes time but pays off significantly in the final structure.
Step 3: Laying the First Course of Blocks
This is where your fire pit begins to take shape.
- Placing the Blocks: Begin placing your cinder blocks or retaining wall stones directly onto the leveled sand base. Start with one block and work your way around the marked circle, fitting them snugly against each other. Ensure the blocks are placed with their hollow cores facing inwards (towards the center of the pit), or as preferred by the specific retaining wall stone design you chose.
- Checking for Levelness: After placing each block, use your smaller level to check that it is level from side to side and front to back. Also, frequently use your longer level across multiple blocks to ensure the entire ring remains perfectly level.
- Adjusting with the Mallet: If a block is too high, gently tap it down with your rubber mallet. If it’s too low, lift it, add a small amount of sand underneath, and re-level. Patience here is key to a sturdy structure.
Step 4: Building Subsequent Layers of Blocks
Once your first layer is perfectly level and complete, you can begin adding height to your fire pit.
- Staggering Blocks (Running Bond Pattern): For maximum strength and stability, lay the second course of blocks in a staggered pattern, similar to how bricks are laid in a wall. This means placing the center of a block in the second layer over the joint of two blocks in the first layer. This interlocking pattern distributes weight and prevents weak points.
- Continuing to Level: As you add each block and complete each layer, continue to check for levelness both horizontally and vertically. Small adjustments at this stage are much easier than correcting a leaning wall later. Most DIY cinder block fire pits are 2-3 courses high (approximately 16-24 inches), which is a comfortable height for sitting around.
- Ensuring a Snug Fit: Press blocks firmly together as you place them. While mortar isn’t typically used for these designs, a tight fit adds to the overall stability.
Step 5: Filling the Interior of the Fire Pit
Once the walls are built to your desired height, it’s time to prepare the inside for your fires.
- Add Drainage Material: Pour a layer of pea pebbles or crushed gravel (about 3-4 inches deep) into the bottom of the fire pit. This layer will provide essential drainage for rainwater, prevent the bottom from becoming muddy, and help with heat dissipation, protecting the ground beneath.
- Introduce Fire Bed Material: On top of the gravel, add your lava rocks or fire glass. This layer serves as the primary bed for your fires. Lava rocks are excellent for absorbing and radiating heat, creating a more efficient and consistent burn. They also look attractive and are highly durable. Fill to a depth that brings the fire bed to a comfortable level, typically a few inches below the top rim of the blocks.
Step 6: The Finishing Touches and Optional Enhancements
Your basic cinder block fire pit is now complete, but you can further enhance its appearance and functionality.
- Aesthetic Upgrades:
- Caps: Consider adding decorative capstones to the top layer of blocks. These can be glued down with landscape adhesive for a more finished look and can serve as a smoother surface for drinks or plates.
- Stone Veneer: For a more integrated, high-end appearance, you could adhere stone veneer to the exterior of the cinder blocks. This transforms the look from utilitarian to rustic or modern, depending on the veneer chosen.
- Paint: Heat-resistant exterior paint designed for masonry can be used to color the blocks, allowing you to match your fire pit to your existing outdoor decor.
- Functional Enhancements:
- Grill Grate: For added versatility, you can purchase a circular grill grate that fits snugly over the top of your fire pit, transforming it into an instant BBQ for cooking hot dogs or grilling skewers.
- Seating Area: As initially envisioned, consider building matching cinder block benches around the fire pit. These can be topped with outdoor cushions for comfort and a cohesive look.
- Lighting: Integrate solar-powered pathway lights or string lights around the fire pit area to enhance the ambiance after dark.
With these steps, your very own DIY cinder block fire pit is ready for its inaugural fire! The satisfaction of building it yourself, combined with the joy it will bring, makes this project incredibly rewarding.
Safety First: Enjoying Your Fire Pit Responsibly
While a cinder block fire pit provides a contained environment for fires, safety should always be your top priority. Following these guidelines will ensure many seasons of safe and enjoyable use:
- Proper Placement: Reiterate the importance of a safe distance from combustibles. Ensure your fire pit is on a non-flammable surface, such as dirt, gravel, concrete, or stone, and never on a wooden deck without adequate heat protection.
- Supervision is Key: Never leave a fire unattended, even for a moment. Always have an adult present when the fire pit is in use, especially when children or pets are around.
- Fire Extinguishing Supplies: Always keep a bucket of water, a garden hose, or a fire extinguisher readily accessible near the fire pit. This allows for quick action in case of an emergency.
- Appropriate Fuel: Only burn dry, seasoned firewood. Avoid burning trash, leaves, treated lumber, or anything that could release toxic fumes or create excessive sparks. Never use gasoline, lighter fluid, or other accelerants to start or rekindle a fire.
- Manage Fire Size: Keep fires to a manageable size that remains well within the confines of the fire pit walls. Avoid overfilling, which can cause embers to escape.
- Be Aware of Weather Conditions: Avoid using your fire pit on windy days, as gusts can easily carry sparks to nearby flammable materials. Always check for local burn bans, especially during dry seasons.
- Complete Extinguishment: Before leaving the fire pit or going indoors, ensure the fire is completely extinguished. Douse the embers with water until no smoke or heat remains, then stir them to ensure everything is cooled.
- Child and Pet Safety: Establish clear safety zones around the fire pit for children and pets. Educate children about fire safety and the dangers of playing near a hot fire pit.
By adhering to these safety practices, your DIY cinder block fire pit will be a source of warmth and joy for years to come, providing a secure gathering space for everyone.
Customizing Your Cinder Block Fire Pit: Beyond the Basics
The beauty of a DIY project lies in its potential for personalization. While the basic cinder block fire pit is charming on its own, here are ideas to make it uniquely yours:
- Seating Arrangements: As mentioned, integrating cinder block benches around your fire pit creates a cohesive and inviting conversation area. Simply stack blocks for the bench bases and top them with sturdy wood planks or outdoor cushions for comfort.
- Lighting and Ambiance: Enhance the evening atmosphere with string lights draped around the area, solar path lights defining the perimeter, or even strategically placed landscape lighting that highlights the fire pit and surrounding features.
- Integrated Cooking Features: Expand the functionality by adding a swivel grill grate or a removable cooking grate that sits over the fire. This transforms your fire pit into a versatile outdoor kitchen for s’mores, hot dogs, or even grilling larger meals.
- Decorative Elements:
- Exterior Finish: Beyond paint or veneer, consider applying stucco or a mosaic tile pattern to the exterior for a unique look.
- Capstones: Install flat, decorative capstones on the top course of blocks. These not only provide a finished appearance but also offer a smooth surface for drinks or small plates.
- Landscaping: Surround your fire pit with fire-resistant plants, gravel, or pavers to create a dedicated fire pit zone that is both beautiful and safe.
- Storage Solutions: If your design allows, create a small, integrated wood storage nook within a section of the cinder block structure.
- Shape and Size Variations: While round is classic, don’t limit yourself. Cinder blocks can be arranged to form square, rectangular, or even oval fire pits, allowing you to fit the design perfectly to your outdoor space and aesthetic preferences.
These customization options allow you to tailor your cinder block fire pit to fit your lifestyle, aesthetic vision, and functional needs, turning a simple DIY project into a true outdoor masterpiece.
Embrace the DIY Spirit: Your Backyard Awaits!
The journey of building your own cinder block fire pit is more than just a construction project; it’s an investment in creating unforgettable moments and enhancing your outdoor living experience. From the initial spark of inspiration from that fantastic YouTube video to the satisfaction of lighting your very first fire, every step is a rewarding testament to your creativity and effort.
This project proves that a stunning backyard feature doesn’t require extensive skills or a hefty budget. With basic materials, a few simple tools, and a weekend of dedicated work, you can transform your backyard into a cozy, inviting oasis. The enduring durability and timeless appeal of a cinder block fire pit ensure it will be a cherished gathering spot for years to come, providing warmth, light, and the perfect ambiance for laughter and camaraderie. So, gather your materials, follow these straightforward steps, and get ready to invite your friends and family over. Your beautifully crafted outdoor fire pit is waiting to host countless memories.