
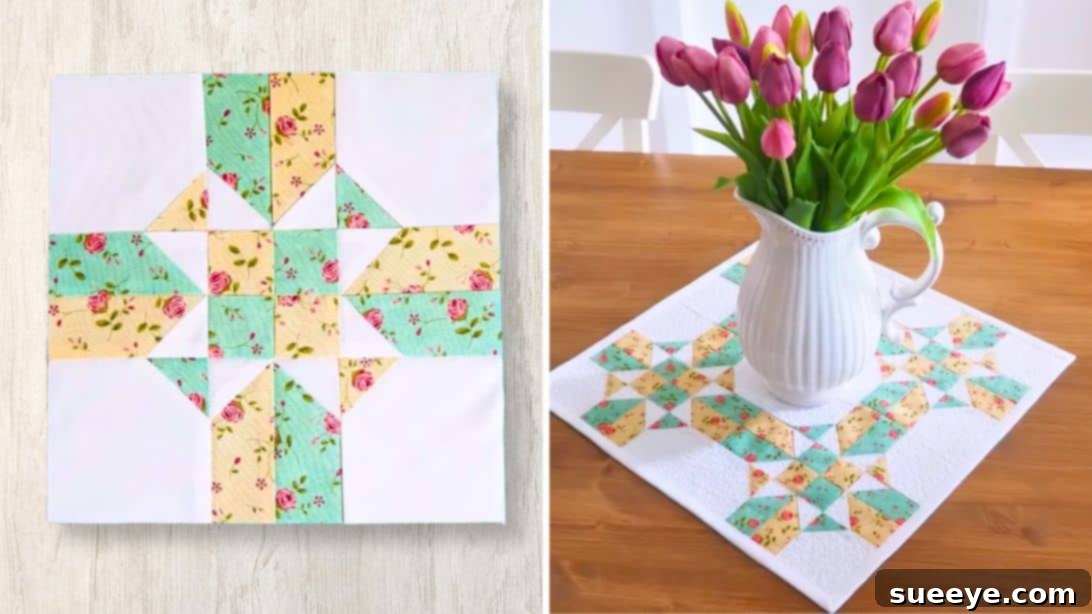
Craft a Beautiful Patchwork Centerpiece Mat: A Quick & Easy Quilt Tutorial
Are you searching for a delightful and achievable sewing project that brings a touch of handmade charm to your home without demanding weeks of your time? Last weekend, I set out to find just such a project – something I could genuinely complete in a mere few hours, offering immediate satisfaction. My search led me to an absolutely beautiful creation by Liza Decor on YouTube, and I instantly knew it was the perfect fit. This quick patchwork centerpiece mat isn’t just visually appealing; it’s incredibly fast and surprisingly easy to construct, making it an ideal choice for quilters of all skill levels, especially beginners.
What makes this particular project so appealing is its deceptive simplicity. Would you believe that this intricate-looking mat is primarily crafted from basic half-square triangles (HSTs)? Yes, the entire design blossoms from a straightforward four-patch block, ingeniously constructed using these fundamental units. If you’re eager to learn how to create this charming pattern, add a unique handmade accent to your dining table or coffee table, or simply dive into a rewarding quilting experience, you’ve come to the right place. Keep reading for a comprehensive, step-by-step guide, or refer to the video for a visual walkthrough. Prepare your fabric, fire up your sewing machine, and get ready for some happy quilting!
This tutorial will walk you through transforming simple fabric squares into a sophisticated centerpiece. We’ll cover everything from precise cutting and sewing techniques to the clever arrangement that brings the unique star design to life. By the end, you’ll not only have a beautiful mat but also a newfound confidence in your quilting abilities. Let’s get started on this creative journey!
Essential Materials & Tools for Your Patchwork Mat
Before we begin stitching, gathering all your materials and tools is crucial for a smooth and enjoyable quilting experience. Accuracy in cutting and consistency in sewing are key to a professional-looking finish, and having the right equipment will make all the difference.
- Fabric Squares:
- 16 pieces of 6″ x 6″ printed squares (choose two different coordinating fabrics for visual interest)
- 16 pieces of 6″ x 6″ background squares (a solid or subtle print that complements your main fabrics)
Tip: Opt for 100% quilting cotton as it’s easy to work with and holds its shape well. Pre-washing your fabrics is highly recommended to prevent shrinking and color bleeding after your mat is complete.
- Basic Quilting Tools:
- Sewing Machine: Equipped with a 1/4-inch piecing foot for accurate seam allowances.
- Rotary Cutter: A sharp blade makes quick, clean cuts.
- Self-Healing Cutting Mat: Protects your work surface and provides a stable base for cutting.
- Quilting Ruler: A square ruler (e.g., 6.5″ or 8.5″) and a long ruler (e.g., 24″) for precise measuring and trimming.
- Fabric Marker or Pencil: For drawing diagonal lines on your squares.
- Iron and Ironing Board: Essential for pressing seams flat and setting stitches.
- Matching Thread: High-quality polyester or cotton thread that blends with your fabrics.
- Pins or Fabric Clips: To hold fabric layers together securely.
- Fabric Scissors: For snipping threads and minor adjustments.
- Batting: A piece slightly larger than your finished mat (e.g., 20″ x 20″).
- Backing Fabric: A piece slightly larger than your finished mat (e.g., 20″ x 20″).
- Binding Fabric: Approximately 2.5 yards of 2.5-inch wide strips, or pre-made binding, to finish the edges.
Step-by-Step Guide to Crafting Your Patchwork Centerpiece Mat
Follow these detailed instructions carefully to bring your beautiful patchwork centerpiece mat to life. Precision at each stage will ensure a stunning final product.
Step 1: Preparing and Sewing Your Half-Square Triangles (HSTs)
The half-square triangle is the fundamental building block of this project. You’ll create 32 HST units from your initial squares. This step involves marking, sewing, and preparing the units for cutting.
Begin by selecting 2 pieces of 6″ printed squares (one from each of your chosen patterns) and 2 pieces of 6″ background squares. Place one background square on top of each printed square, ensuring their right sides are together and all edges are perfectly aligned. Using your fabric marker or pencil and a ruler, draw a diagonal line from one corner to the opposite corner on the wrong side of the background fabric. This line will serve as your guide for cutting later.
Now, take your assembled pairs to your sewing machine. Using your 1/4″ piecing foot, sew a seam exactly 1/4″ away from both sides of the drawn diagonal line. You will have two parallel stitch lines on each square pair. This technique efficiently yields two HSTs from each square set. Repeat this process for all 16 sets of printed and background squares, resulting in 32 potential half-square triangles.
Step 2: Cutting and Trimming Your Half-Square Triangles for Perfection
Accuracy in this step is vital for ensuring your finished blocks are square and your seams align beautifully. Once you have sewn along both sides of the diagonal lines for all your fabric pairs, it’s time to cut them apart.
Carefully cut directly on the drawn diagonal line for all of the pieces. This action will separate each square pair into two triangular units, which, when opened, form your half-square triangles. After cutting, take each newly formed HST to your ironing board. Press the seam allowance open or towards the darker fabric (consistency is key here) to create a flat, crisp unit. The goal is to eliminate any bulk at the seam. Once pressed, use your square quilting ruler and rotary cutter to trim each HST unit to a precise 5.25″ x 5.25″ square. This trimming step is critical for squaring up your units and ensuring all subsequent pieces will fit together perfectly. Take your time here; a well-trimmed HST makes a huge difference in the final look of your mat.
Step 3: Constructing Your First Four-Patch Block
With your perfectly trimmed HSTs ready, it’s time to assemble them into the initial four-patch block. This block forms the base of the star design later on.
Select four of your trimmed 5.25″ x 5.25″ half-square triangles. Arrange them on your design wall or flat surface in a four-patch configuration, just like the arrangement shown in the photo above. Experiment with the orientation of the triangles until you achieve a pleasing design – typically, the light and dark halves create a distinct pattern. Once you are satisfied with the arrangement, sew them together in two rows of two. First, sew the two HSTs in the top row together with a 1/4″ seam, then do the same for the bottom row. Press the seams open or towards the darker fabric (again, be consistent). Finally, sew the two rows together, carefully nesting the center seams to ensure they align perfectly. Pin generously at the intersection to prevent shifting. Press the completed four-patch block flat. This meticulous pressing ensures your block lies flat and square.
Step 4: The Transformative Cut for the Star Design
This is where the magic happens and your simple four-patch begins its transformation into the distinctive star pattern. This step requires careful measurement and cutting.
Take your constructed four-patch block to your cutting mat. Using your ruler and rotary cutter, make precise cuts 1.5″ away from the center seam on all four sides of the block. Visualize the block divided into nine smaller sections by these cuts. You will essentially be cutting off the outer perimeter of the block, leaving a central square and four rectangular strips. These cuts might seem counter-intuitive, but they are crucial for creating the “flipping” effect that forms the star. Accuracy here is paramount; double-check your measurements before making each cut to ensure uniformity across all blocks.
Step 5: Revealing the Star – Assembling the Main Block
Now for the exciting part – manipulating the cut pieces to reveal the beautiful star design! This step will be repeated for each of your four main blocks.
Lay out the central square and the four rectangular pieces you cut in Step 4. Carefully flip the middle parts (the rectangular strips) on all four sides of the central square. When you flip them, orient them so that the points of the smaller triangles (from the original HSTs) are now facing outwards, creating a distinct star shape in the middle of your block. You can also flip the corners so that the small triangles are on the outside corners, creating a different but equally stunning effect. Refer to the second image provided to ensure you’re arranging them correctly for the desired star pattern.
Once you have your desired arrangement, sew these pieces together. It’s often easiest to sew them in rows first: join the three pieces in the top row, then the three in the middle row, and finally the three in the bottom row. Press the seams flat after sewing each row, alternating the direction of the seam allowance to help them nest when joining the rows. After pressing, sew the rows together, paying close attention to aligning all the seams and intersections. Use pins liberally to hold everything in place. Once the rows are joined, press the entire block flat. Finally, trim this completed block to a precise 8.5″ x 8.5″ square. This consistent sizing is critical for ensuring your four main blocks will join together seamlessly. Repeat this entire process (Steps 3-5) to make a total of four identical 8.5″ x 8.5″ blocks.
Step 6: Final Assembly, Quilting, and Binding
You’re almost there! With all four star blocks complete, it’s time to bring them together into your finished centerpiece mat.
Arrange your four 8.5″ x 8.5″ blocks into a 2×2 grid, playing with the orientation until you achieve a pleasing overall design. Once satisfied, sew the two top blocks together, then sew the two bottom blocks together, using a consistent 1/4″ seam allowance. Press these seams open or to one side. Next, sew the top row to the bottom row, carefully aligning the center seams where the blocks meet. Pin thoroughly before sewing to prevent any shifting. Press the entire quilt top flat. You now have a beautiful patchwork quilt top, approximately 16.5″ x 16.5″ (the exact size might vary slightly based on seam allowances).
To finish your mat, create a quilt sandwich: lay your backing fabric right side down, then your batting, and finally your quilt top right side up. Smooth out all layers to eliminate wrinkles. Baste the layers together using pins, basting spray, or hand-stitches. Now, quilt your mat! You can choose simple straight lines, stitch-in-the-ditch along your seam lines, or try some free-motion quilting if you’re feeling adventurous. The quilting process secures all three layers together and adds texture. Once quilted, trim any excess batting and backing fabric, squaring up your mat. Finally, add binding to the edges of your mat. This encases the raw edges, provides durability, and gives a clean, professional finish. And there you have it – a magnificent, quick patchwork centerpiece mat, ready to adorn your home! Enjoy your beautiful handmade creation!
Tips for Quilting Success: Elevate Your Mat Making
To ensure your patchwork centerpiece mat turns out beautifully and stress-free, consider these expert tips:
- Consistent Seam Allowance: A precise 1/4-inch seam allowance is paramount in quilting. Use a 1/4-inch piecing foot on your sewing machine to maintain accuracy. Even a slight variation can lead to misaligned blocks.
- Pressing vs. Ironing: When quilting, we “press” rather than “iron.” Lift your iron, place it down firmly to set the seam, and then lift it again. Sliding the iron can stretch and distort your fabric, especially on bias edges.
- Chain Piecing: To save time and thread, sew your HSTs in a chain. Don’t cut the thread between each pair of squares; simply feed the next set through. This speeds up the process significantly.
- Squaring Up: Don’t skip the trimming step! Squaring up your HSTs and final blocks to the exact measurements ensures that all your pieces fit together perfectly, resulting in a flat and even quilt top.
- Fabric Selection: Choose high-quality quilting cotton. It’s easier to work with, less prone to fraying, and produces more durable results. Contrasting fabrics will make your star pattern pop.
- Sharp Tools: A sharp rotary cutter blade makes clean, precise cuts with less effort. Replace your blade regularly for optimal performance.
- Patience is a Virtue: Quilting is a journey, not a race. Take your time with each step, especially when cutting and pressing. Enjoy the process!
Creative Variations & Design Ideas
While this tutorial provides a fantastic foundation, feel free to unleash your creativity and personalize your patchwork centerpiece mat:
- Color Palette Exploration: Experiment with different color schemes. For a seasonal mat, use autumn tones for fall or bright pastels for spring. A monochromatic scheme with varying shades can create a sophisticated look, while high-contrast colors will make the star pattern truly stand out.
- Scrap Buster Project: This project is excellent for using up your fabric scraps! If you have smaller pieces, piece them together to create your 6″ x 6″ squares, adding even more character and a story to your mat.
- Size Adjustment: Want a larger table runner or a smaller coaster? Adjust the initial square size and the trimming measurements proportionally. Remember that any change will affect the overall dimensions of the final mat.
- Quilting Designs: Beyond simple straight lines, consider trying wavy lines, stippling, or custom free-motion designs to add texture and intricate detail to your mat. The quilting can dramatically alter the mat’s aesthetic.
- Embellishments: Once quilted and bound, you could add small fabric appliqué shapes, decorative stitching, or even some subtle beads to enhance your mat’s uniqueness. Ensure any embellishments are suitable for a table mat and won’t interfere with its function.
Care and Maintenance for Your Quilted Mat
To ensure your beautiful patchwork centerpiece mat remains a cherished item for years to come, proper care is important. Most quilted items made with 100% cotton can be gently machine washed on a cold, delicate cycle with a mild detergent. Avoid harsh chemicals or bleach. Tumble dry on low heat or, ideally, lay flat to air dry to prevent shrinkage and maintain its shape. A light press with a warm iron can smooth out any wrinkles.
Your Handmade Masterpiece: A Touch of Quilted Elegance
And there you have it – a wonderfully detailed guide to creating your very own Quick Patchwork Centerpiece Mat. From the initial cutting of simple squares to the final flourish of binding, you’ve witnessed and participated in the fascinating transformation of fabric into a stunning, functional piece of home decor. This project, while quick and seemingly straightforward, incorporates fundamental quilting techniques like precise half-square triangle construction, accurate trimming, and careful block assembly, making it an excellent learning experience for beginners and a satisfying speedy sew for seasoned quilters.
The beauty of this design, inspired by the talented Liza Decor, lies in its versatility. It can effortlessly complement various interior styles, from rustic farmhouse to modern minimalist, simply by your choice of fabrics. Imagine it gracing your dining table for a festive meal, adding warmth to your coffee table, or even serving as a thoughtful, handmade gift for a loved one. Each stitch tells a story, and each mat is a unique expression of your creativity.
We encourage you to embark on this delightful quilting adventure. Don’t be afraid to experiment with colors, patterns, and even your quilting stitches. The joy of quilting comes not only from the beautiful finished product but also from the mindful, creative process itself. We hope this tutorial has empowered you to pick up your needle and thread with confidence. Share your creations with us, ask questions, and most importantly, have fun bringing your textile dreams to life. Happy quilting!