
Craft Your Own Elegant DIY Wood Serving Board: A Step-by-Step Guide
There’s an undeniable charm that comes with hosting guests, and for many, the presentation of food and drinks is just as crucial as the taste itself. I’ve always found immense joy in making my home feel welcoming and special for visitors, and a beautifully arranged serving tray is often at the heart of that experience. While I have accumulated a collection of serving trays over the years, there always seems to be room for more, especially when I stumble upon truly inspiring ideas that promise both beauty and practicality.
Such was the case when I discovered an amazing serving board tutorial by Do It On A Dime on YouTube. This brilliant creator showcased a simple yet incredibly elegant approach to crafting a gorgeous wooden serving board, immediately sparking my imagination. With my mother-in-law’s visit for tea approaching, I was eager to elevate my presentation. I envisioned serving delicate Earl Grey tea alongside my homemade biscuits on a display that truly impressed, and this DIY wooden tray was precisely the sophisticated touch I needed to make the occasion even more memorable.
What struck me most about the tutorial was its remarkable simplicity. The instructions provided by the talented YouTuber were clear, concise, and incredibly easy to follow, making this project accessible even for novice crafters. Furthermore, the material list was refreshingly minimal, which meant I could dive into the project without delay. Serendipitously, I already had a suitable piece of old wood in my workshop from a previous Home Depot haul last year, requiring only a quick cut to the desired dimensions. This significantly reduced the overall cost and effort, making the project even more appealing.
The only components I needed to purchase were a pair of small, stylish handles. A quick trip to Michael’s craft store, armed with a handy 40% off coupon from their app, made this final acquisition incredibly budget-friendly. This project quickly proved to be not only creatively rewarding but also exceptionally affordable, transforming a simple piece of wood into a functional work of art perfect for any occasion, from casual gatherings to elegant dinner parties.
Why Craft Your Own Serving Board? The Benefits of DIY Entertaining
Venturing into a DIY project like creating your own serving board offers a multitude of advantages beyond just having a new item for your home. It’s an opportunity to infuse personality into your decor, save money, and even learn new skills. Here are some compelling reasons to embrace this creative endeavor:
- Unmatched Customization and Personal Style: Unlike mass-produced store-bought trays, a DIY board allows for complete personalization. You can choose the exact size, wood type, finish, and handle style that perfectly complements your existing decor and personal aesthetic. Create a rustic charm, a modern minimalist look, or something uniquely artistic – the choice is yours.
- Significant Cost Savings: High-quality wooden serving boards can be surprisingly expensive in retail stores. By sourcing your own materials and investing a little time and effort, you can create a premium-looking board for a fraction of the retail price, especially if you have reclaimed wood or leverage craft store coupons for hardware.
- A Unique Personal Touch: Handcrafted items bring warmth, authenticity, and character to a home. Serving guests on a board you made yourself adds a special, personal touch that will undoubtedly be noticed and appreciated. It’s a wonderful conversation starter and reflects your thoughtful hospitality.
- Sustainability and Resourcefulness: This project is ideal for using reclaimed wood or leftover pieces from other projects, promoting sustainability and reducing waste. Giving old wood new life as a beautiful, functional serving piece is incredibly satisfying and eco-conscious.
- Skill Development and Creative Outlet: Even simple woodworking projects like this can build confidence and teach valuable practical skills such as sanding, drilling, and applying finishes. It’s a rewarding way to spend an afternoon, tap into your creativity, and develop a new hobby or refine existing ones.
- Perfect Thoughtful Gift Idea: A custom-made serving board makes an incredibly thoughtful and personal gift for various occasions, including weddings, housewarmings, birthdays, or holidays. It’s a handmade item that carries genuine sentiment.
Essential Materials for Your DIY Wooden Serving Board Project
One of the beauties of this project is its minimal material requirement, making it accessible for almost anyone to tackle. Before you begin, gather the following items to ensure a smooth and successful crafting experience:
- 1 Piece of Wood: The Foundation: The core of your serving board. Consider options like pine for an economical choice, or hardwoods such as oak, maple, or walnut for superior durability, natural beauty, and a premium aesthetic. The size and thickness will depend entirely on your desired board dimensions and its intended use, whether for a small cheese platter or a large charcuterie spread.
- A Sander (with Heavy and Fine Grit Sandpaper): For Smooth Perfection: An electric orbital sander will significantly speed up the process, but a simple sanding block with manual effort can also achieve excellent results for smaller pieces. You’ll need heavy-grit sandpaper (e.g., 60-80 grit) for initial shaping, removing major imperfections, and rough edges. Progress to progressively finer grits (e.g., 120, 180, 220 grit) for a super smooth, splinter-free, and professional-looking finish.
- Handles for the Serving Board: Function and Style: These components elevate both the functionality and aesthetics of your board. Drawer pulls, cabinet handles, or even stylish leather straps or rope can work wonderfully. Choose a style that perfectly matches your vision – be it rustic, modern, industrial, or classic – and complements your existing home decor.
- Food-Safe Mineral Oil: Protection and Luster: Crucial for conditioning and protecting your wooden board, especially if it will come into direct contact with food. Mineral oil penetrates the wood fibers, preventing them from drying out, cracking, and staining, while also enhancing its natural grain and color. Always ensure you choose a food-grade mineral oil.
- Screws: For Secure Handle Attachment: To attach your chosen handles securely. It is vital to ensure the screws are appropriate for the thickness of your wood board and the specific handles you’ve selected. They should be long enough to provide a strong, stable hold but not so long that they protrate through the other side of the board.
- A Drill: For Precision Holes: Essential for drilling pilot holes for your screws. Pilot holes are critical as they prevent the wood from splitting when you drive in the screws and ensure the handles sit flush against the board surface.
- A Screwdriver: For Final Assembly: To finalize the attachment of the handles, either by hand for precise control or with a drill bit adapter for speed.
- Optional Materials for Enhancement: Consider adding wood glue (if laminating multiple pieces of wood), wood stain or paint for a unique color, clear food-safe sealant for extra protection, rubber feet for stability on surfaces, or a wood router for decorative edges.
Step-by-Step Directions: Crafting Your Beautiful Serving Board
Follow these detailed steps to transform a simple piece of wood into an elegant and functional serving board. Remember, patience in each stage, particularly with sanding and finishing, will yield the most impressive and durable results.
-
Step 1: Prepare Your Wood and Initial Shaping
Begin by selecting your piece of wood. If necessary, use a saw to cut it precisely to your desired dimensions. Consider the intended use – a small board for presenting cheeses and appetizers, a larger one for an elaborate charcuterie spread, or a specific rectangular shape for serving beverages. Once cut, visually inspect all edges and surfaces for any major imperfections, splinters, or rough spots. This is also the ideal stage where you might gently round off the corners slightly with your sander for a softer, more refined look, or use a router if you desire to create a decorative edge profile such as a chamfer or ogee for added elegance.
-
Step 2: The Art of Sanding to Achieve a Silky Smooth Finish
This is arguably the most critical step for both the aesthetic appeal and the functionality (especially food safety) of your serving board. You will start by thoroughly sanding your piece of wood with heavy-grit sandpaper (e.g., 60 or 80 grit) to effectively remove any saw marks, deep imperfections, large splinters, or significantly rough areas. Apply even, consistent pressure and always sand in the direction of the wood grain to prevent unsightly cross-grain scratches. Once the entire surface feels relatively smooth to the touch, progress to a medium-grit sandpaper (e.g., 120 grit) to eliminate the marks left by the coarser paper and further refine the surface. Finally, finish with a fine-grit sandpaper (e.g., 180 or 220 grit) to achieve a beautifully smooth, buttery, splinter-free surface that is pleasant to touch and safe for food. Ensure all edges and corners are also meticulously sanded for a professional finish. A perfectly smooth surface is not just visually appealing; it is crucial for proper oil absorption and overall hygiene.
Image By: Do It On A Dime Via YouTube After your board is impeccably smooth and dust-free from sanding, wipe it down thoroughly with a slightly damp cloth to remove any lingering wood dust particles. Allow the wood to dry completely before moving on to the next step, as moisture can interfere with handle attachment and finishing processes.
-
Step 3: Attaching Your Chosen Handles with Precision
Carefully decide on the optimal placement for your handles. Typically, they are positioned equidistant from the ends of the board and centered vertically on the sides for a balanced look. Mark the exact screw hole locations with a pencil, ensuring they are even and symmetrical. Use your drill to create pilot holes at these marked points. Drilling pilot holes is an absolutely essential step as it prevents the wood from splitting when you drive in the screws and ensures that the handles sit flush against the board’s surface, providing a sturdy and professional attachment. Ensure your drill bit is slightly smaller than the diameter of your screws to create a snug fit. Once the pilot holes are accurately drilled, align your handles and secure them firmly in place using your screws and a screwdriver. Be careful not to overtighten, as this can strip the wood or potentially damage the handles.
Image By: Do It On A Dime Via YouTube -
Step 4: The Finishing Touch: Applying Food-Safe Mineral Oil
With your handles securely attached, it’s time to protect and enhance the natural beauty of your board with mineral oil. Liberally apply food-safe mineral oil over all surfaces of the board using a clean, lint-free cloth or paper towel. Don’t be shy; the wood needs to soak it up. Allow the wood to absorb the oil for at least 30 minutes, or even a few hours, for maximum penetration. As the wood absorbs the oil, its natural grain and color will be beautifully revealed, while also creating a vital protective barrier against moisture, stains, and bacteria. After the soaking period, wipe off any excess oil with a fresh, clean, dry cloth until the surface feels dry to the touch and not greasy. For optimal protection and longevity, especially for a brand new board, repeat this oiling process 2-3 more times over the next 24-48 hours, allowing several hours or even overnight between coats for the oil to fully penetrate and cure. This thorough conditioning is vital for the long-term health and hygiene of your serving board.
-
Step 5: Curing and Care for Lasting Beauty and Functionality
Once you’ve applied the final coat of mineral oil and wiped off any excess, allow the board to cure completely for at least 24-48 hours before its first use. This ensures the oil has fully settled into the wood and formed its protective barrier. To maintain your beautiful serving board, always hand wash it with mild soap and water after each use – absolutely never place it in a dishwasher, as the intense heat and moisture can cause the wood to warp, crack, and lose its finish. Dry it immediately and thoroughly with a clean towel. To keep your board conditioned and looking its best, reapply a thin coat of food-safe mineral oil every few weeks or months, depending on the frequency of use and how often it’s washed. This routine maintenance will preserve its luster and extend its life for years of joyful entertaining.
Personalize Your Board: Endless Customization Ideas
The true beauty of a DIY project lies in the ability to customize. Don’t be afraid to experiment and make your serving board truly yours, reflecting your unique style and needs:
- Explore Different Wood Types: Beyond pine, maple offers a light, fine grain, while walnut provides rich, dark, luxurious tones. Oak is classic and highly durable, and exotic woods can add a unique and sophisticated flair.
- Creative Edge Treatments: Utilize a router to create decorative edges like a classic round-over, a modern chamfer, or an intricate ogee profile for an exceptionally elegant finish.
- Stains or Paints for Color: While mineral oil enhances natural wood, you could apply a food-safe wood stain (ensuring it’s fully cured and sealed if intended for direct food contact) for a different color palette. Alternatively, paint decorative patterns or a monogram on the underside or edges for an artistic touch.
- Variety of Handle Styles: The options for handles are virtually endless! From minimalist brass pulls to rustic iron handles, sleek leather straps, or even hand-carved wooden knobs, your choice of handles significantly impacts the board’s overall aesthetic and feel.
- Engraving or Stenciling: Add a deeply personal touch with wood burning techniques, stenciled designs, or a custom engraving of your family name, a significant date, a favorite quote, or even a subtle logo.
- Practical Non-Slip Feet: Attach small, discreet rubber feet to the underside of your board to prevent it from sliding on smooth surfaces and to lift it slightly, protecting both your table and the board itself from moisture.
Beyond Tea & Biscuits: Versatile Uses for Your New Serving Board
While my initial inspiration for crafting this board was a delightful tea party, your newly crafted serving board is incredibly versatile and can be utilized for a myriad of occasions, culinary presentations, and decorative displays:
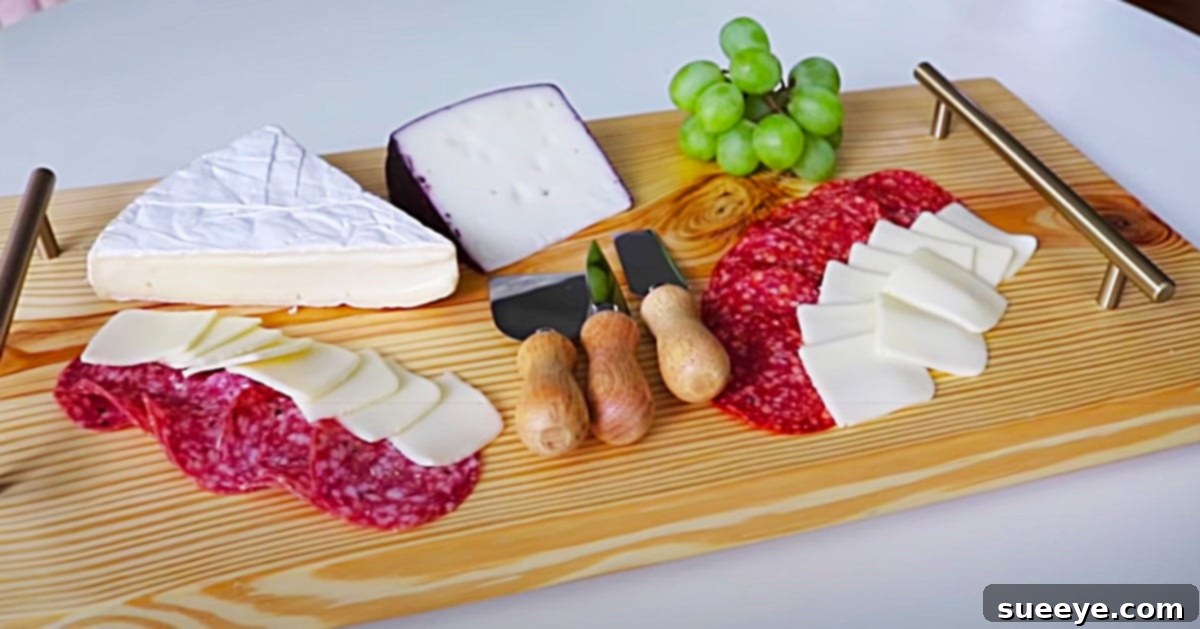
- The Quintessential Charcuterie and Cheese Boards: This is arguably the most popular and visually stunning use. Arrange an artful assortment of gourmet cheeses, cured meats, artisan crackers, fresh fruits, crunchy nuts, olives, and savory jams for an impressive and irresistible appetizer spread.
- Luxurious Breakfast in Bed: Treat yourself or a loved one to a truly indulgent morning with a beautifully presented spread of freshly brewed coffee, warm pastries, fresh fruit, and perhaps a small vase with a flower, all elegantly arranged on your board.
- Elegant Dessert Platter: Showcase an array of delectable cakes, homemade cookies, mini tarts, delicate macarons, or a vibrant selection of fresh fruit for a tempting and eye-catching sweet display that will impress any dessert lover.
- Appetizer & Cocktail Server: Perfect for passing around an assortment of small bites, hors d’oeuvres, or serving a selection of pre-made cocktails or mocktails at a casual gathering or sophisticated soirée.
- Decorative Centerpiece or Tray: Even when not in active use for serving, your beautiful board can serve as a stunning decorative base for candles, small potted plants, seasonal decor, or other cherished decorative elements on a coffee table, dining table, or kitchen island.
- Organized Coffee Bar Station: Create a tidy and stylish coffee or tea station by organizing your mugs, sugar, stirrers, coffee pods, or tea bags neatly on the board, adding a touch of bespoke charm to your kitchen counter.
Conclusion: A Rewarding Project for Every Home and Host
Creating this DIY wooden serving board, inspired by the innovative and accessible tutorials found on platforms like YouTube, was an exceptionally rewarding experience. It’s a project that masterfully combines simplicity with elegance, allowing anyone, regardless of their crafting experience, to produce a professional-looking and deeply personal piece of home decor with minimal effort and expense. The satisfaction of crafting something beautiful and profoundly functional with your own hands is truly immense and deeply gratifying.
Seeing my homemade Earl Grey tea and delicate biscuits beautifully arranged on this stunning wooden tray, crafted specifically for the occasion of my mother-in-law’s visit, filled me with a profound sense of pride and accomplishment. It looked absolutely perfect with my existing decor, seamlessly adding a touch of rustic charm and understated sophistication that I simply couldn’t have achieved with a generic, mass-produced store-bought item. This project serves as a compelling testament that with a little inspiration, some basic tools, and a willingness to create, you can transform ordinary materials into extraordinary pieces that enhance both your home and your entertaining experiences.
I wholeheartedly encourage you to embark on your own DIY serving board journey. Whether you’re a seasoned DIY enthusiast looking for a quick and satisfying project, or just starting out in the world of crafting, this project offers a fantastic opportunity to create something unique, practical, and truly reflective of your personal style. Feel free to share your wonderful creations, get delightfully creative with your finishes, and most importantly, thoroughly enjoy the immensely rewarding process of making something wonderful for your home, your cherished guests, and yourself!