
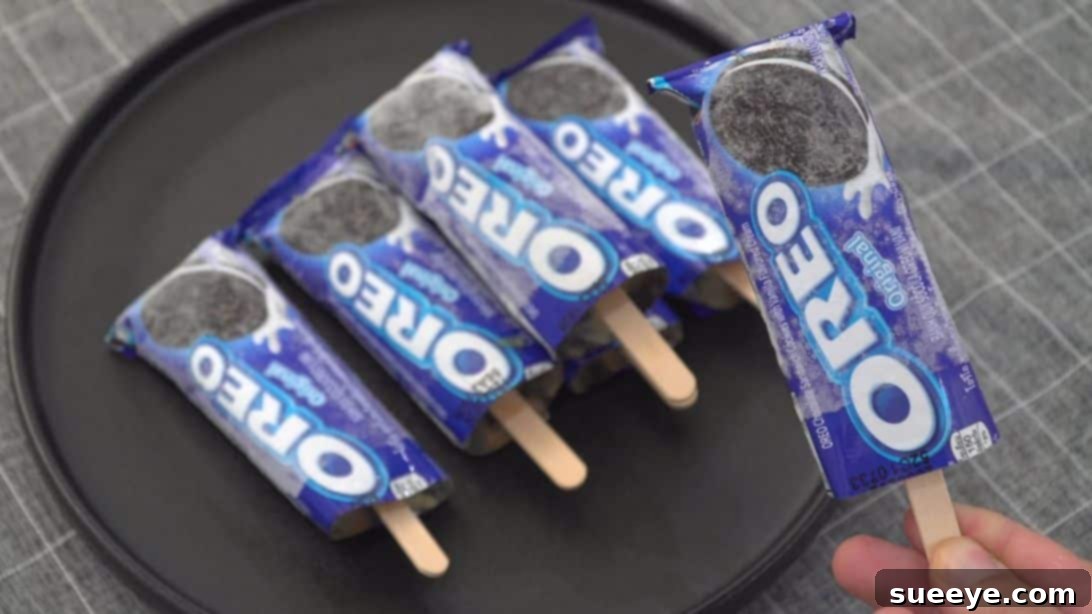
Craving a delightful, creamy treat that’s both incredibly simple to make and budget-friendly? Look no further! If you, like my sister, have an insatiable love for ice cream, especially the kind packed with America’s favorite cookie, Oreos, then this recipe is about to become your new best friend. Forget frequent trips to the grocery store or hefty bills for store-bought versions; we’re diving into the world of homemade Oreo ice cream sticks – a brilliant alternative that promises satisfaction at a fraction of the cost.
My sister’s constant desire for ice cream led me on a quest for convenient and economical solutions. That’s when I stumbled upon a fantastic video tutorial by Nino’s Home on YouTube. What immediately caught my eye was the sheer simplicity and the ingenious method of using the Oreo packaging itself as a mold. It was a game-changer! I instantly shared it with her, and she was captivated, convinced that this homemade rendition might even surpass the deliciousness of anything we could buy. So, we stocked up on plenty of Oreos, transforming our pantry into a ready-to-go ice cream factory. Now, whenever a craving strikes, a few packs are all it takes to whip up a batch of these irresistible frozen treats.
This recipe isn’t just easy; it’s a culinary hack that lets you enjoy the rich, chocolatey goodness of Oreos combined with smooth, sweet ice cream, all on a convenient stick. It’s perfect for a hot summer day, a quick dessert, or a fun activity with kids. Let’s get started on creating these delightful, no-fuss Oreo ice cream sticks that will surely become a staple in your home.
Essential Ingredients for Your Oreo Ice Cream Sticks
One of the most appealing aspects of this recipe is its minimalist approach to ingredients. You only need three basic items, which are readily available at any grocery store. The beauty lies in how these simple components combine to create something truly magical.
- Oreo Cookie Packs: The star of our show! We recommend using original Oreo sandwich cookies for that classic flavor, but feel free to experiment with different varieties like Double Stuffed, Thins, or even flavored Oreos if you’re feeling adventurous. The individual packs are key as they serve as natural molds for our ice cream sticks.
- 180 grams (approximately ½ cup) of Sweetened Condensed Milk: This ingredient is the secret to our no-churn ice cream’s creamy texture. Sweetened condensed milk is essentially cow’s milk with most of the water removed and a generous amount of sugar added. It not only provides the necessary sweetness but also prevents large ice crystals from forming, ensuring a smooth, scoopable (or in this case, lickable) consistency without the need for an ice cream maker.
- 500ml (approximately 2 cups) of Whole Milk: Regular whole milk is crucial for diluting the richness of the condensed milk and achieving the perfect ice cream base. While whole milk is recommended for its fat content which contributes to creaminess, you can experiment with 2% milk if you prefer. For a dairy-free option, unsweetened almond milk or oat milk can be substituted, though the texture might vary slightly.
That’s it! Just three ingredients stand between you and a freezer full of delicious, homemade Oreo ice cream sticks.
Step-by-Step Guide to Crafting Your Oreo Ice Cream Sticks
The process is incredibly straightforward, requiring minimal effort and no specialized equipment. Just a few simple steps will transform these ingredients into a delightful frozen treat.
Step 1: Prepare the Oreos and the Creamy Base
Begin by gently but thoroughly crushing your Oreo packs. The goal here isn’t to turn them into fine powder, but rather to break the cookies into varying sizes – a mix of fine crumbs and small chunks adds wonderful texture to the finished ice cream. A rolling pin is perfect for this task; simply place an Oreo pack on a sturdy surface and roll over it with firm, even pressure. You can also use the back of a spoon or even your hands if you don’t have a rolling pin. Take care not to tear the packaging excessively, as it will act as your mold.
Once crushed, carefully cut open one of the shorter sides of each Oreo pack. This opening will allow you to pour in the liquid ice cream base and later easily remove the finished product. Repeat this process for at least 5-6 more packs, or as many as you wish to make. To keep them upright and stable during the freezing process, arrange the opened Oreo packs in a single layer inside a loaf pan or any similar shallow dish with raised sides. Ensure the cut side is facing upwards.
Next, prepare your creamy ice cream base. In a large measuring cup or mixing bowl, combine the sweetened condensed milk and the regular milk. Stir these two ingredients together thoroughly until they are completely uniform and well combined. This step is crucial for ensuring that the sweetness and creamy texture are evenly distributed throughout your ice cream. Use a whisk or a spoon and continue stirring until no streaks of condensed milk are visible and the mixture has a consistent, pale color.
Finally, carefully pour the prepared milk mixture evenly into each opened Oreo pack. Fill each pack almost to the top, leaving a small amount of space to prevent overflow when the popsicle stick is inserted. The crushed Oreos will absorb some of the liquid, creating a rich, flavorful ice cream with delightful cookie bits in every bite.
Step 2: Insert Sticks, Freeze, and Enjoy!
Once you’ve filled all the Oreo packs, it’s time to insert the popsicle sticks. Gently push one popsicle stick into the center of each pack, ensuring it goes deep enough to provide stability once frozen, but not so deep that it pierces the bottom of the packaging. The crushed Oreos will help hold the stick in place. The loaf pan you used earlier will continue to be helpful here, preventing the packs from tipping over as you work.
Carefully transfer the loaf pan with the filled Oreo packs to your freezer. For best results, ensure they are placed on a flat, stable surface where they won’t be disturbed. Allow them to set for a minimum of 4 hours. However, for a truly firm and perfectly frozen treat, it’s often best to leave them in the freezer overnight. This extended freezing time ensures that the ice cream is solid throughout and holds its shape beautifully when unmolded.
When you’re ready to enjoy your homemade Oreo ice cream sticks, removing them from their packaging is a breeze. If the ice cream feels too firmly stuck, a quick trick can help: simply dip the sealed bottom portion of the Oreo pack into a glass of warm water for a few seconds. The gentle warmth will slightly melt the outer layer of ice cream, allowing for easy release without making a mess. After the quick warm water bath, hold the popsicle stick firmly in one hand and gently pull the Oreo packaging with your other hand, sliding it off the ice cream completely. You might need to twist slightly, but it should come off smoothly.
And there you have it! A perfectly formed, creamy, and crunchy Oreo ice cream stick, ready to be devoured. Serve immediately and savor the delightful combination of chocolate cookies and sweet, cold ice cream.
Why This Oreo Ice Cream Recipe is a Game-Changer
Beyond its incredible simplicity, there are numerous reasons why this 3-ingredient Oreo ice cream stick recipe stands out as a must-try for any dessert lover:
- Unbeatable Ease: No fancy equipment, no complex techniques. If you can stir and crush, you can make this ice cream. It’s truly a beginner-friendly recipe.
- Cost-Effective: Store-bought gourmet ice cream can be expensive. Making your own with just three affordable ingredients significantly cuts down on costs, allowing you to enjoy more for less.
- Customization Galore: While the basic recipe is fantastic, it’s also a blank canvas. Want to add more chocolate? Stir in some mini chocolate chips. A hint of mint? A few drops of mint extract. The possibilities are endless!
- Perfect Portion Control: Using the individual Oreo packs naturally creates single-serving ice cream sticks, making portion control effortless and reducing waste.
- Fun for All Ages: This is a fantastic activity to do with children. They’ll love crushing the Oreos and helping to pour the mixture, making it a memorable kitchen experience.
- No-Churn Magic: The sweetened condensed milk is the hero here, enabling a smooth, creamy texture without the need for an expensive ice cream maker. It’s science and sweetness combined!
- Always Ready: With a batch in your freezer, you’re always prepared for unexpected guests, spontaneous cravings, or a quick cool-down on a hot day.
Tips and Variations to Elevate Your Oreo Ice Cream
While the basic recipe is perfect as is, here are some ideas to make your Oreo ice cream sticks even more special:
- Experiment with Oreo Flavors: Don’t limit yourself to original Oreos! Try Golden Oreos, Mint Oreos, Peanut Butter Oreos, or seasonal flavors for a unique twist.
- Add-Ins: Before pouring the milk mixture, you can sprinkle in additional mix-ins like chocolate chips (milk, dark, or white), mini M&Ms, chopped nuts, or even a swirl of caramel or fudge sauce directly into the crushed Oreos.
- Dipping & Toppings: For an extra layer of decadence, once the ice cream sticks are frozen, you can dip them in melted chocolate and then immediately roll them in sprinkles, chopped nuts, or extra crushed Oreos. Allow the chocolate to set in the freezer for a few minutes.
- Dairy-Free Option: As mentioned, unsweetened almond milk or oat milk can replace regular milk. Ensure your condensed milk is also dairy-free (there are several brands available now) if catering to strict dietary needs.
- Storage: Once unmolded, store any leftover ice cream sticks in an airtight container or individual freezer bags to prevent freezer burn and maintain their freshness for up to 2-3 weeks.
- Creative Presentation: If serving for a party, arrange them attractively on a platter, perhaps with a drizzle of chocolate sauce or a sprinkle of colorful edible glitter.
- Ensure Thorough Crushing: While some chunks are good, ensure the majority of the Oreos are well-crushed to allow the milk mixture to fully penetrate and bind them together.
- Even Filling: Distribute the milk mixture as evenly as possible among the packs to ensure uniform freezing and consistent flavor in each stick.
The Joy of Homemade Treats
There’s an undeniable satisfaction that comes with creating something delicious in your own kitchen. This Oreo ice cream stick recipe embodies that joy perfectly. It’s simple, rewarding, and results in a dessert that’s guaranteed to put a smile on everyone’s face. From the anticipation of crushing the cookies to the moment you take that first creamy, crunchy bite, the experience is delightful from start to finish. It’s more than just a recipe; it’s an invitation to create memories, share laughter, and enjoy a perfectly customized treat.
So, gather your ingredients, clear some space in your freezer, and get ready to impress your family and friends with these effortlessly delicious 3-ingredient Oreo ice cream sticks. They’re a testament to how simple ingredients can yield extraordinary results. Happy freezing!
*All image credit belongs to Nino’s Home via YouTube. Follow and subscribe to his channel for more inspiring recipes!