
Crafting Cherished Memories: The Joy of DIY Handprint Christmas Ornaments
The holiday season is a time for warmth, reflection, and creating lasting memories with loved ones. Amidst the hustle and bustle, one of my most cherished annual traditions is setting aside a special moment to craft a unique ornament. While time can be scarce during Christmas, I always make sure to dedicate a little time each holiday season to engage in this heartwarming activity with my grandchildren. These handmade treasures aren’t just decorations; they are tangible pieces of our shared history, capturing the innocence and growth of little hands year after year.
Why Handprint Ornaments Hold a Special Place in Our Hearts
With three wonderful grandchildren, our annual handmade ornament often involves some type of handprint. It’s a truly magical way to freeze a moment in time, allowing me to pull out each ornament every holiday season and marvel at how small their “paw prints” once were. It’s absolutely astounding to witness their growth over the years, marked by these precious imprints. Each tiny print tells a story, evokes a memory, and reminds me of the joy of those early years.
What makes a handprint ornament even more appealing is its incredible simplicity. They are remarkably easy to make and require very few supplies, making them an accessible and enjoyable craft for families of all sizes. This year, I thought it would be a fantastic idea to expand our tradition beyond just our immediate family. We plan to create ornaments with the children to give to their aunts, uncles, and other extended family members. There’s an undeniable charm and warmth in receiving a gift crafted with the little handprints of a loved one – it truly warms the heart like nothing else.
These adorable keepsakes can be crafted in various ways, from simple painted designs on a disc to more elaborate creations using salt dough or air-dry clay. Even a humble mason jar lid can be transformed into a beautiful ornament. Regardless of the base, the core idea remains: capturing those precious little hands. I personally adore these tiny ornaments and feel a wave of excitement every year when I carefully retrieve them from the Christmas ornament box, ready to adorn our tree with love and memories.
The Enduring Appeal of DIY Christmas Crafts
In an age of mass-produced goods, there’s a profound satisfaction in creating something with your own hands, especially during the holidays. DIY Christmas crafts offer a unique blend of creativity, personal expression, and sentimental value. They provide an opportunity to slow down, connect with family members, and infuse the holiday season with a personal touch that store-bought items simply cannot replicate. From the tactile experience of shaping clay to the vibrant colors of paint, crafting stimulates the senses and provides a much-needed break from digital distractions.
Beyond the joy of creation, handmade ornaments serve as incredible personalized gifts. Imagine the delight on an aunt’s face when she unwraps a beautifully decorated ornament featuring her niece’s or nephew’s handprint. These aren’t just gifts; they are tokens of love, memories, and the unique bond shared between family members. They become cherished heirlooms, passed down through generations, each telling its own story of holidays past.
Getting Started: Essential Supplies for Your Handprint Ornaments
Embarking on your handprint ornament journey is both simple and rewarding. Gathering your materials beforehand will ensure a smooth and enjoyable crafting session, especially when working with eager little ones. Here’s a comprehensive list of what you might need:
Choosing Your Base Material
- Salt Dough: An incredibly versatile and budget-friendly option. It’s made from common kitchen ingredients (flour, salt, water) and can be baked for durability. Its texture is lovely for capturing clear prints.
- Air-Dry Clay: Easy to work with, requiring no baking. It comes in various colors and textures, drying hard and durable. Perfect for those who prefer not to use an oven.
- Flat Wooden Discs: These pre-cut discs provide a sturdy, natural base. They can be found at craft stores in various sizes and are great for painting directly onto.
- Clear Glass or Plastic Ornaments: For a different approach, you can paint a handprint onto the outside of a spherical ornament. Clear plastic is safer for kids.
- Mason Jar Lids: A wonderfully resourceful option! The metal ring of the lid provides a perfect frame for a disc of salt dough or clay, or you can paint directly onto a cardboard cutout that fits inside.
Paints and Embellishments
- Non-Toxic Acrylic Paints: Essential for safety, especially when working with children. Ensure they are washable for easy cleanup. White, black, red, and green are classic Christmas colors, perfect for snowman designs or festive accents.
- Glitter: Fine glitter (various colors) adds sparkle and magic.
- Markers or Paint Pens: For adding names, dates, or small details like eyes, buttons, and scarves.
- Puff Paint (3D Paint): Great for creating textured details or outlines.
- Glue: Craft glue or Mod Podge for attaching glitter or sealing.
Finishing Touches and Tools
- Paintbrushes and Sponges: A variety of sizes for different tasks, from applying paint to stamping.
- Sealant (e.g., Mod Podge, clear spray sealant): Crucial for protecting your finished ornament from wear and tear, ensuring its longevity.
- Ribbon, Twine, or Jute: For hanging your ornament. Choose festive colors and textures.
- Eye Hooks or Ornament Hooks: If not using ribbon directly through a hole.
- Hole Punch: For creating hanging holes in dough or cardboard bases before they dry/harden.
- Rolling Pin and Parchment Paper: If using salt dough or clay, for even thickness and easy handling.
- Cookie Cutters: For shaping dough/clay into stars, circles, or other festive forms.
- Wet Wipes and Paper Towels: For quick cleanups!
Step-by-Step Guide: Creating Your Classic Handprint Ornament
Now that you have all your supplies, let’s dive into the fun part! Here’s how to create beautiful, lasting handprint ornaments.
Step 1: Prepare Your Workspace and Materials
Lay down newspapers, an old tablecloth, or parchment paper to protect your work surface. Gather all your chosen materials within easy reach. If using salt dough, prepare it ahead of time: mix 2 cups flour, 1 cup salt, and 1 cup water until a firm dough forms. Knead for a few minutes until smooth. If using air-dry clay, ensure it’s pliable and ready.
Step 2: Taking the Perfect Handprint
This is where patience and a gentle touch come in handy, especially with younger children. For dough/clay: Roll out the dough or clay to about 1/4 to 1/2 inch thickness on parchment paper. Gently press your child’s hand into the dough/clay, ensuring all fingers and the palm make a clear impression. Be firm but careful not to press too hard and distort the shape. For painted ornaments: Apply an even, thin layer of non-toxic acrylic paint to your child’s palm and fingers using a brush or sponge. Practice on a spare piece of paper first if needed. Then, gently press their hand onto your chosen base (wooden disc, mason jar lid insert, or ornament ball).
Step 3: Shaping and Drying Your Ornament
If using dough or clay, carefully lift the hand. Use a cookie cutter or a knife to cut around the handprint, or shape it into a circle, star, or heart. Before drying, use a straw or a small hole punch to create a hole at the top for hanging. For salt dough, bake at 200-250°F (93-120°C) for 2-4 hours, or until completely hard. Air-dry clay will need 24-72 hours to dry completely, depending on thickness and humidity. Painted ornaments will typically dry within an hour or two.
Step 4: Personalizing and Decorating
Once your base is dry and ready, it’s time for the creative magic! This is where you can truly make each ornament unique. Use fine-tipped markers or paint pens to add the child’s name and the year around the handprint. You can also paint details like a tiny Santa hat on the thumb print, or turn each finger into a snowman. For the “snowman family” idea (detailed below), this step is crucial for bringing your characters to life. Add glitter while the paint is still wet, or apply a thin layer of Mod Podge and then sprinkle glitter for extra sparkle. Allow all paint and decorations to dry completely.
Step 5: The Grand Finale: Sealing and Hanging
To ensure your beautiful handprint ornament lasts for many holidays to come, it’s essential to seal it. Apply a clear coat of Mod Podge with a brush, or use a clear spray sealant (follow manufacturer’s instructions in a well-ventilated area). This protects the paint and adds a nice finish. Once the sealant is dry, thread a festive ribbon, twine, or jute through the hanging hole and tie it in a loop. Alternatively, screw in an eye hook for a more professional look, then attach an ornament hook.
Creative Variations: Beyond the Basic Handprint
While the classic handprint is always endearing, there are many ways to get creative and personalize your ornaments even further.
The Adorable Snowman Family Ornament (Using Mason Jar Lids or Discs)
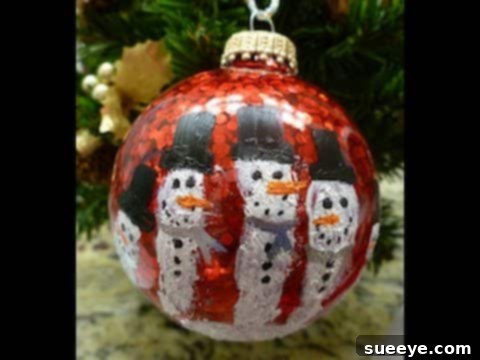
This variation is particularly charming and perfect for capturing multiple family members’ prints on one ornament. Start with a white-painted wooden disc or a piece of salt dough cut to fit inside a mason jar lid. Paint the child’s hand (or multiple children’s hands if they are small enough) with white non-toxic paint. Press the handprint onto the disc, ensuring fingers are spread slightly. Once dry, use a fine-tipped black marker or paint pen to draw a tiny face (dots for eyes, a carrot nose) on the tip of each finger, transforming them into individual snowmen. You can then add colorful scarves, little hats, or even buttons with different colored paints. Label each “snowman” with the name of a family member. The mason jar lid can then be used to frame this creation: simply glue the decorated disc inside the lid’s ring, then attach a ribbon to the lid for hanging. The lid provides a lovely, rustic frame for your snowman family!
Glittering Keepsakes
For extra sparkle, generously sprinkle fine glitter onto the wet paint of the handprint. Once the paint is dry, gently tap off the excess. You can also apply a thin layer of craft glue over the dried handprint and then sprinkle glitter for a different effect. Seal with a clear spray sealant to minimize glitter fallout.
Two-Tone Prints
Instead of a single color, try painting the palm one color and the fingers another contrasting or complementary color before making the print. This can create a vibrant, multi-dimensional effect.
Handprint on a Traditional Ball Ornament
For a different challenge, carefully press a painted hand onto a traditional round ball ornament. This requires a gentle, rolling motion to ensure the entire handprint transfers evenly onto the curved surface. Once dry, add personalization with paint pens.
Tips for a Smooth Crafting Experience with Kids
Crafting with children is an adventure! Here are some tips to make it enjoyable for everyone:
- Manage Expectations: Embrace imperfections! The charm of handmade items lies in their uniqueness. The goal is connection and fun, not perfection.
- Involve Them: Let children participate in age-appropriate steps, like choosing ribbon, stirring salt dough (under supervision), or adding glitter.
- Prepare for Mess: Despite best efforts, paint and little hands often lead to messes. Have plenty of wet wipes, paper towels, and maybe even a smock or old clothes ready.
- Make It Fun: Play some festive music, tell stories, and keep the atmosphere light and enjoyable. Focus on the experience of creating together.
- Work in Batches: If making many ornaments, break the process into stages (e.g., all prints one day, all decorating another day).
Gifting Handmade Ornaments: Spreading Holiday Cheer
There’s no gift quite as personal and heartfelt as a handmade ornament. They are perfect for:
- Grandparents: Who doesn’t love a keepsake from their grandchildren?
- Aunts and Uncles: A sweet reminder of their growing nieces and nephews.
- Teachers: A thoughtful token of appreciation.
- Friends: A unique and personal touch for their Christmas tree.
Package them simply in a small gift box with some tissue paper, perhaps tied with a festive bow and a handwritten tag. The effort and love put into these gifts will surely be appreciated and remembered.
Preserving Your Precious Keepsakes for Years to Come
To ensure your handprint ornaments last and can be cherished for many holidays, proper care is important. Always ensure ornaments are completely dry and sealed before storing. Store them in individual soft pouches or wrap them in tissue paper to prevent chipping or scratching. Keep them in a cool, dry place away from extreme temperature fluctuations. With a little care, these tangible memories will bring joy and nostalgia for decades.
Conclusion
Creating handprint Christmas ornaments is more than just a craft; it’s an annual ritual that weaves joy, love, and memories into the fabric of your holiday traditions. Each year, as I hang these special ornaments, I’m reminded of the laughter, the tiny hands, and the precious moments shared with my grandchildren. These ornaments aren’t just decorations; they are heartwarming capsules of time, allowing us to witness growth and reflect on the beautiful journey of family. So, gather your supplies, call your loved ones, and start your own tradition of crafting these darling, unforgettable keepsakes. Happy crafting, and may your holiday season be filled with cherished memories!