
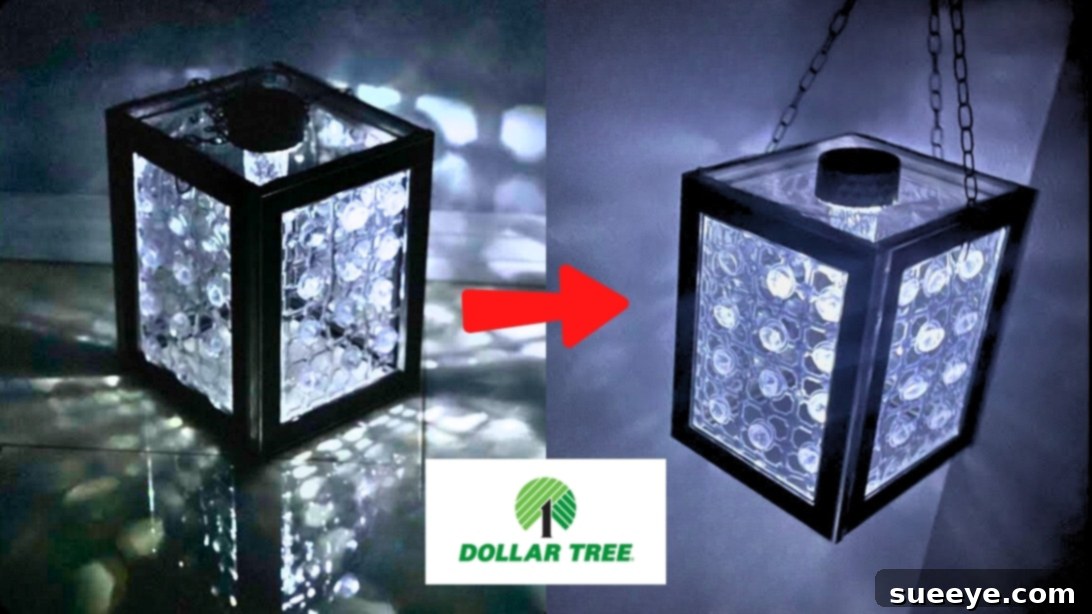
Transform Your Garden: Easy DIY Dollar Tree Outdoor Lighting Decor Project
Are you searching for an affordable yet stunning way to enhance the ambiance of your outdoor living space? Imagine your garden bathed in a warm, enchanting glow, casting intricate shadows that dance with the evening breeze. This incredibly simple and budget-friendly DIY Dollar Tree outdoor lighting project can turn that vision into a reality. Perfect for adding a touch of elegance and whimsy, these handmade luminaries are not just lights; they are pieces of art that elevate your garden’s night-time beauty. Whether you choose to hang them from a tree, letting them sway gently in the wind, or strategically place them on the ground to illuminate pathways and flowerbeds, they are guaranteed to captivate. This brilliant idea comes from the creative mind of Tina Did It on YouTube, offering a quick and satisfying weekend craft that yields impressive results.
Creating beautiful outdoor lighting doesn’t have to be expensive or complicated. With just a few items primarily sourced from your local Dollar Tree store, you can craft captivating decor that adds character and charm to any garden, patio, or balcony. Our detailed guide will walk you through each step, ensuring a smooth and enjoyable crafting experience, even for beginners. Get ready to transform your outdoor space into a magical retreat with these unique, shadow-casting lights!
Materials for Your DIY Dollar Tree Outdoor Lighting
Gathering your supplies is the first exciting step in any DIY project. For this charming outdoor lighting decor, you’ll be delighted to find most items readily available and incredibly affordable. Here’s what you’ll need:
- 4 pieces of 5×7 Picture Frames: Look for simple, inexpensive frames at Dollar Tree. The size is ideal for creating a compact yet impactful luminary. Ensure they are sturdy enough to hold together.
- 1 Splatter Screen: This unexpected item will form the top of your light, providing a unique texture and helping to diffuse the light source. A standard size from Dollar Tree should suffice.
- 1 Solar Garden Light: The heart of your outdoor lighting! Choose a basic solar light that charges during the day and automatically illuminates at night. You’ll primarily be using the top, light-emitting portion.
- 1 Bath Mat with Gem-like Texture (or similar decorative plastic gems): This is where the magic happens! Select a bath mat with a textured, gem-like pattern. These will create the beautiful shadow effects. Alternatively, you can purchase bags of decorative plastic gems or marbles if you prefer a different look.
- Small Length of Chain: Essential if you plan to hang your finished light. The length will depend on how high you want to suspend it. Look for lightweight chain from a craft store or hardware store.
- Hot Glue Gun and Hot Glue Sticks: Your primary adhesive for quickly securing the bath mat pieces and initial assembly.
- E6000 Adhesive (or similar strong, weather-resistant craft glue): Crucial for permanently bonding the frame pieces and gems, ensuring your outdoor light withstands the elements. This glue provides a much stronger and more durable hold than hot glue alone.
With these inexpensive materials in hand, you’re well on your way to creating stunning garden decor that looks far more expensive than it is!
Step-by-Step Guide: Crafting Your Enchanting Outdoor Light
Follow these detailed instructions to assemble your Dollar Tree outdoor lighting decor. Patience with drying times, especially for E6000, will ensure a robust and long-lasting creation.
Step 1: Prepare Your Dollar Tree Frames
Begin by carefully disassembling your four 5×7 Dollar Tree frames. Remove the backings, the glass, and any matting or inserts. Gently set the glass and backings aside; they can be saved for future DIY projects, making this craft even more eco-friendly. Next, using either a pair of sturdy scissors or needle-nose pliers, remove the small metal clamps or tabs that hold the frame backing in place. These tiny protrusions can interfere with the flush assembly of your box, so it’s important to ensure the edges are smooth and clean. Take your time with this step to avoid damaging the frame edges.
Step 2: Customizing the Bath Mat for Your Frames
Now, take one of your bath mats and place a prepared 5×7 frame on top of it. Carefully trace the inside dimensions of the frame onto the bath mat. Cut out four rectangular pieces from the bath mat, each designed to fit snugly within the inner perimeter of a frame. The key here is to ensure that the textured, gem-like dips of the bath mat are facing outwards. This orientation is crucial for achieving those beautiful, intricate shadow patterns when the light shines through. Once cut, apply a thin bead of hot glue along the edges of the bath mat piece and firmly press it into the inside of one frame, ensuring it’s centered and secure. Repeat this process for all four frames, making sure the “gem” side consistently faces outward on each.
Step 3: Secure the Decorative Gems
With the bath mat pieces now integrated into your frames, it’s time to add the decorative gems. If your bath mat already features a textured, gem-like surface, you can reinforce these with a touch of E6000 glue for extra durability, or skip this step if they are firmly attached. If you’re using separate plastic gems, carefully glue each gem onto the designated dips or patterns of the bath mat using E6000 adhesive. E6000 is a powerful, industrial-strength glue known for its weather resistance and strong bond, making it perfect for outdoor projects. Apply the glue sparingly but effectively. Once all gems are in place, allow them to dry completely. This curing process can take several hours, or even up to 24-72 hours for a full, maximum strength bond, so patience is key here. Do not rush this step, as a proper cure will ensure your gems stay put against the elements.
Step 4: Assembling Your Decorative Light Box
This is where your individual frames come together to form the main structure. Begin by taking one frame and applying a generous but even line of E6000 glue along one of its long sides. Carefully attach a second frame, aligning the edges perfectly. Then, apply E6000 to another long side of the first frame and attach a third frame. You will now have three sides of your box. To ensure they dry at a perfect 90-degree angle and don’t collapse, use heavy objects, books, or clamps to support the sides while the glue sets. Allow these three frames to dry and bond together for several hours, ideally overnight, before moving on. Once sufficiently dry, apply E6000 to the remaining open long sides of the three-sided structure and carefully attach the fourth frame, completing your box. Continue to use supports or clamps until this final frame is securely bonded, ensuring a strong, stable cube structure.
Step 5: Preparing the Top Part with the Splatter Screen
Now, focus on creating the top of your light fixture. Take your splatter screen and place it over the open top of your assembled frame box. Using a marker or pen, carefully trace the exact dimensions of the opening onto the splatter screen. With sturdy scissors or tin snips, meticulously cut out a square or rectangular piece from the splatter screen that perfectly fits into the top opening of your frame box. The goal is a snug fit, as this piece will not only cap your light but also serve as a support for the solar light component. Ensure there are no sharp edges and the fit is flush for a polished look.
Step 6: Integrating the Solar Light
Retrieve your solar garden light. For most standard solar lights, you’ll need to separate the top part (which contains the solar panel, battery, and LED light) from the bottom stake or pole. You will only be using the top illuminating section. Locate the center of your cut splatter screen piece and carefully create a hole large enough to accommodate the base of the solar light top, allowing it to sit securely. You can use a utility knife or a drill for this, being mindful of the material. Insert the solar light into this hole, ensuring it’s centered and stable. Once positioned, apply E6000 glue around the base of the solar light where it meets the splatter screen, and also along the perimeter of the splatter screen piece where it will sit on your frame box. Firmly glue this entire top assembly onto your frame box. Allow ample time for the E6000 to cure completely, ensuring a watertight and secure attachment that can withstand outdoor conditions.
Step 7: Adding the Hanging Chain (Optional)
If you envision your beautiful new light hanging gracefully from a tree branch, pergola, or shepherd’s hook, this is the step for you. Take your chain and cut it into four equal lengths, suitable for the desired hanging height. Attach one end of each chain piece to one of the four top corners of your frame box. You can use small screw eyes, metal rings, or even strong fishing line looped through pre-drilled holes in the frame, secured with E6000 for extra strength. Ensure all attachments are robust enough to bear the weight of the light fixture, especially in windy conditions. If you plan to simply place your Dollar Tree outdoor lighting decor on the ground, on a patio table, or nestled within your garden beds, you can happily skip this step entirely. The versatility of this design allows for various display options to suit your outdoor aesthetic.
Enhance Your Outdoor Space: Benefits and Customization
Completing this DIY project offers more than just a new light fixture; it brings a wealth of benefits and opportunities for personal expression. Firstly, the **cost-effectiveness** is unbeatable. By utilizing items from Dollar Tree, you create a high-impact decor piece for a fraction of the cost of store-bought alternatives. Secondly, the **personalization factor** is immense. You have full control over the aesthetic, from the color of the gems to the finish of the frames. Imagine painting the frames a rustic bronze, a chic matte black, or even a vibrant teal to match your outdoor cushions.
The **ambiance** these lights create is truly special. The textured bath mat, combined with the gems, casts unique and captivating shadow patterns that transform your garden into a magical retreat after dusk. This visual appeal is hard to replicate with generic outdoor lighting. Moreover, being **solar-powered**, they are an environmentally friendly and energy-efficient choice, requiring no external wiring or electricity. They charge during the day and automatically light up at night, offering hassle-free operation.
Ideas for Customizing Your Dollar Tree Outdoor Lighting:
- **Color Palette:** Experiment with different colored gems or paint your frames to match your garden’s theme or your home’s exterior. Metallic spray paints can add a sophisticated touch.
- **Texture Variations:** Look for different bath mat textures or even use decorative plastic netting or lace to create alternative shadow patterns.
- **Embellishments:** Consider adding small waterproof beads, sea glass, or other outdoor-safe embellishments to the frames for added sparkle or visual interest.
- **Size and Shape:** While 5×7 frames create a perfect cube, you could potentially adapt the concept using different sized frames to create taller rectangular lights or even multiple smaller ones.
- **Light Source:** If you want more control, you could adapt the design to use small, battery-operated LED fairy lights inside instead of a solar light, allowing for indoor use or specific event lighting.
This DIY Dollar Tree outdoor lighting project is not just a craft; it’s an invitation to unleash your creativity and infuse your outdoor areas with personalized charm and a captivating glow.
Tips for Success and Longevity of Your DIY Outdoor Light
To ensure your beautiful new outdoor light provides enjoyment for seasons to come, keep these practical tips in mind:
- Adhesive Curing: E6000 is a fantastic adhesive for outdoor projects due to its strong bond and weather resistance. However, it requires significant curing time. Always follow the manufacturer’s recommendations, usually 24-72 hours for full strength. Rushing this step can lead to weak joints.
- Weatherproofing: While E6000 is water-resistant, consider applying a clear, outdoor-grade sealant or varnish over the entire frame structure and any exposed seams for extra protection against rain, humidity, and UV rays. This will extend the life of your light and prevent the frames from deteriorating.
- Solar Light Placement: For optimal performance, ensure your solar light receives at least 6-8 hours of direct sunlight during the day. Position your finished decor in a sunny spot in your garden or on your patio.
- Maintenance: Periodically wipe down your light fixture with a damp cloth to remove dust, pollen, or dirt that might accumulate on the solar panel or gems. Clean the solar panel specifically to ensure efficient charging.
- Safety First: When cutting and gluing, always work in a well-ventilated area. If using scissors or a utility knife, exercise caution to prevent injury.
- Test Fit: Before applying any permanent glue, always do a “dry fit” of your pieces. This allows you to check for alignment and make any necessary adjustments without the mess of adhesive.
Conclusion: Illuminate Your Evenings with Handcrafted Charm
This DIY Dollar Tree outdoor lighting decor project is a testament to how simple materials and a touch of creativity can yield extraordinary results. By following these easy steps, you’ve not only crafted a beautiful and unique light fixture but also added a personalized touch that elevates your outdoor space. The enchanting shadows, the gentle glow, and the satisfaction of having created something truly special will make your evenings outdoors more memorable and magical.
Whether nestled among your flowerbeds, accentuating a garden path, or hanging elegantly from a pergola, your handcrafted luminary will be a focal point that sparks conversation and admiration. It’s an affordable, eco-friendly, and immensely rewarding project that proves you don’t need to spend a fortune to create stunning garden decor. So, gather your supplies, unleash your inner crafter, and prepare to bask in the warm, inviting glow of your very own Dollar Tree outdoor lighting masterpiece. Happy crafting, and enjoy the beautifully illuminated nights!