
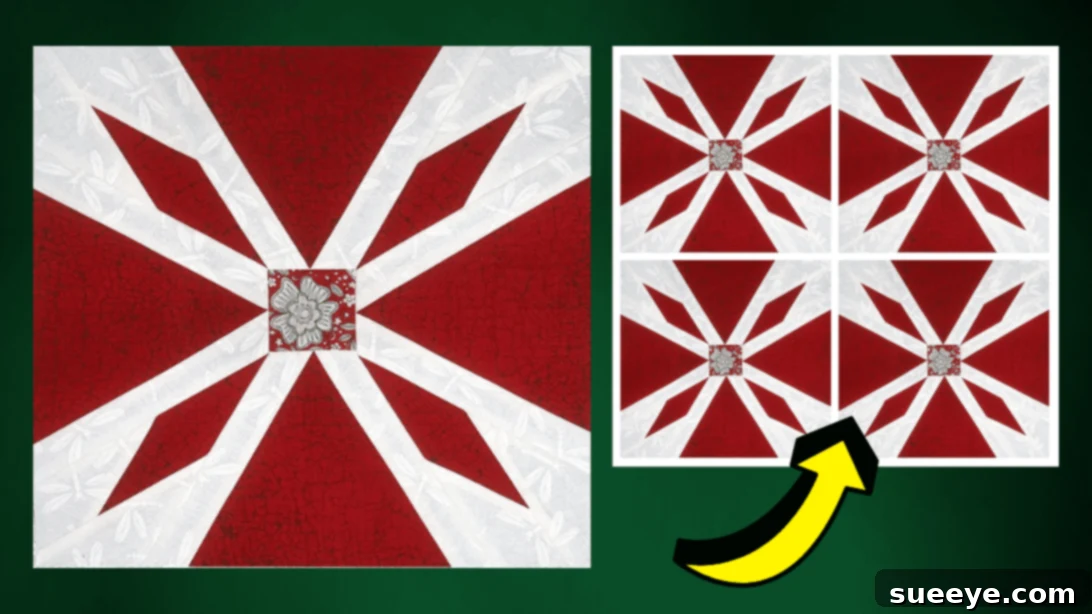
Mastering the 12″ Poinsettia Quilt Block: A Foundation Paper Piecing Tutorial
Quilting, an art form cherished for generations, has evolved with innovative techniques that make complex designs accessible to everyone. Among these, foundation paper piecing (FPP) stands out as a truly brilliant method, simplifying intricate patterns and ensuring unparalleled accuracy. It’s especially beneficial for beginner quilters, transforming what might seem daunting into an enjoyable and rewarding creative process. While countless projects are available online, a particular favorite for its festive charm and clear instructions comes from Dclutter Quilting on YouTube – a stunning Poinsettia quilt block that’s perfect for the holiday season.
Why Foundation Paper Piecing is a Game-Changer for Quilters
Foundation paper piecing, often referred to as FPP, involves sewing fabric directly onto a printed paper pattern. This technique guarantees precise points and accurate seams, even with complex shapes and small pieces. Unlike traditional piecing, where slight variations can accumulate and distort the final block, FPP provides a stable foundation that keeps everything aligned. This method allows quilters to achieve professional-looking results with relative ease, boosting confidence, especially for those new to the craft.
Key Benefits of FPP:
- Unmatched Accuracy: The paper acts as a guide, ensuring every seam is perfectly straight and every point aligns flawlessly.
- Handles Complex Designs: Intricate patterns with many small pieces or unusual angles become manageable and fun to sew.
- Beginner-Friendly: By following numbered sections, new quilters can easily understand the order of operations, reducing confusion and mistakes.
- Reduces Fabric Waste: The structured nature of FPP can lead to more efficient fabric usage compared to freehand cutting and sewing.
- Consistent Results: Create multiple identical blocks effortlessly, which is ideal for larger projects like full quilts or sets of placemats.
The Festive Poinsettia Quilt Block: A Perfect Christmas Project
The poinsettia, with its vibrant red petals and deep green leaves, is an iconic symbol of Christmas. This particular poinsettia quilt block design captures its beauty perfectly, making it an ideal choice for adding a touch of holiday cheer to your home decor. With a finished size of 12 inches, this versatile block can be incorporated into a variety of projects. Imagine it as the centerpiece of a festive table topper, sewn in repetition to create an elegant table runner, or combined with other holiday-themed blocks for a stunning Christmas quilt.
Beyond its aesthetic appeal, crafting this block is a deeply satisfying experience. It allows you to practice essential quilting skills while creating something beautiful and meaningful. The instructions provided below are comprehensive, but we highly recommend watching the detailed video tutorial by Dclutter Quilting for visual guidance and additional tips.
Essential Materials for Your Poinsettia Quilt Block
Gathering the right tools and materials is the first step towards a successful quilting project. For this 12-inch poinsettia block, you’ll need a combination of basic sewing supplies and specific items for foundation paper piecing. Quality materials will always enhance your crafting experience and the final outcome of your quilt block.
- Red and White Fabric: Choose high-quality quilting cottons that are easy to work with and hold their shape well. The contrasting colors will make your poinsettia truly pop. Consider pre-washing your fabrics to prevent shrinking or color bleeding later.
- Fabric Glue (Temporary): A temporary fabric glue stick or washable glue pen is essential for holding your fabric pieces onto the paper pattern before sewing. It helps prevent shifting and ensures accuracy.
- Marking Pen, Pencil, or Chalk: For transferring any necessary markings onto your fabric. A fine-tipped marker or chalk line can be helpful for precise placement.
- Ruler: A clear acrylic quilting ruler is invaluable for accurate measuring, cutting, and folding straight lines. Look for one with clear markings for seam allowances.
- Scissors or Rotary Cutter and a Cutting Mat: A sharp pair of fabric scissors is a must. For quicker, more precise cuts, especially for straight edges, a rotary cutter with a self-healing cutting mat is highly recommended.
- Fabric Pins: Essential for securing fabric layers together before sewing, particularly when joining finished FPP units.
- Needle and Thread: Choose a good quality all-purpose sewing thread that matches your fabrics, or a neutral color like white or light gray. A sharp needle appropriate for quilting cotton will ensure smooth stitches.
- Iron, for Pressing: A well-heated iron and an ironing board are crucial for pressing seams flat as you go. Proper pressing is key to a smooth, flat quilt block and ensures accurate alignment of pieces.
- Sewing Machine: A reliable sewing machine will make quick work of stitching your fabric pieces. Ensure it’s in good working order and you’re comfortable with its settings.
- Pattern (Click here to download the pattern): The digital pattern is indispensable. Make sure to download and print it at 100% scale to maintain the correct block size.
Step-by-Step Guide: Crafting Your Poinsettia Quilt Block
Creating this beautiful 12-inch poinsettia quilt block through foundation paper piecing is a journey of precision and patience. Follow these detailed steps, remembering that careful execution at each stage will lead to a stunning finished product. Take your time, enjoy the process, and don’t hesitate to refer to the video tutorial for visual clarity.
Step 1: Preparing Your Pattern and Fabric Pieces
Begin by downloading and printing your poinsettia quilt block pattern. It is crucial to print it at 100% scale to ensure your finished block measures 12 inches accurately. Once printed, meticulously cut out each template piece. Precision in this step is vital for the overall success of your block. Next, using a ruler or any straight-edged object, carefully fold along the designated lines on the paper template. These creases will serve as your sewing guides. Take your largest red fabric square, which will form the central part of your poinsettia petal, and apply a small amount of temporary fabric glue to the *wrong side* of the fabric. Position the corresponding template piece onto this wrong side, ensuring it’s securely adhered and covers the entire section plus a little extra for seam allowance.
Step 2: Attaching the First Fabric Segment
With your first template piece glued, it’s time to add the next fabric segment. Gently fold back section 2 of the paper pattern along its designated line. This reveals the seam line you’ll be sewing. Now, carefully trim away any excess fabric from the first red piece, leaving a precise ¼ inch seam allowance beyond the fold line. This exact seam allowance is critical for accurate piecing. Take a white fabric strip and align its raw edge with the newly trimmed edge of your red fabric, ensuring right sides are together. Stitch along the folded line of the paper pattern. After sewing, unfold the paper and the white fabric, pressing the seam flat with an iron. This initial pressing helps set the stitches and prepares the block for the next segment.
Step 3: Expanding the Block with White Fabric Strips
Now, you will continue building out the first unit of your poinsettia. Repeat the process from Step 2 with another white fabric strip on the opposite side of the red fabric piece. Ensure you fold back the appropriate section of the paper pattern, trim the excess fabric to a ¼ inch seam allowance, position the white strip right sides together, and stitch precisely along the paper line. Once sewn, unfold and press the seam nicely. Continue this method around the central red piece, adding white strips as indicated by the pattern sections. The goal is to gradually cover all the numbered sections of the paper pattern with fabric. After each new fabric piece is attached and pressed, set this partially completed unit aside.
Step 4: Constructing Additional Units
The poinsettia block is often composed of several identical or mirror-image units that are later joined. For the next unit, repeat the initial gluing process: secure a template piece to the wrong side of another red fabric piece. Following the pattern’s numbered sections, fold the paper along the first sewing line, trim the excess fabric to a ¼ inch seam allowance, and stitch a white fabric strip to that side. It’s crucial to ensure that your fabric completely covers the intended section on the paper, plus enough for the seam allowance, both before and after sewing. Press the seam open or to one side as per your preference or pattern instructions. Consistency in pressing techniques will yield a flatter, more professional block.
Step 5: Final Assembly and Pressing for a Perfect Poinsettia
Continue to piece together the remaining red and white fabric sections for all the units, meticulously following the pattern and pressing each seam as you go. Once all individual units are completed, carefully remove the paper backing if desired (though some quilters leave it in for added stability until the quilting stage). Now, it’s time to assemble the larger sections of your poinsettia block. Refer closely to the video tutorial or the pattern diagram to see how these individual units are arranged and stitched together. Align the raw edges of the units, pin them securely, and stitch them together, usually in rows or quadrants, then join those larger sections to each other. As you sew the sections together, press the seams meticulously after each joint. This final pressing ensures all seams lay flat, reducing bulk and creating a beautiful, crisp 12-inch poinsettia quilt block. The precision of foundation paper piecing truly shines in this assembly phase, where all your points should meet perfectly.
Tips for a Flawless Foundation Paper Piecing Experience
To ensure your poinsettia block, and any future FPP projects, turn out beautifully, consider these helpful tips:
- Use a Shorter Stitch Length: A slightly shorter stitch length (e.g., 1.5 to 2.0) helps perforate the paper, making it easier to remove later without disturbing the stitches.
- Lightly Glue, Don’t Over-Saturate: Use just enough temporary fabric glue to hold the fabric in place. Too much glue can make the paper difficult to remove and potentially stiffen your fabric.
- Accurate Trimming: Invest in a good quality rotary cutter and ruler. Consistently trimming to a ¼ inch seam allowance is fundamental for FPP accuracy.
- Pressing Matters: Always press your seams after each fabric addition. This flattens the block and prevents bulk, making subsequent steps easier and more accurate.
- Check Your Seam Allowance: Regularly check your machine’s ¼ inch seam allowance to ensure it’s consistent. A designated ¼ inch foot can be incredibly helpful.
- Work in a Well-Lit Area: Good lighting helps you see the lines on the paper and ensures precise fabric placement.
- Don’t Rush: FPP is about precision. Take your time with each step, especially with cutting, pinning, and pressing.
Unleash Your Creativity: Beyond the 12″ Block
Once you’ve mastered this 12-inch poinsettia quilt block, the possibilities for its use are endless. Create a set of festive placemats, piece several blocks together for a stunning holiday wall hanging, or incorporate it into a larger Christmas-themed quilt. The beauty of quilting lies in its adaptability, allowing you to personalize your projects and truly make them your own. This poinsettia design is not only a fantastic way to decorate for the holidays but also an excellent opportunity to refine your foundation paper piecing skills, opening the door to even more intricate and exciting quilting adventures.
RELATED PROJECT: For another delightful holiday-themed block, explore How to Make a Peppermint Quilt Block.
All these amazing images and the comprehensive tutorial are thanks to Dclutter Quilting via YouTube. Her channel is an invaluable resource for quilters of all levels, offering a wealth of creative inspiration and detailed instructions. Do visit her channel to discover more fantastic quilting videos! Happy quilting!