
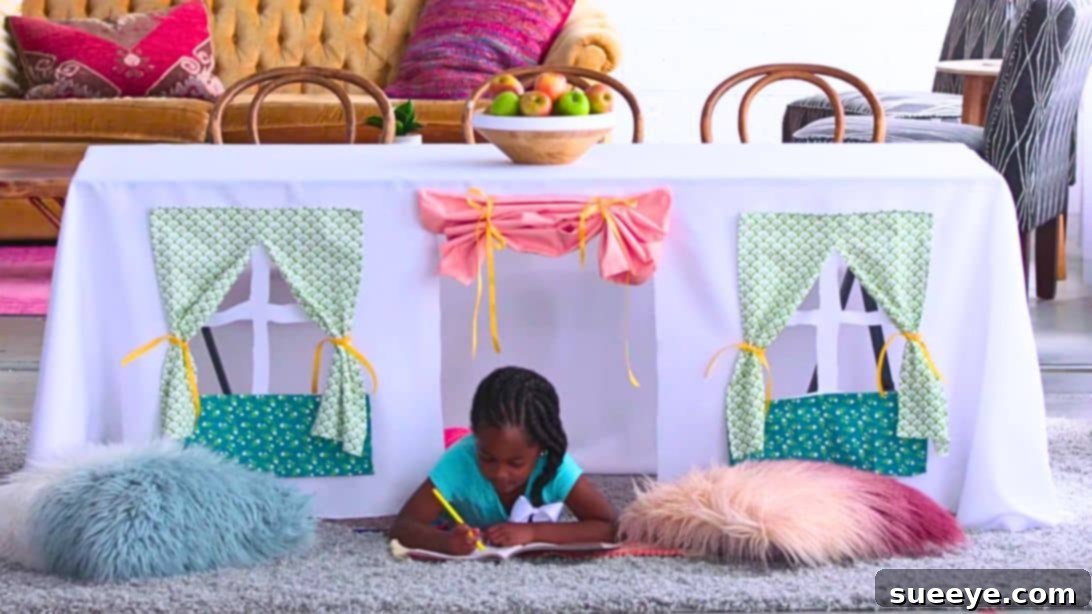
Are you searching for engaging and creative ways to keep your children entertained indoors, regardless of the weather outside? Look no further! The **DIY Tablecloth Playhouse** offers a brilliant, budget-friendly solution that transforms an ordinary table into a world of endless imagination. This delightful project is not only simple to construct but also provides a safe, monitored play environment, making it perfect for families in any living space.
Creating a **homemade playhouse** from a simple tablecloth means you don’t have to worry about the kids venturing too far or struggling to find an indoor activity when outdoor play isn’t an option. It’s an ideal choice for apartments, smaller homes, or simply for those days when the weather just isn’t cooperating. Plus, the beauty of this project lies in its versatility: you can easily customize the design, theme, and size to suit your child’s preferences and expand it by combining multiple tables for a grander play area.
Beyond its convenience, this **DIY kids’ project** promotes imaginative play, critical for child development. Children can create their own stories, roles, and adventures within their personalized fort, fostering creativity and problem-solving skills. When playtime is over, the tablecloth can be easily lifted, folded neatly, and stored away, reclaiming your living space. This makes it a wonderfully practical option for modern families seeking engaging, yet manageable, activities. The best part? It’s incredibly cost-effective, especially if you repurpose old tablecloths, pillowcases, or tea towels you already have at home.
RELATED: Spark More Indoor Fun with a DIY Cardboard Box Maze
Why Choose a DIY Tablecloth Playhouse for Your Kids?
In a world filled with screens and complex toys, a simple, handcrafted play space can offer unparalleled value. A **tablecloth playhouse** stands out for several compelling reasons, making it a favorite among parents looking for **easy indoor activities for kids**.
-
Unleashes Creativity and Imagination: This isn’t just a structure; it’s a blank canvas for your child’s imagination. They can transform it into a castle, a secret hideout, a bustling market, a cozy reading nook, or even a spaceship. The possibilities are limited only by their creativity.
-
Promotes Independent Play: While parents can supervise easily, the playhouse encourages children to engage in independent play, developing self-reliance and focus away from constant adult direction. It’s their own private world to explore.
-
Budget-Friendly Fun: Unlike expensive store-bought playhouses, this project often utilizes materials you already own, like old sheets, pillowcases, or fabric scraps. This makes it an incredibly **budget-friendly DIY** option for family entertainment.
-
Space-Saving and Convenient: Living in a smaller home? No problem! This **table fort** can be set up in minutes and dismantled just as quickly, making it ideal for compact spaces. It doesn’t take up permanent floor space and can be stored away in a drawer or closet.
-
Easy Supervision: Because it’s an indoor activity, parents can easily keep an eye on their children while still allowing them the freedom of their own play area. This provides peace of mind for parents while kids enjoy their play.
-
Customizable and Adaptable: As your child grows or their interests change, the playhouse can evolve. Easily update themes, add new decorations, or change the “furniture” inside. It’s a play space that can adapt through different developmental stages.
Materials Needed for Your DIY Tablecloth Playhouse:
Gathering your materials is the first exciting step in bringing this magical play space to life. Most items are readily available, and many can be creatively repurposed from around your home. Here’s what you’ll need:
- Floor-length tablecloth: This is the foundation of your playhouse. Choose a durable fabric that reaches the floor on all sides of your table for full enclosure. An old sheet can also work wonders!
- Pencil: For marking out your design elements like doors and windows with precision.
- Pinking shears: Essential for cutting fabric edges in a zigzag pattern, which helps prevent fraying and gives a neat, finished look to your doors and windows.
- Adhesive hook-and-loop tape (e.g., Velcro): Perfect for attaching curtains or other decorative elements without permanent stitching, allowing for easy removal and washing.
- Pillowcase: Ideal for creating charming windows or a small, welcoming door.
- Tea towels: Excellent for crafting smaller window coverings, banners, or additional decorative accents.
- Ribbon: Use this to tie back your curtains or add decorative bows and ties around the playhouse.
- Hot glue gun and glue sticks: Your trusty tool for quick and secure fabric attachments, especially useful for details and embellishments. Ensure adult supervision when using.
Step-by-Step Guide: How to Build a DIY Tablecloth Playhouse
Creating your **tablecloth playhouse** is a straightforward and rewarding process. Follow these detailed steps to transform a simple table into an enchanting world for your child. For a visual demonstration, refer to helpful video tutorials by creators like HGTV on YouTube, which illustrate each stage perfectly.
Step 1: Prepare Your Tablecloth Base
Begin by draping your floor-length tablecloth over the chosen table. Ensure it hangs evenly on all sides, reaching the floor. This provides the full enclosure necessary for a cozy play space. Smooth out any wrinkles or folds to ensure accurate measurements and cuts.
Step 2: Design and Cut the Doorway
Locate the center of one side of the tablecloth where you wish the main entrance to be. Using your pencil, mark the desired top point of your doorway. For a standard 18-inch-wide door, measure 9 inches to the left and 9 inches to the right from this center mark along the top edge of your intended door. Now, carefully use your pinking shears to cut from the bottom edge of the tablecloth straight upwards to the marked top corners of your door, creating two vertical cuts. Connect these two vertical cuts with a horizontal cut across the top. This will create a clean, non-fraying door flap.
Step 3: Create the Windows
Decide where you’d like your windows to be on the remaining sides of the playhouse. You can sketch out various shapes – squares, circles, or arches – directly onto the tablecloth with your pencil. Once satisfied with the placement and design, use your pinking shears to carefully cut out these window openings. Remember, these shears are key for preventing fabric edges from fraying, giving your playhouse a professional finish.
Step 4: Attach Curtains and Door Accents
Now, it’s time to add character! Take your pillowcases and tea towels. Cut them to size, creating small curtains or panels that will cover your door and window openings. For easy attachment and removal, cut strips of adhesive hook-and-loop tape. Affix one side of the tape to the playhouse around the edges of your windows and door, and the corresponding piece to your fabric cutouts. This allows the curtains to be opened and closed, or easily removed for washing. Alternatively, a hot glue gun can be used for more permanent attachments.
Step 5: Add Decorative Ribbons and Final Touches
To complete the look, cut lengths of ribbon. Attach these ribbons to the sides of your window openings and along the top edges of your door with a hot glue gun. These ribbons will serve as elegant tie-backs for your curtains, allowing natural light into the playhouse when desired. You can also use ribbons to add decorative bows or to create a festive banner over the door.
Creative Customization Ideas for Your Tablecloth Playhouse
The beauty of a **homemade playhouse** is the endless potential for personalization. Once the basic structure is complete, let your imagination – and your child’s – run wild with these exciting customization ideas:
-
Themed Decor: Transform the playhouse into anything your child dreams of!
- Castle: Add felt turrets, a drawbridge motif, and royal flags.
- Grocery Store: Attach felt pockets for “produce,” a small counter, and a fabric sign.
- Space Shuttle: Use metallic fabric scraps, glow-in-the-dark stars, and printed control panels.
- Fairy House: Adorn with artificial flowers, leaves, and strings of battery-operated fairy lights.
- Puppet Theater: Create a wider opening on one side and hang a backdrop for shows.
-
Exterior Embellishments:
- Fabric Paint or Markers: Let your child draw directly onto the tablecloth.
- Appliqués and Patches: Sew or glue on fabric shapes like stars, hearts, animals, or letters to spell out your child’s name.
- Pompoms and Tassels: Attach along the bottom hem or around windows for a whimsical touch.
- Mailbox: Create a small fabric pocket near the door for receiving “mail.”
-
Interior Comforts:
- Cozy Corner: Furnish the inside with soft pillows, blankets, and a small rug for ultimate comfort.
- Reading Nook: Add a small battery-operated lamp and a basket of books.
- Storage Pockets: Sew fabric pockets inside the playhouse walls for storing small toys, art supplies, or secret treasures.
-
Interactive Elements:
- Bell or Knocker: Attach a small bell or a fabric “knocker” to the door.
- Window Boxes: Create small fabric pockets below the windows and fill with artificial flowers.
- Chalkboard Panel: Glue a piece of chalkboard fabric inside for drawing.
Safety Tips for Your Homemade Playhouse
While a DIY tablecloth playhouse is generally safe, a few considerations can ensure a worry-free play experience:
-
Secure the Tablecloth: If your kids are particularly energetic, consider using tablecloth clips or a non-slip pad under the table to prevent the tablecloth (and potentially the table itself) from shifting or being pulled down during vigorous play.
-
Ventilation: Ensure adequate airflow, especially if the playhouse is fully enclosed. Keep door and window openings sufficiently large, or use breathable fabric.
-
Lighting: If adding lights, opt for battery-operated fairy lights or small LED lanterns. Avoid anything that requires a power outlet inside the play space to prevent trip hazards or electrical risks.
-
Supervision: Always supervise young children during play, even in a safe indoor environment. This allows you to intervene if needed and enjoy their imaginative adventures.
-
Material Choice: If using older fabrics, ensure they are clean and free from allergens or loose threads that could pose a choking hazard for very young children.
Maintaining and Storing Your DIY Table Fort
One of the many advantages of a fabric playhouse is its ease of maintenance and storage. To keep your playhouse looking fresh and ready for countless adventures:
-
Washing: Most tablecloths, pillowcases, and tea towels are machine washable. Follow the fabric care instructions to keep them clean and hygienic. For playhouses with glued embellishments, spot cleaning might be preferable, or ensure the glue used is washable.
-
Quick Tidy-Up: For daily use, simply shake out any crumbs or dust. If there are minor spills, a damp cloth can often do the trick.
-
Storage: When not in use, simply lift the tablecloth off the table. Fold it neatly, perhaps along with any detached curtains or accessories, and store it in a dedicated bag, box, or drawer. Its compact nature means it won’t take up much space, making it perfect for small homes.
-
Longevity: With proper care, your DIY tablecloth playhouse can provide years of imaginative fun. As components wear out, they can easily be replaced or updated, extending the life of your creation.
The Enduring Value of Simple Play
In our fast-paced digital world, providing opportunities for simple, unstructured play is more important than ever. A **DIY tablecloth playhouse** offers children a dedicated space to disconnect, create, and explore. It fosters crucial developmental skills such as problem-solving, social interaction (if playing with siblings or friends), language development through storytelling, and emotional regulation as they navigate imaginary scenarios. It’s a testament to how the most basic materials can spark the most profound moments of childhood joy and learning.
This project isn’t just about building a playhouse; it’s about building memories. The time spent designing, cutting, and decorating together can be a wonderful bonding experience for parents and children. Witnessing your child’s delight as they step into their custom-made world is truly priceless.
Ready to bring this charming **DIY tablecloth playhouse** to life for your little ones? Gather your materials, follow these steps, and watch as your home transforms into a hub of imagination and adventure. Happy crafting!
These amazing images are all credited to HGTV via YouTube. Check their other content and follow for more inspiring DIY projects!