
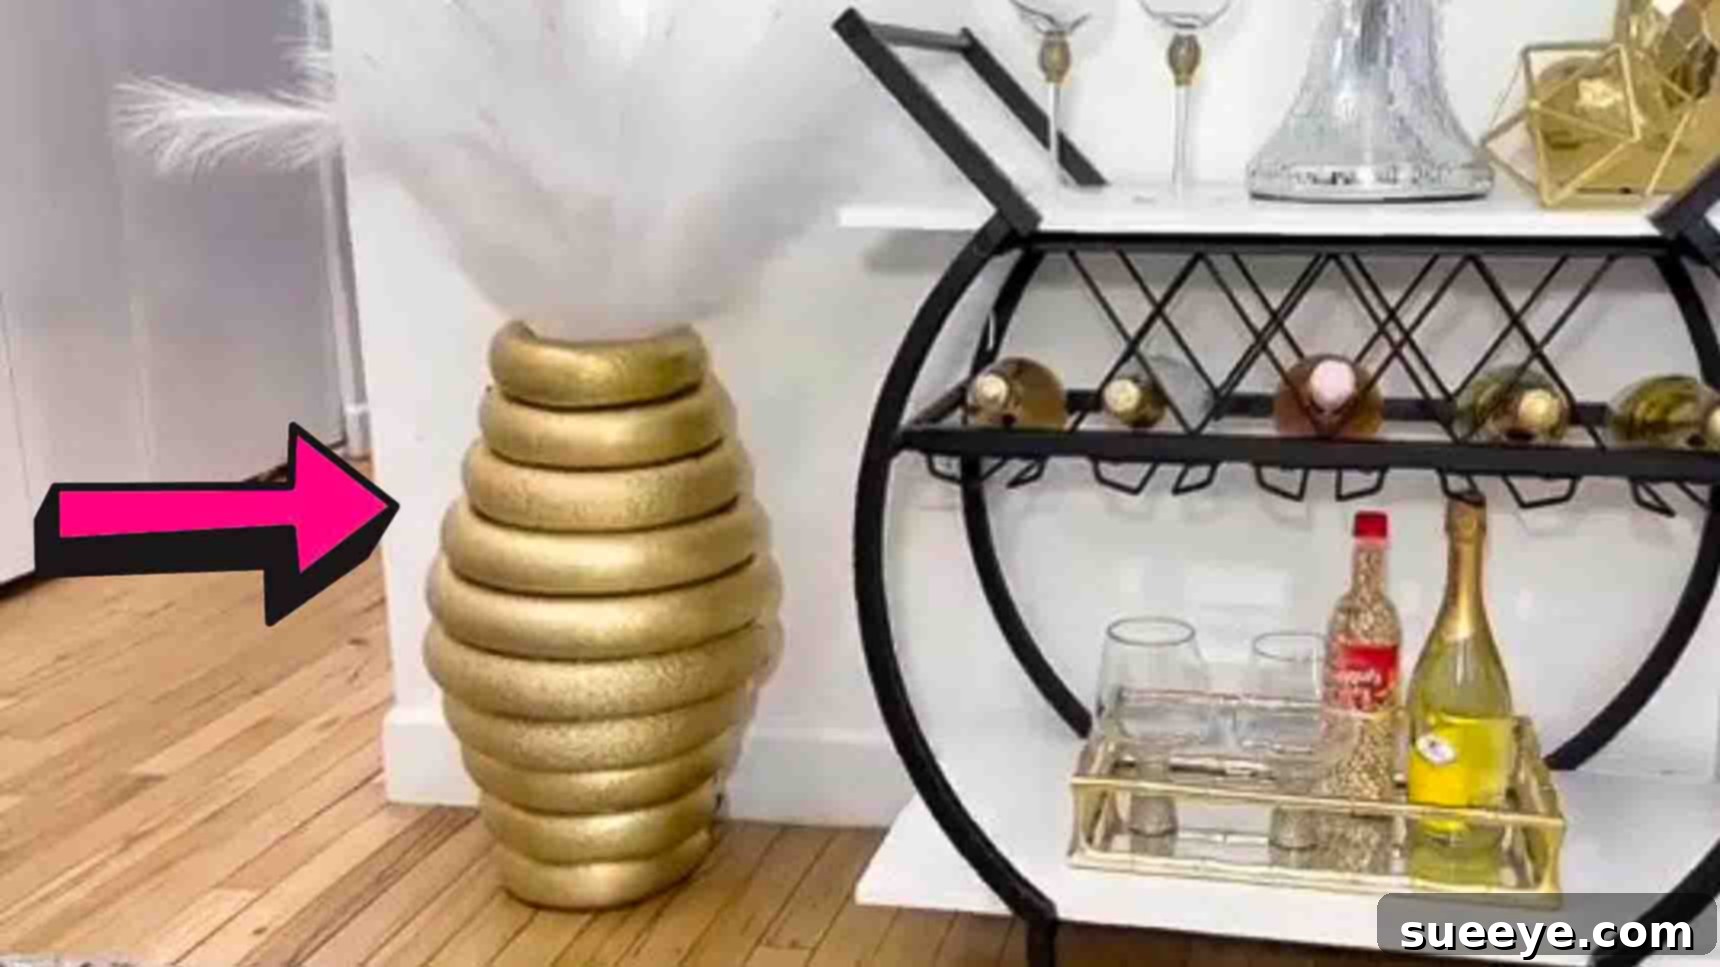
Transforming your living space with stylish decor often comes with a hefty price tag, especially when it comes to statement pieces like elegant floor vases. But what if you could achieve that high-end look without emptying your wallet? Imagine crafting a magnificent, tall floor vase that rivals designer pieces, all from materials found at your local Dollar Tree. This incredible project, inspired by a brilliant tutorial from Nittasdesign on YouTube, demonstrates just how easy and affordable it can be to elevate your home aesthetics.
I recently stumbled upon Nittasdesign’s ingenious creation and was instantly captivated. The result was a chic, modern floor vase that perfectly mimics those luxurious items found in upscale department stores, yet it’s made from something as unexpected as pool noodles! The simplicity and budget-friendliness of this DIY immediately inspired me to gather my supplies. For this project, you’ll primarily need a few pool noodles and some common crafting essentials – all readily available and incredibly inexpensive. Not only is this DIY remarkably easy to assemble, but it also promises a stunning decorative outcome that will leave your guests impressed. Ready to create your own bespoke floor vase? Let’s dive into the step-by-step instructions and discover how effortlessly you can add a touch of sophistication to your home.
Materials You’ll Need: Crafting Your Stylish Floor Vase
Gathering your materials is the first exciting step in bringing your DIY floor vase to life. The beauty of this project lies in its accessibility; most items can be sourced from a Dollar Tree or a similar discount store, ensuring your project remains incredibly budget-friendly. Here’s a detailed list of what you’ll need:
- Eight Pool Noodles: These are the core structural component of your vase. Opt for standard foam pool noodles, typically found in vibrant colors, as they will be completely covered by paint. Their lightweight and flexible nature makes them ideal for this craft.
- Duct Tape: Essential for securely joining the ends of your pool noodles to form stable circular rings. Choose a strong, reliable duct tape that offers good adhesion.
- Hot Glue Gun and Glue Sticks: A hot glue gun provides a quick, strong bond for stacking the pool noodle rings. Ensure you have plenty of glue sticks on hand, as you’ll be using a generous amount for robust assembly.
- Gold Spray Paint (or your desired color): This is where the magic happens, transforming simple pool noodles into an elegant decor piece. Gold offers a luxurious, high-end finish, but feel free to choose any color that complements your home decor. Matte, metallic, or even textured spray paints can achieve different aesthetics.
- Measuring Tape: Accuracy is key for creating a perfectly symmetrical vase. A standard retractable measuring tape will work perfectly for precise measurements of your pool noodles.
- Cutter (Utility Knife or Craft Knife): A sharp utility knife or a strong craft knife is necessary for cleanly cutting through the pool noodles. Always exercise caution and use a cutting mat or protective surface underneath.
Having all these items ready before you begin will ensure a smooth and enjoyable crafting experience, leading to a professional-looking finish for your elegant DIY floor vase.
Step-by-Step Guide: Assembling Your Dollar Tree Floor Vase
Now that you have all your materials, it’s time to bring your vision to life. This detailed guide will walk you through each stage, ensuring a successful and satisfying crafting experience.
Step 1: Measuring and Cutting Your Pool Noodle Rings
The foundation of your stylish floor vase relies on carefully measured and cut pool noodle rings. This step creates the varied diameters that give the vase its appealing, sculptural form.
To begin, grab your first pool noodle. Using your measuring tape, mark a 20-inch section. Carefully and precisely cut this section using your utility or craft knife. A clean cut will ensure the ends meet flush, making it easier to form a neat circle. From the same pool noodle, measure another section, this time 24 inches long, and cut it.
Next, take a new pool noodle. Measure 28 inches and make your cut. For the fourth pool noodle, measure 32 inches and cut it. Finally, with another pool noodle, measure 36 inches and cut. At this point, you should have five individual lengths of pool noodle: 20″, 24″, 28″, 32″, and 36″. These will form the varying tiers of your vase.
Now, prepare your duct tape. Starting with your shortest 20-inch pool noodle piece, gently bend it into a circular shape, bringing the two cut ends together. Align the ends as perfectly as possible to create a seamless ring. Secure these ends firmly together with a strip of duct tape, wrapping it snugly around the seam. For extra durability and to prevent any separation, double-secure it by applying a second strip of duct tape over the first, ensuring a strong and lasting bond.
Repeat this exact process for the remaining four pool noodle lengths (24″, 28″, 32″, and 36″), forming a complete set of five graduated rings. You will now have one set of rings ready for assembly. To achieve the full grandeur of the vase as seen in Nittasdesign’s tutorial, you will need to repeat this entire measuring, cutting, and taping process to create a second identical set of five pool noodle rings. This means you will have two 20-inch rings, two 24-inch rings, two 28-inch rings, two 32-inch rings, and two 36-inch rings in total. Ensuring consistency in your measurements and cuts across both sets will contribute to a beautifully balanced final product.
Step 2: Stacking, Securing, and Finishing Your Elegant Floor Vase
With all your pool noodle rings prepared, it’s time for the exciting assembly phase where your vase truly takes shape. This step involves carefully stacking and securing the rings, followed by the transformative touch of spray paint.
Start with the largest ring from one of your sets – the 36-inch diameter circle. Lay it flat on a clean, protected surface. Next, take strips of duct tape and place them strategically on two opposite areas on the top surface of this largest pool noodle circle. These taped areas will serve as a reinforced base for the hot glue, ensuring a stronger bond and preventing the hot glue from melting or weakening the foam directly.
Now, apply a generous amount of hot glue directly onto these taped areas. While the glue is still hot, carefully center the 32-inch ring (the second largest) on top of the 36-inch base. Press down firmly and hold it in place for a few moments until the hot glue sets, creating a secure attachment. The key here is to ensure the rings are aligned both centrally and vertically for a stable and aesthetically pleasing structure.
Continue this precise stacking process. For each subsequent ring (28″, 24″, then 20″), repeat the steps: place duct tape on opposite sides of the top of the previous ring, apply hot glue generously, and then carefully stack the next smaller ring on top, pressing firmly to secure. Always ensure a good amount of glue and firm pressure for a robust bond between each layer. Once you have stacked all five rings from the first set, you will have one tapering half of your vase.
Now, repeat this exact same stacking procedure for your second set of five pool noodle rings. You will end up with two identical, tapering halves of your floor vase.
With both halves constructed, it’s time to join them. Carefully flip one of the stacked sets over so that its widest (36-inch) base is facing upwards. Again, apply duct tape to two opposite areas on this widest surface. Then, apply a substantial amount of hot glue over the taped sections. Carefully take the other stacked set and align its widest (36-inch) base directly on top of the glued surface of the first set. Press down firmly and hold until the glue thoroughly cures, creating one tall, symmetrical floor vase. Take a moment to adjust for perfect alignment before the glue fully hardens.
Finally, the transformation to elegance! It’s time to spray paint your pool noodle vase. Find a well-ventilated area, preferably outdoors or in a garage with open doors. Lay down a drop cloth or old newspaper to protect your surroundings. Using your gold spray paint (or any color you’ve chosen), apply light, even coats across the entire surface of the vase. Hold the can about 8-12 inches away and use sweeping motions to avoid drips and ensure uniform coverage. Don’t try to cover it all in one thick coat; multiple thin coats will yield a much smoother and more professional finish. Allow each coat to dry completely according to the paint manufacturer’s instructions before applying the next. Once you’re satisfied with the coverage and the paint has fully dried and cured – which might take several hours or even overnight – your stunning, high-end-looking DIY floor vase is complete and ready to adorn your home!
Why Pool Noodles? The Unexpected Secret to Elegant Decor
You might be wondering why pool noodles, typically relegated to summer fun, are the star of this sophisticated DIY project. The answer lies in their unique properties that make them an ideal, albeit unconventional, crafting material. First and foremost, pool noodles are incredibly **lightweight**. This ensures that even a large floor vase remains easy to move and position in your home without any heavy lifting.
Their **flexibility** allows them to be easily bent and shaped into perfect circles, which forms the core structure of our vase. This malleability is crucial for creating the varied diameters needed for the tapering effect. Beyond their practical attributes, pool noodles are remarkably **inexpensive**. Sourcing them from Dollar Tree means you can create substantial decor pieces for a fraction of the cost of store-bought alternatives. They are also **easy to cut**, allowing for precise measurements and clean edges with simple tools. Furthermore, their foam composition provides a suitable surface for spray paint, transforming their initial bright colors into any desired finish. This combination of affordability, workability, and lightness makes pool noodles a hidden gem in the world of budget-friendly home decor.
Customization Tips: Personalize Your Pool Noodle Vase
While the gold spray paint provides a classic, elegant finish, the beauty of DIY lies in customization. Your pool noodle vase can be a true reflection of your personal style and home decor.
- Color Palette: Don’t limit yourself to gold. Consider matte black for a minimalist, modern look, silver for a sleek contemporary vibe, or a bold jewel tone like emerald green or sapphire blue for a pop of color. Pastel shades can create a softer, more bohemian feel.
- Texture and Finish: Experiment with different types of spray paint. A textured “stone look” or “concrete effect” spray paint can add depth and an industrial touch. Glitter spray paint can introduce a dazzling sparkle, perfect for festive occasions or a glamorous aesthetic.
- Embellishments: Once the paint is dry, you can further enhance your vase. Wrap sections with twine or rope for a rustic, natural texture. Attach faux pearls, rhinestones, or even small mirror pieces for added sparkle. Stenciling patterns or freehand painting abstract designs can also make your vase truly unique.
- Height and Shape Variations: While this tutorial provides specific measurements for a classic tapering vase, feel free to experiment. You could create a shorter, wider vase using fewer rings or different measurements. Or, create multiple vases of varying heights to form a cohesive display.
- Faux Botanicals and Fillers: Consider what you’ll place inside your vase. Tall dried pampas grass, artificial branches, silk flowers, or even string lights can complete the look. The lightweight nature of the vase makes it perfect for holding a variety of faux botanicals without concern for stability.
By exploring these customization options, you can ensure your Dollar Tree floor vase not only looks expensive but also perfectly complements your home’s unique charm.
Displaying Your Masterpiece: Where to Place Your DIY Vase
Once your stunning pool noodle vase is complete, the next enjoyable step is finding the perfect spot to showcase it in your home. Its versatile design and lightweight nature make it suitable for a variety of spaces, instantly elevating the room’s ambiance.
- Living Room: Place it in an empty corner, beside a sofa, or next to a console table. Its height adds vertical interest and draws the eye, making the room feel more spacious and well-decorated.
- Entryway: Create a welcoming statement by positioning your vase in your home’s entryway or foyer. It’s an excellent way to introduce your personal style right as guests walk in.
- Bedroom: Add a touch of elegance to your bedroom by placing it next to a dresser, a reading nook, or even in a spacious corner. It can contribute to a serene and luxurious atmosphere.
- Dining Room: While typically a floor vase, a slightly shorter version could even work as a dramatic centerpiece on a large dining table, especially for special occasions.
- Office or Studio: Bring warmth and personality to your workspace by adding this unique piece. It can inspire creativity and make your office feel less sterile.
- What to Fill It With: Since the vase is not designed to hold water, it’s perfect for dried flowers, tall branches (such as willow or birch), faux pampas grass, artificial floral arrangements, or even decorative LED fairy lights for an evening glow. These elements will complete the high-end look without any maintenance.
Remember, the key is to place it where it can be admired and where its scale complements the surrounding furniture and decor.
Care and Maintenance for Your Pool Noodle Vase
One of the benefits of crafting a vase from pool noodles is its relatively low maintenance. However, a few simple tips can help ensure its longevity and keep it looking pristine.
- Dusting: Like any decor item, your vase will collect dust. Simply wipe it down periodically with a soft, dry cloth or a feather duster. Avoid abrasive cleaners or harsh chemicals, which could damage the spray paint finish.
- Indoor Use: This vase is primarily designed for indoor use. While spray paint offers some protection, prolonged exposure to direct sunlight, extreme temperatures, or moisture (like rain or humidity) could cause the foam to degrade or the paint to chip, fade, or blister over time. If you wish to use it outdoors for an event, ensure it’s a temporary placement in a sheltered area.
- Gentle Handling: While securely glued, the structure is still foam. Handle it with care, especially when moving it, to prevent any accidental dents or damage.
- Storage: If you ever need to store your vase, choose a dry, cool place away from direct heat or heavy objects that could crush or misshape the foam.
By following these simple care instructions, your Dollar Tree pool noodle vase will continue to be a beautiful and eye-catching feature in your home for years to come.
Conclusion: Your Journey to Affordable Elegance
In a world where exquisite home decor often comes with an exorbitant price tag, this DIY floor vase project stands out as a beacon of creativity, affordability, and ingenuity. Inspired by the brilliant vision of Nittasdesign, you now have the power to transform humble Dollar Tree pool noodles into a stunning, high-end accent piece that will undoubtedly become a focal point in any room.
This tutorial demonstrates that elegance doesn’t require a lavish budget. With a few basic materials, some careful measurements, and a little hot glue, you can craft a unique decorative item that not only saves you money but also offers immense personal satisfaction. The process is straightforward, the materials are accessible, and the opportunities for customization are endless, allowing you to tailor the vase to perfectly match your home’s aesthetic.
So, why wait? Embrace your inner crafter, head to your nearest Dollar Tree, and embark on this rewarding project. Imagine the compliments you’ll receive and the pride you’ll feel knowing that such a sophisticated piece was created by your own hands. This DIY pool noodle floor vase isn’t just a craft; it’s a testament to the fact that with a bit of imagination, anything is possible – even turning a simple foam toy into a luxurious home decor statement. Happy crafting!