
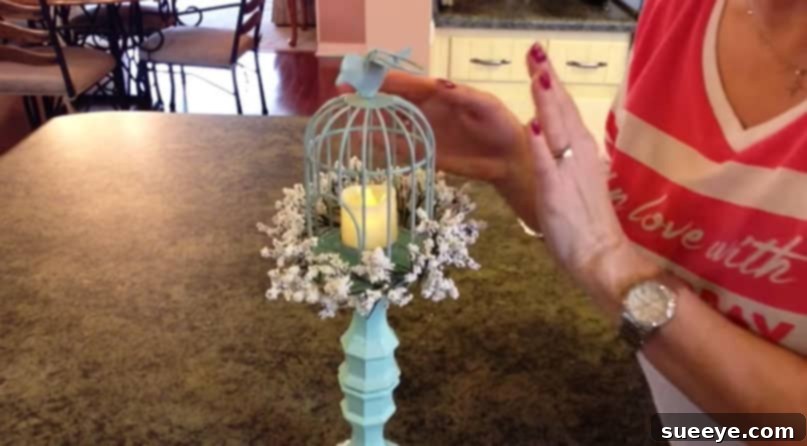
Create Your Own Charming Birdcage Candle Holder with Dollar Store Finds
For many of us, the gentle glow and comforting aroma of candles are essential elements of a cozy home. Whether you’re a minimalist who appreciates a single, perfectly placed flame or a dedicated collector with an impressive array of scents and styles, candles undoubtedly enhance any living space. And just as a beautiful painting needs the right frame, a beloved candle deserves an equally captivating holder. If you find yourself constantly seeking new ways to display your candles without breaking the bank, then you’re in for a treat.
Imagine transforming everyday dollar store items into a piece of decor that looks far more expensive than it is. We’ve stumbled upon an enchanting DIY candle holder project that not only adds a touch of rustic elegance but also allows for complete creative freedom. This delightful craft is perfect for ushering in the freshness of spring, or simply adding a peaceful, quaint aesthetic to any room, all while being incredibly budget-friendly. The beauty lies in its versatility: spray paint it to match your existing decor, adorn it with any flowers or embellishments you desire, and truly make it your own unique creation.
Why DIY? The Allure of Handmade Decor
In a world of mass-produced goods, there’s a unique satisfaction in creating something with your own hands. DIY projects offer a wonderful opportunity to infuse your personal style into your home decor, ensuring that every piece tells a story. Beyond the monetary savings, handmade items carry a certain charm and authenticity that pre-made decor often lacks. This particular birdcage candle holder embodies that spirit perfectly – it’s affordable, customizable, and remarkably easy to achieve, making it an ideal project for both seasoned crafters and beginners alike.
Introducing the Quaint Birdcage Candle Holder Project
This ingenious DIY concept, popularized by Tawnyah from The Magnolia Housewife, demonstrates how a few inexpensive items can come together to form a truly eye-catching decorative piece. The core components are simple: a mini birdcage, a couple of candlesticks, some faux flowers, spray paint, and hot glue. Once assembled, the addition of an LED candle completes the look, providing a safe and lasting glow that perfectly complements the holder’s charm.
The finished product exudes a delicate, vintage-inspired vibe that can effortlessly elevate a variety of interior styles, from farmhouse chic to shabby elegance, or even a subtle bohemian touch. It’s not just a candle holder; it’s a miniature sculpture, a focal point that draws the eye and sparks conversation. Best of all, it starts with items you can find at your local dollar store, proving that stunning decor doesn’t require a hefty investment.
Gathering Your Materials: What You’ll Need
One of the most appealing aspects of this DIY birdcage candle holder is the accessibility and affordability of its materials. Most, if not all, can be sourced from a dollar store, craft store, or even items you might already have around your home. Here’s a detailed list to get you started:
- Mini Birdcage: Look for a small, decorative wire birdcage. These are often found in the floral or craft section of dollar stores or discount retailers. The size should be appropriate to hold a small LED candle comfortably.
- Candlesticks (2-3): You’ll need at least two identical candlesticks to form the base and provide height. These can be glass, plastic, or even small wooden blocks. If you find ones with interesting designs, they can add extra flair. Consider finding a third, shorter candlestick if you want to create a tiered effect or add stability.
- Faux Flowers or Other Decor: This is where your personalization truly shines. Silk flowers, small artificial greenery, faux succulents, small decorative birds, butterflies, or even tiny berries can be used. Choose colors and styles that match your desired aesthetic and the season.
- Spray Paint: Select a color that complements your existing home decor. Popular choices include matte white, cream, gold, silver, or pastel shades for a spring look. Ensure it’s suitable for multiple surfaces (plastic, metal, glass).
- Hot Glue Gun and Glue Sticks: Essential for securely bonding the components. A strong craft adhesive could also work, but hot glue offers quick setting time.
- LED Candle: For safety and longevity, an LED flameless candle is highly recommended. These come in various sizes and even with flickering effects, mimicking real flames without the fire hazard.
- Optional Items:
- Protective Mat or Newspaper: To protect your work surface during painting.
- Gloves: To keep your hands clean while spray painting.
- Rubbing Alcohol or All-Purpose Cleaner: To clean the surfaces of your items before painting for better adhesion.
- Clear Sealer Spray: To protect the paint finish, especially if the holder will be in a high-traffic area or exposed to humidity.
- Additional Embellishments: Ribbons, twine, small decorative beads, glitter, or even tiny painted rocks to add weight and stability.
Step-by-Step Guide to Crafting Your Masterpiece
Creating this charming birdcage candle holder is a straightforward process that yields impressive results. Follow these detailed steps to assemble your own unique piece of decor:
1. Preparation and Safety First
Before you begin, ensure your workspace is well-ventilated, especially if you’re using spray paint. Lay down a protective mat, old newspaper, or a drop cloth to shield your surfaces. Lightly clean all your dollar store items (birdcage, candlesticks) with rubbing alcohol or an all-purpose cleaner to remove any dust, dirt, or oils. This step is crucial for ensuring the spray paint adheres properly and creates a smooth, lasting finish. Allow everything to dry completely before proceeding.
2. Painting Your Components
The key to a cohesive and elegant look is to unify all the separate pieces with a single color. Take your mini birdcage and all your candlesticks to your well-ventilated area. Apply several thin, even coats of spray paint, allowing each coat to dry according to the manufacturer’s instructions before applying the next. This prevents drips and ensures full coverage. Remember, multiple thin coats are always better than one thick coat. Rotate the items to get all angles. Once fully painted, allow all components to dry and cure completely. This might take a few hours or even overnight, depending on the paint and humidity.
3. Assembling the Base
Once your candlesticks are dry, it’s time to assemble the base. Take two candlesticks and carefully apply hot glue to the top of one and the base of the other. Press them firmly together, ensuring they are perfectly aligned. You want to create a single, taller candlestick from two shorter ones, with their original bases forming the top and bottom of your new, elongated stand. Hold them in place for a few moments until the glue sets. For added stability, you might consider reinforcing the joint with a more permanent adhesive if you don’t mind the longer drying time.
4. Attaching the Birdcage
Now, take your assembled candlestick base and apply a generous amount of hot glue to the top-most flat surface (what was originally the base of the second candlestick). Carefully center your mini birdcage on top of this glue and press down firmly. Ensure the birdcage is straight and stable. Hold it in place until the hot glue cools and creates a strong bond. Double-check that it’s secure and won’t wobble.
5. Decorating with Flowers and Embellishments
This is the fun part where you truly personalize your candle holder! Arrange your faux flowers, greenery, or other decorative elements around the base of the birdcage, where it meets the candlestick. You can create a small wreath-like arrangement or cluster them to one side. Use small dabs of hot glue to secure each piece in place. Don’t be afraid to experiment with different placements and quantities. Consider adding other small embellishments like a ribbon tied around the base, small beads, or even a tiny decorative bird perched on the birdcage itself for extra charm.
6. The Final Touch: Inserting Your Candle
Once all the glue has dried and your decorations are secure, carefully place your LED flameless candle inside the birdcage. The LED candle provides a realistic glow without the worry of an open flame, making your beautiful creation safe to display anywhere. Ensure the candle fits comfortably within the birdcage without touching the sides too much.
Unleashing Your Creativity: Customization Ideas
The core design of this birdcage candle holder is wonderfully adaptable, allowing for endless customization to suit any season, style, or personal preference. Here are some ideas to spark your imagination:
- Seasonal Themes:
- Spring: Use pastel spray paints (mint green, sky blue, blush pink) and adorn with cherry blossoms, small white flowers, or faux butterflies.
- Summer: Opt for vibrant colors like coral or turquoise, and decorate with faux sunflowers, seashells, or small nautical elements.
- Autumn: Choose rich hues like matte black, bronze, or deep red. Embellish with faux fall leaves, tiny pumpkins, acorns, or berries.
- Winter/Holidays: Go for silver, gold, or classic red and green. Decorate with tiny pinecones, evergreen sprigs, faux cranberries, or miniature ornaments.
- Style Statements:
- Farmhouse Chic: Paint in distressed white or cream. Use burlap ribbon, cotton bolls, or natural twine with faux wildflowers.
- Bohemian Rhapsody: Use an earthy tone or even black paint. Adorn with dried flowers, feathers, macrame accents, or small dreamcatchers.
- Modern Minimalist: Keep it sleek with matte black or crisp white paint. Use very sparse, geometric greenery or skip the floral decor for a clean look.
- Glamorous Gold: Spray paint entirely in metallic gold or silver. Embellish with sparkly beads, pearl accents, or opulent faux roses.
- Alternative Embellishments: Beyond flowers, consider gluing on small resin charms, vintage buttons, beads, glitter, moss, or even tiny painted rocks for a unique textural element.
- Different Bases: Instead of candlesticks, you could use a small stack of decorative wooden blocks, a miniature vase, or even a sturdy, decorative coaster or small plate as the base for the birdcage.
- Varying Heights: Create a collection of these candle holders in different heights by using a single candlestick for some and two or three for others. Grouping them together creates an even more dynamic display.
Where to Display Your Beautiful Creation
Once your charming birdcage candle holder is complete, the next delightful step is finding the perfect spot to showcase it. Its versatile design means it can enhance almost any room in your home:
- Living Room: Place it on a coffee table, end table, or mantelpiece to add a touch of warmth and elegance. It can serve as a beautiful centerpiece.
- Dining Room: An ideal centerpiece for your dining table, especially for intimate dinners or gatherings.
- Bedroom: Adds a soft, romantic glow on a nightstand or dresser, creating a serene atmosphere.
- Entryway: A welcoming accent on a console table or shelf, setting a charming tone as soon as you walk in.
- Bathroom: Creates a spa-like ambiance when placed on a vanity or a shelf, perfect for relaxing baths.
- Kitchen: Adds a quaint, decorative element to a kitchen island or a shelf, bringing personality to a functional space.
- Outdoor Patios/Decks (under cover): Can be used to add a festive touch to outdoor spaces, just ensure it’s protected from direct weather.
- Special Occasions: These make fantastic decor for weddings, baby showers, garden parties, or any event where you want to add a personalized, handmade touch.
Beyond Decor: The Joy of Gifting
Because these birdcage candle holders are so customizable and cost-effective to make, they also serve as incredibly thoughtful and personal gifts. Imagine crafting a holder specifically tailored to a friend’s home decor, favorite colors, or a special occasion. It’s a gift that truly comes from the heart, demonstrating care and creativity, and is sure to be cherished.
Important Safety Tips for Candle Holders
While this project primarily uses LED candles for safety, it’s always good practice to keep candle safety in mind:
- Always use LED candles: We highly recommend flameless LED candles for this project. They eliminate fire hazards, soot, and the need for constant supervision, making them ideal for homes with children or pets.
- If using real candles (not recommended for this specific design): Never leave a burning candle unattended. Keep it away from flammable materials, drafts, and out of reach of children and pets. Ensure the holder is stable and on a heat-resistant surface.
- Placement: Ensure your candle holder is placed on a stable, level surface where it won’t be easily knocked over.
Embrace Your Inner Crafter
This DIY dollar store birdcage candle holder is more than just a craft; it’s an invitation to explore your creativity, personalize your living space, and discover the joy of making something beautiful with your own hands. It’s an easy, rewarding project that proves elegant home decor doesn’t have to come with a hefty price tag. So, head to your nearest dollar store, gather your supplies, and get ready to transform simple items into a captivating piece that reflects your unique style.
We’re eager to see how you customize yours! Where are you going to put your unique creation, and what personal touches will you add? Share your ideas and finished projects in the comments below, and don’t forget to inspire your friends by sharing this super cute and affordable DIY candle holder!