
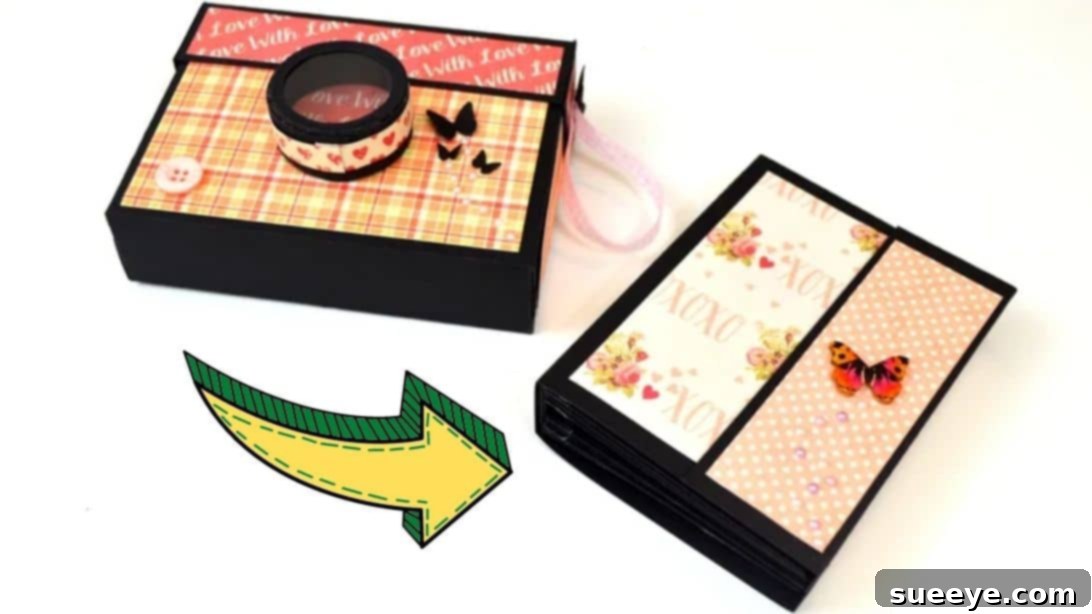
DIY Camera Box Photo Album: A Step-by-Step Guide to Creative Memory Keeping
Embark on a delightful crafting journey and discover the pure joy of creating your very own photo album. Forget generic, store-bought options; this unique DIY project transforms your cherished memories into an adorable camera-shaped box. It’s a whimsical, personalized, and incredibly fun way to preserve your favorite moments. This tutorial will guide you through crafting a charming camera box that not only looks fantastic but also offers ample space for numerous photos, making it a truly special keepsake or a heartfelt handmade gift.
Whether you’re looking for a creative outlet, a unique way to display family photos, or an unforgettable present for a loved one, this camera box photo album is an absolute winner. Its distinctive design immediately captures attention, while the thoughtful effort put into its creation adds immeasurable sentimental value. Get ready to gather your materials and unleash your inner artisan with this accessible and rewarding paper craft project. For visual learners, a comprehensive video tutorial by DIY Paper Crafts – Giulia’s Art on YouTube provides even more detailed guidance.
Why Craft a Camera-Themed Photo Album?
In an increasingly digital world, the tangible act of holding a physical photo album brings a unique sense of nostalgia and connection. Crafting a camera-themed photo album elevates this experience further. The camera shape itself symbolizes the act of capturing moments, making it a poetic vessel for your visual history. It’s more than just storage; it’s a conversation starter, a decorative piece, and a testament to your creativity. This DIY album allows for complete personalization, from the choice of paper to the embellishments, ensuring that your album perfectly reflects your style or the personality of the recipient. It’s a project that combines artistic expression with practical memory keeping, offering a delightful alternative to traditional photo storage.
Materials You’ll Need
Before diving into the creative process, ensure you have all the necessary tools and supplies at hand. Having everything organized will make your crafting experience much smoother and more enjoyable.
- Double-sided tape: Essential for strong, clean adhesion without messy liquid glue, perfect for paper crafts.
- Glue: A good quality craft glue for secure attachments, especially for decorative elements and transparent sheets.
- Black cardstock: This will form the main body of your camera box, providing sturdy structure and the classic camera aesthetic.
- Scissors: Sharp scissors are crucial for precise cuts, ensuring clean edges and a professional-looking finish for your box components.
- Ruler: Indispensable for accurate measurements and drawing straight lines, vital for a well-proportioned camera box.
- Pencil: For lightly marking your cardstock before cutting and folding. Choose a pencil that erases cleanly to avoid visible marks.
- Decorative paper: Choose patterns, colors, or textures that resonate with your theme or recipient’s taste to personalize your camera box. Options range from vintage designs to modern geometrics.
- Transparent sheet: A clear plastic sheet or acetate for creating the realistic camera lens effect. Repurposed clear packaging can work beautifully.
- Optional embellishments: Small buttons, charming stickers, intricate die-cuts, a touch of glitter, or small paper cutouts (like delicate butterflies) to add unique touches and personality.
Step-by-Step Guide to Making Your Camera Box Photo Album
Step 1: Preparing and Assembling the Camera Body and Lid
The foundation of your camera box photo album begins with carefully cutting and folding the cardstock to create the main structure. Precision here is key for a well-formed and sturdy box that will hold your precious memories.
- Marking the Cardstock for the Body: Take your black cardstock, which will serve as the primary structural material. Using your ruler and pencil, meticulously mark out the dimensions for the main camera body. Begin by marking along one of the long sides of the cardstock, establishing your primary length. Then, connect these marks with straight, faint pencil lines. Repeat this process on the short side to create a clear grid of rectangles. While specific measurements provide the best results (and can be found in the comprehensive video tutorial by DIY Paper Crafts – Giulia’s Art), a common approach is to create a central rectangle that forms the base/top, surrounded by flaps that will become the side walls of your box. Aim for exactness to ensure a neat finish.
- Cutting and Folding V-Shapes for Clean Edges: At each of the four corners of your marked grid, you will observe small rectangular sections. Carefully cut V-shapes (or small, inward-pointing triangles) from these corner rectangles. This clever technique is essential because it allows the flaps to fold inward cleanly without overlapping when you assemble the box, preventing bulk and ensuring crisp edges. Once these precise V-cuts are made, use your ruler to gently score along all the pencil lines you previously marked. Scoring creates a crease that makes folding much easier and ensures sharp, professional-looking folds.
- Assembling the Camera Body: With all your folds neatly creased, it’s time to bring the box to life. Apply a strong adhesive, such as double-sided tape or a thin line of craft glue, along the outer edges of the V-cut flaps. Carefully begin folding these flaps inward, pressing them firmly against the adjacent side panels. Work slowly and methodically, ensuring all edges align perfectly. This process will create a robust, open-top rectangular box that forms the core structure of your camera.
- Constructing the Lid: The lid requires the same meticulous attention to detail as the body. Repeat the entire marking, cutting, and folding process as described in steps 1 and 2, but for a separate piece of cardstock. For a perfect fit, the lid must be designed to be ever so slightly larger than the camera body – typically by just one or two millimeters on each side. This small allowance ensures that the lid slides on and off smoothly without being too tight or too loose. Again, consulting the video tutorial for precise lid dimensions is highly recommended to achieve this snug fit. Once assembled, test the lid on the body to confirm a good fit.
- Decorating the Box Exterior: Now for the artistic touch! Select your preferred decorative paper and cut pieces to fit the exterior panels of both the camera body and the lid. These can be solid colors, intricate patterns, or even textured papers that mimic materials like vintage leather or sleek metal. Use double-sided tape or a reliable glue to attach these decorative pieces, completely covering the black cardstock. This step is where you truly begin to personalize your camera box, reflecting your style or the theme of the photos it will hold.
Step 2: Creating and Attaching the Camera Lens and Final Touches
The lens is the defining feature of your camera box, adding that realistic touch that makes the project truly special. This step also involves the final embellishments that bring your entire creation to vibrant life.
- Designing the Lens Base: On a fresh piece of black cardstock, which will form the frame of your lens, use a compass or various circular objects (such as different sized coins, jar lids, or even tape rolls) to draw two concentric circles. These circles will establish the outer ring and the inner aperture of your camera lens. The outer circle should be proportioned to be a prominent and visually appealing feature on the front of your finished camera box. The inner circle will define the area where your transparent “lens” will be visible. Ensure your pencil marks are light and accurate.
- Cutting and Shaping the Lens Frame: Carefully cut out the largest, outer circle of your lens design from the black cardstock. Now, focus on the inner circle. Instead of cutting it out completely to create a simple hole, strategically cut small, evenly spaced triangles around its perimeter, with their points directed towards the center of the circle. Once these triangles are cut, gently fold them inward. This ingenious technique creates a neat, slightly raised edge for the lens, adding a subtle dimension and making it easier to securely attach the transparent sheet. After folding all the triangles, carefully cut out the very center of the inner circle, leaving a clean, circular opening.
- Adding the Transparent Sheet for a Realistic Lens: Select your transparent sheet (acetate or clear plastic). Cut it into a circle that is slightly larger than the inner opening you just created in the black cardstock lens frame, but ensure it remains smaller than the outer perimeter of the black frame. Apply a continuous line of double-sided tape or a thin, even layer of craft glue around the inside edge of the black cardstock lens base. Carefully position and attach the transparent circle from the backside of the black frame. Press firmly to ensure it’s smooth, free of air bubbles, and securely bonded, creating the compelling illusion of a realistic camera lens.
- Attaching the Lens to the Box: With your lens assembly now complete and looking fantastic, apply a generous amount of strong double-sided tape or robust craft glue to the entire back surface of the black cardstock lens base. Carefully position the lens assembly onto the front panel of your main camera box. Take a moment to ensure it’s perfectly centered and aligned, then press it down firmly. Hold it in place for a few moments to allow the adhesive to bond securely, ensuring your lens stays put.
- Decorating and Personalizing with Final Touches: This is the exciting stage where your camera truly comes to life with bespoke details! Use an array of embellishments such as small buttons to mimic camera controls, tiny paper cutouts (like charming butterflies, twinkling stars, or intricate gears), or other small decorative elements to simulate a flash, a viewfinder, or decorative dials. You could even add a small strap made from a strip of decorative paper or a piece of ribbon for extra realism. Let your creativity soar to make your camera box unique and reflective of your style or the personality of the gift recipient.
- Inserting Your Photo Album: Finally, once all the glue is completely dry and your camera box is fully decorated and ready, gently slide your collection of cherished printed photographs or a small, pre-made mini album into the spacious interior of the box. Your beautifully crafted camera box photo album is now complete and perfectly prepared to safeguard and display your precious memories!
Pro Tips for a Perfect DIY Camera Album
Achieving a professional and polished look for your DIY camera box is easier with a few expert tips:
- Take Your Time: Crafting should be enjoyable, not rushed. Hasty work often leads to avoidable mistakes. Allow sufficient time for each step, especially for adhesives to dry completely before moving on. Patience is a virtue in paper crafting.
- Utilize a Scoring Tool: While a ruler and pencil can mark folds, a dedicated scoring tool (or the back of a dull butter knife/empty ballpoint pen) creates much crisper, cleaner creases on cardstock. This enhances the overall structural integrity and aesthetic appeal of your finished box.
- Experiment with Different Adhesives: Not all glues are created equal. While double-sided tape is excellent for large flat surfaces, a glue stick might be better for delicate decorative papers, and liquid craft glue offers a stronger bond for structural elements or thicker embellishments. Test different adhesives on scrap pieces to find what works best for each component.
- Plan Your Decoration Layout: Before permanently attaching any decorative papers or embellishments, arrange them on your camera box. This allows you to visualize the final look, make adjustments, and ensure everything is placed exactly where you want it, preventing regrets later.
- Consider the Recipient’s Style: If you’re crafting this as a gift, tailor the colors, patterns, and embellishments to the recipient’s personal tastes and favorite themes. A personalized touch makes the gift even more special and cherished.
Ideas for Personalizing Your Camera Box
The true beauty of a DIY project lies in the endless possibilities for customization. Make your camera box truly one-of-a-kind:
- Themed Albums: Design your camera box to match a specific theme. For instance, create a travel-themed camera using maps, vintage postcards, or travel-inspired decorative paper. A baby-themed album could feature soft pastels, cute animal prints, or tiny footprints.
- Vintage Charm: To achieve a retro or antique look, opt for sepia-toned papers, distressed inks on the edges, and embellishments like antique brass buttons, faux leather textures, or small metallic charms that evoke an old-world feel.
- Modern & Minimalist: For a sleek, contemporary design, choose solid, bold colors, clean lines, and simple geometric patterns. Focus on strong contrasts and limited embellishments to maintain a sophisticated, uncluttered aesthetic.
- Interactive Elements: Enhance the album’s functionality by adding small pull-out tags or mini-envelopes tucked inside the box. These can be used for writing captions, dates, funny anecdotes, or special messages related to the photos.
- External Embellishments Beyond Buttons: Expand your decorating toolkit beyond just buttons. Consider incorporating small gears for a steampunk vibe, charming metallic trinkets, faux leather patches, tiny plastic charms related to photography, or even small handwritten labels to mimic camera settings.
Frequently Asked Questions About This Craft Project
- What kind of cardstock is best for this project?
- For optimal results and durability, we recommend using medium to heavy-weight cardstock, typically around 80-100lb (or 216-270gsm). This weight provides sufficient sturdiness to hold the box’s shape while remaining flexible enough for clean folding.
- Can I use regular printer paper instead of cardstock?
- While you technically could, regular printer paper (usually 20-24lb) is far too flimsy and will not adequately hold the structure of the box. The camera box would easily collapse or warp. Cardstock is essential for creating a robust and long-lasting album.
- What if I don’t have double-sided tape?
- If double-sided tape isn’t available, a strong liquid craft glue can be used as an alternative. However, be cautious to apply thin, even layers to prevent the paper from warping or creating unsightly bulges. Ensure you allow ample drying time between steps if using liquid glue.
- Where can I find transparent sheets for the lens?
- Transparent sheets, often called acetate sheets, can typically be found at most craft supply stores or stationery shops. Alternatively, you can repurpose clear plastic packaging from various products (like toys or food containers), ensuring it is clean, flat, and free of creases.
- How many photos can this camera box album typically hold?
- The capacity of your camera box photo album will largely depend on the specific dimensions you choose for your box and the thickness of the photos you intend to store. A moderately sized box can comfortably hold a stack of several dozen standard-sized photos (e.g., 4×6 inches) or accommodate several small, pre-made mini-albums.
Conclusion: Capture Your Memories with a Handmade Touch
Creating this DIY camera box photo album is more than just a simple craft project; it’s a thoughtful act of love and a beautifully tactile way to honor and preserve your most cherished memories. The immense satisfaction of transforming readily available materials into such a unique, personalized, and visually appealing keepsake is truly rewarding. Not only will you end up with a stunning, handcrafted item to proudly display in your home or on your desk, but you’ll also have a functional and charming home for your precious photographs.
Whether you’re crafting this delightful camera box for yourself as a personal memory keeper or as an incredibly thoughtful, handmade gift for a friend or family member, this camera-themed album is sure to evoke warm smiles and spark engaging conversations. It’s a testament to the power of creativity and the value of tangible memories in an increasingly digital world. So, gather your supplies, follow these detailed steps, and get ready to create a masterpiece that captures both beloved images and the hearts of all who see it. Happy crafting!
*These amazing images are all credited to DIY Paper Crafts – Giulia’s Art via YouTube. Check their other content and follow for more inspiration and tutorials!