
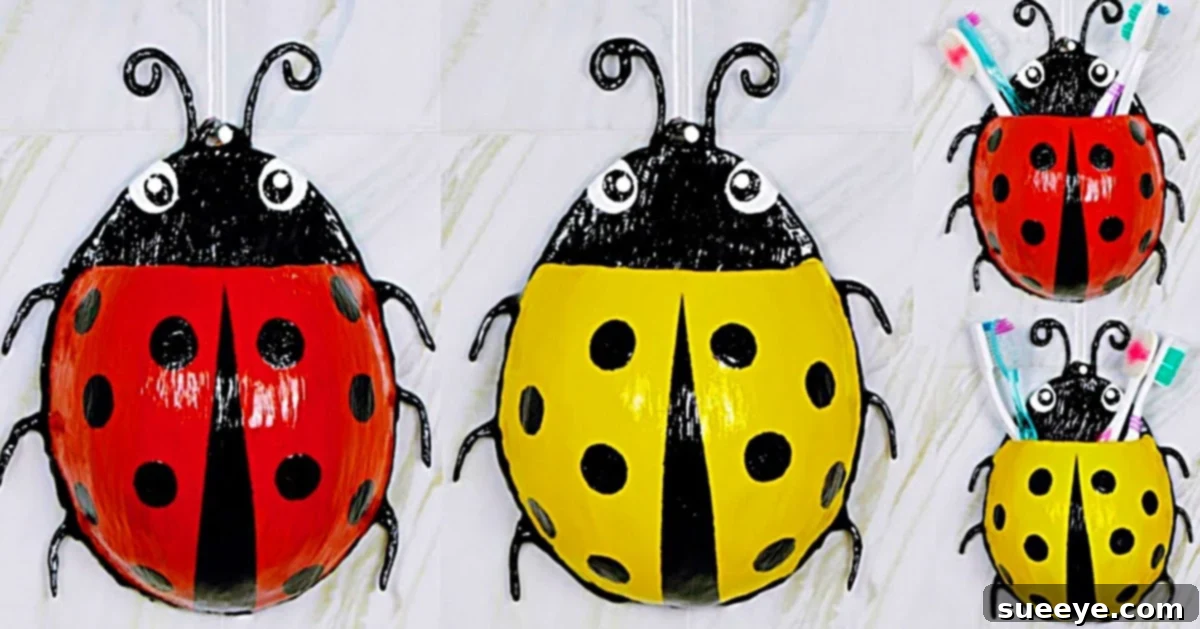
Crafting Joy: How to Make a Charming Paper Mache Ladybug Toothbrush Holder
The timeless art of paper mache has captivated hearts for generations, offering a simple yet incredibly versatile medium for creating everything from whimsical figures to functional home decor. For me, the joy of paper mache began in childhood, spent with friends transforming mundane newspaper strips and glue into fantastical creations. It’s a craft that truly never loses its charm, appealing to makers of all ages.
Imagine the delight of bringing a splash of personalized charm to your bathroom with a handmade item that’s both practical and adorable. That’s precisely the inspiration behind this exciting project: a delightful paper mache ladybug toothbrush holder. The idea truly sparked when I discovered an incredible YouTube tutorial by Kuti Bari, which meticulously detailed the process. The thought of my children’s excitement upon returning home to find these cute ladybugs adorning their bathroom wall, ready to hold their toothbrushes, was enough to motivate me to jump straight into action.
This comprehensive guide will walk you through every step of creating your very own ladybug toothbrush holder. Not only is it a fantastic way to add a unique, personalized touch to your home decor, but it also serves as a wonderful craft activity for families, fostering creativity and a sense of accomplishment. Gather your materials, many of which you likely already have tucked away in your craft cupboard or kitchen pantry, and let’s embark on this fun and rewarding creative journey!
Why a Ladybug Toothbrush Holder? A Blend of Charm and Functionality
Ladybugs, with their vibrant red shells and distinctive black spots, are universally adored symbols of good luck and cheer. Incorporating them into your home decor, especially in a functional item like a toothbrush holder, adds a playful and heartwarming element to an often overlooked space – the bathroom. For children, a charming ladybug holder can transform the daily chore of brushing teeth into a more engaging and enjoyable routine, encouraging good hygiene habits with a smile.
Beyond their aesthetic appeal, handmade toothbrush holders offer a unique alternative to generic store-bought options. They allow for complete customization, letting you choose colors, sizes, and even facial expressions to perfectly match your personal style or bathroom theme. Furthermore, engaging in DIY projects like this paper mache craft promotes resourcefulness, reduces waste by repurposing common materials, and provides a deeply satisfying sense of achievement. It’s more than just a holder; it’s a piece of art made with love, bringing a burst of personality and a touch of nature’s beauty into your home.
Gather Your Creative Arsenal: Essential Materials for Your Ladybug Craft
Before diving into the creative process, it’s crucial to have all your materials organized and ready. The beauty of paper mache is its accessibility, often requiring only basic household items. Here’s a detailed list of what you’ll need to create your charming ladybug toothbrush holder:
- Balloons: Opt for standard round balloons, preferably about 6-8 inches in diameter when inflated. These will serve as the core form for your ladybug’s spherical body. The size of the balloon will determine the final size of your ladybug, so consider where it will be displayed.
- Decoupage Glue: A good quality decoupage glue, such as Mod Podge, works perfectly for this project. Alternatively, you can easily make your own paper mache paste by mixing flour and water to a thick, creamy consistency. Ensure it’s smooth and lump-free for easier application.
- Newspaper Squares (approx. 2×2 inches): Old newspapers are ideal. Tear them into small, manageable squares or strips (approximately 2×2 inches, as suggested in the original video, or slightly larger if you prefer). Tearing, rather than cutting, creates softer edges that blend more seamlessly when layered, resulting in a smoother finish. You’ll need a generous stack of these.
- Coat Hanger Wire (or any bendable wire): This sturdy yet flexible wire will be used to create the ladybug’s delicate legs and antennae. Look for wire that holds its shape well once bent but is still easy to manipulate with pliers. Floral wire or craft wire can also be suitable alternatives, depending on their gauge.
- Two Pieces of Wood or Sturdy Cardboard: These pieces will form the back support for your ladybug, allowing it to be mounted securely to the wall. For durability, wood (e.g., thin plywood or craft wood) is preferable, but thick, rigid cardboard can also work. Each piece should be slightly larger than the flat back of your ladybug’s body to provide ample surface for attachment and mounting hardware.
- Craft Paint: You’ll need acrylic craft paints in essential ladybug colors: bright red for the body, black for the spots, head, and feet, and a touch of white for the eyes. Feel free to add other colors for personalization or details if desired.
- Paint Brushes: A selection of sizes will be helpful – a larger brush for the main body color and smaller, finer brushes for detailed work like spots, eyes, and antennae.
- Scissors or Craft Knife: For trimming excess paper mache and creating openings in your ladybug body. A craft knife provides more precision.
- Pencil and Ruler: Essential for measuring and marking your cardboard or wood backing.
- Sandpaper (fine-grit): If using wood for the backing, sandpaper will help smooth the edges and prepare the surface for painting.
- Clear Sealant/Varnish: A clear, waterproof sealant (e.g., Mod Podge Outdoor or a spray varnish) will protect your finished ladybug from moisture in the bathroom environment and give it a durable, polished look.
- Strong Adhesive/Hot Glue Gun: For securely attaching the paper mache body to the wooden or cardboard backing, and for securing the wire legs and antennae. A hot glue gun offers quick drying and strong adhesion.
- Wall Mounting Hardware: Depending on your preference and the weight of your finished piece, you might need small screws, picture hangers, or adhesive strips to mount the ladybug to the wall. Ensure it’s appropriate for your wall type and the holder’s weight.
Your Ladybug Journey: Step-by-Step Crafting Instructions
Follow these detailed steps to bring your charming paper mache ladybug toothbrush holder to life. Remember to allow ample drying time between layers for the best results.
Step 1: Preparing the Ladybug Body Base with Paper Mache
Begin by inflating your chosen balloon to the desired size for your ladybug’s body. Tie it securely. Next, prepare your newspaper strips by tearing them into approximately 2×2 inch squares. Pour your decoupage glue into a shallow dish. Dip each newspaper square into the glue, ensuring it’s fully saturated, then run it between two fingers to remove excess glue. Carefully apply the glued newspaper strips to the surface of the balloon, overlapping them slightly to create a continuous, smooth layer. Cover about two-thirds of the balloon, leaving a section at the bottom uncovered where the ladybug will eventually meet its mounting board. Aim for at least 3-4 layers for strength and durability. Smooth out any wrinkles or air bubbles as you go. This initial layering is crucial for forming a sturdy foundation for your ladybug.
Step 2: Drying and Shaping Your Ladybug Shell
Once you’ve applied all the necessary layers, set the balloon aside in a well-ventilated area to dry completely. This can take anywhere from 24 to 48 hours, depending on humidity and the number of layers. Resist the urge to rush this step; inadequate drying can lead to mold or a weakened structure. Once the paper mache feels hard and completely dry to the touch, it’s time to remove the balloon. Carefully pop the balloon with a pin or scissors, and it should easily detach from the hardened paper mache shell. Now, using a craft knife or sharp scissors, carefully trim the edges of your paper mache shell to create a neat, symmetrical opening at the bottom. This opening will allow the ladybug to sit flush against its backing and also serve as the main access point for shaping the interior and adding toothbrush slots.
Step 3: Crafting the Mounting Base
Take your two pieces of wood or sturdy cardboard. Measure the flattened back area of your paper mache ladybug body. Cut one piece of wood/cardboard to match this shape, ensuring it’s slightly larger than the opening to provide a good surface for gluing. This will be the immediate backing for the ladybug. Cut the second piece to be identical or slightly larger if you want a more substantial mount. If using wood, sand the edges smooth. You might choose to paint these backing pieces black or a complementary color to blend seamlessly with the ladybug or your wall. Allow any paint to dry completely. These pieces will provide the necessary stability and surface for attaching your mounting hardware later.
Step 4: Attaching the Ladybug to its Mount
Apply a generous amount of strong adhesive or hot glue around the trimmed opening of your paper mache ladybug body. Carefully align it with the first (smaller) prepared wood or cardboard backing piece and press down firmly. Hold it in place until the glue sets, ensuring a strong bond. Next, apply adhesive to the back of this combined piece and attach it to the second, larger wooden or cardboard backing. This layering provides extra stability and a thicker base for mounting. Ensure both pieces are perfectly aligned and securely fastened. A strong, stable mount is critical for the long-term integrity of your toothbrush holder on the wall.
Step 5: Adding Decorative Elements: Legs and Antennae
Now it’s time to give your ladybug its characteristic features. Cut six pieces of coat hanger wire for the legs, each about 3-4 inches long, and two shorter pieces (2-3 inches) for the antennae. Carefully bend each leg piece into a slight ‘L’ or ‘V’ shape, mimicking a ladybug’s jointed limbs. For the antennae, bend one end into a tiny loop or curl to represent the tips. Using a strong adhesive, attach the legs evenly spaced along the underside edges of the ladybug’s body. Secure the antennae to what will be the front of your ladybug, near where its head would be. You can gently push the ends of the wire through the paper mache and secure them with a dab of hot glue from the inside if the paper mache is thick enough, ensuring they are very firm.
Step 6: Bringing Your Ladybug to Life with Paint
With the structure complete, it’s time for the vibrant colors! Start by painting the entire ladybug body a solid red. Apply multiple thin coats, allowing each coat to dry thoroughly before adding the next, to achieve an opaque and even finish. Once the red is dry, use black paint to create the ladybug’s distinctive spots on its back, a small head shape at the front, and carefully paint the wire legs and antennae black. For added charm, use a small brush and white paint to create tiny ‘eye’ dots on the black head. Allow all paint to dry completely. This step is where your ladybug truly comes to life!
Step 7: Final Touches and Mounting
To ensure your ladybug toothbrush holder withstands the humid bathroom environment, apply several coats of clear sealant or varnish. This will protect the paint and paper mache from moisture and add a lovely sheen. Once the sealant is dry, consider how your toothbrushes will be held. You can either make small slits in the bottom edge of the paper mache body (if thick enough) to hold them upright or, more effectively, attach small hooks or clips to the inside of the ladybug’s shell or to the mounting board itself. Finally, attach your chosen wall mounting hardware to the back of the wooden/cardboard base. Measure and mark your desired spot on the bathroom wall, then securely mount your beautiful, handmade ladybug toothbrush holder. Enjoy your new, personalized bathroom accent!
Pro Tips for Paper Mache Success
Achieving a professional-looking paper mache project requires a little patience and attention to detail. Here are some expert tips to help you along the way:
- Glue Consistency is Key: Whether using store-bought decoupage glue or a homemade paste, ensure it’s not too thin (which makes it runny and weak) or too thick (which makes it hard to spread and lumpy). Aim for a consistency similar to pancake batter.
- Layering Technique: Apply multiple thin layers rather than a few thick ones. Thin layers dry faster and create a stronger, smoother shell with fewer bumps. Alternate the direction of your newspaper strips (e.g., horizontal then vertical) for added strength.
- Patience with Drying: This cannot be stressed enough. Paper mache *must* be completely dry before adding new layers, painting, or sealing. Rushing this step can lead to a soft, moldy, or easily damaged piece. Place your project in a warm, dry area, and consider using a fan to aid circulation.
- Smoothing as You Go: As you apply each strip, use your fingers to smooth out any wrinkles or air bubbles. A smoother surface from the start will require less effort later.
- Ventilation: Work in a well-ventilated area, especially when using paints and sealants, to avoid inhaling fumes.
- Customization: Don’t hesitate to experiment with different colors, glitter, or even small embellishments to make your ladybug truly unique.
Creative Variations and Personalization
While the ladybug is undeniably charming, the beauty of DIY paper mache lies in its endless possibilities for personalization. Once you’ve mastered the basic technique, you can easily adapt this project to create a menagerie of different creatures or unique holders. Consider creating a friendly bumblebee with yellow and black stripes, a whimsical frog in vibrant green, or even an imaginative monster with googly eyes for a child’s bathroom.
Beyond animal themes, you could experiment with different base shapes for other storage needs. Imagine a larger, wall-mounted paper mache fruit bowl for the kitchen or a fun, themed holder for pens and pencils in a child’s bedroom. You can also vary the decorative elements: add glitter to your ladybug’s spots, incorporate texture by gluing small fabric pieces before painting, or create a whole family of ladybugs in varying sizes. The only limit is your imagination!
A Charming Addition to Your Home and a Rewarding Craft Experience
And there you have it – a delightful, handmade paper mache ladybug toothbrush holder ready to bring a touch of whimsy and organization to your bathroom! This project is more than just a craft; it’s an opportunity to create something beautiful and functional with your own hands, to engage in a mindful activity, and to add a truly personalized element to your living space. The satisfaction of seeing your vision come to life, from simple newspaper strips to a charming decorative piece, is incredibly rewarding.
Whether you’re a seasoned crafter or new to the world of DIY, this paper mache ladybug offers a fun and accessible project that yields fantastic results. It’s perfect for sparking creativity in children, encouraging good hygiene habits, and simply brightening up your day every time you step into the bathroom. So, embrace the joy of making, and let your creativity take flight!