
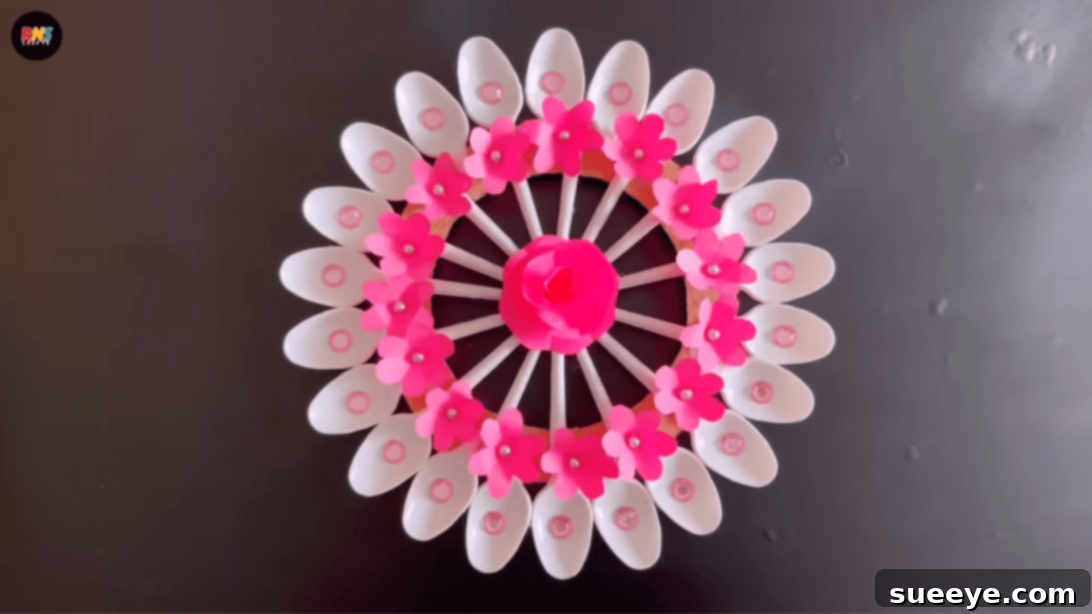
Transform Your Space: The Ultimate DIY Plastic Spoon Wall Art Guide
Are you searching for a unique, budget-friendly, and eco-conscious way to infuse personality into your home decor? Look no further! This comprehensive guide will empower you to transform ordinary, discarded plastic spoons into a breathtaking piece of wall art. This project is not only incredibly rewarding but also champions the spirit of upcycling, giving new life to materials that would otherwise contribute to landfills. Get ready to unleash your inner artist and craft a stunning decor piece that will undoubtedly spark conversations and impress your guests.
This fantastic and easy home decor idea is inspired by the innovative crafting techniques shared by RNS Crafts on YouTube. We’ve taken their brilliant concept and expanded upon it to provide you with an even more detailed, engaging, and inspiring crafting experience. While their original video offers excellent visual guidance, our enhanced tutorial will delve deeper into each step, offering valuable tips for success and customization.
Why Embrace Upcycling with Plastic Spoons for Your Wall Art?
In today’s world, where environmental consciousness is paramount, upcycling stands out as a powerful solution for reducing waste and simultaneously creating beautiful, functional items. Plastic spoons, ubiquitous at parties and gatherings, often face a fate of single-use before being discarded, contributing significantly to plastic pollution that harms our planet. By choosing to transform these humble utensils into a work of art, you’re not merely decorating your home; you’re actively participating in a sustainable practice and making a conscious choice to be part of the solution to plastic waste.
This DIY project serves as a compelling testament to how creativity can seamlessly intersect with environmental responsibility. Beyond the clear ecological advantages, crafting your own decor allows for unparalleled personalization. You can select colors, patterns, and embellishments that perfectly align with your existing home aesthetic, ensuring your space reflects your unique style and personality without necessitating expensive purchases. It’s an opportunity to create something truly bespoke and meaningful.
Gather Your Materials: What You’ll Need for Your Craft
Before you embark on this exciting crafting journey, it’s essential to ensure you have all the necessary items readily available. Gathering everything beforehand will streamline the process, make it more enjoyable, and allow your creativity to flow uninterrupted.
- Sturdy Cardboard: A robust piece of cardboard, perhaps recycled from an old shipping box or a discarded poster board, will serve as the strong and stable base for your intricate wall art. Its resilience is key to supporting the weight of the spoons and decorations.
- Sharp Scissors: A reliable and sharp pair of scissors is crucial for precision cutting – whether it’s for the cardboard base, the plastic spoons, or the delicate paper flowers.
- Clean Plastic Spoons: Collect a generous quantity of clean, used plastic spoons. The more spoons you have, the greater your flexibility in creating a fuller, more intricate, and layered design. Consider gathering spoons of slightly different sizes if you envision adding varying depths and textures to your piece.
- Two Plates in Different Sizes: These everyday kitchen items will serve as convenient templates for tracing perfect concentric circles onto your cardboard base, ensuring a symmetrical and professional-looking foundation.
- Small Circle-Shaped Object: Anything from a coin (like a quarter or a half-dollar) to a bottle cap or a small jar lid will work perfectly for tracing smaller circular cuts, especially for the central design elements.
- Pencil: An essential tool for tracing, marking, and sketching preliminary designs on your cardboard and paper before committing to cuts or glue.
- Hot Glue Gun and Ample Glue Sticks: The hot glue gun is your primary adhesive for this project. It provides a strong, quick-drying bond vital for securely attaching the plastic spoons and other embellishments. Ensure you have plenty of glue sticks to avoid interruptions.
- Colored Craft Paper: Various colors of craft paper or construction paper will be used for creating charming decorative flowers. Choose colors that complement your home decor or create a vibrant contrast for a pop of color.
- Small Beads: These tiny embellishments will be glued into the center of your paper flowers, adding a touch of sparkle, dimension, and refined detail to your floral accents.
- Circle Flat Beads (Optional but Recommended): These beads, often found in craft stores, are excellent for adding texture and an elegant finishing touch by being glued inside the cup of each plastic spoon head, enhancing the decorative appeal.
Step-by-Step Guide: Crafting Your Exquisite Plastic Spoon Wall Art
Follow these detailed instructions meticulously to create your stunning DIY wall art. Taking your time with each step will ensure precision, a high-quality finish, and a piece you’ll be proud to display.
Step 1: Preparing Your Robust Cardboard Base
Begin by selecting your chosen sturdy piece of cardboard. Place the larger of your two plates onto the cardboard and carefully trace its entire circumference with your pencil, creating a perfectly round large circle. Next, center the smaller plate within the confines of this larger circle and trace its circumference as well. This process will yield two distinct concentric circles. With your sharp scissors, meticulously cut out the large outer circle. Subsequently, cut out the inner circle, leaving you with a hollow cardboard ring. This robust ring will serve as the foundational structure, the very skeleton upon which your beautiful spoon arrangement will be built.
Step 2: Transforming Plastic Spoons into Delicate Petals
This is where the transformative magic truly begins! Take each plastic spoon individually and, using your sharp scissors, carefully cut it just below the neck – the point where the bowl of the spoon gracefully meets the handle. For this project, you will be utilizing only the spoon heads, which, once detached, remarkably resemble delicate petals. Set the handles aside for now; they will be repurposed later for a distinct and creative design element. Now, apply a small, controlled dab of hot glue to the bottom tip of a spoon head. Position it precisely just below the outer edge of your cardboard ring, ensuring that the convex side of the spoon faces outwards. Continue this systematic process, gluing spoon heads all around the entire outer circumference of your cardboard ring. As you go, pay close attention to the spacing between each spoon, adjusting as needed to create an even, symmetrical, and visually pleasing arrangement. This forms the essential outermost layer of your captivating floral design.
Step 3: Crafting the Inner Structure with Repurposed Spoon Handles
It’s now time to retrieve the plastic spoon handles that you thoughtfully set aside earlier. On a separate, smaller piece of cardboard, trace a small circle using your chosen small circular object (such as a coin or bottle cap). Carefully cut out this small cardboard circle; this will function as a central anchor for the innovative handle design. Now, meticulously place this small cardboard circle directly in the very middle of your larger hollow wall art piece. Select four of your spoon handles and apply a small amount of hot glue to one end of each. Firmly stick these glued ends to the small central circle, extending the other ends outwards to the outer edge of the larger cardboard ring. This action will create a distinct and symmetrical cross pattern, reminiscent of the spokes of a delicate wheel. For the remaining handles, continue the pattern by filling in the empty spaces within each “quarter” section of your circular design, radiating outwards from the small central circle. Strive for an even and balanced distribution of handles in each quarter to maintain a harmonious and aesthetically pleasing overall look.
Step 4: Decorating with Vibrant Paper Flowers and Elegant Beads
This final step is where you infuse vibrant life and intricate detail into your wall art. Using your chosen colored paper, carefully cut out numerous small flower shapes. These can be simple five-petal designs, charming spirals, or more elaborate patterns – this is your chance to truly unleash your creativity and personal style! Once each flower is cut, secure a small bead into its center using a dab of hot glue; these beads will add a lovely touch of sparkle and dimension. These small, decorative flowers will then be strategically glued onto the larger cardboard ring, filling the spaces between the spoon heads, or adorning any area you wish to enhance. For the very focal point, the center of your wall art, create a larger, more prominent layered paper flower. This can be achieved by cutting several flower shapes of varying sizes and stacking them, gluing them together at their centers, to form a fuller, multi-dimensional bloom. Finally, to add a truly delicate and refined finishing touch, take your flat circle beads (if using) and carefully glue one inside the hollow cup of each plastic spoon head. This seemingly small detail adds a beautiful textural element and significantly elevates the decorative appeal of your unique artwork.
Pro Tips for a Perfect Finish and Limitless Customization
To ensure your DIY plastic spoon wall art not only turns out spectacular but also truly reflects your individual style, consider incorporating these additional tips and exploring various customization ideas:
- Safety First with Hot Glue Guns: Always exercise utmost caution when operating a hot glue gun. Ensure you are working in a well-ventilated area, and consistently keep your fingers clear of the hot nozzle and molten glue. If children are involved in the crafting process, direct adult supervision is absolutely essential for their safety.
- Experiment with Colors and Finishes: Do not feel restricted to using plain white plastic spoons. Before assembly, you can easily paint your plastic spoons using spray paint (specifically designed for plastic) or acrylic paints for a truly customized and vibrant look. Consider metallic spray paints for a sophisticated, high-end finish that can transform the humble plastic into something luxurious. Similarly, play with an expansive palette of colored papers for your flowers to perfectly match your room’s existing decor or to create a striking, intentional contrast.
- Varying Spoon Sizes for Depth: If you have access to plastic spoons of different sizes (e.g., dessert spoons and soup spoons), try incorporating them into your design. You could use larger spoons for the outermost layers to create a bold perimeter and progressively smaller ones for inner layers to build a more dynamic, multi-dimensional, and visually interesting effect.
- Alternative Embellishments Galore: While beads are charming, don’t hesitate to explore other embellishment options. Small buttons, shimmering sequins, fine glitter, tiny faux pearls, or even miniature rhinestones can be used for the center of your flowers or artfully placed inside the spoon cups, adding unique texture and sparkle.
- Securely Hanging Your Masterpiece: Once all the glue has completely dried and cured (this can take several hours), you can attach a sturdy picture hanger to the back of the cardboard base. For lighter pieces, a simple but strong loop of ribbon or string, securely glued to the top edge, will suffice. Always double-check that your chosen hanging mechanism is robust enough to support the weight of your finished artwork.
- Explore Diverse Patterns and Shapes: While this guide focuses on a beautiful circular, floral-inspired design, do not shy away from experimenting with other patterns. You could arrange spoons to create abstract designs, form intricate geometric shapes (like squares, triangles, or stars), or even completely cover an entire canvas with spoon heads for a dramatic, textured art piece. Let your imagination be your guide!
- Durability and Easy Cleaning: To protect your beautiful artwork from dust and wear, and to make future cleaning easier, you can lightly spray the finished piece with a clear protective sealant (available at most craft stores). For routine cleaning, a soft, dry brush or a can of compressed air is recommended to gently remove any accumulated dust without damaging the delicate components.
Beyond Decoration: The Profound Benefits of Creating Your Own Wall Art
Engaging in inspiring DIY projects such as this plastic spoon wall art offers a rich tapestry of benefits that extend far beyond simply acquiring a new decoration for your home. It’s an investment in your creativity, well-being, and the environment:
- Personalized Home Decor: Your home will proudly showcase a piece that is truly unique, handcrafted by your own hands, and a direct reflection of your personal taste, style, and creative vision. It’s decor with a story.
- Remarkable Cost-Effectiveness: By cleverly upcycling readily available materials like plastic spoons, you dramatically reduce the financial outlay typically associated with purchasing home decor, making stylish and unique accents accessible on any budget.
- Therapeutic Stress Relief and Mindfulness: The act of crafting can be a deeply therapeutic and meditative activity. It provides a wonderful, productive outlet for stress, encourages focused concentration, and promotes a sense of mindfulness as you immerse yourself in the creative process.
- Positive Environmental Impact: By choosing to reuse plastic instead of discarding it, you are actively contributing to waste reduction, diminishing your carbon footprint, and promoting more sustainable living practices within your community.
- Enhanced Skill Development: Every DIY project you undertake helps you refine and expand your crafting skills – from precision cutting and secure gluing to imaginative design and meticulous assembly, building confidence for future creative endeavors.
- Immense Sense of Accomplishment: There is an unparalleled sense of satisfaction and pride that comes from looking at a beautifully finished piece of art and knowing, unequivocally, that you created it with your own hands and ingenuity.
Frequently Asked Questions About DIY Plastic Spoon Wall Art
- Q: How long does this project typically take to complete?
- A: The time required can vary based on your individual crafting experience, the complexity of your chosen design, and the speed at which you work. Generally, you can expect to spend anywhere from 2 to 4 hours from the initial gathering of materials to the final finishing touches, including allowing adequate time for the hot glue to fully dry and set.
- Q: Is this craft suitable for involving children?
- A: Children can certainly be involved in many aspects of this creative project, such as cutting out the paper flowers, arranging beads, or even helping to paint spoons (under supervision). However, due to the inherent dangers of a hot glue gun, its operation should be strictly limited to adults or performed under very close and direct adult supervision.
- Q: What if I don’t have enough plastic spoons readily available?
- A: The most eco-friendly approach is to start collecting them from various sources – ask friends and family to save their used spoons after parties, picnics, or even takeout meals. Alternatively, if you need a larger quantity quickly, you can purchase bulk plastic spoons from party supply stores, although this does slightly diverge from the primary upcycling objective.
- Q: How can I ensure my finished wall art hangs straight and securely?
- A: For optimal hanging results, make sure your chosen picture hanger or a sturdy loop made from strong string or ribbon is centered precisely and securely attached to the top-back portion of your cardboard base. When mounting it on your wall, always use a spirit level to ensure your artwork is perfectly straight and aesthetically pleasing.