
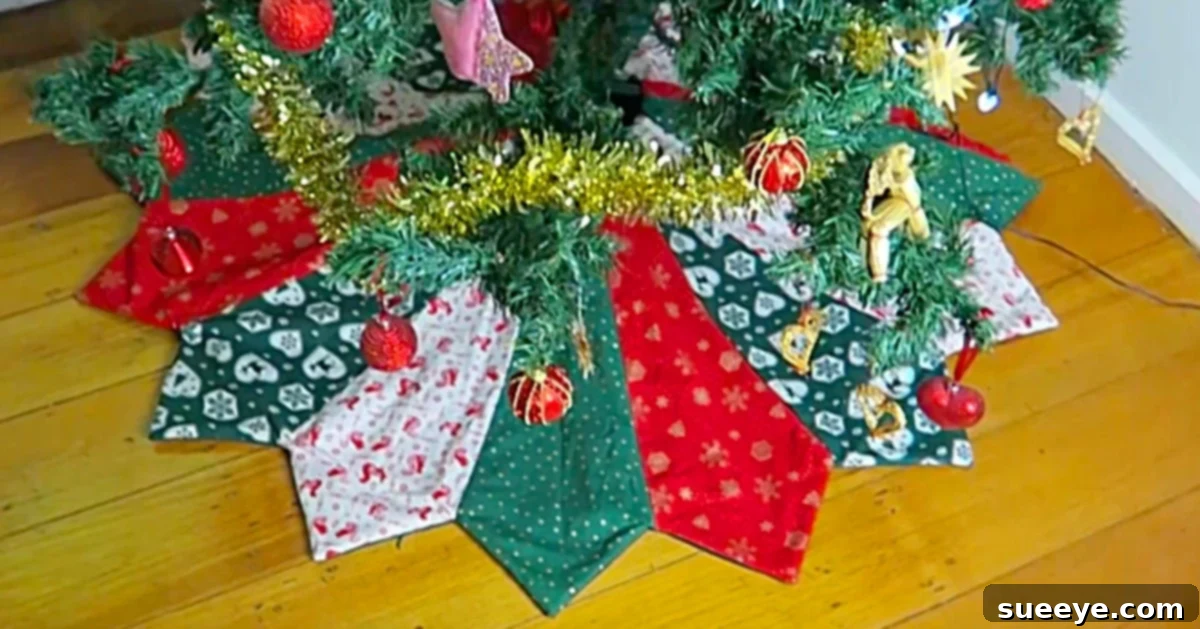
Master the Dresden Pattern: A Simple Guide to Your Quilted Christmas Tree Skirt
The timeless allure of a Dresden Quilt Pattern is undeniable, yet many quilters are intimidated by its intricate appearance. We’re here to debunk that myth! This comprehensive tutorial is designed to be incredibly straightforward and easy to follow, making the stunning Dresden design accessible to everyone, from seasoned sewers to enthusiastic beginners. Forget the hassle of searching for specific fabrics; chances are, your sewing room already holds the perfect scraps to bring this project to life. Imagine creating a cherished piece of handmade Christmas decor in just a few enjoyable evenings!
Creating beautiful, personalized home decor, especially for the holidays, adds a unique warmth that store-bought items simply can’t replicate. A handmade Christmas tree skirt becomes more than just decoration; it’s a family heirloom, a centerpiece of holiday memories. And with the elegant Dresden Plate design, your tree skirt will exude a classic charm that enhances any festive setting.
From Stress to Serenity: My Journey to a Handmade Christmas
Moving house is often cited as one of life’s most stressful events, and I can certainly attest to that. The sheer magnitude of packing, organizing, and ensuring every single possession reaches its new destination safely can be overwhelming. Recently, I navigated this challenging process, brimming with excitement at the prospect of celebrating Christmas in my new home. However, my festive cheer took an unexpected hit when, upon searching for my beloved Christmas ornaments in the garage, they were nowhere to be found. A wave of dismay washed over me; somehow, inexplicably, all my cherished Christmas decorations had been lost in transit.
While the initial impulse might be to dwell on blame, the reality of moving involves too many variables for such a pursuit to be productive. Instead, I resolved to channel my energy into something positive: creating new Christmas decor. Many of my lost ornaments were handmade, and among my most treasured items was a beautiful, custom-made Christmas Tree Skirt that my Mom and I had crafted together years ago. The thought of losing these homemade gems was disheartening, but then a beacon of hope emerged: YouTube! The internet, it turned out, held the key to rekindling those crafting traditions.
The first project I chose to embark on was a Dresden Pattern Quilted Tree Skirt. This choice was deeply personal, as it mirrored the very skirt my Mom and I had created years prior – a magnificent, grand patchwork quilted star. The joy of discovering a detailed YouTube tutorial for this exact design was immense. While my Mom is an expert quilter who previously guided me through such intricate processes, my own sewing skills, though adequate, often require basic, clear directions. This tutorial provided just that, empowering me to recreate a cherished memory on my own. My creative journey began with gathering materials, meticulously outlining the pattern, and carefully cutting the fabric. I started by sketching the pattern onto newspaper, then using it to cut my fabric pieces – each representing one-quarter of the final tree skirt, perfectly laying the groundwork for this exciting project.

Understanding the Enduring Charm of the Dresden Plate Pattern
The Dresden Plate quilt block, with its distinctive fan-like or spoke-of-a-wheel appearance, has been a beloved design in quilting for centuries. Named after the intricate porcelain work of Dresden, Germany, this pattern radiates a classic elegance that never goes out of style. It’s created by piecing together several wedge-shaped fabric pieces, or “spokes,” around a central circle or raw edge, forming a striking radial design. When adapted for a Christmas tree skirt, its circular nature and the dynamic movement of its “spokes” lend themselves perfectly to creating a festive focal point beneath your tree.
What makes the Dresden Plate particularly appealing for a tree skirt is its versatility. You can opt for a vibrant mix of holiday prints, a sophisticated palette of solids, or a harmonious blend of both. The outer edges of the wedges can be finished in various ways – pointed tips create a sharp, star-like effect, while rounded edges offer a softer, scalloped look. This adaptability allows each quilter to infuse their personal style into their creation, ensuring a truly unique piece of holiday decor.
Essential Materials for Your Quilted Tree Skirt Project
Before you dive into the joyful process of piecing and quilting, ensure you have all the necessary supplies on hand. Having everything ready will make your crafting experience much smoother and more enjoyable:
- Quilting Cotton Fabrics:
- Various coordinating prints and solids for the Dresden wedges (consider a mix of festive colors, reds, greens, golds, whites).
- A larger piece for the backing of the tree skirt (something durable and attractive, as it might show).
- Fabric for the binding (usually a contrasting or complementary color to frame your design).
- Batting: A layer of cotton or polyester batting to give your tree skirt structure, warmth, and the characteristic quilted puffiness. Choose a medium loft for a good balance.
- Thread: High-quality cotton thread in a neutral color (like white or cream) for piecing, and matching or contrasting colors for quilting the Dresden panels.
- Basic Sewing Supplies:
- Sewing machine (in good working order!).
- Rotary cutter with a sharp blade.
- Self-healing cutting mat.
- Quilting rulers (especially a long ruler and a square ruler).
- Pins or fabric clips.
- Fabric scissors.
- Iron and ironing board (pressing is key in quilting!).
- Dresden Plate Ruler or Template: While I initially used newspaper for my template, a dedicated Dresden Plate ruler or a printable template will ensure precise wedge cuts. These rulers often have markings for various sizes and pointed or rounded ends.
- Fabric Marking Tool: A disappearing fabric pen, chalk, or a fine-line fabric pencil for marking lines on your fabric.
- Basting Supplies: Safety pins (curved basting pins are excellent) or basting spray to secure the quilt sandwich (top, batting, backing) before quilting.
- Closure Mechanism: Velcro strips, fabric ties, or buttons to secure the tree skirt around the tree base.
Step-by-Step Guide to Crafting Your Dresden Tree Skirt
Once your materials are gathered, the real fun begins! Follow these detailed steps to bring your quilted Christmas tree skirt to life:
1. Prepare Your Fabrics
Wash, dry, and thoroughly press all your fabrics. This pre-shrinks them and ensures a smooth, wrinkle-free surface for cutting and sewing.
2. Create Your Dresden Wedge Template
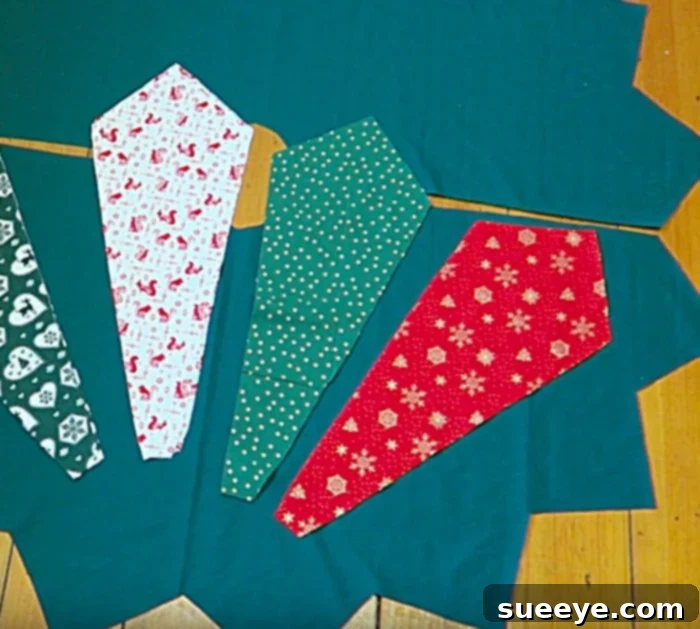
If you don’t have a Dresden Plate ruler, you can easily create one. Determine the desired size of your tree skirt and the inner circle opening for the tree trunk. Based on these measurements, draw a wedge shape on newspaper or cardstock. A standard Dresden Plate typically uses 16-20 wedges for a full circle; for a tree skirt, you’ll be making a large C-shape. Ensure your template accounts for a seam allowance (usually ¼ inch) on all sides.
3. Cut Your Dresden Wedges
Using your template or ruler, carefully cut out your fabric wedges. For a visually appealing skirt, alternate different prints and solids from your chosen fabric collection. Precision here is crucial for a beautifully finished project.
4. Assemble the Dresden Panel
Take two wedge pieces and place them right sides together, aligning the raw edges. Sew along one side edge with a ¼-inch seam allowance. Press the seam open or to one side (experiment to see which gives a flatter finish). Continue adding wedges in this manner until you have assembled a long, curved strip that will form the main Dresden panel of your tree skirt. Remember to leave a gap in your circle for the skirt opening.
5. Finish the Outer Edges of the Wedges
For a clean finish, you’ll need to turn under and topstitch the outer edges of each wedge. If your wedges have pointed tips, fold the tip down and sew across to create a sharp point before turning right side out. If they are rounded, simply fold the raw edge under twice and topstitch. This step creates the beautiful defined edges of the Dresden Plate.
6. Prepare the Backing and Batting
Cut your backing fabric and batting slightly larger (about 2-3 inches on all sides) than your assembled Dresden panel. Layer them smoothly on a flat surface: first the backing fabric (wrong side up), then the batting, and finally your Dresden panel (right side up) centered on top.
7. Baste the Quilt Sandwich
Securely baste the three layers together using safety pins or basting spray. This prevents shifting during the quilting process, ensuring a smooth and even finish.
8. Quilt the Dresden Panel
With your sewing machine, quilt through all three layers. You can choose “stitch-in-the-ditch” (sewing along the seam lines of your wedges), outline quilting (sewing a small distance from the seams), or free-motion quilting for more elaborate designs. This step adds texture, secures the layers, and gives your skirt its “quilted” look.
9. Trim and Shape the Skirt
Once quilted, carefully trim the excess batting and backing fabric, shaping the outer edge of your tree skirt to be perfectly circular (or whatever shape you chose). Also, cut out the inner circle for the tree trunk, ensuring it’s large enough to accommodate your tree stand.
10. Create the Skirt Opening
Along the straight opening of your tree skirt (where the C-shape begins and ends), fold under the raw edges twice and topstitch to create a neat, finished opening. This will be where you add your closure.
11. Attach the Binding
Cut long strips of binding fabric (typically 2 ¼ inches wide) and sew them together to create one continuous strip long enough to go around the entire outer edge and inner edge of your tree skirt. Attach the binding to the raw edges using your preferred method (either machine-sewn or hand-finished for a pristine look). The binding frames your beautiful Dresden design and provides a durable, polished finish.
12. Add Your Closure
Finally, sew Velcro strips, fabric ties, or buttons along the finished opening of your tree skirt to allow it to be securely wrapped around the base of your Christmas tree.
Tips for a Flawless Finish
- Precision Pays Off: In quilting, accuracy in cutting and a consistent ¼-inch seam allowance are paramount. Take your time with these initial steps.
- Pressing is Your Friend: Pressing seams as you go, rather than waiting until the end, makes a huge difference in the flatness and professionalism of your finished quilt.
- Fabric Choices: Don’t be afraid to experiment with different fabric combinations. A mix of large and small prints, along with solids, can create a visually dynamic Dresden Plate.
- Needle & Thread: Use a sharp, new needle in your sewing machine, appropriate for quilting, and good quality cotton thread for best results.
- Take Breaks: Quilting can be a marathon, not a sprint. Step away when you feel frustrated; a fresh perspective often solves minor issues.
The Enduring Joy of a Handmade Christmas
And there it was! Once I sewed the whole thing together, the Dresden Pattern Quilted Tree Skirt looked absolutely amazing. The satisfaction of seeing the vibrant fabrics come together in that classic design was immense. It wasn’t just a tree skirt; it was a testament to perseverance, a new beginning, and a link to cherished memories. When my Mom saw it, her reaction was priceless. She expressed such pride, not just in the beautiful finished product, but in the fact that I had created it entirely myself. That validation, that shared joy, truly encapsulated the spirit of the season.
Creating something with your own hands for Christmas adds an unparalleled layer of meaning to the holiday season. This Dresden Quilted Christmas Tree Skirt is more than just a decorative item; it’s a new memory, a new tradition, born from a moment of challenge. It stands as a beautiful reminder of the power of creativity and the joy of a handmade Christmas. I hope this detailed tutorial inspires you to embark on your own quilting adventure. Discover the simple pleasure and immense reward of crafting a truly unique and sentimental piece for your home this holiday season. Happy quilting!