
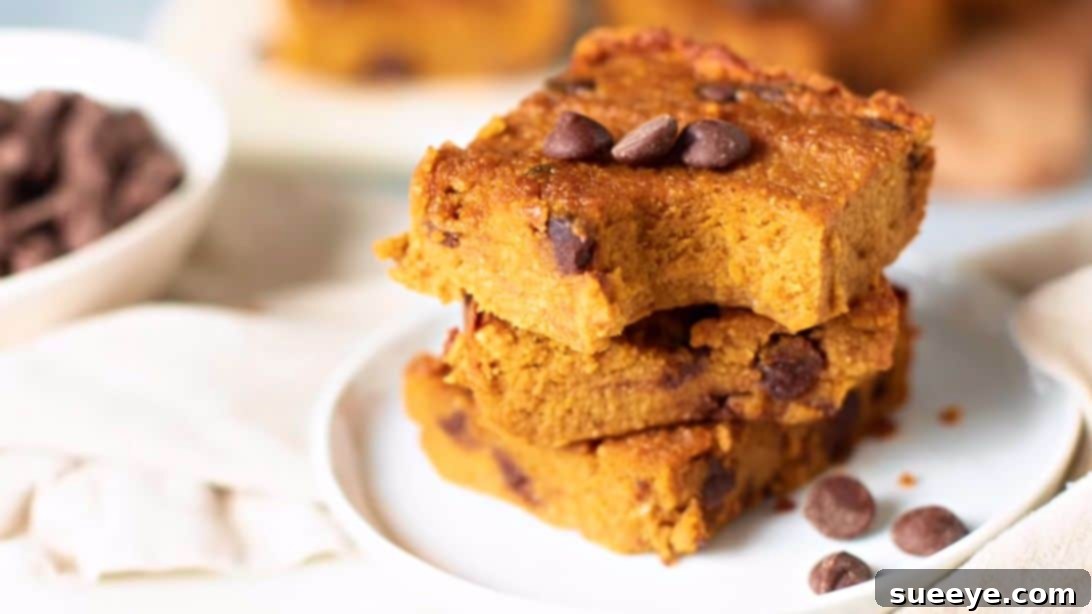
Easy & Healthy One-Bowl Pumpkin Pie Bars: Your New Fall Favorite (Gluten-Free & Grain-Free)
As autumn leaves begin to fall and a crisp coolness fills the air, the comforting aroma of pumpkin spice becomes an irresistible invitation to indulge in the season’s delights. From bustling coffee shops to quaint bakeries, pumpkin-infused treats abound, each promising warmth and satisfaction. While store-bought options offer convenience, there’s an unparalleled joy and sense of accomplishment in crafting homemade desserts. This fall, why not trade the pre-made for a truly exceptional, wholesome, and incredibly easy pumpkin treat? We’re thrilled to share a recipe for **One-Bowl Pumpkin Pie Bars** that perfectly embodies the spirit of the season: healthy, delicious, and wonderfully simple to make.
Inspired by the culinary wisdom of Clean & Delicious on YouTube, these bars boast a lusciously smooth, custard-like texture that makes them ideal for any time of day – whether as a wholesome breakfast, a satisfying snack, or a delightful dessert. What makes them even better? They are naturally gluten-free and grain-free, offering a lighter alternative without compromising on flavor or the rich, comforting experience. Prepare to captivate your family and friends with these irresistible pumpkin delights, all whipped up in just four simple steps. Get ready to embrace the joy of healthy, happy baking!
Wholesome Ingredients for Your Healthy Pumpkin Pie Bars
Crafting these delectable **One-Bowl Pumpkin Pie Bars** begins with a selection of wholesome ingredients designed to deliver maximum flavor and nutrition with minimal fuss. Each component plays a crucial role in achieving that perfect, comforting texture and autumnal spice profile, making them a standout among healthy fall recipes.
The Essential Line-Up:
- 15-ounce can of pumpkin puree: The undisputed star of the show! Ensure you’re using 100% pure pumpkin puree, not pumpkin pie filling, which often contains added sugars and spices that would alter our recipe’s balanced profile. Pumpkin provides a rich, earthy flavor and a wealth of vitamins (especially Vitamin A) and fiber, contributing significantly to the bars’ moistness and vibrant color.
- 3/4 cup of coconut flour: Our chosen flour for a naturally gluten-free and grain-free experience. Coconut flour is exceptionally absorbent, so a little goes a long way. It imparts a subtle natural sweetness and a wonderfully soft, tender texture while being packed with beneficial fiber.
- 1/2 cup of maple syrup: A fantastic natural sweetener that pairs exquisitely with pumpkin. Pure maple syrup adds a distinct caramel-like note and helps us keep these bars refined sugar-free. You can adjust the amount slightly (a tablespoon more or less) to perfectly suit your preferred sweetness level.
- 1/4 cup of almond milk: Contributes to the creamy consistency of the batter and helps bind all the ingredients together smoothly. Feel free to use unsweetened dairy milk or any other plant-based milk you prefer, such as oat, cashew, or soy milk.
- 2 large eggs: Act as a vital binder, providing structure and contributing significantly to the rich, custard-like texture that makes these bars so appealing. For an egg-free or vegan alternative, you might experiment with flax eggs (2 tbsp ground flaxseed mixed with 6 tbsp water, let sit for 5 mins), though please note the texture may vary slightly.
- 1 teaspoon of vanilla extract: A crucial flavor enhancer that adds a warm, aromatic depth, beautifully complementing and rounding out the spice profile.
- 1 teaspoon of pumpkin pie spice: The quintessential fall flavor blend! This aromatic mix typically includes cinnamon, nutmeg, ginger, and cloves, delivering that beloved autumnal warmth in every bite.
- 1 teaspoon of ground cinnamon: An additional touch of cinnamon deepens the overall spice notes and infuses your kitchen with a wonderfully comforting aroma as the bars bake.
- 1/4 teaspoon of kosher salt: A seemingly small but mighty ingredient. Salt is crucial for balancing the sweetness and enhancing the full spectrum of flavors in the bars. Don’t skip this essential flavor amplifier!
- 1/2 teaspoon of baking soda: This leavening agent helps the bars rise slightly and achieve a tender crumb, ensuring they aren’t too dense and have a pleasant, light mouthfeel.
- 1/3 cup of chocolate chips: A delightful optional addition for a touch of melty sweetness and texture. Dark chocolate chips are an excellent choice for a healthier twist, adding antioxidants without excessive sugar.
Customization Corner: Your Favorite Mix-Ins & Swaps!
While chocolate chips are always a crowd-pleaser, these **healthy pumpkin pie bars** are incredibly versatile and welcome your personal touch. Feel free to unleash your creativity and swap them out, or add to them, with other delicious inclusions:
- Dried cranberries: For a tart burst of flavor and a beautiful festive color.
- Shredded coconut (unsweetened): Adds a tropical hint and delightful textural interest.
- Pecans or walnuts (finely chopped): For a satisfying crunch, nutty richness, and healthy fats.
- White chocolate chips: For a sweeter, creamier contrast that pairs wonderfully with pumpkin.
- Crystallized ginger (finely diced): For a warm, sweet, and spicy kick that elevates the flavor profile.
- Sunflower or pumpkin seeds: For an added nutritional boost and subtle crunch.
Don’t hesitate to combine a few of these options to create your unique signature pumpkin bar! The goal is to make these **gluten-free pumpkin bars** uniquely yours and perfectly suited to your taste preferences.
Simple Steps to Baking Your One-Bowl Pumpkin Pie Bars
Creating these delectable **One-Bowl Pumpkin Pie Bars** is a testament to the beauty of simplicity in baking. With just four straightforward steps, you’ll go from raw, wholesome ingredients to a batch of flavorful, healthy bars perfect for sharing or enjoying solo. This streamlined process makes fall baking effortless and enjoyable, even for novice bakers.
Step 1: Prepare Your Oven and Baking Dish for Success
Begin by preheating your oven to a precise **350 degrees F (175 degrees C)**. This crucial first step ensures that your oven reaches and maintains the correct temperature, allowing the bars to bake evenly and set properly from the moment they enter. Baking in a properly preheated oven is essential for consistent results. While the oven warms up, prepare an **8 x 8 inch (20 x 20 cm) baking dish**. Generously grease the dish with your choice of **coconut oil, melted butter, or a non-stick cooking spray**. Adequate greasing is paramount to preventing the bars from sticking, ensuring a clean release and perfectly formed squares once they’ve cooled. For an even easier removal, consider lining the bottom and sides of the dish with parchment paper, leaving an overhang on the sides to create “handles” for lifting the cooled bars out effortlessly.
Step 2: The Magic of One-Bowl Mixing – Combine and Stir
This is where the ‘one-bowl’ convenience truly shines! Grab a **large mixing bowl** – one spacious enough to comfortably accommodate all your ingredients without spillage. Into this bowl, add the following: the entire 15-ounce can of **pumpkin puree**, the finely milled **coconut flour**, the golden **maple syrup**, creamy **almond milk**, the two **eggs**, fragrant **vanilla extract**, the comforting blend of **pumpkin pie spice**, aromatic **ground cinnamon**, a pinch of **kosher salt**, and the leavening agent, **baking soda**. Using a sturdy whisk or a rubber spatula, mix all these ingredients thoroughly until they are **well combined and smooth**. It’s important to ensure there are no dry pockets of flour and that the batter has a consistent, uniform color and texture – a beautiful, vibrant orange. Once your base batter is perfectly blended, it’s time for the delightful mix-ins. Gently stir in your **1/3 cup of chocolate chips** or your preferred alternative from our customization suggestions (like dried cranberries or chopped nuts). Be careful not to overmix at this stage; just fold them in until they are evenly distributed throughout the batter. Overmixing can sometimes lead to a tougher texture, especially with gluten-free flours.
Step 3: Transfer and Even Out for Optimal Baking
With your perfectly mixed, aromatic batter ready, carefully **transfer it into your prepared 8×8 inch baking dish**. Use a rubber spatula to scrape out all the batter from the bowl, ensuring no deliciousness is left behind. Once all the batter is in the dish, use the back of your rubber spatula or an offset spatula to **evenly spread and flatten the top surface**. Take your time to ensure the batter is distributed from edge to edge and has a uniform thickness across the entire dish. This step is crucial for even baking, preventing some areas from being undercooked while others are perfectly set. A smooth, even top also contributes to a more appealing final product, creating a beautiful canvas for slicing and any optional toppings you might add after baking.
Step 4: Bake, Cool, Chill, and Savor!
Gently place your baking dish into the **preheated 350-degree F (175 degrees C) oven**. Allow the **pumpkin pie bars to bake for approximately 45 minutes**. Baking times can vary slightly depending on your specific oven and the exact depth of your batter, so it’s always wise to keep an eye on them. You’ll know they are perfectly baked when the center is set (a toothpick inserted into the middle comes out clean or with moist crumbs, but no wet batter) and the edges are lightly golden brown. The top might also develop a few subtle cracks, which is completely normal for a custard-like dessert and a sign of proper setting. Once baked, carefully remove the dish from the oven and place it on a wire rack to **cool completely at room temperature**. This cooling period is absolutely crucial for the bars to firm up and fully set their structure. Do not rush this step, as trying to cut them warm will likely result in crumbly, messy bars. After cooling for at least 1-2 hours, the real magic happens in the refrigerator. **Refrigerate the pumpkin pie bars for a minimum of eight hours, or ideally overnight.** Chilling allows the flavors to meld beautifully, the spices to deepen, and the custard texture to fully set, making them much easier to cut into clean, elegant squares and significantly enhancing their overall taste and texture. Once thoroughly chilled, use a sharp knife (running it under hot water and wiping dry between cuts can help) to **cut them into neat squares**, much like brownies. These **healthy, gluten-free pumpkin pie bars** are truly at their best when served cold, allowing their rich, spiced flavors and smooth, creamy texture to shine. Serve them as a festive and wholesome breakfast, a satisfying mid-day treat, or a delightful dessert. Enjoy every wholesome, flavorful bite!
Why You’ll Fall in Love with These One-Bowl Pumpkin Pie Bars
These isn’t just another pumpkin recipe; these **One-Bowl Pumpkin Pie Bars** are a game-changer for anyone seeking a delightful, healthy, and easy-to-make fall treat. Here’s why they’re destined to become a staple in your autumn baking repertoire:
- Effortless One-Bowl Preparation: Say goodbye to stacks of dirty dishes! The beauty of this recipe lies in its simplicity. All the wet and dry ingredients come together in a single bowl, making cleanup a breeze and the baking process quick and stress-free.
- Healthy Indulgence: Crafted with wholesome ingredients like pumpkin puree, coconut flour, and natural maple syrup, these bars offer a guilt-free way to enjoy your favorite fall flavors. They’re significantly lighter and more nutritious than traditional pumpkin desserts, making them perfect for those mindful of their diet.
- Gluten-Free & Grain-Free: Ideal for individuals with dietary restrictions or those simply looking to reduce their gluten and grain intake. Coconut flour provides a fantastic alternative, ensuring everyone can enjoy a slice of fall comfort.
- Versatile for Any Occasion: Whether you need a quick grab-and-go breakfast, a satisfying mid-afternoon snack, or an elegant dessert to share with guests, these pumpkin bars fit the bill. Their rich flavor and pleasant texture make them suitable for any time of day.
- Rich, Custard-Like Texture: Unlike dense cake-like bars, these pumpkin pie bars boast a wonderfully smooth, almost custard-like consistency that melts in your mouth. The chilling process enhances this unique and appealing texture.
- Perfectly Spiced Fall Flavors: The combination of pumpkin puree, pumpkin pie spice, and extra cinnamon creates a symphony of classic autumnal flavors that are both comforting and invigorating.
- Kid and Family-Friendly: The delicious taste and appealing texture make these bars a hit with kids and adults alike. They’re a great way to sneak in some wholesome ingredients while still providing a treat.
Tips for Perfect Pumpkin Pie Bars Every Time
While this recipe is incredibly straightforward, a few expert tips can help ensure your **healthy pumpkin pie bars** turn out absolutely perfect, maximizing their flavor and texture.
- Choose the Right Pumpkin: Always use 100% pure canned pumpkin puree, not pumpkin pie filling. The latter contains added sugar, spices, and sometimes other ingredients that will throw off the carefully balanced flavors and sweetness of this recipe.
- Measure Coconut Flour Accurately: Coconut flour is notoriously absorbent. Measuring it precisely is crucial. Too much can lead to a dry, crumbly bar, while too little might result in a batter that’s too wet. Always spoon and level it, or weigh it with a kitchen scale if possible.
- Don’t Overmix the Batter: While you want everything well combined, avoid vigorous or prolonged mixing after the ingredients are just incorporated. Overmixing can develop any latent gluten (even in gluten-free recipes, sometimes minor proteins can react) or lead to a denser texture.
- The Importance of Cooling & Chilling: This cannot be stressed enough! Allowing the bars to cool completely at room temperature, then chilling them thoroughly in the refrigerator for at least 8 hours (or overnight), is vital. This process allows the custard to fully set, the flavors to meld and deepen, and makes the bars firm enough to cut into clean, perfect squares. Patience is key for optimal texture.
- Check Your Oven Temperature: Ovens can vary. If you find your baking times are consistently different from recipes, consider using an oven thermometer to ensure your oven is truly preheating to the stated temperature. This consistency will improve all your baking endeavors.
- Adjust Sweetness to Taste: The 1/2 cup of maple syrup provides a moderate sweetness that complements the pumpkin beautifully. If you prefer a slightly sweeter bar, you can add an extra tablespoon or two of maple syrup. Taste the batter before adding eggs, if comfortable doing so.
Creative Customization Ideas for Your Pumpkin Bars
These **gluten-free pumpkin pie bars** are a fantastic base for culinary creativity. Once you’ve mastered the basic recipe, feel free to experiment with these ideas to make them uniquely yours!
- Nutty Additions: Beyond pecans and walnuts, consider chopped almonds, cashews, or even toasted pumpkin seeds (pepitas) mixed into the batter for added crunch and healthy fats.
- Spice It Up: Enhance the existing spice profile by adding a pinch of ground ginger, nutmeg, or allspice. A tiny dash of cardamom can also add an unexpected, sophisticated twist.
- Citrus Zest: A teaspoon of finely grated orange or lemon zest can brighten the flavors beautifully, offering a subtle counterpoint to the rich pumpkin and spices.
- Cream Cheese Swirl: For an extra decadent touch, dollop small spoonfuls of softened cream cheese (sweetened with a touch of maple syrup and vanilla) onto the batter before baking. Use a knife to gently swirl it through for a marbled effect.
- Flavor Extracts: Experiment with a few drops of rum extract or almond extract for different aromatic notes, enhancing the depth of flavor.
- Seasonal Toppings: After baking and chilling, consider a light dusting of powdered sugar (or a sugar-free alternative), a drizzle of homemade caramel sauce, a dollop of coconut whipped cream, or a sprinkle of toasted shredded coconut or finely chopped nuts just before serving.
Serving and Storage Suggestions
These **healthy pumpkin bars** are incredibly versatile, perfect for various occasions and easy to store, ensuring you can enjoy them for days.
Serving:
- Chilled & Plain: They are truly at their best when served cold, allowing their texture to be firm and their flavors fully developed.
- With a Dollop of Cream: A spoonful of coconut whipped cream (for a dairy-free option) or traditional whipped cream adds a luxurious touch.
- Aromatic Companions: Pair them with a warm cup of coffee, spiced tea, or a comforting mug of hot apple cider for the ultimate fall experience.
- As a Dessert Platter Addition: Cut into smaller, bite-sized squares and arrange them on a dessert platter for gatherings, alongside other seasonal treats.
Storage:
- Refrigerator: Store leftover **pumpkin pie bars** in an airtight container in the refrigerator for up to 5-7 days. The cold helps maintain their texture and freshness.
- Freezer: These bars freeze wonderfully! Once completely cooled and chilled, cut them into individual squares. Place them in a single layer on a baking sheet and freeze until firm (about 2 hours). Then, transfer the frozen bars to a freezer-safe airtight container or zip-top bag, separating layers with parchment paper to prevent sticking. They can be stored in the freezer for up to 2-3 months. Thaw them in the refrigerator overnight or at room temperature for an hour before serving.
The Nutritional Power of Pumpkin
Beyond its delicious taste and comforting aroma, pumpkin is a nutritional powerhouse, making these **healthy pumpkin pie bars** a truly wholesome treat. Incorporating pumpkin into your diet offers a myriad of health benefits:
- Rich in Vitamin A: Pumpkin is an excellent source of beta-carotene, which your body converts into Vitamin A. This vitamin is crucial for healthy vision, immune function, and skin health.
- High in Antioxidants: Packed with antioxidants like beta-carotene, alpha-carotene, and beta-cryptoxanthin, pumpkin helps neutralize free radicals in your body, potentially reducing the risk of chronic diseases.
- Good Source of Fiber: The fiber content in pumpkin promotes digestive health, helps regulate blood sugar levels, and contributes to a feeling of fullness, which can aid in weight management.
- Immune System Support: The abundance of Vitamin C, along with other vitamins and minerals, strengthens your immune system, helping your body ward off illnesses, especially during the colder months.
- Heart Health Benefits: Potassium, Vitamin C, and fiber in pumpkin all contribute to heart health by helping to manage blood pressure and cholesterol levels.
Enjoying these **gluten-free, grain-free pumpkin bars** means you’re not just indulging in a seasonal delight, but also nourishing your body with powerful nutrients.
Frequently Asked Questions About One-Bowl Pumpkin Pie Bars
- Q: Can I use fresh pumpkin puree instead of canned?
- A: Absolutely! If you have fresh pumpkin on hand, you can make your own puree. Just ensure it’s well-drained to avoid adding excess moisture to the batter, which could alter the texture of the bars. The consistency should be similar to canned puree.
- Q: Is there a substitute for coconut flour?
- A: Coconut flour is unique due to its high absorbency and high fiber content. Substituting it directly with other flours (like almond or oat flour) will require significant adjustments to the liquid ratios, as they behave very differently. For a truly gluten-free and grain-free result with a similar texture, sticking to coconut flour is recommended for this specific recipe.
- Q: Can I make these bars vegan?
- A: To make them vegan, you would need to replace the eggs. Flax eggs (2 tbsp ground flaxseed mixed with 6 tbsp water, let sit for 5 mins) are a common substitute. However, the texture might be slightly less custard-like and a bit denser. Ensure all other ingredients, like chocolate chips, are also vegan-friendly.
- Q: How can I make them less sweet?
- A: You can reduce the maple syrup by 1-2 tablespoons if you prefer a less sweet bar. The recipe provides a balanced sweetness that highlights the pumpkin and spices, but personal preference varies.
- Q: Why do I need to chill the bars for so long?
- A: Chilling is crucial for two main reasons: it allows the custard-like texture to fully set and firm up, making the bars easier to cut into clean squares, and it allows the flavors of the pumpkin and spices to meld and deepen, resulting in a more delicious and cohesive taste. Don’t skip this step!
- Q: Can I add nuts to the top before baking?
- A: Yes, you can sprinkle chopped nuts (like pecans or walnuts) on top of the batter before baking for an added textural element and beautiful presentation. Just ensure they don’t burn towards the end of the baking time.