
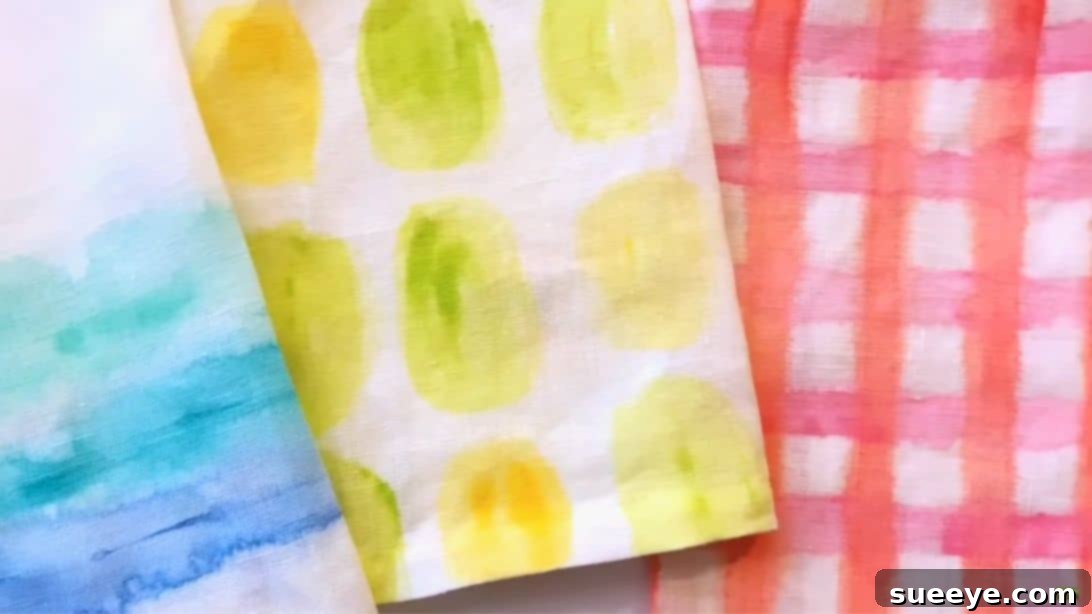
DIY Hand-Painted Tea Towels: Unleash Your Creativity with Custom Designs
Transform ordinary tea towels into personalized works of art! Hand-painting tea towels is a wonderfully relaxing and rewarding craft that offers a fantastic creative outlet. Whether you’re looking for a new pastime, a unique gift idea, or simply want to add a touch of handmade charm to your home, this guide will walk you through everything you need to know. Dive into the world of fabric painting and discover how easy it is to create stunning, one-of-a-kind pieces. You can experiment with an endless array of colors and patterns, but if you’re seeking inspiration, we’ll explore three beautiful designs inspired by the creative minds at JOANN Fabric and Craft Stores. These personalized tea towels make perfect thoughtful gifts for friends, family, or even yourself! Read on to learn the full instructions and unleash your inner artist.
Essential Materials for Your Tea Towel Project
Before you embark on your fabric painting journey, gathering the right supplies is crucial. Quality materials will ensure your designs come out vibrant, durable, and professional-looking. Here’s a comprehensive list of what you’ll need, along with some helpful tips for selection:
- Tea Towels: The canvas for your creations! If you don’t have traditional tea towels, don’t worry. You can easily substitute them with flour sacks, plain cotton napkins, or even pre-washed cotton fabric. Opt for light-colored, natural fiber fabrics for the best paint adhesion and color vibrancy. Always pre-wash and dry your fabric without fabric softener to remove any sizing that might prevent paint from absorbing properly.
- Fabric Paint: This is specially formulated to adhere to fabric and withstand washing without fading or cracking. Available in a vast spectrum of colors, fabric paints come in various finishes like opaque, translucent, metallic, or glitter. Choose colors that complement your home decor or reflect the personality of your gift recipient.
- Paintbrushes: You’ll need at least two – one for applying water and one for paint. However, having a variety of brush sizes and shapes (flat, round, fine-tipped) will give you more flexibility with your designs. Consider a wider brush for broad strokes and a finer one for details.
- Painter’s Tape: An indispensable tool for creating crisp, clean lines and geometric patterns. High-quality painter’s tape will prevent paint bleed and peel off cleanly without damaging your fabric. You might want different widths for various design elements.
- Water Cups: Essential for diluting paint (especially for watercolor effects) and cleaning your brushes. Have at least two: one for rinsing brushes and another for clean water when needed.
- Water: For rinsing brushes and diluting paints.
- Newspaper or Drop Cloth: Protect your workspace from accidental spills and paint splatters. Lay down several layers of newspaper, a plastic sheet, or an old tablecloth beneath your tea towel.
- Cardboard Insert: Place a piece of cardboard or plastic sheet inside the tea towel before painting to prevent the paint from bleeding through to the other side.
- Iron (Optional but Recommended): For heat-setting your fabric paint once it’s dry. This step is vital for ensuring the paint is permanent and washable.
- Fabric Medium (Optional): If you’re using acrylic paints, a fabric medium can be mixed in to make them suitable for fabric, improving their flexibility and washability. Always check product instructions.
- Stencils/Stamps (Optional): For creating more intricate or repetitive patterns. You can buy pre-made stencils or create your own from freezer paper or cardstock.
With your materials ready, ensure your workspace is well-lit and comfortable. Lay out your pre-washed tea towel flat and smooth, with a protective barrier underneath to prevent bleed-through. You are now ready to unleash your creativity!
Three Creative Hand-Painted Tea Towel Designs
Let’s dive into some inspiring design ideas that are perfect for beginners and seasoned crafters alike. Each technique offers a unique aesthetic, allowing you to create truly distinctive tea towels.
1. Serene Watercolor Stripes: The “Wet on Wet” Technique
Embrace the beauty of flowing colors with this elegant watercolor stripe design. This technique, often referred to as “wet on wet,” is incredibly satisfying and produces soft, diffused lines that evoke a sense of calm and sophistication.
Instructions:
- Prepare Your Palette: Select three complementary shades of blue (or any color family you prefer – think gradients of green, soft pinks, or earthy browns). Pour a small amount of each fabric paint color into separate palettes or shallow dishes. Fill three water cups: one for clear water, and two for mixing specific paint dilutions.
- Create the Wet Base: Dip one paintbrush (preferably a wider, flat brush) into clean water. Starting just above the bottom edge of your tea towel, create a horizontal line of clear water. Ensure the fabric is thoroughly damp along this line, but not soaking wet. This “wet” base is key to the technique.
- Apply the Darkest Shade: With your second paintbrush (a clean one), dip it into your darkest shade of blue paint, then lightly into one of the water cups. This dilutes the paint slightly, enhancing the watercolor effect. Gently apply this diluted paint along the wet line you just created. Watch as the color beautifully spreads and blends into the water, creating a soft, feathered edge.
- Add Lighter Shades: Repeat the process with your next lighter shade of blue, creating a parallel stripe directly above the first. Ensure there’s a slight overlap with the previous wet area to encourage blending. Finish with your lightest shade, creating the final stripe.
- Define Edges (Optional): For a crisper edge, you can use painter’s tape to mark off your stripe area before wetting the fabric. Once the tape is down, apply the water and then the paint. Carefully remove the tape while the paint is still damp for the cleanest lines.
- Mirror the Design: For a balanced look, repeat the entire process on the opposite edge of the tea towel, creating a symmetrical design.
- Allow to Dry Thoroughly: Let your beautifully painted stripes dry completely flat. This can take several hours, depending on the paint’s thickness and humidity. Once dry, proceed to heat-set the paint according to the fabric paint manufacturer’s instructions, typically by ironing the painted area on the reverse side or through a pressing cloth.
The “wet on wet” technique allows the colors to naturally flow and blend, giving your tea towels a delicate, artistic appeal. Experiment with different color combinations and stripe widths to discover your favorite looks.
2. Charming Gingham Check Inspired: Geometric Precision
The timeless appeal of gingham gets a hand-painted twist! This design brings a classic, cozy feel to your tea towels and allows for precise lines, whether you opt for hand-painting or a DIY stencil.
Instructions:
- Choose Your Colors: For a traditional gingham look, use two contrasting colors like pink and red, or classic blue and white. For a modern take, consider pairing a bold color with a neutral. Prepare your paints in two separate cups, diluted slightly with water for a translucent effect if desired, similar to true gingham fabric.
- Prepare for Stenciling (Optional but Recommended): For the cleanest, most consistent gingham pattern, creating a DIY stencil with painter’s tape is highly effective.
- Step 2a (Tape Method): Apply strips of painter’s tape vertically across your tea towel, ensuring they are evenly spaced. The width of your tape and the gaps between them will determine the size of your gingham squares. Press the tape down firmly to prevent any paint bleed.
- Step 2b (Hand Painting Method): If freehanding, use a ruler and a disappearing fabric marker or light pencil to lightly sketch your vertical lines first, ensuring even spacing.
- Paint Vertical Lines: Using your first chosen color (e.g., orange/red), carefully paint within the taped off areas or along your marked lines to create vertical stripes. Aim for an even application of paint. For a deeper color and saturation, you can apply a second thin coat after the first has slightly dried.
- Allow to Dry Partially: Let the vertical stripes dry for about 30-60 minutes, or until touch-dry. If you used tape, do not remove it yet.
- Create Horizontal Lines: Once the vertical lines are partially dry, turn your tea towel 90 degrees. If using the tape method, apply new strips of painter’s tape horizontally, crossing over your existing vertical stripes. Make sure the spacing is consistent with your vertical lines to form squares. If hand painting, sketch your horizontal lines.
- Paint Horizontal Lines: Using your second chosen color (e.g., pink), paint within these new horizontal taped areas or along your marked lines. Where the two colors overlap (or where the same color overlaps itself if using one color with varying intensity), you will get a darker shade, creating the characteristic gingham pattern.
- Remove Tape and Dry: Carefully peel off all painter’s tape while the paint is still slightly damp (but not wet) to reveal crisp lines. This helps prevent the paint from peeling with the tape. Let the entire design dry completely flat for several hours.
- Heat-Set: Once fully dry, heat-set the paint by ironing on the reverse side or using a pressing cloth, following the paint manufacturer’s instructions.
This method allows for great control over your pattern, resulting in a neat and eye-catching gingham design that’s perfect for any kitchen or as a charming gift.
3. Playful Dot Design: Simple Shapes, Big Impact
Dots are deceptively simple yet incredibly versatile. A dot design can range from classic polka dots to abstract clusters, offering a fun and dynamic way to decorate your tea towels. This pattern is excellent for all skill levels and offers endless customization.
Instructions:
- Choose Your Tools & Colors: For dotting, you have many options: a foam brush, a round paintbrush, a pencil eraser, the back of a paintbrush, or even specialized dotting tools. Select two contrasting or complementary colors like green and yellow for a fresh, vibrant look, or opt for a monochromatic scheme with varying shades. Prepare your paints.
- Start with Your First Color: Dip your chosen dotting tool into the green fabric paint. Begin creating a row of oval or circular shapes across your tea towel. As you place each dot, leave a consistent amount of empty space between them – these will be filled by your second color. Aim for even spacing and pressure for uniform dots.
- Introduce the Second Color: Once your first row of green dots is complete (and still wet or slightly damp, allowing for a slight blend if desired, or completely dry for distinct dots), switch to your yellow paint and fill in the free spaces in the same row. This creates a staggered or alternating pattern.
- Vary the Pattern (Optional): For subsequent rows, experiment with different dot arrangements to add visual interest.
- Offset Rows: In the next row, you could start with the yellow paint, placing the dots in the spaces directly below the green dots of the previous row.
- Varying Sizes: Use different-sized dotting tools to create a mix of large and small dots.
- Random Placement: For a more organic feel, simply scatter dots randomly across the fabric.
- Repeat and Complete: Continue creating rows or clusters of dots until your tea towel is covered to your desired extent. Don’t be afraid to overlap colors slightly for a unique effect.
- Allow to Dry and Heat-Set: Let the entire dot design dry thoroughly, usually several hours. Once completely dry, heat-set the paint according to the manufacturer’s instructions to ensure durability and washability.
The dot design is a fantastic way to introduce color and pattern without requiring advanced artistic skills. It’s forgiving and allows for a lot of personal expression.
Pro Tips for Flawless Fabric Painting
To ensure your hand-painted tea towels look their best and last for years, keep these essential tips in mind:
- Pre-Wash Your Fabric: Always wash and dry your tea towels before painting. This removes any sizing or chemicals that might repel the paint, ensuring better adhesion and preventing future shrinkage that could distort your design. Avoid using fabric softener.
- Protect Your Workspace: Lay down newspaper, a plastic sheet, or an old towel to protect your table or floor from paint spills.
- Insert a Barrier: Place a piece of cardboard, freezer paper (wax side up), or a plastic mat inside the tea towel to prevent paint from bleeding through to the back side.
- Test Your Colors: If possible, test your chosen paint colors and techniques on a scrap piece of the same fabric. This allows you to see how the color will appear and practice your strokes before committing to your tea towel.
- Work in Thin Layers: It’s better to apply multiple thin coats of paint than one thick coat. Thick paint can crack or feel stiff when dry. Thin layers provide better flexibility and adhesion.
- Allow Adequate Drying Time: Patience is key! Ensure each layer of paint (and the final design) is completely dry before handling or moving on to the next step. Rushing can lead to smudges or adhesion issues.
- Heat-Setting is Crucial: This is arguably the most important step for durability. Once your paint is fully dry (usually after 24 hours), follow the fabric paint manufacturer’s instructions for heat-setting. Typically, this involves ironing the painted area on a medium-high setting for a few minutes, either on the reverse side or with a pressing cloth over the design. This process permanently bonds the paint to the fabric fibers, making it washable.
Caring for Your Hand-Painted Tea Towels
Once your beautiful hand-painted tea towels are complete and heat-set, proper care will ensure they remain vibrant and last for a long time:
- Wait Before Washing: Allow at least 48-72 hours after heat-setting before the first wash to give the paint maximum time to cure.
- Gentle Cycle, Cold Water: Wash your tea towels on a gentle cycle with cold water. Hot water can be harsh on fabric paints over time.
- Mild Detergent: Use a mild detergent and avoid harsh chemicals like bleach, which can strip the paint.
- Turn Inside Out: If possible, turn your tea towels inside out before washing to protect the painted design from friction.
- Air Dry or Low Heat: Air drying is best for longevity. If using a dryer, opt for a low heat setting. High heat can weaken the bond of the fabric paint over time.
- Avoid Dry Cleaning: Most fabric paints are not suitable for dry cleaning.
Beyond the Designs: Expanding Your Fabric Painting Horizons
The three designs explored here are just the beginning! Once you’re comfortable with the basics, consider these ideas to take your fabric painting skills to the next level:
- Freehand Fun: If you feel confident, ditch the tape and stencils and try drawing directly onto the fabric with a pencil before painting. Simple doodles, floral motifs, or abstract swirls can create a truly unique piece.
- Stamping Techniques: Use rubber stamps or even natural objects like leaves and potatoes to create stamped patterns. Just apply fabric paint to the stamp and press firmly onto the towel.
- Personalize with Text: Add names, monograms, inspirational quotes, or witty kitchen sayings using fine-tipped brushes or fabric markers. This makes gifts even more special.
- Mixing Mediums: Explore different types of fabric paint – puff paint for 3D effects, metallic paints for sparkle, or glow-in-the-dark paints for fun.
- Expand to Other Items: Don’t limit yourself to tea towels! Apply these techniques to tote bags, pillow covers, t-shirts, aprons, or even canvas shoes for a coordinated look.
Fabric painting is a versatile art form that allows for endless creative expression. Each project is an opportunity to experiment, learn, and create something truly beautiful and functional.