
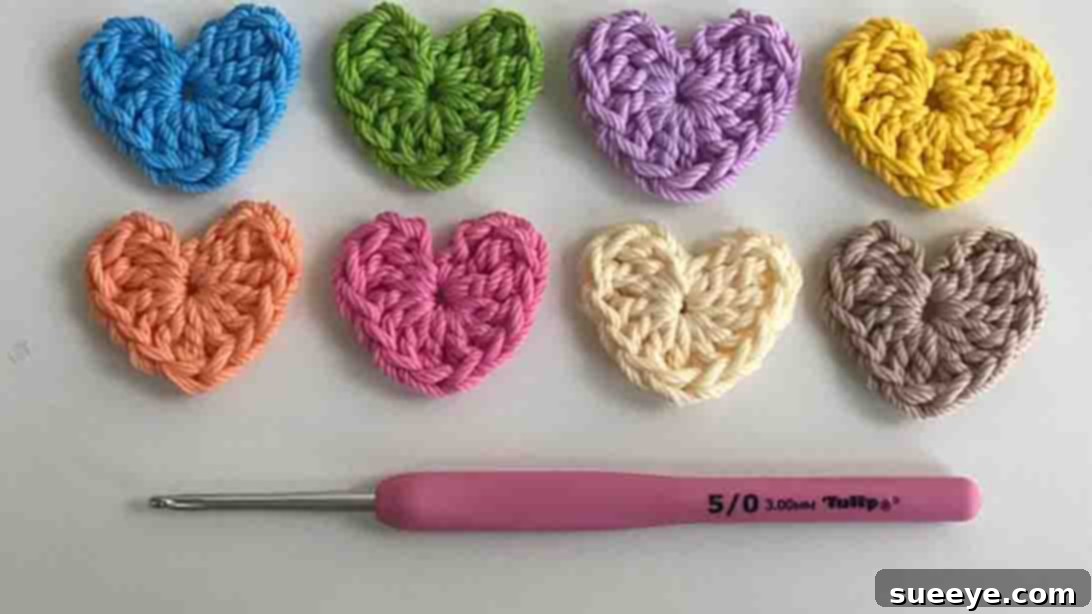
Master the Art of Crochet: Easy Mini Heart Tutorial for Beginners
Embarking on a new craft journey is always exciting, and for many, crocheting offers a delightful blend of creativity, relaxation, and the immense satisfaction of bringing beautiful items to life with just a hook and some yarn. If you’ve ever dreamt of creating charming handmade pieces but felt intimidated by complex patterns, you’re in the perfect place. We understand that starting something new can feel daunting, which is why we’re thrilled to introduce you to a project that’s not only incredibly simple but also immensely rewarding: the mini crochet heart.
This beginner-friendly tutorial will guide you through crafting adorable little hearts that are quick to make, requiring minimal materials, and perfect for learning fundamental crochet stitches. My own journey into the world of crochet began with a similar quest for easy, accessible projects, leading me to discover the wonderful GratiaProject mini heart tutorial on YouTube. It was love at first stitch! In less than ten minutes, I had created my first charming heart, and soon, a colorful collection began to grow. These sweet creations are incredibly versatile and can be used for countless decorative and functional purposes, from embellishing garments to filling decorative jars. If you’re searching for an unintimidating introduction to crocheting, this mini heart project is truly a gem. Follow along as we break down each step, making your first foray into crochet enjoyable and successful.
Why Mini Crochet Hearts Are Perfect for New Crafters
For anyone new to the art of crocheting, choosing the right first project can make all the difference in building confidence and fostering a lasting love for the craft. Mini crochet hearts are an ideal starting point for several compelling reasons:
- Instant Gratification: These hearts work up incredibly fast, often in under 10-15 minutes. This quick turnaround provides an immediate sense of accomplishment, which is crucial for maintaining motivation when learning a new skill.
- Fundamental Stitch Practice: The pattern incorporates several essential crochet stitches – the magic ring, chain stitch, treble crochet, double crochet, and slip stitch. Mastering these basics will equip you with the foundational knowledge for almost any future crochet project.
- Minimal Material Investment: You only need a small amount of yarn and one crochet hook to create these hearts, making it an affordable way to test the waters of crocheting without a significant initial outlay.
- Low Pressure, High Reward: Since they are small and quick, there’s no pressure to achieve perfection on your first try. Each heart offers a chance to refine your technique, and even imperfect ones are undeniably cute!
- Versatility in Use: Once you’ve made a few, you’ll discover endless ways to incorporate them into your life, from simple decorations to thoughtful gifts, adding a personal touch to everything.
Essential Materials for Your Mini Heart Project
One of the beauties of this project lies in its simplicity. You won’t need a vast array of tools or specialty yarns. Just a few basic supplies will get you started on your heart-making journey. Here’s what you’ll need:
Yarn Selection: Your Creative Canvas
- Yarn (color of your choice): For beginners, we highly recommend using a smooth, light-colored worsted weight (or Aran weight) acrylic or cotton yarn.
- Acrylic Yarn: This is a fantastic choice for novices as it’s affordable, widely available, comes in an endless array of colors, and is easy to work with. It’s less prone to splitting than some natural fibers and provides good stitch definition, making it easier to see your work.
- Cotton Yarn: Also a great option, cotton offers a natural feel and good stitch clarity. It might have slightly less stretch than acrylic, but it’s durable and comes in beautiful matte finishes.
- Color Choice: While any color works, starting with a lighter shade will help you distinguish your stitches more easily as you learn. Once you’re comfortable, feel free to experiment with vibrant reds, soft pinks, or even variegated yarns for unique effects.
Crochet Hook: Your Magic Wand
- 3mm Crochet Hook: The hook is your primary tool, and the size determines the tightness and overall size of your stitches. A 3mm hook is a good standard size for the recommended yarn weights, creating a lovely, compact mini heart.
- Hook Material: Hooks come in various materials like aluminum, steel, plastic, or bamboo. Aluminum hooks are a popular choice for beginners due to their smoothness and durability.
- Ergonomics: If you plan to crochet for extended periods, consider hooks with ergonomic handles for added comfort.
Optional Tools for a Smoother Experience
- Scissors: Essential for cutting your yarn tails when finishing your project.
- Tapestry Needle (or Yarn Needle): While not strictly necessary for this super simple project, a tapestry needle is invaluable for weaving in your yarn ends neatly, giving your hearts a professional finish. It has a blunt tip and a large eye, perfect for yarn.
- Stitch Markers: For such a small project, you might not need them, but stitch markers are helpful for marking the beginning of rounds or specific stitches in more complex patterns. They are inexpensive and a great addition to any crafter’s toolkit.
With these few items in hand, you’re ready to transform simple strands of yarn into charming crochet hearts!
Step-by-Step Guide: Crafting Your Adorable Mini Crochet Heart
Let’s dive into the practical steps of creating your mini heart. We’ll break down each instruction, explaining the fundamental stitches as we go. Remember, practice makes perfect, so don’t hesitate to pause, rewind, and repeat sections if you’re watching the video tutorial.
Step 1: The Magic Ring – Your Foundation for Success
The magic ring (also known as a magic circle or adjustable ring) is a fantastic technique that creates a tight, closed center for your crocheted piece, preventing a hole from forming in the middle. It’s often used for projects like amigurumi (crocheted toys) and motifs. Here’s how you start:
- Create a Magic Ring: Wrap the yarn around your fingers (usually index and middle finger) to form a loop. Insert your hook into this loop, yarn over, and pull up a loop. Yarn over again and pull through that loop to create a chain stitch. This secures your magic ring.
- Chain Three (3): From the magic ring, chain three stitches. To make a chain stitch, yarn over your hook and pull the yarn through the loop already on your hook. Repeat this three times. These three chain stitches will count as your first treble crochet (tr) stitch for the purpose of shaping the heart.
- Treble Crochet Two Times (2x): Now, within the magic ring, you will make two treble crochet stitches.
- How to Treble Crochet (tr): Yarn over your hook twice. Insert your hook into the magic ring. Yarn over and pull up a loop (you should have four loops on your hook). Yarn over and pull through the first two loops (three loops remaining). Yarn over and pull through the next two loops (two loops remaining). Yarn over and pull through the last two loops (one loop remaining). You’ve just made one treble crochet! Repeat this one more time to make a total of two treble crochets.
- Double Crochet Three Times (3x): Next, make three double crochet stitches into the magic ring.
- How to Double Crochet (dc): Yarn over your hook once. Insert your hook into the magic ring. Yarn over and pull up a loop (you should have three loops on your hook). Yarn over and pull through the first two loops (two loops remaining). Yarn over and pull through the last two loops (one loop remaining). That’s one double crochet! Repeat this two more times for a total of three double crochets.
Step 2: Building the First “Bump” and Preparing for the Point
You’ve completed the initial side of your heart. Now, we’ll work on the defining point and the second curve of the heart.
- Treble Crochet Once (1x): Make one more treble crochet stitch into the magic ring. This single treble crochet will form the very bottom point of your heart.
Step 3: Forming the Second “Bump” and Completing the Shape
Now, you will mirror the stitches from Step 1 to create the other side of your heart.
- Double Crochet Three Times (3x): Work three double crochet stitches into the magic ring. This creates the inner curve of the second half of your heart.
- Treble Crochet Two Times (2x): Follow with two treble crochet stitches into the magic ring. These stitches build the outer curve, matching the first side.
Step 4: Closing Your Heart and Finishing Touches
You’re almost there! This final step brings your heart together and secures your work.
- Chain Three (3): Chain three stitches. These chains will help complete the symmetrical look of the heart’s top curve.
- End with a Slip Stitch: Insert your hook into the magic ring one last time. Yarn over and pull the yarn through the loop on the hook AND through the loop already on your hook. This “slip stitch” joins the end of your work to the beginning, closing the heart shape securely.
- How to Slip Stitch (sl st): A slip stitch is the shortest crochet stitch and is often used to join stitches or move yarn across a row without adding height. It’s a simple process of inserting your hook, yarning over, and pulling through all loops on your hook.
- Tighten the Magic Ring: Find the tail end of your magic ring (the unworked yarn end). Gently but firmly pull this tail. You’ll see the center of your heart gather and tighten, closing up the initial ring and giving your heart a neat finish.
- Fasten Off and Cut: To “fasten off,” chain one more stitch (this creates a knot). Then, cut your yarn, leaving a tail of about 4-6 inches. Pull the cut tail completely through the loop on your hook and tug gently to secure the knot.
- Weave in Ends: Using a tapestry needle, carefully weave the two yarn tails (the one from fastening off and the one from the magic ring) into the stitches of your heart. This hides the ends, prevents your work from unraveling, and gives it a clean, polished look.
Congratulations! Your adorable mini heart crochet is now finished. You’ve successfully navigated the basics of crochet and created a charming handmade item.
Troubleshooting Common Crochet Issues for Beginners
Don’t be discouraged if your first few hearts aren’t perfect. Learning a new skill involves a bit of trial and error. Here are some common issues beginners face and quick tips to overcome them:
- Stitches Too Tight or Too Loose: This is all about tension. If your stitches are too tight, your project will be stiff and hard to work. If too loose, it will be floppy and gappy. Experiment with how you hold your yarn and hook. Practice helps build consistent tension.
- Difficulty Finding Stitches: Lighter-colored, smooth yarn can make it easier to see where to insert your hook. Ensure good lighting. As you practice, your hands will learn the feel of the stitches.
- Magic Ring Not Closing: Make sure you’re pulling the correct yarn tail (the starting tail). If it’s still not closing tightly, ensure all your stitches were indeed worked *into* the ring and not just around the chain you made to secure it.
- Yarn Splitting: This happens when your hook doesn’t go through the entire yarn strand, instead splitting it. Try to ensure your hook goes cleanly under both loops of the stitch. A hook with a pointier tip might split yarn more easily; a more rounded tip can help.
- Losing Count of Stitches: For this small project, it’s manageable to count as you go. For longer rows or more complex patterns, consider using stitch markers to mark key stitches or the start of a round.
Creative Ways to Use Your Handmade Mini Hearts
Now that you’ve mastered making these adorable mini hearts, the fun truly begins! Their small size and charming shape make them incredibly versatile for a multitude of creative applications. Here are just a few ideas to inspire your next crafting adventure:
- Gift Embellishments: Attach a heart to a gift package instead of a bow for a personal, handmade touch. They also make lovely additions to greeting cards or scrapbooks.
- Garlands and Banners: String multiple hearts together on a length of yarn or ribbon to create a festive garland for holidays (like Valentine’s Day or Christmas), baby showers, or children’s rooms.
- Keychains or Bag Charms: Add a small jump ring and a keychain finding to turn your heart into a cute accessory for your keys, backpack, or purse.
- Hair Accessories: Sew a heart onto a plain hair clip, headband, or elastic tie for a sweet, custom hair adornment.
- Appliqués for Clothing or Accessories: Stitch hearts onto sweaters, hats, scarves, denim jackets, or even baby blankets to add a pop of color and handmade charm.
- Bowl or Jar Fillers: Create a collection of hearts in various colors and fill a clear glass jar or bowl for an easy, charming decorative accent in any room.
- Jewelry: With some earring hooks or a necklace chain, mini hearts can be transformed into unique earrings or a pendant.
- Coasters (Larger Version): While these are mini, you could easily adapt the pattern with thicker yarn and a larger hook to create heart-shaped coasters.
- Bookmarks: Attach a heart to a length of ribbon, and you have a lovely handmade bookmark.
These hearts are not just cute; they are tangible symbols of effort and creativity, making them perfect for sharing joy with others or adding a touch of warmth to your own surroundings.
Dive Deeper into Crocheting: What’s Next?
You’ve taken your first successful steps into the world of crochet by creating these lovely mini hearts. This is just the beginning of a wonderfully fulfilling hobby! Here’s how you can continue to grow your skills and explore more of what crochet has to offer:
- Practice, Practice, Practice: The more hearts you make, the more comfortable you’ll become with your hook and yarn. Repetition builds muscle memory and helps refine your tension and stitch consistency.
- Explore New Stitches: Once you’re confident with treble and double crochet, consider learning other basic stitches like half double crochet (hdc) or front/back post stitches.
- Try Other Beginner Projects: Look for patterns for simple scarves, dishcloths, or granny squares. These projects often use repetitive stitches and help you get comfortable with reading patterns.
- Experiment with Different Yarns and Hooks: See how different yarn weights (e.g., bulky, sport weight) and hook sizes affect the fabric you create. This will expand your understanding of texture and drape.
- Join a Crochet Community: Online forums, social media groups, or local crafting circles are fantastic places to share your work, ask questions, and find inspiration from fellow crocheters.
- Learn to Read Patterns: Most crochet patterns use abbreviations. Learning these will open up a vast world of projects. Websites like GratiaProject and many others offer free patterns and tutorials.
Conclusion
Congratulations, budding crafter! You’ve successfully embarked on your crochet journey and created a charming mini heart. This project serves as a perfect stepping stone, introducing you to fundamental stitches and the sheer joy of handmade creation without any of the intimidation. It’s truly amazing how a simple hook and a strand of yarn can transform into something so adorable and versatile.
I hope you found this expanded tutorial clear, easy to follow, and inspiring. A huge thank you once again to GratiaProject for sharing such a wonderful and accessible project that sparked my own love for crochet. Now that you’ve experienced the satisfaction of making your first mini heart, don’t stop here! Continue to explore, experiment, and let your creativity flourish. Whether you make one heart or a hundred, each one will carry a piece of your dedication and growing skill. Happy crocheting, and don’t forget to check out GratiaProject’s channel for even more fantastic tutorials!