
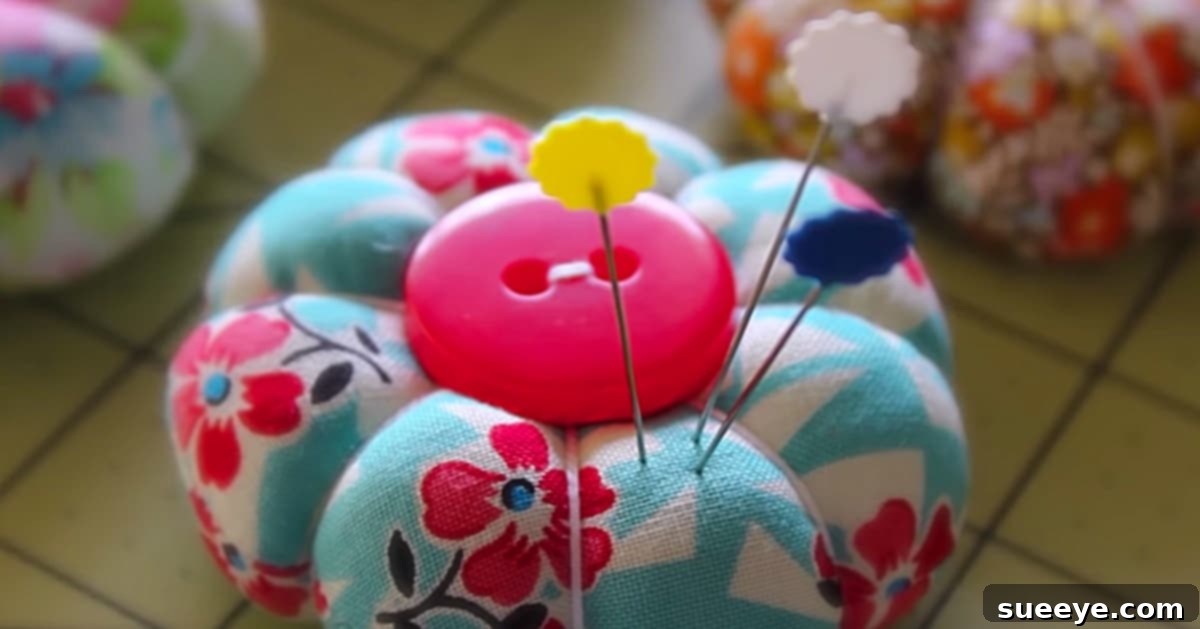
The art of sewing is a journey filled with creativity, precision, and the profound joy of bringing fabric to life. For every enthusiastic seamstress, whether a seasoned professional or a budding beginner, certain tools are absolutely indispensable. Among these, the humble pincushion stands out as a loyal and constant companion, keeping our precious pins organized, sharp, and always within reach. But why simply settle for a basic utility item when you have the opportunity to craft something truly exquisite and functional, something that reflects your personal style and passion? This very thought sparked my inspiration as my mother’s birthday approached.
Knowing her deep love for sewing and her appreciation for beautiful, handmade items, I sought a project that would not only be immensely practical for her well-loved sewing room but also resonate with her discerning eye for beauty and craftsmanship. My quest for the perfect idea led me down the digital rabbit hole of YouTube, where I stumbled upon a delightful discovery: the enchanting Petal Pincushion. Its unique design and elegant structure immediately captured my imagination, promising a project that was both creatively engaging and wonderfully useful.
As anyone deeply involved in sewing can readily attest, our collection of pins tends to grow organically over time. We accumulate a diverse array: delicate glass-head pins for fine fabrics, sturdy plastic-headpins for everyday use, versatile T-pins for thicker materials, and various specialty pins for specific tasks. A single, standard pincushion often proves insufficient for this eclectic and ever-expanding assortment. This is precisely where the concept of a varied pincushion collection truly shines, offering not only superior practical organization but also adding a charming aesthetic dimension to any sewing space. The Petal Pincushion, with its distinct and segmenting design, offered an ideal solution, blending both form and function seamlessly. I envisioned it not merely as a pin holder but as a small, decorative work of art, a testament to the love and care I would pour into its creation.
What made this particular project even more special and deeply personal was the wonderful opportunity to incorporate materials I already cherished. Tucked away within my carefully curated fabric stash was a precious remnant of vintage velveteen printed fabric – a truly beautiful piece I’d been saving, waiting patiently for just the right occasion. Its rich, luxurious texture and intricate, timeless pattern felt perfectly suited for a project intended as a heartfelt gift for my mother. Complementing this, I had a small, exquisite collection of gorgeous antique buttons, each with its own story, unearthed during a memorable and inspiring visit to an antique fair in the charming town of Fredricksburg, Texas. These buttons seemed destined to become the focal point, the very heart of this pincushion. The combination of these treasured elements promised a truly unique, deeply meaningful, and exquisitely personalized gift that she would adore.
Embarking on this rewarding creative endeavor, the first essential step, as with any successful sewing project, was to meticulously gather all the necessary components. I carefully laid out my chosen antique velveteen fabric, the specially selected antique buttons, a spool of strong and lustrous 100% cotton pearl thread (renowned for its exceptional durability and elegant sheen), sharp thread snips for clean cuts, precision fabric scissors, a pair of invaluable pinking shears (an often-underestimated tool crucial for effective fray prevention), a generous handful of soft yet firm polyester stuffing, a few standard fabric pins for securely holding layers, a trusty chopstick or corner stick for achieving precise turns, and a perfectly round object for tracing – a saucer or the lid of a biscuit tin works wonderfully as an accessible template. Having everything meticulously at hand ensures a smooth, efficient, and genuinely enjoyable crafting process, allowing creativity to flow uninterrupted by frantic searches for missing tools.
Crafting Your Own Petal Pincushion: A Comprehensive Step-by-Step Guide
Step 1: Preparing Your Fabric Circles with Precision
The very foundation of your beautiful Petal Pincushion lies in creating perfectly cut fabric circles. Begin this crucial step by carefully selecting your chosen fabric. While my personal preference leaned towards the elegant vintage velveteen, almost any non-stretch woven fabric can be transformed into a stunning pincushion. Consider options such as classic quilting cottons, crisp linen, or even soft, luxurious wool – each offering a unique texture and aesthetic. For a pincushion destined to endure daily use, it’s wise to consider the fabric’s inherent durability and its ability to gracefully accommodate pins without sustaining significant damage or snags over time. Lay your selected fabric flat and smooth out any wrinkles or creases meticulously to ensure an even surface. Position your chosen round object (a saucer, a small plate, or a biscuit tin lid are all excellent and readily available choices for templates) onto the fabric. Using a fabric marker or tailor’s chalk, meticulously trace around the perimeter of your object. You will need to cut two identical circles for each individual pincushion you plan to create. If you are working with a fabric that features a distinct pattern, take a moment to thoughtfully consider how the pattern will be oriented on your finished pincushion before tracing, aiming for a pleasing and balanced aesthetic. Precision in this initial tracing and cutting step is absolutely crucial for achieving a beautifully symmetrical and professional-looking end product.
Step 2: Expertly Sewing Your Circles Together
Once your two perfectly cut fabric circles are prepared, it’s time to skillfully bring them together. Take both circles and place them with their “right sides” (meaning the side of the fabric that you want to be visible on the finished project) facing each other. Align the raw edges as precisely as possible, ensuring they match up all the way around. To effectively prevent any unwanted shifting or slippage while you are sewing, use a few standard fabric pins to securely hold the layers together, inserting them perpendicular to your intended seam line. Now, using your sewing machine (or hand-sewing if you prefer the traditional touch), carefully begin to sew around the entire circumference of the circles. It is absolutely vital to leave a gap of approximately 1.5 to 2 inches unsewn along one edge. This strategically placed opening will be critically important later for effortlessly turning your pincushion right side out and for the subsequent stuffing process. Utilize a standard straight stitch with a moderate stitch length (typically around 2.5mm for most woven fabrics). Always remember to backstitch diligently at both the very beginning and the very end of your seam, particularly at the start and end of the designated opening, to firmly secure your stitches and prevent them from unraveling once the pincushion is turned and subjected to the tension of stuffing.
After you have successfully completed the main sewing, retrieve your trusty pinking shears. With meticulous care, trim the seam allowance around the entire sewn edge, making sure to include the edges of the opening. Pinking shears are designed to create a distinctive zigzag edge that significantly helps in preventing the fabric from fraying, a feature that is especially crucial for pincushions that will be tightly packed with stuffing. This essential step also effectively reduces bulk within the seam, which in turn allows the finished pincushion to achieve a smoother, more aesthetically pleasing circular shape once it has been turned right side out. For areas where the curve of your circle is particularly tight, you might also consider gently clipping small notches into the seam allowance (taking extreme care not to cut through your stitch line) to help the fabric lay flatter and more smoothly once the pincushion is inverted.
Step 3: Flawlessly Turning and Generously Stuffing Your Pincushion
With the sewing complete and the edges meticulously trimmed, it’s now time for a truly magical transformation. Reach into the unsewn opening and with careful, gentle movements, begin to turn your pincushion right side out. This particular process can sometimes be a bit delicate, especially when working with smaller circles or thicker, less pliable fabrics. Take your time and proceed patiently, gently pushing out the fabric from the inside. Once partially turned, enlist the aid of a chopstick, a blunt pencil, or a specialized corner stick to meticulously push out the entire seam allowance, ensuring that you achieve a perfectly round and smooth shape. Pay especially close attention to the curves, striving to achieve a pristine, unwrinkled edge all around the circumference.
Now arrives the deeply satisfying task of stuffing your pincushion. Polyester fiberfill (often referred to as dacron batting) is an outstanding choice for pincushions due to its inherent softness, resilient bounce, and its ability to allow pins to glide in and out with effortless ease. However, the world of pincushion stuffing offers a delightful array of alternative options! For a traditional pincushion that offers the added benefit of helping to sharpen your pins with each insertion, enthusiastically consider using crushed walnut shells or finely ground, clean, and thoroughly dry sand – these natural materials contain gentle abrasives. Rice or small plastic pellets can also be employed to create a heavier, more stable pincushion, providing a satisfying weight. For a softer, yet still wonderfully firm, option, luxurious wool roving or natural cotton batting are excellent choices. Regardless of the stuffing material you ultimately choose, the paramount key is to stuff it firmly and with absolute evenness. Begin by inserting small, manageable amounts of stuffing, gradually filling the pincushion. Utilize your fingers and the chopstick to meticulously push the stuffing into all areas, diligently ensuring there are no hidden lumps, hollow spots, or empty pockets. A densely packed pincushion will not only retain its beautiful shape better over time but will also provide a secure, stable, and deeply satisfying resting place for your invaluable pins. Continue stuffing until the pincushion feels wonderfully plump, delightfully firm, and resilient to the touch.
Once your pincushion is thoroughly and perfectly stuffed, the next step is to carefully and artfully close the remaining opening. The very best method for achieving a neat, almost invisible finish is the renowned ladder stitch (also widely recognized as the invisible stitch or blind stitch). To execute this, carefully fold the raw edges of the opening inwards so that they precisely align with the previously sewn machine seam. Thread a hand-sewing needle with a matching thread color to ensure invisibility and begin sewing, catching tiny folds of fabric from one side of the opening, then the other, and pulling the thread tautly to bring the edges together seamlessly. Take your time with this critical step; a well-executed ladder stitch makes a profound difference to the overall professional and polished appearance of your finished pincushion.
Step 4: Creating the Signature Petal Formations and Attaching the Exquisite Button
This is the exciting stage where your pincushion truly undergoes its remarkable transformation into its signature petal design, revealing its unique charm. Begin by cutting a generous section of your robust 100% cotton pearl thread – I highly recommend approximately 24-30 inches to ensure you have ample length to complete the entire design without the inconvenience of re-threading. Thread your needle, doubling the thread for superior strength and durability, and then tie the ends together securely with a firm knot. Carefully locate the precise center of your fully stuffed pincushion. Push the needle straight through the very center of the pincushion, ensuring it emerges directly on the opposite side. Pull the thread all the way through until the knot is snug and flush against your starting point on the fabric surface.
Now, to artfully create the captivating petal effect, you will systematically work your way around the entire circumference of the pincushion. Reinsert your needle into the pincushion approximately half an inch to one inch from the central point (the exact distance will depend on how large and pronounced you desire your petals to be) along the edge of the circular form. Carefully guide the needle through the resilient stuffing and bring it out again at the central point, on the opposite side from where you last exited. Pull the thread firmly but with a gentle, controlled tension. As you do this, you will distinctly notice the fabric beginning to indent, forming a segment or a beautiful “petal.” Repeat this precise process, meticulously moving around the circumference of the pincushion. For instance, if your very first stitch created a petal at the 12 o’clock position, your next might be at 2 o’clock, followed by 4 o’clock, then 6 o’clock, 8 o’clock, and finally 10 o’clock, striving for an even and aesthetically pleasing distribution of petals. The exact number of petals you choose to create is entirely up to your personal preference and the size of your pincushion – typically 6 or 8 petals work beautifully for a balanced, symmetrical, and visually appealing design. Each time you pass the thread through and gently pull, you are effectively cinching the fabric, meticulously creating those lovely, defined depressions that are the hallmark of the petal look. Maintain consistent tension with each pull to ensure uniform petal size, depth, and overall symmetry.
Once you are completely satisfied with the petal formations and your pincushion has gracefully taken on its beautiful, sculpted shape, it’s time for the final, elegant flourish: attaching the exquisite antique button. With the same pearl thread you’ve been using, which should still be securely connected to your needle and ideally passed through the center of the pincushion, carefully position your chosen antique button directly over the central indentation on one side of the pincushion. Pass the needle through the holes of the button and then back down into the pincushion, ensuring it exits through the exact center on the opposite side. Repeat this vital process several times, meticulously stitching through the button and the pincushion, pulling tightly each time to ensure maximum security. This not only anchors the button firmly in place but also further enhances the central depression, making the surrounding petals stand out with even greater prominence and definition. Once the button is absolutely securely attached, carefully weave your needle through a few discreet stitches on the underside of the button or subtly within the fabric itself, tie a small, almost invisible knot, and then snip the excess thread close to the fabric surface. And just like that, with skill and care, your exquisite Petal Pincushion is gloriously complete, ready to grace any sewing room!
Why Every Seamstress Needs a Petal Pincushion in Their Collection
Beyond its undeniable and captivating charm, the Petal Pincushion offers a myriad of practical advantages that are invaluable for any dedicated sewing enthusiast. Its unique, sculpted design inherently provides distinct sections or “petals,” which can be an incredibly efficient and visually appealing method for organizing different types of pins. Imagine the ease of dedicating one “petal” exclusively to your delicate glass-head pins, another to your workhorse plastic-head pins, and a third to your specialized T-pins or applique pins. This simple yet effective organizational hack not only saves precious time spent searching for the right pin but also prevents frustrating tangles, making your entire sewing experience smoother, more enjoyable, and significantly more efficient. Furthermore, the firm and dense stuffing, carefully chosen and packed, ensures that your pins are held securely and steadfastly, preventing them from falling out or mysteriously getting lost amidst your growing pile of fabric scraps. The sturdy construction inherent in its design means it can withstand constant, daily use, ensuring it becomes a durable, reliable, and cherished fixture in your personal sewing space for years to come.
This project is not only incredibly rewarding in its outcome but also remarkably accessible to a wide range of skill levels. It stands as a fantastic DIY sewing project for beginners who are eager to hone their basic machine sewing skills, particularly in the nuanced art of sewing curves and mastering essential hand-finishing techniques like the crucial ladder stitch. For more advanced sewers, it presents a delightful and refreshing opportunity to experiment with an array of different fabrics, explore intricate embellishments, and delve into various stuffing materials, thereby transforming a seemingly simple pincushion into a truly personalized and unique masterpiece. Moreover, it’s an inherently eco-friendly craft, perfectly suited for utilizing those cherished, smaller fabric scraps that are simply too beautiful to discard but perhaps too modest in size for larger, more ambitious projects. The profound satisfaction of creating something that is both beautiful and highly functional with your own skilled hands is truly immense and deeply gratifying. The Petal Pincushion isn’t just a place to store pins; it’s a small yet significant token of artistry that adds an elegant touch, a burst of personality, and a sense of handcrafted warmth to your creative sanctuary, making every moment spent sewing a little bit more inspiring.
Conclusion: A Gift from the Heart, Crafted with Enduring Care
The profound joy of giving a handmade gift, especially one crafted with such thoughtfulness, meticulous attention to detail, and a generous spirit, is truly unparalleled. My mother, with her discerning eye and loving heart, absolutely adored her Petal Pincushion, appreciating not only its undeniable beauty and practical utility but also the palpable love and dedicated effort woven into every single stitch. This heartwarming project serves as a wonderful and timely reminder that even the simplest and most utilitarian items can be elevated to extraordinary levels through the thoughtful application of a personal touch and a creative flair. Whether you’re actively searching for a heartfelt and meaningful gift for a fellow crafting enthusiast, desiring a charming and functional addition to your very own sewing arsenal, or simply seeking a delightful and productive way to spend a peaceful afternoon, the DIY Petal Pincushion is an endeavor you are absolutely sure to cherish. So, dive wholeheartedly into your fabric stash, gather your essential tools, and enthusiastically embark on this wonderful creative journey. You are going to be incredibly happy and deeply satisfied with the beautiful, functional, and deeply gratifying results you achieve from crafting your very own exquisite Petal Pincushion. Happy sewing, my dear friends!