
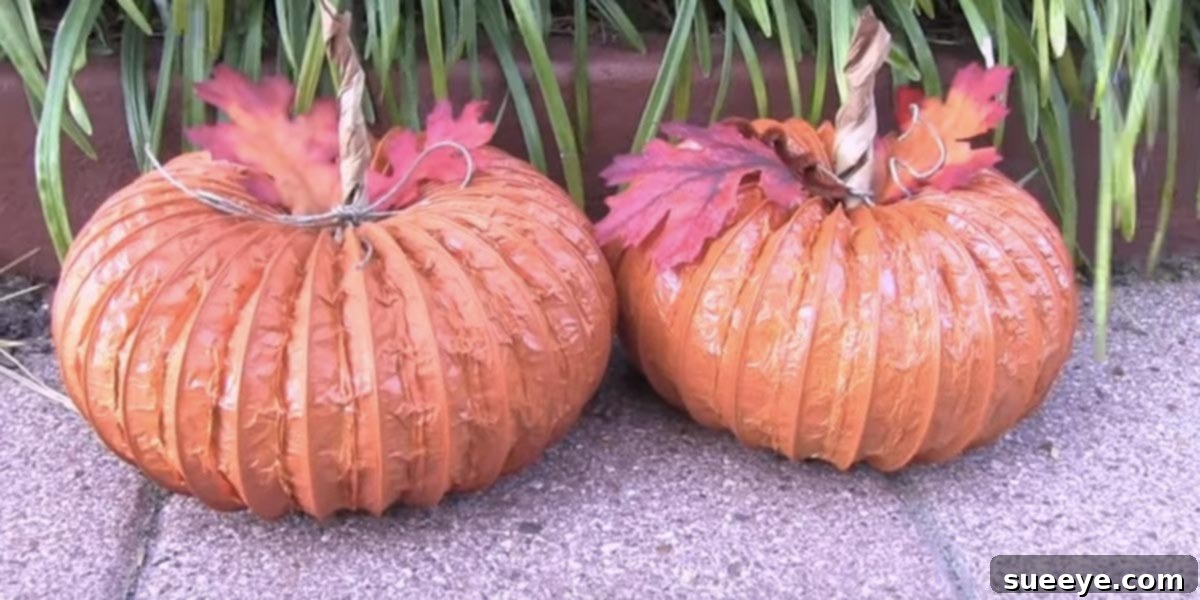
DIY Dryer Vent Pumpkins: The Ultimate Guide to Easy, No-Carve Fall Decor
Prepare to be absolutely amazed! Imagine transforming a seemingly ordinary household item into one of the most charming, unique, and incredibly simple fall decorations you’ve ever seen. What if we told you that the secret to creating adorable, reusable pumpkins that require no carving and no mess lies within your laundry room – specifically, a humble dryer vent hose?
That’s right! We were just as astonished when we first encountered this ingenious crafting hack. It’s a testament to the boundless creativity found in the DIY community. Forget the hassle of pumpkin carving, the sticky seeds, and the inevitable decay. This brilliant project offers a refreshing, hassle-free alternative that will not only elevate your autumn decor but also spark conversations among your guests. Get ready to gather some simple materials and embark on a crafting journey that promises delightful results with minimal effort.
Why Dryer Vent Pumpkins Are Your Next Favorite Fall Project
In a world full of complex DIYs, the dryer vent pumpkin stands out for its sheer simplicity and impressive outcome. But beyond the “wow” factor, there are numerous compelling reasons why this craft should be at the top of your fall decorating list:
- Effortless & Quick: Unlike traditional carving that can take hours, these pumpkins can be assembled in mere minutes, excluding paint drying time. It’s an instant gratification craft!
- No Mess, No Fuss: Say goodbye to sticky pumpkin guts, sharp tools, and the cleanup nightmare. This project is remarkably clean, making it perfect for crafters of all ages.
- Eco-Friendly & Recycled: Have a leftover piece of dryer vent hose from a home improvement project? This is the perfect way to upcycle it, giving a second life to materials that might otherwise end up in a landfill. It’s a fantastic example of sustainable crafting.
- Reusable Year After Year: Once you’ve created your dryer vent pumpkins, they’re yours to keep! Store them away carefully, and they’ll be ready to bring out every autumn, saving you time and money on seasonal decor.
- Incredibly Versatile: While orange is classic, the possibilities for customization are endless. Paint them in any color, add various embellishments, and adapt them to any decor style, from rustic farmhouse to modern chic.
- Budget-Friendly: If you already have a vent hose or can snag a scrap piece, your cost is minimal. Even if you purchase a new hose, it’s an inexpensive material that yields multiple pumpkins, making it a very economical choice compared to buying decorative pumpkins.
This project truly embodies the spirit of clever crafting – transforming the unexpected into something truly special and heartwarming.
Essential Materials: Gathering Your Supplies
One of the most appealing aspects of this project is the modest list of materials required. Most items can be found at your local hardware store or craft supply shop, and you might even have some of them lying around already! Here’s what you’ll need to create your charming dryer vent pumpkins:
1. The Star: Dryer Vent Hose
This is the foundation of your pumpkin. Dryer vent hose is typically made from aluminum and is flexible, allowing you to shape it easily. You can find it in various diameters (commonly 3 or 4 inches) at any hardware store. A standard roll or even a discarded piece from a past installation is perfect. The length you use will determine the size of your pumpkin.
2. Color & Character: Spray Paint
This is where your pumpkin truly comes to life! While classic orange is always a hit, don’t limit your imagination. Consider these popular options:
- Traditional Orange: For that quintessential fall look.
- Copper or Gold: Adds an elegant, metallic sheen perfect for sophisticated autumn displays.
- Off-White or Cream: Creates a rustic, farmhouse-inspired pumpkin that pairs well with neutral decor.
- Black or Deep Purple: For a spooky, modern Halloween twist.
- Teal, Sage Green, or Pastels: For whimsical, non-traditional fall aesthetics.
Choose a good quality spray paint that adheres well to metal. Matte, satin, or gloss finishes all offer different effects. You might also consider specialty paints like glitter spray for extra sparkle.
3. The Finishing Touch: A Stem
The stem gives your creation its pumpkin identity. Here are some fantastic, easy-to-find options:
- Cinnamon Sticks: As suggested in the original idea, these not only look great but also add a wonderful autumnal fragrance.
- Natural Twigs or Small Branches: Gathered from your yard, these provide an authentic, rustic feel.
- Wine Corks: A fun and unique upcycled option.
- Artificial Floral Stems: Many craft stores sell small artificial branches or berry sprigs that can be cut down for stems.
- Sculpted Clay: For the more adventurous crafter, air-dry clay can be shaped and painted to resemble a realistic stem.
4. Embellishments & Personality: Raffia and More
These small additions tie everything together and allow for personalization:
- Raffia: Natural raffia adds a lovely rustic touch, mimicking dried vines or leaves.
- Ribbon: Burlap, plaid, velvet, or satin ribbons in fall colors can be used to create bows or wraps.
- Faux Fall Leaves & Berries: Small artificial leaves or berry clusters can be hot-glued on.
- Twine or Jute: For a more understated, natural look.
- Glitter or Sequins: For a touch of sparkle and glam.
- Googly Eyes or Vinyl Decals: For playful or spooky Halloween versions.
- Moss: A small patch of craft moss at the base of the stem can add texture.
5. Tools for the Job
- Hot Glue Gun and Glue Sticks: Essential for securing the vent hose into shape and attaching embellishments.
- Heavy-Duty Scissors or Wire Cutters: For cutting the dryer vent hose (be careful, edges can be sharp).
- Protective Gloves: To protect your hands while handling the vent hose and during spray painting.
- Drop Cloth or Newspaper: To protect your work surface during spray painting.
- Well-Ventilated Area: Crucial for safe spray painting.
Step-by-Step Tutorial: Crafting Your Dryer Vent Pumpkin
Ready to turn that dryer vent into dazzling decor? Follow these simple steps to create your own collection of charming pumpkins.
Step 1: Prepare Your Workspace and Materials
Before you begin, ensure you have a clean, well-ventilated area for crafting, especially if you’ll be spray painting indoors (near an open window with a fan, or better yet, outside). Lay down a drop cloth or old newspapers to protect your surfaces. Gather all your chosen materials so they’re within easy reach.
Step 2: Measure and Cut Your Dryer Vent Hose
Decide on the size of your pumpkin. The length of the vent hose you cut will determine the overall circumference and “squatness” of your pumpkin. For a standard pumpkin, a length of 24-36 inches (60-90 cm) is a good starting point for a 4-inch diameter vent. For smaller, more squat pumpkins, use a shorter length. Carefully use heavy-duty scissors or wire cutters to snip the hose to your desired length. Be cautious as the edges can be sharp; consider wearing gloves.
Step 3: Form the Pumpkin Shape
This is where the magic happens! Take your cut piece of dryer vent hose and bring the two ends together to form a circle or “donut” shape. Overlap the ends slightly, perhaps by an inch or two. Apply a generous amount of hot glue to secure these overlapping ends together, creating a sturdy, continuous loop. Hold them firmly in place until the glue sets. You can also add a few dots of hot glue at various points around the inside of the loop to pinch sections together and give it that characteristic pumpkin-like indentation, making it less of a perfect circle and more rounded and organic.
Step 4: Spray Paint Your Pumpkin Base
Once the glue is dry and your pumpkin shape is stable, it’s time for color! Place your pumpkin on your prepared drop cloth in a well-ventilated area. Apply several light, even coats of your chosen spray paint, rather than one thick coat. This prevents drips and ensures better adhesion and coverage. Rotate the pumpkin as you spray, making sure to get into all the grooves and crevices of the vent hose for complete coverage. Allow each coat to dry according to the manufacturer’s instructions before applying the next. This might take anywhere from 15 minutes to an hour per coat. Once fully painted, allow the pumpkin to dry completely for several hours, or even overnight, before handling it for the next steps.
Step 5: Attach the Stem
With your pumpkin fully dry and vibrant, it’s time to add the stem. Take your chosen stem (cinnamon stick, twig, etc.) and apply a generous dollop of hot glue to one end. Carefully press it firmly into the center of the pumpkin’s top opening. Hold it in place for a moment until the glue cools and sets, ensuring a secure attachment. If your stem is a bit wobbly, you can add more glue around its base for extra stability.
Step 6: Embellish and Personalize
Now for the fun part – bringing your pumpkin to life with embellishments! Wrap a piece of raffia around the base of the stem, tying it into a small bow or knot, and let the ends trail naturally. You can hot glue small faux fall leaves, berries, or even a tiny fabric bow next to the stem for added charm. For a touch of glam, you could lightly spray the pumpkin with an adhesive and dust it with fine glitter. Experiment with different textures and colors to match your home decor or create a themed pumpkin. This is your chance to make it uniquely yours!
Creative Variations & Display Ideas
The beauty of the dryer vent pumpkin lies in its adaptability. Once you’ve mastered the basic technique, you can explore endless creative variations to suit any style or occasion throughout the fall season.
Color Palettes Beyond Orange
- Rustic Farmhouse: Use off-white, cream, or matte gray spray paint. Embellish with burlap ribbon, twine, and natural twigs.
- Elegant & Glamorous: Opt for metallic spray paints like gold, silver, rose gold, or copper. Add a touch of glitter, pearls, or velvet ribbon for a luxurious look.
- Modern Minimalist: Paint pumpkins in matte black, deep charcoal, or crisp white. Keep embellishments simple with a sleek stick stem and perhaps a geometric-patterned ribbon.
- Whimsical & Playful: Choose pastel colors (light blue, mint green, soft pink). Add polka dots, stripes (using painter’s tape), googly eyes for Halloween, or brightly colored ribbons.
- Spooky Chic: Paint pumpkins black, dark purple, or deep red. Decorate with faux spiders, cobwebs, tiny bat cutouts, or skeleton hands for Halloween.
Dynamic Display Ideas
- Clustered Centerpiece: Group several dryer vent pumpkins of varying sizes and colors together on a tray or platter. Add pinecones, autumn leaves, small gourds, and battery-operated fairy lights for a stunning dining table display.
- Mantel Magic: Arrange a line of pumpkins along your fireplace mantel, interspersing them with candles, fall garlands, and family photos for a warm, inviting glow.
- Welcoming Porch Decor: Place your durable dryer vent pumpkins (preferably under a covered porch to protect from harsh elements) alongside hay bales, mums, and corn stalks to create a festive autumnal entrance.
- Tiered Tray Showcase: Small dryer vent pumpkins are perfect for tiered tray styling. Combine them with mini signs, faux succulents, and other tiny fall trinkets.
- Window Sill Charm: Line your window sills with a row of small, brightly painted pumpkins to bring autumn cheer indoors.
- Place Settings & Favors: Create mini dryer vent pumpkins to use as unique place card holders for Thanksgiving dinner or as thoughtful party favors for fall gatherings.
Don’t be afraid to mix and match textures, colors, and sizes. The more variety you incorporate, the more visually interesting your fall display will be!
Tips for Success and Longevity
To ensure your dryer vent pumpkins are not only beautiful but also long-lasting, keep these expert tips in mind:
- Safety First with Spray Paint: Always work in a well-ventilated area, preferably outdoors. Wear a mask and gloves to avoid inhaling fumes and getting paint on your skin.
- Patience with Drying: Resist the urge to handle your pumpkins before the paint is completely dry. Rushing this step can lead to smudges, fingerprints, and an uneven finish.
- Even Coats are Key: When spray painting, hold the can about 6-10 inches away from the surface and use sweeping motions. Several thin coats are always better than one thick coat for a smooth, professional look.
- Secure the Shape: Use enough hot glue to firmly secure the ends of the vent hose together. If the loop feels weak, add a few more dots of glue on the inside to strengthen it.
- Protect for Outdoor Use: If you plan to display your dryer vent pumpkins outdoors, consider applying a clear sealant or outdoor-grade spray varnish over the paint. This will protect them from moisture and UV rays, preventing fading and rust. However, for maximum longevity, display them in a sheltered area like a covered porch.
- Storage: When the season ends, gently wrap your dryer vent pumpkins in tissue paper or bubble wrap and store them in a dry, safe place. This will keep them looking pristine for next year’s festivities.
Embrace the Eco-Friendly Charm of Recycled Crafts
In an age where sustainability is more important than ever, the dryer vent pumpkin project offers a wonderful opportunity to contribute positively to the environment. By repurposing a material that might otherwise be discarded, you’re actively reducing waste and embracing a more eco-conscious approach to decorating.
This project serves as a fantastic reminder that creativity knows no bounds and that beautiful decor doesn’t always have to come with a hefty price tag or a large environmental footprint. It’s about looking at everyday objects with a new perspective and envisioning their potential. Share this idea with friends and family, and encourage them to join the movement of turning trash into treasure!
Conclusion: Your Easiest, Most Charming Fall Project Awaits!
Who knew that such a simple, unassuming item like a dryer vent hose could be transformed into such darling and festive fall decorations? These DIY dryer vent pumpkins are the epitome of clever crafting: they’re quick to make, incredibly easy, mess-free, budget-friendly, and best of all, reusable year after year.
Whether you’re decorating for Halloween, Thanksgiving, or simply want to infuse your home with the cozy spirit of autumn, these no-carve pumpkins are the perfect solution. So, gather your supplies, unleash your creativity, and prepare to impress everyone with your ingenious fall decor. You’re going to love bringing these out every single year!
Don’t keep this brilliant idea to yourself! Share this guide with your friends and family on Facebook and inspire them to create their own charming dryer vent pumpkins. Happy crafting!