
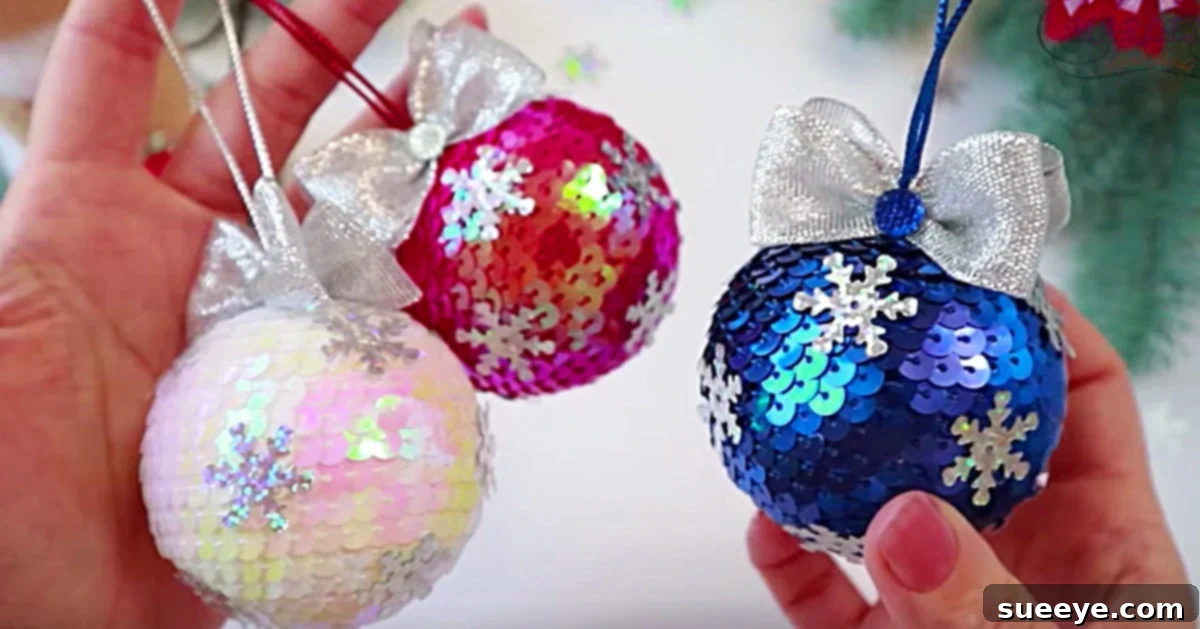
DIY Sequined Christmas Ornaments: Sparkle Your Way to a Festive Home
The holiday season is synonymous with sparkle, joy, and the warmth of handmade decorations. Nothing quite captures the enchanting glow of Christmas like ornaments that shimmer and reflect the festive lights. If you’re searching for an easy, affordable, and incredibly dazzling way to elevate your holiday decor, look no further than these spectacular DIY sequined Christmas ornaments. Prepare to fall in love with a project that promises not only stunning results but also a delightful crafting experience. When we say “cheap and easy,” we genuinely mean it – this is a project designed for everyone, from crafting novices to seasoned DIY enthusiasts, ensuring your tree, home, and gifts radiate with custom-made brilliance.
Imagine transforming simple craft store supplies into breathtaking decorative pieces that look like they cost a fortune. This beloved DIY project allows you to unleash your creativity using just a few fundamental items: styrofoam balls, a spool of shimmering sequins, and your trusty hot glue gun. The beauty lies in its versatility; you can accessorize these balls with virtually anything you fancy – a few sprigs of faux greenery, elegant bows, glittery letters, or delicate beads. The possibilities are endless, allowing you to tailor each ornament to perfectly match your unique holiday theme and personal style. Whether you prefer classic silver and gold, vibrant reds and greens, or a playful rainbow of colors, these sequined Christmas ball ornaments are your canvas.
I embarked on this sparkling adventure by gathering my core supplies: a selection of styrofoam craft balls and a generous spool of iridescent sequins from my local craft store. With a smart coupon in hand, these materials were incredibly inexpensive, proving that breathtaking holiday decor doesn’t have to break the bank. Beyond these, I simply needed common household items like string or ribbon to create hangers for the finished ornaments and, of course, my indispensable hot glue gun. The process began with a single, precise dot of hot glue applied to the very top of a styrofoam ball. This initial anchor allowed me to securely attach the first sequin, setting the stage for a mesmerizing spiral of sparkle that would soon cover the entire surface.
Why Choose DIY Sequined Ornaments for Your Holiday Decor?
In a world of mass-produced decorations, handmade ornaments offer a unique charm and personal touch that simply can’t be replicated. Opting for DIY sequined ornaments brings a multitude of benefits, making them a top choice for festive crafting:
- Unparalleled Sparkle: Sequins are designed to catch and reflect light, creating a dazzling display that instantly elevates any Christmas tree or holiday centerpiece.
- Budget-Friendly Beauty: You can create a substantial collection of stunning ornaments for a fraction of the cost of store-bought equivalents, especially when utilizing coupons and craft store sales.
- Complete Customization: From color palettes to accent details, you have full control over the design. Match your existing decor, create a new theme, or personalize ornaments for loved ones.
- Simple & Accessible: The technique is straightforward, requiring no advanced crafting skills. It’s a fantastic project for beginners and a satisfying one for experienced crafters.
- Family-Friendly Fun: While the hot glue gun requires adult supervision, younger family members can assist with sorting sequins, choosing colors, and planning designs, making it a wonderful bonding activity.
- Sustainable Option: Repurpose old craft supplies or purchase only what you need, reducing waste compared to buying new, often disposable, plastic decorations each year.
Essential Materials You’ll Need for Sparkling Success
The beauty of this project lies in its simplicity and the minimal number of supplies required. Here’s a comprehensive list to get you started, along with some tips for sourcing:
- Styrofoam Craft Balls: These are your foundation. Available in various sizes at craft stores. Consider getting a mix of sizes (e.g., 2-inch, 3-inch, 4-inch) for visual interest on your tree. Look for smooth, dense foam for easier sequin application.
- Sequins: The star of the show!
- Spools of Sequins: These are often pre-strung, making them very easy to apply in continuous spirals. Great for consistent coverage.
- Loose Sequins: Offer more variety in size, shape (cup, flat, flower, star), and finish (iridescent, metallic, matte). Best for intricate patterns or filling small gaps. You might need to pick them up individually.
- Color & Finish: Think about your desired aesthetic. Classic silver, gold, red, and green are popular, but don’t hesitate to explore blues, purples, pinks, or even iridescent options for extra shimmer.
- Hot Glue Gun & Glue Sticks: An absolute essential. A mini glue gun is perfect for this project as it allows for precise application of small dots of glue. Ensure you have plenty of glue sticks on hand.
- Ribbon, String, or Ornament Hooks: For hanging your finished masterpieces. Thin satin ribbon, metallic cord, or even fishing line work well. If you prefer a quick solution, standard ornament hooks can also be used.
- Optional Embellishments: This is where you personalize!
- Faux Greenery Sprigs: Small pine needles, holly, or mistletoe for a natural touch.
- Small Bows: Pre-made or DIY tiny bows in coordinating colors.
- Glitter: For extra sparkle on top of or between sequins.
- Small Beads or Rhinestones: To add texture and extra bling.
- Acrylic Paint: To paint the styrofoam ball a matching color before applying sequins, preventing any white gaps from showing through.
- Letter Beads or Stickers: For personalized messages or monograms.
- Scissors: For cutting ribbon, string, or sequin spools.
- Awl or Skewer: A sharp, thin tool (like a skewer, toothpick, or an awl) can be useful for poking a small hole to insert the hanger.
Step-by-Step Guide to Crafting Your Dazzling Sequined Ornaments
Creating these ornaments is a meditative and rewarding process. Follow these detailed steps to ensure your creations turn out perfectly:
Step 1: Prepare Your Workspace and Materials
- Clear a Space: Find a clean, flat surface to work on. Lay down newspaper or a craft mat to protect your table from any stray glue or glitter.
- Gather Supplies: Arrange all your styrofoam balls, sequins, glue gun, glue sticks, and any chosen embellishments within easy reach.
- Pre-heat Glue Gun: Plug in your hot glue gun and allow it a few minutes to heat up completely. Always exercise caution when working with hot glue.
Step 2: Anchor the First Sequin and Begin the Spiral
- Initial Glue Dot: Hold a styrofoam ball securely. Apply a very small dot of hot glue to the very top center of the ball. This will be the starting point.
- Place First Sequin: Immediately press the end of your sequin spool (or a single loose sequin if you’re not using a spool) firmly into the glue dot. Hold it in place for a few seconds until the glue sets. This is crucial for a stable foundation.
- Start the Spiral: Once the first sequin is secure, begin applying tiny dots of hot glue in a circular pattern around the initial sequin. As you apply each dot, press the sequins from your spool firmly into the glue, slightly overlapping the previous row to ensure full coverage and a seamless, glittering surface. Think of it like winding a coil or a continuous spiral.
Step 3: Continue Covering the Ball with Shimmer
- Consistent Application: Work your way down the ball, maintaining a consistent overlap of sequins. Apply glue in small sections – just enough for a few sequins at a time – to prevent it from cooling and hardening before you can place the sequins.
- Even Coverage: Gently rotate the ball as you go, ensuring the sequins lay flat and snugly against each other. The goal is to cover as much of the styrofoam as possible, minimizing any white gaps. If you’re using loose sequins, you can apply them in rows or random patterns, overlapping slightly.
Step 4: Create the Hanger Loop
Once you’ve covered about two-thirds to three-quarters of the ball’s surface and are approaching the bottom, it’s time to insert the hanger:
- Prepare the Hanger: Cut a piece of ribbon or string about 6-8 inches long. Fold it in half to create a loop.
- Poke a Hole: Using an awl, skewer, or even the tip of a sturdy toothpick, carefully poke a small hole into the styrofoam ball at the desired top center (opposite where you started). Make it deep enough to securely anchor the loop.
- Insert and Glue Loop: Apply a generous dot of hot glue into the poked hole. Immediately insert the folded ends of your ribbon or string loop into the glue, pushing it down until it’s firmly embedded. Hold it in place for a moment to allow the glue to set and create a strong bond. This creates a sturdy, decorative loop for hanging your ornament.
Step 5: Finish Covering and Embellish
- Complete Sequin Coverage: Once the hanger is secure, continue gluing sequins, working your way around the base of the hanger and covering any remaining exposed styrofoam. Ensure the area around the hanger is neatly finished.
- Add Embellishments (Optional): This is the exciting part!
- Bows & Greenery: Hot glue small bows or tiny sprigs of faux greenery near the base of the hanger for an elegant touch.
- Glitter: For extra sparkle, you can lightly brush adhesive (like Mod Podge or clear glue) onto certain areas and sprinkle fine glitter.
- Beads/Rhinestones: Attach small beads or rhinestones with tiny dots of glue for added texture and bling.
- Paint: If you’ve chosen to paint the ball, ensure it’s completely dry before adding sequins.
- Allow to Dry: Let your finished ornament sit undisturbed for at least 15-30 minutes to ensure all the hot glue has completely cooled and set.
These Christmas balls are truly gorgeous and astonishingly simple to make. With this refined technique, you’ll find yourself creating a stunning collection in no time. I personally managed to craft around 25 beautiful ornaments in just about an hour, completely transforming the look of my Christmas tree with a sparkling, cohesive theme!
Tips for a Flawless Finish and Enduring Sparkle
While the process is straightforward, a few tips can help you achieve professional-looking results and ensure your ornaments last for seasons to come:
- Less is More with Glue: Use very small dots of hot glue. Too much glue can seep out from under the sequins, creating visible lumps and making the finish look messy. A tiny dot is often all it takes to secure a few sequins.
- Overlap Consistently: The key to a seamless look is consistent overlapping. Each sequin should slightly cover the edge of the one next to it and the row below it. This minimizes gaps and creates a smooth, continuous glittery surface.
- Pre-paint Your Balls: For a truly professional finish, consider painting your styrofoam balls in a color that matches your sequins before you start gluing. This way, if any tiny gaps occur, they won’t reveal the white styrofoam underneath.
- Work in Sections: Especially with larger balls, work in small sections. Apply glue to an area, then quickly place sequins. This prevents the glue from drying too fast.
- Protect Your Fingers: Hot glue can cause burns. Consider using finger protectors or a silicone thimble, especially if you’re working on many ornaments.
- Proper Drying: Ensure all glue is completely dry and cooled before handling or hanging your ornaments. This prevents sequins from shifting and maintains the integrity of the design.
Unleash Your Creativity: Customization Ideas for Your Sequined Ornaments
One of the most rewarding aspects of DIY is the ability to personalize everything. These sequined ornaments are a blank canvas for your imagination:
- Color Themes:
- Monochromatic Magic: Use various shades of a single color (e.g., light blue, medium blue, dark blue sequins) for a sophisticated, textured look.
- Rainbow Radiance: Create a vibrant spectrum of colors, either blending them seamlessly or creating distinct bands.
- Ombre Effect: Gradually transition from one color to another, or from a lighter to a darker shade of the same color.
- Texture & Mix-Ins:
- Mixed Sequins: Combine different sizes or shapes of sequins (e.g., round with star-shaped, iridescent with metallic) for added visual interest.
- Beaded Borders: Add a line of small beads or pearl accents around the top or bottom of the ornament.
- Glitter Bomb: After applying sequins, dab a bit of clear glue in sparse areas and sprinkle fine glitter for an extra layer of sparkle.
- Themed Creations:
- Winter Wonderland: Use silver, white, and ice-blue sequins, perhaps adding tiny snowflake charms.
- Rustic Charm: Combine gold or copper sequins with natural elements like small dried berries or twine bows.
- Personalized Messages: Hot glue small letter beads or stick-on letters to spell out names, dates, or festive words.
- Beyond the Ball: While styrofoam balls are classic, consider using other shapes like hearts, stars, or even styrofoam wreaths as your base for a varied collection.
Beyond the Christmas Tree: Creative Uses for Your Sequined Ornaments
These sparkling creations aren’t just for hanging on the tree! Their versatility allows them to enhance various aspects of your holiday decor and gifting:
- Stunning Gift Toppers: Attach an ornament to a wrapped gift for an extra special, personalized touch that doubles as an additional present.
- Festive Centerpieces: Arrange a collection of sequined balls in a decorative bowl or on a tiered stand. Add some evergreen branches or fairy lights for a dazzling tabletop display.
- DIY Garlands: Thread several finished ornaments onto a long ribbon or string to create a custom garland for your mantle, doorway, or staircase banister.
- Window or Door Displays: Hang them individually or in clusters in windows to catch the light, or adorn a wreath on your front door.
- Party Favors: Create smaller versions as delightful take-home gifts for holiday party guests.
- Table Place Settings: Use a personalized sequined ornament as a charming place card holder or a small favor at each guest’s setting for your holiday dinner.
Making Memories: A Fun Family Activity
Crafting together during the holidays is a cherished tradition for many families. These DIY sequined ornaments offer a fantastic opportunity to create lasting memories:
- Teamwork Makes the Dream Work: Assign age-appropriate tasks. Older children can help with the glue gun (under strict adult supervision), while younger ones can sort sequins by color, choose ribbons, or even practice their fine motor skills by placing pre-glued sequins.
- Storytelling Ornaments: Each year, create a new ornament and write the year or a special family memory on it. Over time, your tree will tell the story of your family’s holidays.
- Developing Skills: Crafting helps develop fine motor skills, creativity, patience, and the satisfaction of seeing a project through to completion.
- Personalized Gifts: Encourage children to make ornaments for their grandparents, teachers, or friends, instilling the joy of handmade gifting.
Conclusion: Craft Your Way to a Dazzling Holiday Season
There’s an undeniable magic in creating something beautiful with your own hands, especially during the festive season. These DIY sequined Christmas ornaments offer the perfect blend of simplicity, affordability, and spectacular sparkle. They are more than just decorations; they are expressions of creativity, love, and the joy of the holidays.
Whether you’re looking to refresh your Christmas tree, craft unique gifts, or simply enjoy a relaxing and rewarding project, these shimmering balls are sure to delight. So gather your supplies, put on some festive music, and prepare to transform humble styrofoam into dazzling gems. Your tree (and your home) will thank you for the radiant, custom-made charm. We encourage you to embark on this crafting adventure and share your magnificent, sparkling creations with the world! Happy crafting and happy holidays!