
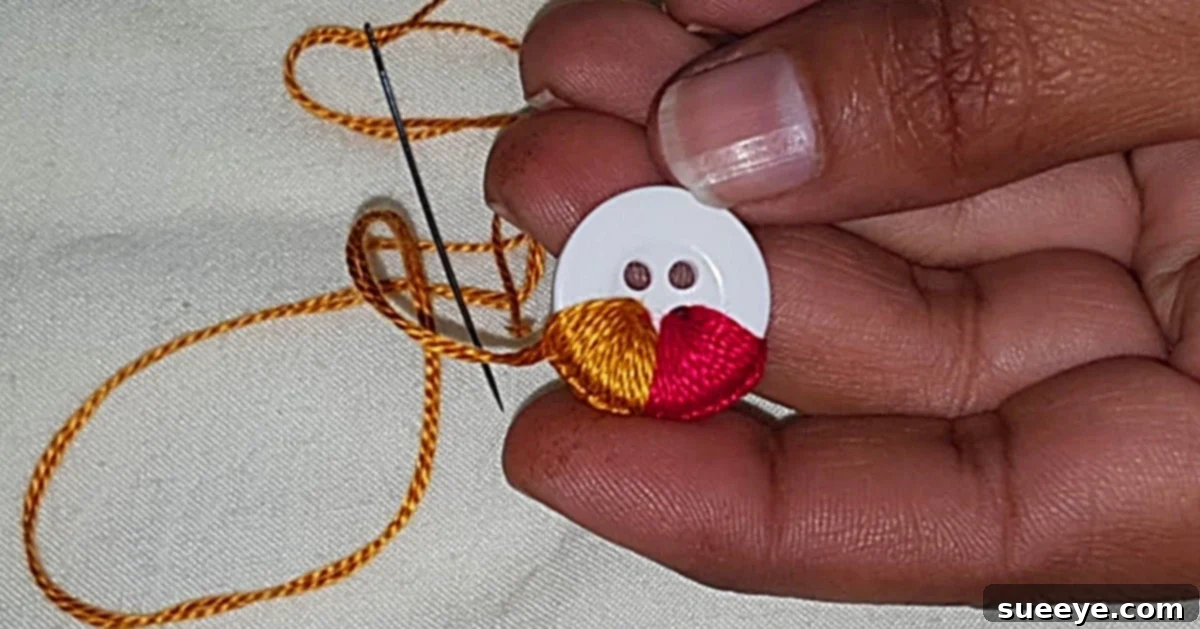
How to Make Hand Embroidered Buttons: A Creative DIY Guide
In the vibrant world of crafting, few projects offer the immediate satisfaction and boundless creativity of custom-made items. Among these, the humble button, often overlooked, presents a fantastic canvas for personalization. Imagine transforming ordinary garments or accessories with unique, handcrafted buttons that reflect your personal style. This tutorial will guide you through the surprisingly simple yet incredibly rewarding process of making hand-embroidered buttons, a craft that has quickly become a favorite for its ease, accessibility, and charming results. Whether you’re a seasoned crafter or a curious beginner, this DIY project is perfect for adding a touch of handmade elegance to your wardrobe or home decor.
Hand-embroidered buttons are not just decorative; they are a statement of individuality and a testament to the beauty of handmade artistry. This delightful hack, widely shared in the crafting community, requires minimal supplies – essentially just a button and some embroidery floss – making it an ideal craft for anyone looking to explore their creative side without a hefty investment. Beyond personalizing your own items, these bespoke buttons make thoughtful, unique gifts and can even be a fantastic way to upcycle old clothes, breathing new life into forgotten pieces. Get ready to discover your new favorite fun thing to make, one stitch at a time!
The Allure of Handmade Buttons: Why Embroider Your Own?
The appeal of creating your own hand-embroidered buttons extends far beyond mere decoration. It’s an opportunity to infuse personality into every detail of your life. In an era of mass-produced goods, a handmade button stands out, telling a story of thoughtful creation and individual style. Here are just a few reasons why you’ll fall in love with this craft:
- Unleash Your Creativity: With an endless palette of floss colors and various stitching techniques, you can design buttons that are truly one-of-a-kind. Match them perfectly to an outfit, or create a vibrant contrast for a playful touch.
- Sustainable Style: Upcycle old, plain buttons or breathe new life into existing garments. This eco-friendly approach reduces waste and encourages mindful consumption, transforming the ordinary into something extraordinary.
- Mindful Crafting: The rhythmic motion of wrapping floss and creating patterns can be incredibly therapeutic. It’s a wonderful way to unwind, focus your mind, and engage in a calming activity that yields beautiful results.
- Perfect for All Ages: This project is remarkably simple, making it suitable for crafters of all skill levels, including children. It’s an excellent way to introduce kids to the joys of sewing, helping them develop fine motor skills and patience while fostering their imagination.
- Unique Gifts: Handmade buttons can be incorporated into jewelry, used as embellishments on gift wrapping, or even presented as a set to a fellow crafter. They add a heartfelt, personalized touch to any present.
Embroidering buttons is more than just a craft; it’s an enjoyable journey into personalization and artistic expression, promising hours of engaging fun and stunning results that you’ll be proud to show off.
What You’ll Need: Essential Supplies for Your Embroidered Button Project
One of the best aspects of this DIY embroidered button project is its minimal material requirements. You likely have most of these items lying around your home already, making it incredibly accessible. Gathering your supplies is the first step toward creating your beautiful custom buttons.
Choosing Your Button Base
The foundation of your embroidered button is, naturally, the button itself. While almost any button can work, certain types are ideal for this technique:
- Four-Hole Flat Buttons: These are the easiest to work with as their holes provide clear anchor points for your floss, allowing for even wrapping.
- Two-Hole Buttons: Also suitable, though you might need to adjust your wrapping technique slightly to ensure even coverage.
- Shank Buttons: While possible, these can be trickier because they lack holes on the surface to secure the initial wrap. You’d typically wrap around the shank itself, which can be less stable.
- Material and Size: Plastic, wooden, or even metal buttons work well. Consider the size; larger buttons offer more surface area for intricate designs, while smaller ones are perfect for quick, colorful accents. Smooth-edged buttons are preferable to prevent snagging your floss.
Selecting Your Embroidery Floss
Embroidery floss is the star of this project, offering a spectrum of colors and textures:
- Standard Cotton Embroidery Floss: This is the most common and versatile choice, available in virtually every color imaginable. It’s affordable, durable, and easy to work with.
- Variegated Floss: For a gradient effect, variegated floss changes color along its length, creating beautiful, spontaneous patterns as you wrap.
- Specialty Floss: Consider metallic, silk, or pearl cotton floss for a different sheen or texture. These can add an extra layer of luxury to your buttons.
- Quantity: A single skein of floss contains multiple strands. You’ll typically use a few strands at a time, so one skein will last for many buttons.
Needles and Other Handy Tools
While the process is mostly wrapping, a needle is essential for starting and finishing your project neatly.
- Embroidery Needle: These have a larger eye, making it easier to thread multiple strands of floss. A sharp point helps with piercing the fabric or even carefully guiding the floss through tight spots.
- Regular Sewing Needle: If an embroidery needle isn’t available, a standard sewing needle with an eye large enough for your floss will suffice.
- Scissors: Small, sharp embroidery scissors are ideal for clean cuts and trimming excess floss.
- Optional: Thimble: If you find yourself pushing the needle through tight areas, a thimble can protect your finger.
Materials:
- Embroidery Floss
- An Embroidery Needle (a regular needle will work as well)
- A Button (preferably with 2 or 4 holes)
- Small Scissors
Step-by-Step Guide: Crafting Your Custom Embroidered Buttons
Now that you have your materials ready, let’s dive into the simple yet satisfying process of creating your hand-embroidered buttons. This project is designed to be straightforward, ensuring a fun experience for everyone.
Step 1: Preparing Your Floss and Button
The first step is crucial for ensuring your embroidery is secure and neat. Begin by cutting a manageable length of embroidery floss, typically about 18-24 inches. This prevents tangling while you work. Separate 2-3 strands from your chosen floss – using fewer strands results in a finer, more delicate wrap, while more strands create a bolder, chunkier look. Thread your needle with these strands.
To anchor your floss, take one end of your thread and pass it through one of the buttonholes from the back to the front. Leave a tail of about 2-3 inches on the back. Then, bring the needle back down through an adjacent buttonhole. On the back of the button, tie the short tail and the working thread together with a secure double knot. Trim the excess tail close to the knot. This loop and knot method provides a strong starting point, ensuring your embroidery floss is completely secure and won’t unravel as you begin to lace it throughout the surface of your button.
Step 2: Beginning the Lacing Process
With your floss securely anchored, you’re ready to start lacing. The basic technique involves bringing the floss up through one hole and down through another, repeatedly. The goal is to gradually cover the entire surface of the button with even, taut stitches, creating a smooth, embroidered texture. Think of it as weaving a colorful net over the button’s face.
For a standard four-hole button, you can start by making simple straight stitches across the center, connecting opposing holes. Then, you’ll begin wrapping around the perimeter of the button, or creating more intricate patterns by varying which holes you pass the needle through. Maintain an even tension as you work; this is key to achieving a neat and professional finish. Too loose, and the floss might slip; too tight, and the button might warp or the floss could snap.
Step 3: Covering the Button Surface
Continue lacing the embroidery floss around and across your button, aiming to cover the entire visible surface. The beauty of this project lies in its flexibility – you can stick to a uniform, tightly packed coverage for a solid color effect, or leave small gaps to reveal glimpses of the button underneath for a textured look. Experiment with different lacing paths to see what patterns emerge. For example, you can create radial spokes by always bringing the thread up through a central hole and down through different perimeter points, or create concentric circles by wrapping around the outer edge first, then moving inward.
Ensure that each pass of the floss lies flat and is evenly spaced, creating a cohesive and pleasing design. If you notice any gaps or uneven areas, gently adjust the previous stitches with your needle before pulling the next stitch tight. The objective is to achieve a dense, smooth covering that completely transforms the button.
Step 4: Exploring Color Variations and Patterns
This is where the true artistic potential of the embroidered button shines! You can choose to use a solid color for a classic look, or you can introduce multiple colors for vibrant patterns. To tie on different colors, simply finish off your current thread color by securing it with a small knot on the back of the button, then cut the excess. Take your new color, secure it with a knot as described in Step 1, and continue lacing.
For visual guidance on seamlessly joining different colors and exploring various patterns, you might find the clear instructions provided by crafters like @Shehla_Kanwal on YouTube incredibly helpful. Many tutorials demonstrate techniques for creating stripes, spirals, or even simple geometric designs by strategically changing floss colors and lacing paths. This entire project is truly a breeze, especially once you grasp the basic wrapping concept.
Step 5: Securing the End
Once your button is fully covered to your satisfaction, it’s time to secure the end of your floss. Turn the button over to the back. Carefully pass your needle under a few of the existing stitches on the back of the button. Pull the floss through, creating a small loop. Pass your needle through this loop and pull tightly to form a knot. Repeat this process once or twice more to create a secure double or triple knot. Trim the excess floss close to the knot, ensuring no loose ends are visible. Your beautifully hand-embroidered button is now complete and ready to adorn your favorite items!
Elevating Your Embroidered Buttons: Tips and Creative Ideas
Once you’ve mastered the basic technique, there are countless ways to take your hand-embroidered buttons to the next level. Let your imagination guide you and explore these ideas to add even more flair and functionality to your creations.
Beyond Solid Colors: Pattern Inspiration
While solid colors are elegant, experimenting with patterns can truly make your buttons pop:
- Stripes: Alternate between two or more colors in distinct sections as you wrap, creating clear horizontal or vertical stripes depending on your lacing direction.
- Spirals: Start with one color in the center and gradually add new colors as you work your way outwards, forming a captivating spiral.
- Color Blocking: Divide your button mentally into quadrants or halves and use a different color for each section.
- Mini Motifs: For larger buttons, once the base is covered, you can use a single strand of floss and an embroidery needle to add tiny embellishments like a small cross, a star, or a heart on top of the wrapped surface.
- Variegated Floss Magic: Let variegated floss do the work for you! Its natural color changes will create a beautiful, organic pattern without any extra effort on your part.
Material Play: Different Floss and Button Combinations
The choice of materials can significantly alter the final look and feel of your embroidered buttons:
- Textured Floss: Beyond standard cotton, try working with silk floss for a luxurious sheen, or fine wool yarn for a rustic, cozy feel.
- Shiny Accents: Integrate metallic floss for a touch of sparkle, perfect for evening wear or festive occasions.
- Button Materials: While plastic buttons are common, consider embroidering over wooden or mother-of-pearl buttons. The natural texture and color of the base button can peek through and add depth to your design.
- Bead Embellishments: For a truly unique button, you can carefully sew small seed beads onto the wrapped surface, creating dimension and sparkle. Do this after the main embroidery is complete.
Versatile Applications: Where to Use Your Custom Buttons
These delightful creations are not just for clothes! Their versatility opens up a world of possibilities:
- Fashion Upgrades: Replace plain buttons on jackets, cardigans, blouses, or even jeans for an instant, personalized style boost. They can also be used as decorative closures on bags, hats, or scarves.
- Accessorize: Transform them into unique jewelry pieces like brooches, earrings (with a bit of jewelry hardware), or charming pendants.
- Home Decor Accents: Sew them onto cushion covers, curtains, or decorative wall hangings for a touch of handmade charm.
- Craft Projects: Incorporate them into scrapbooking, card making, or as embellishments on handmade dolls and plush toys.
- Thoughtful Gifts: Present a set of custom buttons to a friend who loves sewing, or use them to adorn a handmade gift package, adding an extra layer of care and personalization.
This is such a fun project and can truly add a colorful, unique upgrade to any article of clothing or craft item, turning everyday objects into cherished, personalized treasures.
Troubleshooting Common Issues
While this project is generally straightforward, occasionally you might encounter minor hurdles. Here are some quick fixes:
- Tangled Floss: If your floss starts to tangle, let your needle hang freely for a moment. It will untwist itself. Using shorter lengths of floss (around 18 inches) can also help prevent tangling.
- Uneven Coverage: This usually means your tension is inconsistent. Try to maintain a steady, gentle pull on your thread with each stitch. If an area is too sparse, carefully weave in a few more stitches to fill the gap.
- Loose Knots: Ensure your starting and ending knots are double or even triple knotted. You can add a tiny dab of fabric glue to the knot on the back for extra security, especially if the button will undergo frequent washing.
- Button Holes Getting Blocked: If you’re using a four-hole button and planning to sew it onto fabric, make sure you don’t completely fill all four holes with embroidery. Leave two opposing holes open on the back for later attachment, or make sure your lacing is tight and low enough not to impede the attachment process.
The Joy of Crafting: A Sustainable and Mindful Hobby
Beyond the beautiful end product, the act of making hand-embroidered buttons offers significant personal benefits. In today’s fast-paced world, engaging in a mindful craft like this provides a wonderful opportunity to slow down, disconnect from digital distractions, and immerse yourself in a creative process. It fosters patience, enhances dexterity, and allows for a unique form of self-expression. Furthermore, by repurposing old buttons and adding a handmade touch to your belongings, you contribute to a more sustainable lifestyle, valuing craftsmanship over disposability. Embrace the quiet satisfaction of creating something beautiful with your own hands, and enjoy the lasting charm your embroidered buttons bring to your life.